Author Topic: 1972 CB450 "Supersport" NOW SHE REALLY LIVES!!!!!  (Read 102340 times)

0 Members and 3 Guests are viewing this topic.

Offline MarkoVisacki

  • Full Member
  • *
  • Posts: 19
  • Buy the ticket, take the ride
    • SMK KLASIK - Vintage motorcycle racing club
Re: 1972 CB450 "Supersport" Finally a worthy update!
« Reply #50 on: November 19, 2009, 09:35:22 AM »
And a little more sharpened camshafts.  ;D

Offline dagersh

  • "A country attempting to tax itself into prosperity is akin to a man standing in a bucket attempting to lift that bucket by its handle. - Winston Churchill"
  • Expert
  • ****
  • Posts: 1,010
    • Photos
Re: 1972 CB450 "Supersport" Finally a worthy update!
« Reply #51 on: November 19, 2009, 10:22:49 AM »
You are holding out on me Marko! ;D
1962 CA95
1966 Black Bomber
1966 CA77 Dream
1967 Superhawk
1970 CB750K0
1972 CL350
1972 CB450/500 Custom
1972 CB500K1
1975 CB550F
1976 CB400F
1975 CB750 Future Restoration
1976 CB750K6
1976 CB750F
1976 GL1000


1968 Suzuki T500 Cobra
1990 BMW K1
2001 'Busa
2003 RC 51
Bunch of Guzzi's

http://www.sohc4.us/gallery/v/members/personal/dagersh/

Offline dagersh

  • "A country attempting to tax itself into prosperity is akin to a man standing in a bucket attempting to lift that bucket by its handle. - Winston Churchill"
  • Expert
  • ****
  • Posts: 1,010
    • Photos
Re: 1972 CB450 "Supersport" Cases Split
« Reply #52 on: November 24, 2009, 10:38:06 AM »
Got the cases split this weekend and slowly getting ready for reassembly.  Here are some pics, mostly for documentation purposes.


Kickstarter Spring


Shifter Return Spring


Lower Case - you can see all the Rotor Shavings at the bottom.  What a mess...  2 Questions - does anyone know if the plate with the "X's" is supposed to be removed?  I think its purpose is keep the oil from getting too frothy, is that correct?


KickStarter Gear Assembly
« Last Edit: December 17, 2013, 11:40:51 AM by dagersh »
1962 CA95
1966 Black Bomber
1966 CA77 Dream
1967 Superhawk
1970 CB750K0
1972 CL350
1972 CB450/500 Custom
1972 CB500K1
1975 CB550F
1976 CB400F
1975 CB750 Future Restoration
1976 CB750K6
1976 CB750F
1976 GL1000


1968 Suzuki T500 Cobra
1990 BMW K1
2001 'Busa
2003 RC 51
Bunch of Guzzi's

http://www.sohc4.us/gallery/v/members/personal/dagersh/

Offline dagersh

  • "A country attempting to tax itself into prosperity is akin to a man standing in a bucket attempting to lift that bucket by its handle. - Winston Churchill"
  • Expert
  • ****
  • Posts: 1,010
    • Photos
Re: 1972 CB450 "Supersport" Cases Split
« Reply #53 on: November 24, 2009, 10:56:42 AM »


Another view of the Kickstarter and Shift Return


Upper Crankcase


Crankshaft out
« Last Edit: December 17, 2013, 11:48:05 AM by dagersh »
1962 CA95
1966 Black Bomber
1966 CA77 Dream
1967 Superhawk
1970 CB750K0
1972 CL350
1972 CB450/500 Custom
1972 CB500K1
1975 CB550F
1976 CB400F
1975 CB750 Future Restoration
1976 CB750K6
1976 CB750F
1976 GL1000


1968 Suzuki T500 Cobra
1990 BMW K1
2001 'Busa
2003 RC 51
Bunch of Guzzi's

http://www.sohc4.us/gallery/v/members/personal/dagersh/

Offline dagersh

  • "A country attempting to tax itself into prosperity is akin to a man standing in a bucket attempting to lift that bucket by its handle. - Winston Churchill"
  • Expert
  • ****
  • Posts: 1,010
    • Photos
Re: 1972 CB450 "Supersport" Cases Split
« Reply #54 on: November 24, 2009, 11:13:34 AM »


Shifter Cam


Cases Getting Cleaner

I used Purple Power diluted with water about 1:1, a lot of scrubbing and the jet spray setting on my hose nozzle.  It did a very good job, but there was a lot of grime that was real stubborn.  One again, I used my soda blaster to go through all the cases and ended up getting them really clean. 

When I removed the 8mm bolts that hold the cases together, I snapped one with my impact wrench, so I will need to extract the piece that was left in the Upper crankcase.  I attempted to drill out the piece, but was not having any luck.  Hopefully, an extraction set will work its magic with no broken bits!  I will detail that this weekend.  For now I am going to order new hardware, either from Honda or McMaster Carr. 

As I stated before, I am going to use bigger pistons.  Either 70mm Kawi Z1000 pistons from Wiseco, or 4mm overbored from THR.  The THR kit comes complete with a new copper headgasket, whereas, the Wiseco stuff does not.  When I have the cylinders machined, will the shop adjust the headgasket to fit the new clearance for the pistons?  Or is there enough clearance in the head gasket to fit the extra 2mm of diameter?  I can probably figure that out byb putting the new gasket over the cylinder, but I am not up there, so I figured I would ask.
« Last Edit: December 17, 2013, 11:53:52 AM by dagersh »
1962 CA95
1966 Black Bomber
1966 CA77 Dream
1967 Superhawk
1970 CB750K0
1972 CL350
1972 CB450/500 Custom
1972 CB500K1
1975 CB550F
1976 CB400F
1975 CB750 Future Restoration
1976 CB750K6
1976 CB750F
1976 GL1000


1968 Suzuki T500 Cobra
1990 BMW K1
2001 'Busa
2003 RC 51
Bunch of Guzzi's

http://www.sohc4.us/gallery/v/members/personal/dagersh/

Offline dagersh

  • "A country attempting to tax itself into prosperity is akin to a man standing in a bucket attempting to lift that bucket by its handle. - Winston Churchill"
  • Expert
  • ****
  • Posts: 1,010
    • Photos
Re: 1972 CB450 "Supersport" Cases Split
« Reply #55 on: November 24, 2009, 06:05:59 PM »

I forgot, I also cleaned the carbon deposits off of the valves.  I used a brass rotary brush in my dremel, and chucked the valve in my vise, the carbon came right off.  I then realized that to get the upper side of the valve face, I could put the dremel in my vise and chuck the vlave into my cordless hand drill.  I turned on the dremel about speed #4 and spun the valve with the drill, being very careful not to hit the sealing face.  It worked a treat and took no time at all.  However, the brass brush was pretty much done in after the 4th valve.


« Last Edit: December 17, 2013, 11:55:53 AM by dagersh »
1962 CA95
1966 Black Bomber
1966 CA77 Dream
1967 Superhawk
1970 CB750K0
1972 CL350
1972 CB450/500 Custom
1972 CB500K1
1975 CB550F
1976 CB400F
1975 CB750 Future Restoration
1976 CB750K6
1976 CB750F
1976 GL1000


1968 Suzuki T500 Cobra
1990 BMW K1
2001 'Busa
2003 RC 51
Bunch of Guzzi's

http://www.sohc4.us/gallery/v/members/personal/dagersh/

Offline dagersh

  • "A country attempting to tax itself into prosperity is akin to a man standing in a bucket attempting to lift that bucket by its handle. - Winston Churchill"
  • Expert
  • ****
  • Posts: 1,010
    • Photos
Re: 1972 CB450 "Supersport" Cases Split
« Reply #56 on: January 03, 2010, 08:27:47 PM »
So its been a while, but I am back at it, thanks to the holidays!  I spent a great deal of time looking after little jobs that need to be addressed before I reassemble the engine, and also while I am waiting for parts.  I decided to go with the 74mm Todd Henning Racing pistons and copper gasket.  The pieces arrived in very short order, and they and the jugs are off getting over-bored.  I will post pics when they return.  They are porno cool!

So my week started with a lot of smaller tasks to bring up to speed.  There was much aluminum polishing to be done before reassembly.  First up was the  engine case bolt that had snapped while removing it.  The process was very easy, much to my relief.  I had prepped the broken piece with PB Blaster, and a bit of heat.  I drilled into the broken piece and then tapped the extractor in with a smaller ball peen hammer.


The threaded remnants were pretty much stuck to the extractor, but some heat and work with some pliers freed it up.  The practice was good when I stripped the bolt on the fork lowers….  Looks like I will have to replace that one…
« Last Edit: December 17, 2013, 12:08:13 PM by dagersh »
1962 CA95
1966 Black Bomber
1966 CA77 Dream
1967 Superhawk
1970 CB750K0
1972 CL350
1972 CB450/500 Custom
1972 CB500K1
1975 CB550F
1976 CB400F
1975 CB750 Future Restoration
1976 CB750K6
1976 CB750F
1976 GL1000


1968 Suzuki T500 Cobra
1990 BMW K1
2001 'Busa
2003 RC 51
Bunch of Guzzi's

http://www.sohc4.us/gallery/v/members/personal/dagersh/

Offline dagersh

  • "A country attempting to tax itself into prosperity is akin to a man standing in a bucket attempting to lift that bucket by its handle. - Winston Churchill"
  • Expert
  • ****
  • Posts: 1,010
    • Photos
Re: 1972 CB450 "Supersport" Cases Split
« Reply #57 on: January 03, 2010, 08:37:46 PM »
I am going to have to update my progress in short posts, as I am being limited in the length of my posts.  So.. pardon the multiple posts.
The brake system was next…  and NASTY!


I left the Master Cylinder to soak in denatured alcohol after cleaning the bore and chamber with tin foil and denatured alcohol.  it cleaned up beautifully, and I later on polished the exterior.  It will look fantastic on the bike and with braided steel hoses and a rebuild kit, will work a charm as well.
« Last Edit: December 17, 2013, 12:15:19 PM by dagersh »
1962 CA95
1966 Black Bomber
1966 CA77 Dream
1967 Superhawk
1970 CB750K0
1972 CL350
1972 CB450/500 Custom
1972 CB500K1
1975 CB550F
1976 CB400F
1975 CB750 Future Restoration
1976 CB750K6
1976 CB750F
1976 GL1000


1968 Suzuki T500 Cobra
1990 BMW K1
2001 'Busa
2003 RC 51
Bunch of Guzzi's

http://www.sohc4.us/gallery/v/members/personal/dagersh/

Offline dagersh

  • "A country attempting to tax itself into prosperity is akin to a man standing in a bucket attempting to lift that bucket by its handle. - Winston Churchill"
  • Expert
  • ****
  • Posts: 1,010
    • Photos
Re: 1972 CB450 "Supersport" Cases Split
« Reply #58 on: January 03, 2010, 09:02:56 PM »
Here are the Cam Chain Covers on the head.  I wanted to document how I polished them.  I was going for a chrome like finish, and the pics do not do them justice.  Here is my method, and I have spent the holidays working on all the aluminum engine covers, fork lowers, triple clamps, engine mounts, and whatever else i could think of.

Most importantly, this is a very dirty and dusty process.  You must wear a mask, eye protection and gloves. Keep a vacuum handy in order to keep the dust and grit produced at bay.  It will get EVERYWHERE!!!!!!!!


These are the two covers (fore and aft) the shinier is after the Tripoli, but before the Jewelers Rouge.  I should note, I am using a Blador buffer with 3/4 inch arbor.  The first step is Emery on a Sisal 8" wheel.  I then use Tripoli on a cotton sewed 8" wheel and then Tripoli again on a loose sewn wheel.  The final step will be Jewelers Rouge on a loose sewn wheel, which will give the piece a chrome-like finish.  I have found that heat and a good amount of compound on the wheel imparts the best results.

The Emery Compound on the Sisal wheel will be frustrating.  Black residue build-up will happen constantly, but, do not despair!  After you are sure you have hit the entire part and knocked down the worst of the oxidation/crap, clean it with acetone and hit it with the Tripoli.  Let heat build-up in part, and you will start to see your goal.  It is quite pleasing.
« Last Edit: December 17, 2013, 12:28:58 PM by dagersh »
1962 CA95
1966 Black Bomber
1966 CA77 Dream
1967 Superhawk
1970 CB750K0
1972 CL350
1972 CB450/500 Custom
1972 CB500K1
1975 CB550F
1976 CB400F
1975 CB750 Future Restoration
1976 CB750K6
1976 CB750F
1976 GL1000


1968 Suzuki T500 Cobra
1990 BMW K1
2001 'Busa
2003 RC 51
Bunch of Guzzi's

http://www.sohc4.us/gallery/v/members/personal/dagersh/

Offline fastbroshi

  • Puppet
  • Old Timer
  • ******
  • Posts: 2,645
Re: 1972 CB450 "Supersport" Cases Split
« Reply #59 on: January 04, 2010, 06:00:38 PM »
Awesome.  There's a 450 I know of around here that's pretty much complete though it's pretty rough.  If I ever get a bike to actually restore, it be one of these.  Love that motor.   Can't wait to see pics of the pistons.
Just call me Timmaaaaay!!!

Offline dagersh

  • "A country attempting to tax itself into prosperity is akin to a man standing in a bucket attempting to lift that bucket by its handle. - Winston Churchill"
  • Expert
  • ****
  • Posts: 1,010
    • Photos
Re: 1972 CB450 "Supersport" Cases Split
« Reply #60 on: January 05, 2010, 10:20:34 AM »

Sorry Guys,

I was interrupted on the last post, and did not realize it actually posted.  So here is the piece after the Emery on Sisal.  it will remain a bit cloudy - the camera makes it look much more so than it actually is - but, that will disappear in the next step.  A tip with the emery on sisal; reload the wheel about every 30 seconds, it is really hard to keep up the heat.  When reloading, only apply your bar of compound to the wheel for 2 seconds, you don't need a lot, just enough to keep some fresh compound on the wheel.


I then move on to the Tripoli stage, where you will really get to see a huge improvement in the finish of the part.  I use both or either a tight or loose sewn wheel with a decent amount of compound loaded on the wheel.  I try to be able to see some brown on the wheel (Tripoli compound is generally brown), but as soon as you start on the part, it will quickly become black.  When I see black residue start to collect on the part, I will load up the wheel a bit more compound, again, for about a 2 second period.  The part will start to get pretty hot.  Make sure you keep it moving, but the heat tells you work is being done.  Depending on how many contours, bolt holes and tight crevices are on the part, I will move on to the loose sewn wheel with the Tripoli, again using the same principals.  If there are really hard to reach areas (i.e. Master Cylinders between the reservoir and the mirror mount), I will use my Dremel with a felt bob loaded with Tripoli.  This Cam cover is pretty flat, and between the sewn and loose-sewn wheels, I was able to get a good cleaning and polishing.


The example is now on the top...
« Last Edit: December 17, 2013, 12:48:00 PM by dagersh »
1962 CA95
1966 Black Bomber
1966 CA77 Dream
1967 Superhawk
1970 CB750K0
1972 CL350
1972 CB450/500 Custom
1972 CB500K1
1975 CB550F
1976 CB400F
1975 CB750 Future Restoration
1976 CB750K6
1976 CB750F
1976 GL1000


1968 Suzuki T500 Cobra
1990 BMW K1
2001 'Busa
2003 RC 51
Bunch of Guzzi's

http://www.sohc4.us/gallery/v/members/personal/dagersh/

Offline dagersh

  • "A country attempting to tax itself into prosperity is akin to a man standing in a bucket attempting to lift that bucket by its handle. - Winston Churchill"
  • Expert
  • ****
  • Posts: 1,010
    • Photos
Re: 1972 CB450 "Supersport" Cases Split
« Reply #61 on: January 05, 2010, 10:39:59 AM »
I then use Jeweler's Rouge (JR) on a loose sewn wheel and go over the pieces again.  Its the same principal as the Tripoli.  Reload your wheel every minute or so - you will figure out your own timing.  It is interesting to note, that the JR creates much more heat than the other steps.  You will soon see a gorgeous shine that will be much more refined than what the Tripoli accomplished.


Here, the example piece has had the JR steps done, and the shine is much better than the lower piece after just the Tripoli

One thing I forgot to mention - use acetone on the parts in-between steps, or also if you are getting a lot of black residue building up on the parts.  This removes any excess wax from the compound and will really help your progress.  Give the pieces a final rub-down with acetone and move on to Flitz, Wenol, Simi-Chrome, Mother's or whatever your favorite metal polish may be for the final step.  I tried to use Wenol with a wheel - but don't waste your time, it has to be done by hand.  Before reassembly, I am going to see if some good car wax will help to protect the shine.  My bikes live inside, so I am not too worried about future oxidation.

Over the Holiday week, I went over all the pieces I had already done, as well as the rest of the engine covers, the rear brake panel, fork lowers and upper triple tree – along with whatever else I could get my hands on!  I was also able to polish up the engine mounts, which are steel.  My first step was to glass bead them to remove rust and oxidation.  They were slightly pitted from this process, so I wet sanded them with some 180 grit paper using WD-40 as a lubricant.  I really only did this to make the polishing on the wheels a bit easier.  I was kind of feeling my way through this, so I don’t know if it actually helped anything.  I them went through the 3 different compound steps on the buffer.  One thing about steel and polishing…  IT GETS WICKED HOT!!!!!!!!  Make sure you are wearing very good gloves!  You can easily boil water on these pieces, especially during the Jeweler’s Rouge!  But they sure did come out nice!

I have more pics, but I need to load them later.  Back with more soon.
« Last Edit: December 17, 2013, 12:51:29 PM by dagersh »
1962 CA95
1966 Black Bomber
1966 CA77 Dream
1967 Superhawk
1970 CB750K0
1972 CL350
1972 CB450/500 Custom
1972 CB500K1
1975 CB550F
1976 CB400F
1975 CB750 Future Restoration
1976 CB750K6
1976 CB750F
1976 GL1000


1968 Suzuki T500 Cobra
1990 BMW K1
2001 'Busa
2003 RC 51
Bunch of Guzzi's

http://www.sohc4.us/gallery/v/members/personal/dagersh/

Offline dagersh

  • "A country attempting to tax itself into prosperity is akin to a man standing in a bucket attempting to lift that bucket by its handle. - Winston Churchill"
  • Expert
  • ****
  • Posts: 1,010
    • Photos
Re: 1972 CB450 "Supersport" Cases Split
« Reply #62 on: January 05, 2010, 05:55:27 PM »


Bike down to the frame.  I was surprised at how easy it was to remove the steering head bearings.  My next step is to strip off the paint and fill in and complete the welds.  Also, I am going to have the tires stripped off and I will then disassemble the wheels so that I can polish the hubs.


More polished parts.  The brake stay came out really nice.  I want to speed drill it a bit to make it more interesting looking.


Parts on the shelf. 


I quickly put the engine loosely together to protect the internals from all the polishing dust.  It was also nice to get some more work surface clear.  Looking forward to this weekend and more progress.
« Last Edit: December 17, 2013, 12:57:18 PM by dagersh »
1962 CA95
1966 Black Bomber
1966 CA77 Dream
1967 Superhawk
1970 CB750K0
1972 CL350
1972 CB450/500 Custom
1972 CB500K1
1975 CB550F
1976 CB400F
1975 CB750 Future Restoration
1976 CB750K6
1976 CB750F
1976 GL1000


1968 Suzuki T500 Cobra
1990 BMW K1
2001 'Busa
2003 RC 51
Bunch of Guzzi's

http://www.sohc4.us/gallery/v/members/personal/dagersh/

Offline fastbroshi

  • Puppet
  • Old Timer
  • ******
  • Posts: 2,645
Re: 1972 CB450 "Supersport" Cases Split
« Reply #63 on: January 05, 2010, 06:02:56 PM »
  You're obviously going to prep and paint or coat the frame.  What colors have you considered?
Just call me Timmaaaaay!!!

Offline dagersh

  • "A country attempting to tax itself into prosperity is akin to a man standing in a bucket attempting to lift that bucket by its handle. - Winston Churchill"
  • Expert
  • ****
  • Posts: 1,010
    • Photos
Re: 1972 CB450 "Supersport" Cases Split
« Reply #64 on: January 05, 2010, 06:27:31 PM »
I am playing with the concept of chroming the frame, but if not, then just black.  Anything else I think would take away from the '68 Tank I am using.
1962 CA95
1966 Black Bomber
1966 CA77 Dream
1967 Superhawk
1970 CB750K0
1972 CL350
1972 CB450/500 Custom
1972 CB500K1
1975 CB550F
1976 CB400F
1975 CB750 Future Restoration
1976 CB750K6
1976 CB750F
1976 GL1000


1968 Suzuki T500 Cobra
1990 BMW K1
2001 'Busa
2003 RC 51
Bunch of Guzzi's

http://www.sohc4.us/gallery/v/members/personal/dagersh/

Offline dagersh

  • "A country attempting to tax itself into prosperity is akin to a man standing in a bucket attempting to lift that bucket by its handle. - Winston Churchill"
  • Expert
  • ****
  • Posts: 1,010
    • Photos
Ok, so on to the wheels.  This is the first time I am getting onto these, and I plan to rebuild them myself.  I started by getting a buddy of mine to strip the tires off the rims.  I then Documented the spoke pattern for both wheels.


The rear wheel


The front wheel


In disassembling the wheels I employed my blind bearing pulling set.  I cannot recommend these sets enough.  I had the bearings out with no fuss in just a couple of minutes. 


The bearing puller getting set-up on the front hub


And the wheel bearing is out!


If you look at the grease on the bearing, it looks lke it was simply squeezed from a tube and not impregnated into the bearing itself.  I am wondering if it was done this way in the factory.


You can see how clean the bead of grease broke on the retainer that was holding the opposite side bearing in place.  Needless to say I am glad I am replacing these with sealed items.


Let us backtrack a bit.  The rear wheel did not have a punched bearing retainer, and was easily removed with a hammer and drift, after some penetrant and heat were applied.  I thought the front bearing retainer was the same, but quickly realized that there were punch marks on the thread.  They were pretty hard to see until the area was very clean.  I was expecting them to be much more pronounced, but they were in fact very subtle.  Nonetheless, I was fortunate enough to only slightly damage the retainer, it can be reused.  I then took a small bit, and carefully drilled out the punch marks.  I went very shallow, what felt to me like 1 thread depth, applied some more heat and penetrant, and sure enough the retainer spun right off with a drift and light taps from a hammer.


You can see the punch mark at about 12:30 on the hub surface.  In the foreground is the bit on my drill.


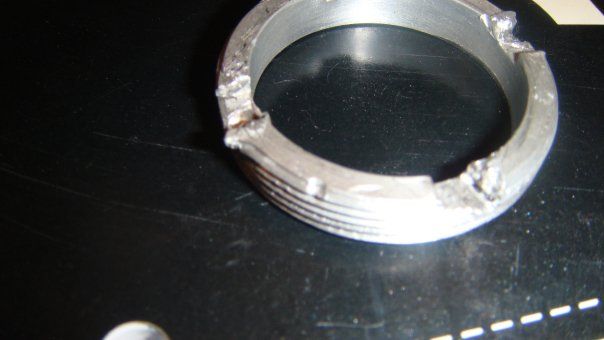
The retainer after removal – not too bad, but will require a bit of attention.  You can clearly see one of the punch marks at 6:00 on the retainer.


Here is a picture of the front wheel prior to disassembly, with a pencil inserted through the air-valve hole in the rim for spoke pattern documentation.  I think I am going to go with aluminum, shouldered rims and stainless spokes for the rebuild.

I then proceeded to disassemble the spokes from the wheels and hubs.  I used penetrant on the spoke nipples, as there was quite a bit of rust under the wheels. 


I learned a valuable lesson in not rushing the job – if you can’t unscrew a nipple with a standard screwdriver, use a spoke wrench, they are so much easier!  Ah, well, I guess I will go with new spoke nipples as well!

Once all that was done, I set about cleaning up the hubs.  I really like the look of polished hubs, but I am concerned about keeping them clean.  I am thinking to maybe clear Powdercoat them, or try one of Eastwood’s Diamond clear products.  This entire endeavor is a learning process for me, so I don’t mind experimenting a bit. 


The Rear Hub


After the partswasher, and before blasting off the clear-coat and then subsequent polishing.


I was not really able to get into the cooling grooves on the inner part of the rear hub, so I am going to have to figure that one out.  Any tips would be greatly appreciated!  I have to still bring these through the Jeweler’s Rouge stage, but they are looking really nice.

Onto my swingarm.  I got everything apart, and checked the bearings.  They look to be steel, so I will have to strip the paint, powder coat, and then send the arm off to Hondaman to replace them with bronze.  The swingarm shaft on the 450 has a zerk on the rider’s right side, an exit hole 1/2 –way along the length of the shaft, which opens at 12 o’clock and 6 o’clock and then a further exit hole under the cap on the rider’s left.  Everything looks like it is in great shape, with no wear marks at all.  There is a still a good amount of grease in the swingarm shaft.

So that’s all for now.  I have from Z1 coming new sealed bearings for front and back, a new timing chain and master link.  I am going to find a sandblaster to strip the frame, centerstand and swingarm, and look into a pwdercoater in Poughkeepsie, NY that my friend Ashton at Machinehead Cycles in Red Hook, NY uses regularly.   More updates to come!
« Last Edit: December 17, 2013, 02:45:48 PM by dagersh »
1962 CA95
1966 Black Bomber
1966 CA77 Dream
1967 Superhawk
1970 CB750K0
1972 CL350
1972 CB450/500 Custom
1972 CB500K1
1975 CB550F
1976 CB400F
1975 CB750 Future Restoration
1976 CB750K6
1976 CB750F
1976 GL1000


1968 Suzuki T500 Cobra
1990 BMW K1
2001 'Busa
2003 RC 51
Bunch of Guzzi's

http://www.sohc4.us/gallery/v/members/personal/dagersh/

Offline dagersh

  • "A country attempting to tax itself into prosperity is akin to a man standing in a bucket attempting to lift that bucket by its handle. - Winston Churchill"
  • Expert
  • ****
  • Posts: 1,010
    • Photos
Here are some more pics of the polishing -


Just for Documentation....
« Last Edit: December 17, 2013, 02:48:06 PM by dagersh »
1962 CA95
1966 Black Bomber
1966 CA77 Dream
1967 Superhawk
1970 CB750K0
1972 CL350
1972 CB450/500 Custom
1972 CB500K1
1975 CB550F
1976 CB400F
1975 CB750 Future Restoration
1976 CB750K6
1976 CB750F
1976 GL1000


1968 Suzuki T500 Cobra
1990 BMW K1
2001 'Busa
2003 RC 51
Bunch of Guzzi's

http://www.sohc4.us/gallery/v/members/personal/dagersh/

Offline hoodellyhoo

  • CB350F
  • Master
  • *****
  • Posts: 1,726
you sure are going to town with the polishing! I always get bored with it and skip the finer rouges.
1972 CB350F (Back from the Dead!)- http://forums.sohc4.net/index.php?topic=20822.0
1965? S65 - Coming Eventually!
1972 CB750K2 (father-son project)
1976 CB750K6- (sold) http://forums.sohc4.net/index.php?topic=96859.0
1976 CB750K6 (sold)- http://forums.sohc4.net/index.php?topic=62569.0

Offline dagersh

  • "A country attempting to tax itself into prosperity is akin to a man standing in a bucket attempting to lift that bucket by its handle. - Winston Churchill"
  • Expert
  • ****
  • Posts: 1,010
    • Photos
Totally boring, dirty and makes a mess of the shop.  I spend as much time vacuuming after a polishing session as I do polishing.  I have to build a shower curtain like containment system and rig up some sort of vacuum at the wheels.

But it sure looks purty....
1962 CA95
1966 Black Bomber
1966 CA77 Dream
1967 Superhawk
1970 CB750K0
1972 CL350
1972 CB450/500 Custom
1972 CB500K1
1975 CB550F
1976 CB400F
1975 CB750 Future Restoration
1976 CB750K6
1976 CB750F
1976 GL1000


1968 Suzuki T500 Cobra
1990 BMW K1
2001 'Busa
2003 RC 51
Bunch of Guzzi's

http://www.sohc4.us/gallery/v/members/personal/dagersh/

Offline dagersh

  • "A country attempting to tax itself into prosperity is akin to a man standing in a bucket attempting to lift that bucket by its handle. - Winston Churchill"
  • Expert
  • ****
  • Posts: 1,010
    • Photos
Another weekend, and lots of work and progress .  My buddy James, who is a Saab repair specialist and rally racer gave me a lesson on mild head porting and cleaning and lapping valves.  My intent with the “porting” was to simply take down the rough casting marks, and smooth out the airflow in both the intake and exhaust ports.  I did not want to remove a lot of metal.  I also reshaped the exhaust orifice so that it would fit the header circumference better.

Here are the Exhaust orifices before any work, just for reference sake:


Exhaust 1:


Exhaust 2:


Inside the head:


Intake 1:


Intake 2:


I performed most of the work with sanding drums and my Dremel.  To get into the tight spaces, I carefully used a very small round burr, avoiding the valve seats and guides.

Onto the valve seat lapping:
I first continued my cleaning of the valves themselves.  I originally chucked the valve stems into my drill, and chucked my Dremel with a brass brush into my vice.  The brass did OK, but it was not strong enough.  I got a stainless brush wheel for the drill, and chucked it into my vice so that I use it as a “lathe”.   I then removed the carbon deposits, looking for the original machining marks underneath the buildup.  It worked great.

Machining marks and seating surface (referenced below):


Here is one of the exhaust valves.  You can see the carbon buildup in the seat surface.  I was able to get this very clean with the stainless brush.


I then went on to the Lapping.  You are looking to get a nice dull gray color on the head’s seating surface, and on the valves, you are looking for the same – however, if you can see shiny rings on the lower and uppermost edges of the dull gray line, you are doing great!  You can get an idea of what I am talking about in the 3rd picture above.
When lapping, a little compound goes a long way.  Every third spin, I would pop the valve in and out of the seat to reset the compound.  When you feel the compound no longer cutting – you will feel less friction and the valve will “squeak” a bit – clean all the surfaces (valve and head) and add some more compound.  It is a slow process, but as you feel the seats being made, it is very gratifying.


I also bought a Vibratory Tumbler.  It is really working great for cleaning up nuts and bolts and other small items I don’t want to use on the buffer.  I will update with more pics and progress next week.
« Last Edit: December 18, 2013, 12:21:27 PM by dagersh »
1962 CA95
1966 Black Bomber
1966 CA77 Dream
1967 Superhawk
1970 CB750K0
1972 CL350
1972 CB450/500 Custom
1972 CB500K1
1975 CB550F
1976 CB400F
1975 CB750 Future Restoration
1976 CB750K6
1976 CB750F
1976 GL1000


1968 Suzuki T500 Cobra
1990 BMW K1
2001 'Busa
2003 RC 51
Bunch of Guzzi's

http://www.sohc4.us/gallery/v/members/personal/dagersh/

Offline fastbroshi

  • Puppet
  • Old Timer
  • ******
  • Posts: 2,645
Re: 1972 CB450 "Supersport" Fun with porting and lapping!
« Reply #70 on: January 20, 2010, 05:51:49 PM »
  Is it just me or is that combustion chamber hemispherical?  Awesome.
Just call me Timmaaaaay!!!

Offline dagersh

  • "A country attempting to tax itself into prosperity is akin to a man standing in a bucket attempting to lift that bucket by its handle. - Winston Churchill"
  • Expert
  • ****
  • Posts: 1,010
    • Photos
Re: 1972 CB450 "Supersport" Fun with porting and lapping!
« Reply #71 on: January 21, 2010, 08:19:41 AM »
heh....  heh....  He said....Hemi! ;D ;D ;D

I am getting the pistons and jugs back this weekend.  Wait until you see that pornography!
1962 CA95
1966 Black Bomber
1966 CA77 Dream
1967 Superhawk
1970 CB750K0
1972 CL350
1972 CB450/500 Custom
1972 CB500K1
1975 CB550F
1976 CB400F
1975 CB750 Future Restoration
1976 CB750K6
1976 CB750F
1976 GL1000


1968 Suzuki T500 Cobra
1990 BMW K1
2001 'Busa
2003 RC 51
Bunch of Guzzi's

http://www.sohc4.us/gallery/v/members/personal/dagersh/

Offline HAIRHEAD

  • Full Member
  • *
  • Posts: 43
Here are some more pics of the polishing -


Just for documentation.... ;D
Nice Work!!
77 R100/7 cafe,75 CB550 caffeinated,74 CB450(520)TWIN, 73TX650,72 CB750,72 CB350 TWIN,75 XL100,

Offline dagersh

  • "A country attempting to tax itself into prosperity is akin to a man standing in a bucket attempting to lift that bucket by its handle. - Winston Churchill"
  • Expert
  • ****
  • Posts: 1,010
    • Photos
Re: 1972 CB450 "Supersport" Fun with porting and lapping!
« Reply #73 on: January 22, 2010, 02:33:08 PM »
Thanks Hairhead!
1962 CA95
1966 Black Bomber
1966 CA77 Dream
1967 Superhawk
1970 CB750K0
1972 CL350
1972 CB450/500 Custom
1972 CB500K1
1975 CB550F
1976 CB400F
1975 CB750 Future Restoration
1976 CB750K6
1976 CB750F
1976 GL1000


1968 Suzuki T500 Cobra
1990 BMW K1
2001 'Busa
2003 RC 51
Bunch of Guzzi's

http://www.sohc4.us/gallery/v/members/personal/dagersh/

Offline dagersh

  • "A country attempting to tax itself into prosperity is akin to a man standing in a bucket attempting to lift that bucket by its handle. - Winston Churchill"
  • Expert
  • ****
  • Posts: 1,010
    • Photos
Re: 1972 CB450 "Supersport" Preppng the Fame and Painting the Engine
« Reply #74 on: January 27, 2010, 02:31:39 PM »
Holy cow!  500 posts!!!!!

I got a lot of stuff done over the weekend.  I had 2 goals, the first being to get the frame, swing arm and center stand ready for sandblasting and then powder coating, and the second being to start on the cosmetic restoration of the engine.
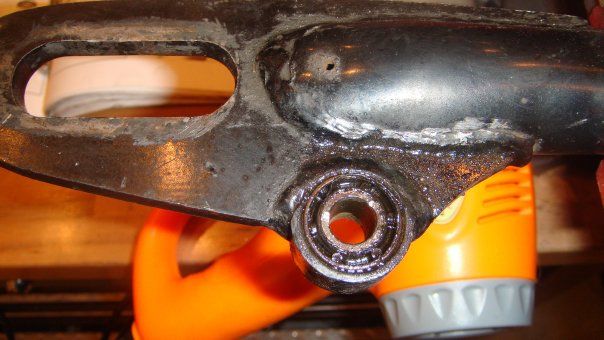


Someone said in another post of mine that after the Armageddon, the only things left will be cockroaches and the shock bushings in Honda Swing arms! 

I did not have a press, and after bending up a bunch of washers and bolts attempting to press them out, I resorted to my new favorite tool, the air saw, to cut them out of the arm..  It worked great.
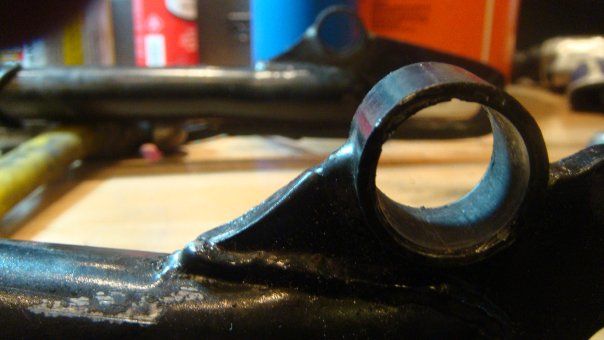


Shock Bushings are out!

Next up were the swing arm bushings.  I learned a very important lesson here.  When you are taking these things apart, make sure you study the parts diagrams.  Study them CLOSELY!!!!  I thought I was cutting on a flanged bushing, and it turned out I was cutting on the swing arm pivot.  It’s hollow, but luckily, it is pretty robust.  I got even luckier when it started to slide out from the swing arm, and I was able to grab it and get it all the way out.  Although I put some nice cuts in the pivot, they were not deep enough to go all the way through.  I am sure it is still serviceable.

Once the pivot was out, I could then easily see the bushings which needed to be removed.
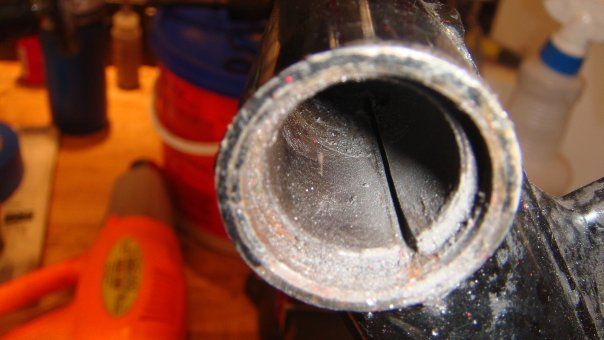


Here you can see the initial cut to weaken the bushing
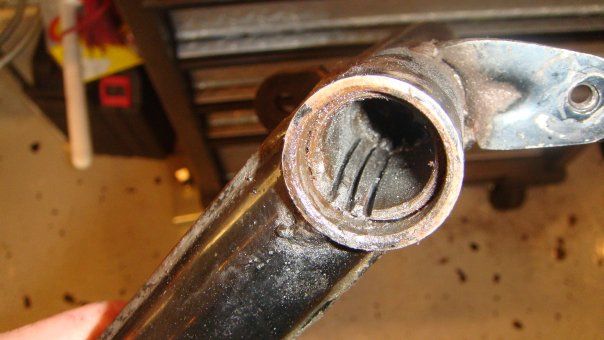


A few more to further weaken it. 

The cuts here are not all the way through, I did complete them, I was just trying to be careful as to not hit the swing arm surface.  The metal on the swing arm is pretty robust, and Hondaman has said not to worry too much if you actually cut into the swing arm, just make sure not to cut all the way through!  Caution and patience was my Mantra here.  It worked and they came out.

Once the cuts were made, and the bushing could be moved…
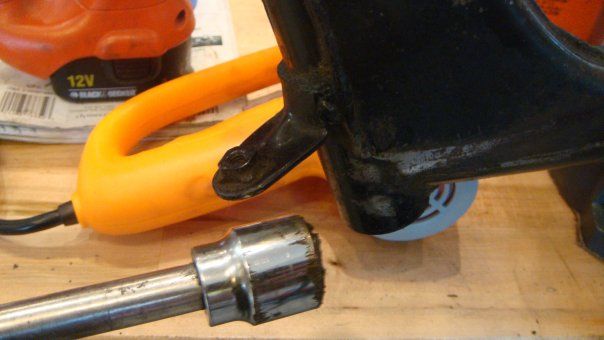


I drove them out with a socket on an extension (Gotta’ love Craftsman!)
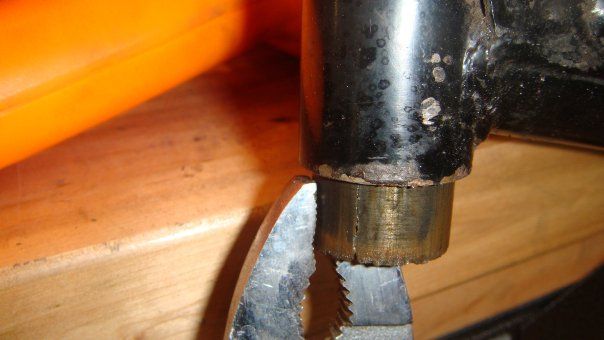


Here it comes…
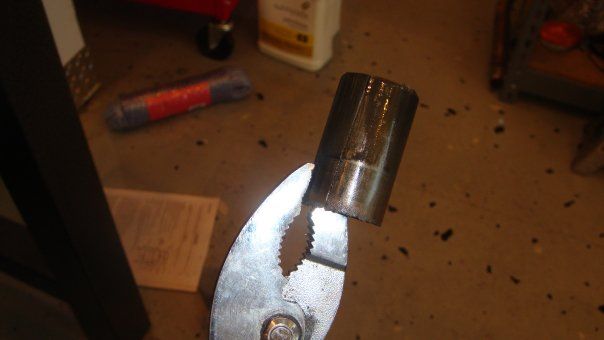


Here’s the Bugger!


Alright, everything was out, and off to my body shop to be sandblasted.

Now on to the engine. 

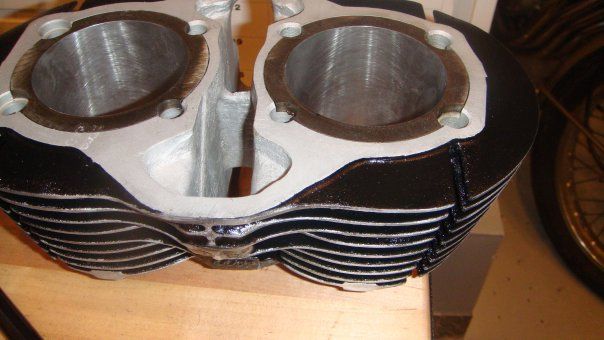
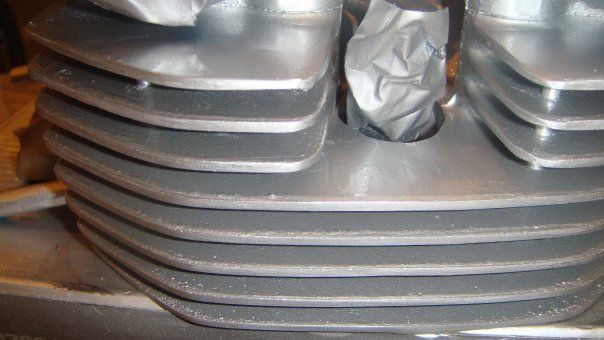
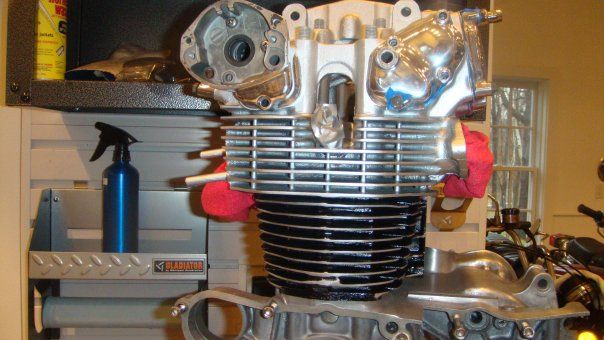
I spent hours cleaning the cases, including running them through the dishwasher.  I was not happy how they looked, so I decided to paint them.  I also really like the finished look of filing the fins and then polishing the outer ends.  The casting looks really unfinished from the factory, and smoothing and polishing the ends makes a nice visual impact.  I used a Fein Multipurpose Tool, going through 60, 80, 100, 120, 180, 240 grits.  Here is a picture of the machine:
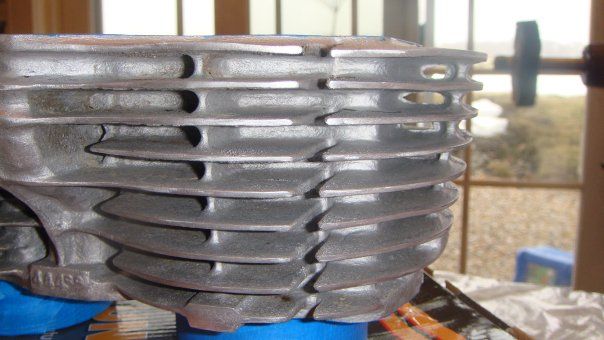


It works really great for this purpose.  I was able to do the Jugs in about an hour, and the next day I did the fins on the head in even less time.  I then masked up the Cylinders for paint.
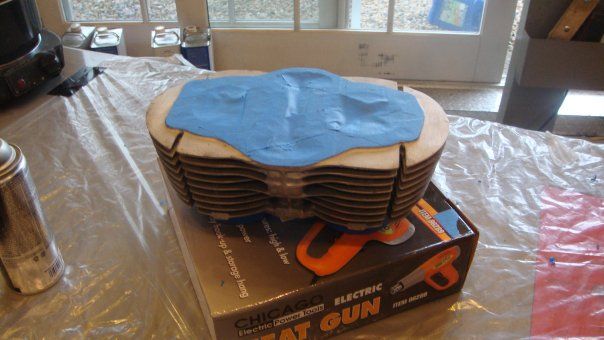


For prep, I doused the piece with acetone, and when that dried, I doused it with Brake Cleaner, and let it evaporate.  I made very sure to wear rubber gloves and to not touch the piece.  I used Duplicolor Engine Enamel Semi-Gloss Black on the cylinder, and would later use the same brand later in Aluminum on the Head.

I let the paint heat up in a warm pot of water for about 10 minutes, until it was just uncomfortable enough to hold.  I then shook it vigorously for 2 full minutes.  The first 2 coats were light, with 10 minutes in between all coats.  In between the coats, I went over the ends of the fins on their newly flat faces with acetone on a rag tightly wrapped around my finger.  It worked great!
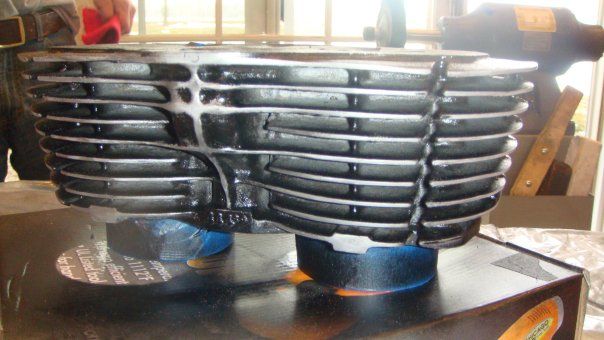


The first coat on…  the second looked about the same.
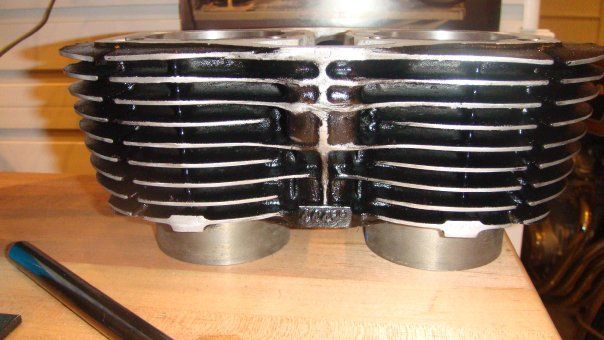


The finished product

I need to touch up a bit in front so thet the “web” will be more defined, but overall, I am really pleased with the results.

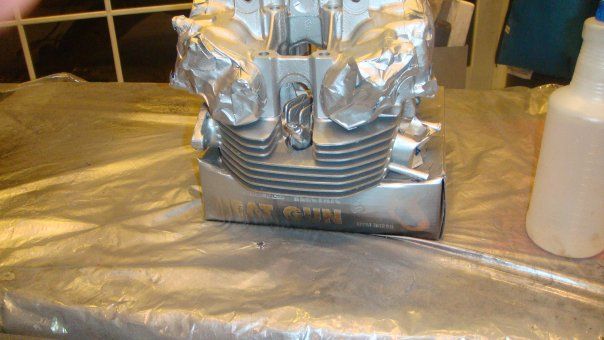
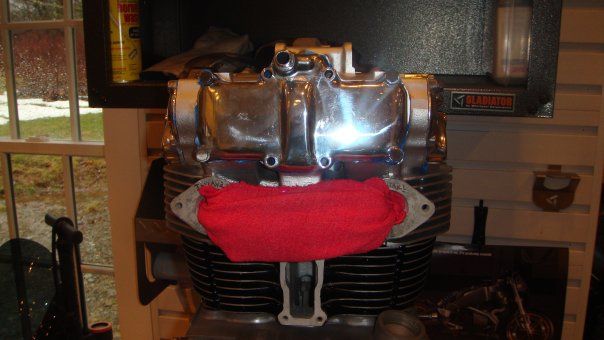
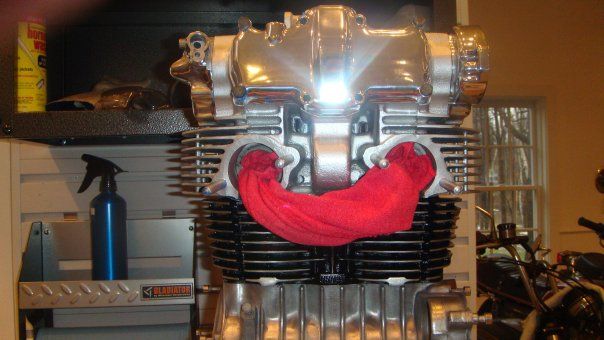
For the head, I found masking easier if I used all the Cam covers, pre-taped in low tack masking tape, to protect all the gasket surfaces.  I also wrapped the spark plugs, intake and exhaust ports to protect them from overspray.  I used the same prepping as the jugs, and painted the same way.
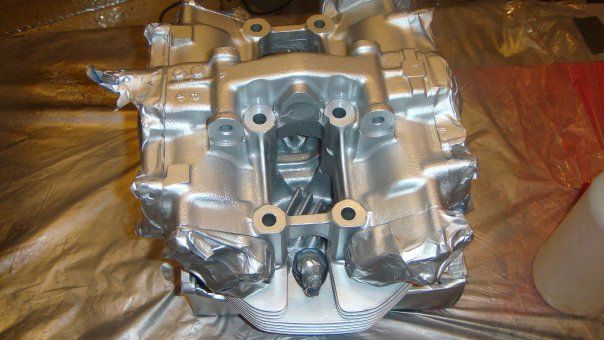


The sanded fins:
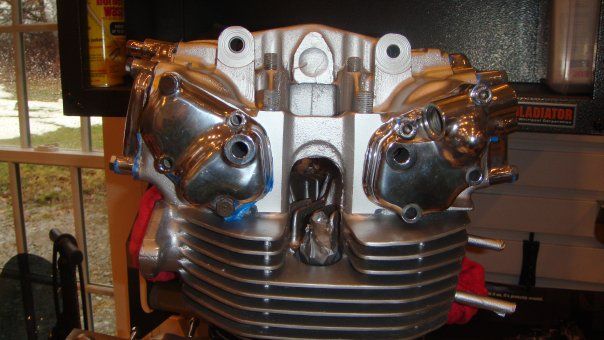


The masking tape pulled off, after the head was dry about 7 hours.

This weekend, I am considering painting the crankcases the same as the head, but I think it would look better a little darker.  Anyone that is thinking about painting your cases, do it, it is so easy, and really makes a huge impact on the looks of the engine.  I will also further polish the fins using finer grades of wet/dry paper to get a really nice shine.

I have also, while all this going on, been sending different hardware into my vibratory Tumblers to be polished.  These are really great, I let the process go on for a day or two, and the results are stunning.   

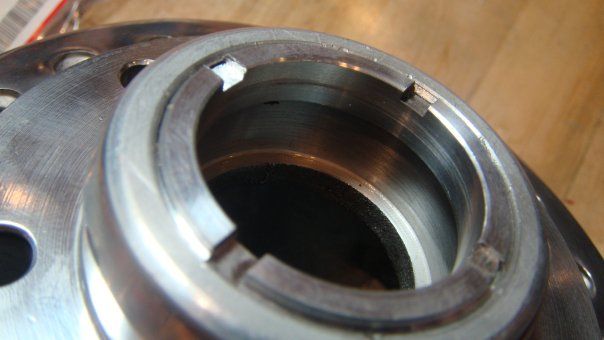
Also, a question.  How do I restore the threads inside this wheel hub?
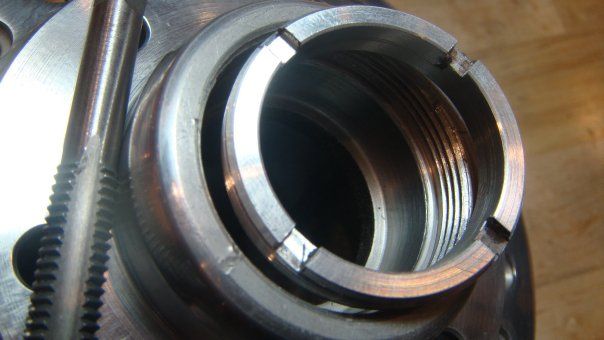


« Last Edit: December 18, 2013, 01:20:11 PM by dagersh »
1962 CA95
1966 Black Bomber
1966 CA77 Dream
1967 Superhawk
1970 CB750K0
1972 CL350
1972 CB450/500 Custom
1972 CB500K1
1975 CB550F
1976 CB400F
1975 CB750 Future Restoration
1976 CB750K6
1976 CB750F
1976 GL1000


1968 Suzuki T500 Cobra
1990 BMW K1
2001 'Busa
2003 RC 51
Bunch of Guzzi's

http://www.sohc4.us/gallery/v/members/personal/dagersh/