Author Topic: Alumiweld  (Read 19419 times)

0 Members and 1 Guest are viewing this topic.

Offline mystic_1

  • Really Old Timer ...
  • *******
  • Posts: 6,071
  • 1970 CB750K
Alumiweld
« on: June 22, 2008, 12:54:19 am »
So I recently acquired some Alumiweld rods from the local Harbor Freight and have been experimenting with them a bit.  Although the website claims that you can use these to "Weld aluminum with any low temperature torch", this is not welding.  These are basically brazing rods that are designed for low-temperature brazing of aluminum and pot-metal alloys. 


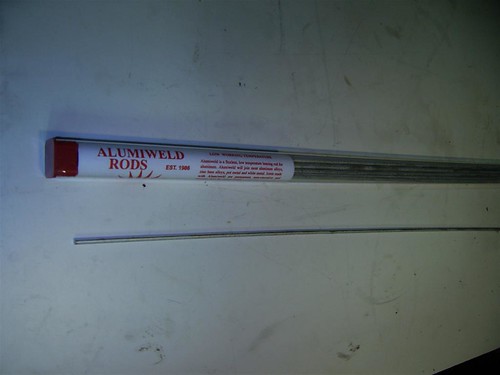
The package came with 8 rods about 18 inches long, and cost US$12.99.

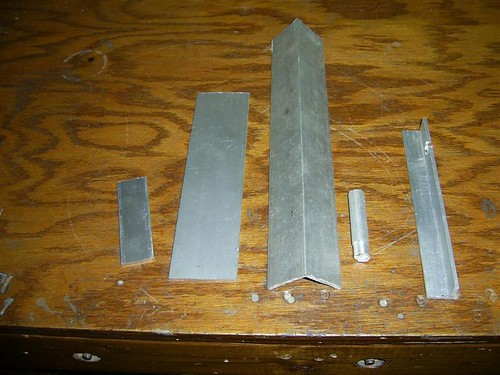
So, to play around with I gathered some scrap aluminum pieces I had in my scrap pile. 


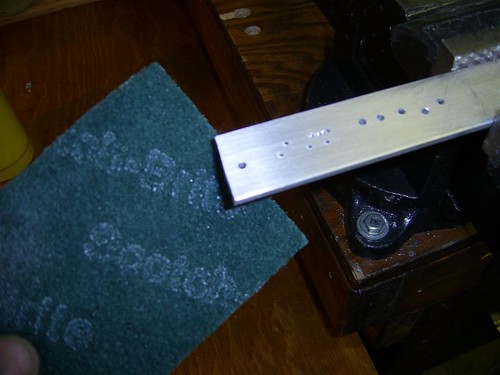
Reading over the literature it remarks that the parts have to be perfectly clean, bare shiny aluminum.  My scrap pieces are new and clean, so I just swiped them a few times with a scotchbrite pad to break the oxide a bit.  Later on for more irregular parts I used stainless steel brushes.


For heat, I'm using MAPP gas because I had it on hand.  The literature states you can use propane also.  More on this later on.


Remember your safety gear.


Instructions state that you heat the base material, then melt the rods on to surface using a scratching motion.  The scratching action breaks up any oxides that form on the metal during heating.  Literature also recommends drawing a stainless steel rod through the molten pool of Alumiweld during brazing.  I found this unnecessary and I had no real problems with oxide formation during the process. 

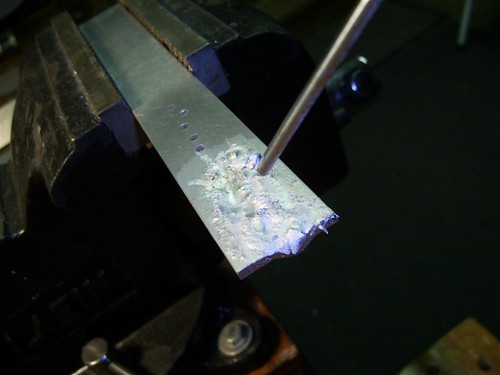
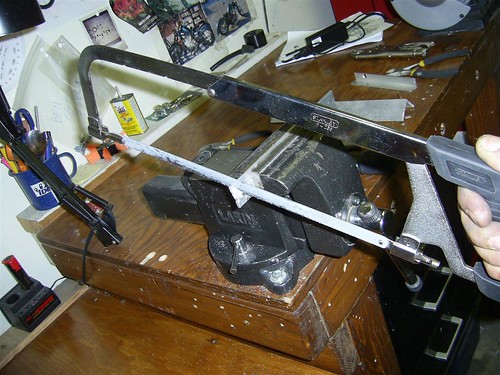
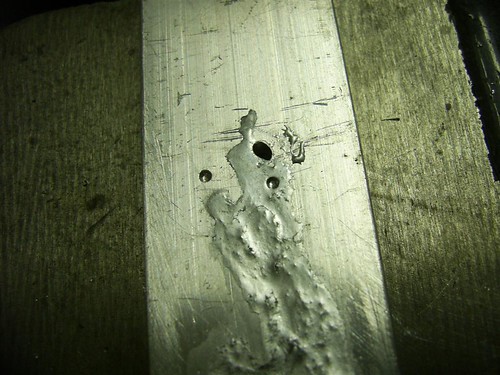
To begin with I drilled a number of holes in a piece of flat stock.


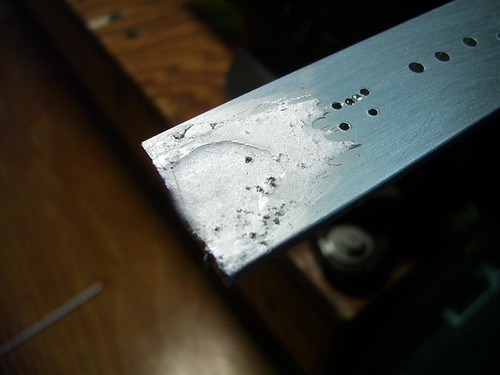
Clamped the part into the vice and applied heat.  It took about 30 seconds of heating with MAPP gas to get this part up to working temperature.  Flowed out some Alumiweld.

[ur=http://www.flickr.com/photos/21913947@N04/2599219197/in/set-72157605742644616/l][/url]

Interestingly, it seems that the Alumiweld etches itself into the parent material somewhat.  In the previous pic, you can sees a depressed area.  While the Alumiweld was still molten, I dragged a stainless brush through the puddle.  What you see is the result.  If I hadn't brushed away the puddle, it would have cooled into lump thicker than the parent material.  The Alumiweld did not initially flow THROUGH the holes, and in fact as you'll see in a minute the product seemed to work very well for closing up holes.

Back to the fun, I fired the torch back up and really went to town.  I intentionally used way more rod than necessary, I wanted to get a feel for how the rods behaved.

Top view.


Bottom view.  :D


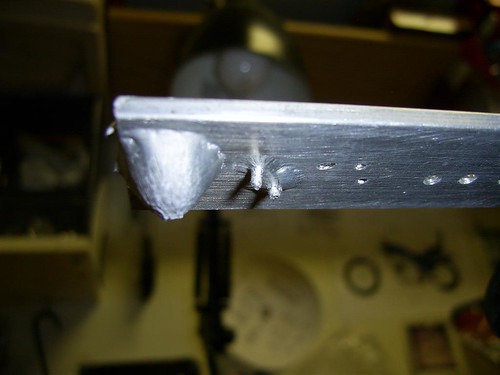
So, if you use enough rod, this material will flow through a 1/16 in hole fairly well.  During this pass I also experimented with re-melting previous brazed areas and found that the alumiweld re-melted and flowed in a fashion that felt more like soldering than brazing.  This stuff changes state quite suddenly.  Thin layers stay in place pretty well when molten but larger applications will drip and/or run when molten.

After about 10 minutes of cooling I took a coarse file to the lumps.  The material is quite hard when solid.  It's definitely harder than the cheap aluminum scrap I was using.


Hammer time!


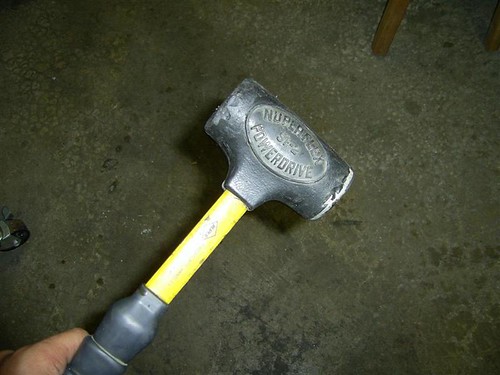
Beat on the lump a bit with my deadblow hammer, in the same spot I filed.  No visible deformation after one whack.  A bit of flattening after repeated blows.  Again, definitely harder than the scrap.


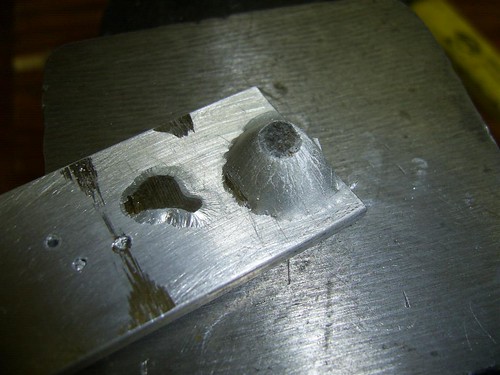
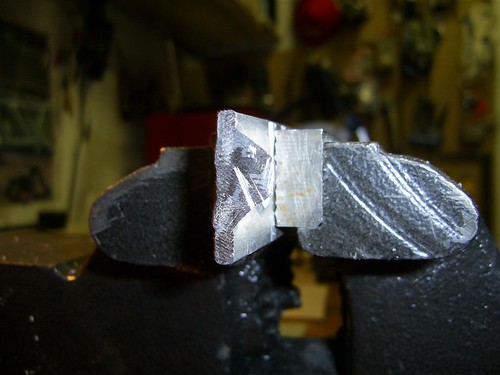
Re-clamped the piece and cut through the lump with a hacksaw, then filed the end with a file.


As you can see the junction between the parent material and the Alumiweld is indistinguishable.


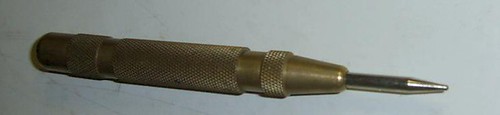
Used a spring-loaded center punch to do a seat-of-the-pants hardness test. 


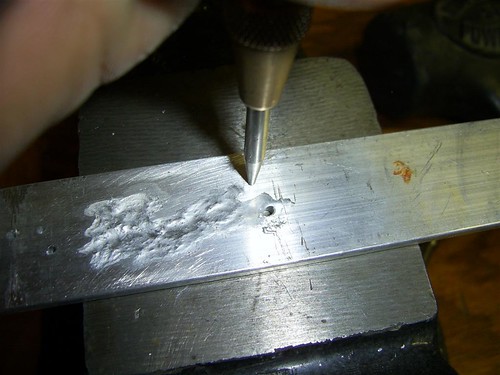
The alumiweld dimples slightly less than the parent material in places where it is thick.  No chipping or flaking of the Alumiweld.


continued...


"A ship in harbor is safe, but that is not what ships are built for."
- John Augustus Shedd

My build thread:  http://forums.sohc4.net/index.php?topic=68952.0

Offline mystic_1

  • Really Old Timer ...
  • *******
  • Posts: 6,071
  • 1970 CB750K
Re: Alumiweld
« Reply #1 on: June 22, 2008, 12:55:50 am »

For my next trick, I repeated a test I'd seen done with a different product.  I created a plain butt joint, joining a small piece to a larger piece at a 90 degree angle.


I first tinned both pieces in the places where they would join by flowing a thin layer of alumiweld onto each.  The were then allowed to cool.


Re-heated both parts and pressed them together.  Removed heat and held parts in place until cool.


You guessed it, Hammer Time!


As you can see, the longer piece bent.  The joint was totally unaffected by the first blow.


After the second blow.  Still no damage to the joint.


Back in the other direction.


And back again.  I'm starting to be impressed.  Some slight lifting at the edge of the joint but it's still very solid.


Back and forth.


Finally starting to see visible signs of failure.... in the parent material!


Broke.


As you can see, the joint is still more or less intact.


continued
"A ship in harbor is safe, but that is not what ships are built for."
- John Augustus Shedd

My build thread:  http://forums.sohc4.net/index.php?topic=68952.0

Offline mystic_1

  • Really Old Timer ...
  • *******
  • Posts: 6,071
  • 1970 CB750K
Re: Alumiweld
« Reply #2 on: June 22, 2008, 12:56:45 am »

Next up, I have a cracked alternator cover in my collection.  This thing is pretty far gone.


So, I did a quick degreasing, not thorough at all.  Wanted to see how alumiweld would behave on less-than-perfectly clean items.  Swiped the area a few times with a scotchbrite just before heating.  Took about 60 seconds to bring this part up to temperature.

Flowed a bead, intentionally over-did it.  Adhesion seemed fine.  You can see discoloration of the clear coat from the heat.


Noted that the alumiweld didn't flow as far on this part as on the smaller pieces.  Heat is obviously carried away from the work zone faster in larger parts.  More on this in a bit.

View from the inside.  No penetration through the crack of course.  If I was going to do a real fix on a part like this I would have V-cut the cracked area and brazed both sides.  This cover is too far gone for that so I didn't bother. 


As you can see you can build up parts like this fairly well and then machine back to shape.


Finally, the most ambitious item, a crankcase half. 


This item has a pinhole leak in one of the high-pressure oil passages, and I was hoping to use the alumiweld to seal it up. 


Results up to now were encouraging, but the fact of the matter is that I cannot heat this part enough to bring the work area up to the necessary temperature.  There was simply too much material wicking away the heat.  I could not get the alumiweld to flow at all.  After using up quite a bit of MAPP gas in a futile attempt to reach working temperature, I cracked out my propane-oxygen torch.  This also proved insufficient.  Although the flame is hotter it is also a small torch and insufficient to the task.  Was also concerned about creating too much of a thermal gradient in the part so I gave up for the night.

I had not pre-heated the part at all, that may help.  I plan to give it another go after pre-heating the part in the oven.  Have to acquire a infrared thermometer first as I want to monitor the temperature of the part fairly closely.  I figure pre-heating the part to 300 or 400 Fahrenheit and then brazing right away might work.  I'm going to do a test run on a different crankcase half first.

So in conclusion, I think that Alumiweld works great for smaller repairs but gets more difficult to work with as the size of the parts increase.  Adhesion and hardness were very good, I don't see any problem with grinding, drilling, tapping, etc.  I still would not trust this stuff for critical or structural areas, but I can see a lot of potential uses for it in my shop.

cheers
mystic_1


"A ship in harbor is safe, but that is not what ships are built for."
- John Augustus Shedd

My build thread:  http://forums.sohc4.net/index.php?topic=68952.0

troppo

  • Guest
Re: Alumiweld
« Reply #3 on: June 22, 2008, 01:42:31 am »
Now either this is stolen from their website or you do the how to lessons for a living...
I`ve seen worse tests and how to`s coming from the people that make the products.
I havent seen this in aus yet but i`ll be looking, looks like bloody good stuff

Offline Uncle Ernie

  • Old Timer
  • ******
  • Posts: 3,613
Re: Alumiweld
« Reply #4 on: June 22, 2008, 04:00:29 am »
Would you use this stuff to make something like saddlebag brackets, that will undergo constant vibration?
Where would you see the advantages of Alumaweld over JBWeld?
Dude- your 8 layers are showing!

Offline kghost

  • Really Old Timer ...
  • *******
  • Posts: 6,855
  • www.facebook.com/RetroMecanicaAustralia
Re: Alumiweld
« Reply #5 on: June 22, 2008, 06:33:21 am »
Thats very informative Mystic
Stranger in a strange land

Offline DRam

  • Enthusiast
  • **
  • Posts: 155
Re: Alumiweld
« Reply #6 on: June 22, 2008, 07:31:41 am »
Thanks Mystic.  Great information. 

Offline mystic_1

  • Really Old Timer ...
  • *******
  • Posts: 6,071
  • 1970 CB750K
Re: Alumiweld
« Reply #7 on: June 22, 2008, 08:21:54 am »
Would you use this stuff to make something like saddlebag brackets, that will undergo constant vibration?
Where would you see the advantages of Alumaweld over JBWeld?

Well, this stuff is designed for use on aluminum, I have not tested it on other materials, so unless you're making your saddlebag supports with aluminum, I'd use something different :)  If I WAS going to make aluminum saddlebag supports, I'd sure give this stuff a go.  For steel I'd do standard brazing with brass rods, or weld.

Based on my limited experiences with this stuff I'd guess that it would withstand vibration quite well - it's rather hard and bonds quite thoroughly to the parent material.  In fact in terms of adhesion and hardness I'd rate it better than JB Weld.  In the test I did with the 90 degree joint, JB Weld would never have held up that well.  I would still use JB weld for places where this stuff is not appropriate, for example pieces too diffucult to heat, joining dissimilar materials, and so forth.  I'd also use Alumiweld in places where drilling and tapping is necessary as it's definitely harder than JB Weld.

mystic_1

"A ship in harbor is safe, but that is not what ships are built for."
- John Augustus Shedd

My build thread:  http://forums.sohc4.net/index.php?topic=68952.0

Offline mystic_1

  • Really Old Timer ...
  • *******
  • Posts: 6,071
  • 1970 CB750K
Re: Alumiweld
« Reply #8 on: June 22, 2008, 08:22:52 am »
Now either this is stolen from their website or you do the how to lessons for a living...
I`ve seen worse tests and how to`s coming from the people that make the products.
I havent seen this in aus yet but i`ll be looking, looks like bloody good stuff


Heh, nah I'm an software and systems developer by day.  I enjoy well-documented test results :)

cheers
mystic_1
"A ship in harbor is safe, but that is not what ships are built for."
- John Augustus Shedd

My build thread:  http://forums.sohc4.net/index.php?topic=68952.0

Offline kghost

  • Really Old Timer ...
  • *******
  • Posts: 6,855
  • www.facebook.com/RetroMecanicaAustralia
Re: Alumiweld
« Reply #9 on: June 22, 2008, 09:58:33 am »
Now either this is stolen from their website or you do the how to lessons for a living...
I`ve seen worse tests and how to`s coming from the people that make the products.
I havent seen this in aus yet but i`ll be looking, looks like bloody good stuff


Heh, nah I'm an software and systems developer by day.  I enjoy well-documented test results :)

cheers
mystic_1

So do I. Well done.
Stranger in a strange land

Offline FunJimmy

  • Who you calling
  • Old Timer
  • ******
  • Posts: 3,802
  • Vancouver
Re: Alumiweld
« Reply #10 on: June 22, 2008, 12:26:59 pm »
mystic_1

That's an awesome product review! Thanks

I'll have to find some of those rods too.

Cheers
FJ
You never see a motorcycle parked outside of a psychiatrist's office!

CB550 Cafe Interceptor a Gentlemans Roadster
http://forums.sohc4.net/index.php?topic=27159.0

Offline kirkn

  • Expert
  • ****
  • Posts: 1,046
Re: Alumiweld
« Reply #11 on: June 22, 2008, 06:32:06 pm »
Outstanding review and tutorial!  Thanks for the education.

My dad and older brother have both used Alumiweld off and on for years.  They've both built various brackets, mounts, etc. for different projects over the years.  Never had a failure at all.

I've never given it a go.  Just never had a need.  But, pretty neat all the same.

Thanks!

Kirk

Offline crazypj

  • I'm brill, me
  • Old Timer
  • ******
  • Posts: 4,467
  • first 100,000 miles. 1977 CB550F
Re: Alumiweld
« Reply #12 on: July 07, 2008, 07:23:09 am »

Finally, the most ambitious item, a crankcase half. 

This item has a pinhole leak in one of the high-pressure oil passages, and I was hoping to use the alumiweld to seal it up. 


Results up to now were encouraging, but the fact of the matter is that I cannot heat this part enough to bring the work area up to the necessary temperature.  There was simply too much material wicking away the heat.  I could not get the alumiweld to flow at all.  After using up quite a bit of MAPP gas in a futile attempt to reach working temperature, I cracked out my propane-oxygen torch.  This also proved insufficient.  Although the flame is hotter it is also a small torch and insufficient to the task.  Was also concerned about creating too much of a thermal gradient in the part so I gave up for the night.

I had not pre-heated the part at all, that may help.  I plan to give it another go after pre-heating the part in the oven.  Have to acquire a infrared thermometer first as I want to monitor the temperature of the part fairly closely.  I figure pre-heating the part to 300 or 400 Fahrenheit and then brazing right away might work.  I'm going to do a test run on a different crankcase half first.

So in conclusion, I think that Alumiweld works great for smaller repairs but gets more difficult to work with as the size of the parts increase.  Adhesion and hardness were very good, I don't see any problem with grinding, drilling, tapping, etc.  I still would not trust this stuff for critical or structural areas, but I can see a lot of potential uses for it in my shop.

cheers
mystic_1


excellent review of how to use the Alumiweld, I've got some, just need time to try it out.
 I remember one of the old time retired mechanics at shop telling me the real old fashioned way of pre-heating crankcases etc. (this was a long time ago, late 1970's)
 He was aluminium welder during WWII, didn't have TIG, etc.
It was a real experience to see him gas welding a crankcase using an old piston for filler.
Due to the weird shapes and areas that need welding, stand them in correct position in a sand bath and heat the entire thing
 It holds parts in place and also keeps the heat longer than just a case half due to extra mass and insulating properties of sand compared to heat radiating into surrounding air
PJ
« Last Edit: July 07, 2008, 07:26:05 am by crazypj »
I fake being smart pretty good
'you can take my word for it or argue until you find out I'm right'

Offline gc8andy

  • Ride Safe
  • Full Member
  • *
  • Posts: 15
Re: Alumiweld
« Reply #13 on: July 23, 2008, 07:35:50 am »
Excellent review, I think I will order some to play with and familiarize my self with before attempting a bug repair similar to you. Thank you
1976 CB400F

Offline mal

  • Full Member
  • *
  • Posts: 22
Re: Alumiweld
« Reply #14 on: July 30, 2008, 09:48:05 pm »
Troppo

There is a product in Australia called Techni-2000 that I am fairly sure is the same stuff as mentioned here. Its available from a guy on ExpensiveBay (where I got mine). If you cant find it, PM me and I will send you his details.

I did some tests with mine, before I took to my crankcases, just to get a feel for it.

I found the same thing as mystic, in regard to getting enough heat into the cases before you actually apply the rod. I fixed a cracked bolt hole in the bottom case on the points side, because it would heat up enough (with an oxy torch) for the rod to flow/bond into the base metal. Tried a spot on the upper case around the the final drive sprocket, but could not get enough heat into it for the rod to "incorporate" into the surface of the case (there is a lot of metal there). As soon as it cooled, it would crack off (tried 3 times). :-\. Im just not game enough to really apply the heat, in case I stuff up my case (no spares!).

Just another tip. This stuff does not adhere to steel at all, so you can actually use steel as form work. I actually had the steel bolt in the case and welded over the top of it. When the thing cools, you can just screw the bolt out, and you have the new thread left behind (albiet a bit rough, but it still does the job).

Apparently it will weld most non ferrous metals, so have a play with it.

Mal
CB750K2
VF500F
CX500 (current project)

Offline void909

  • Hot Shot
  • ***
  • Posts: 463
Re: Alumiweld
« Reply #15 on: July 31, 2008, 12:55:27 am »
Would be great for making a license plate bracket or a tail light bracket for the cafe crowd. 
knock with no answer

troppo

  • Guest
Re: Alumiweld
« Reply #16 on: July 31, 2008, 01:55:48 am »
Troppo

There is a product in Australia called Techni-2000 that I am fairly sure is the same stuff as mentioned here. Its available from a guy on ExpensiveBay (where I got mine). If you cant find it, PM me and I will send you his details.

I did some tests with mine, before I took to my crankcases, just to get a feel for it.

I found the same thing as mystic, in regard to getting enough heat into the cases before you actually apply the rod. I fixed a cracked bolt hole in the bottom case on the points side, because it would heat up enough (with an oxy torch) for the rod to flow/bond into the base metal. Tried a spot on the upper case around the the final drive sprocket, but could not get enough heat into it for the rod to "incorporate" into the surface of the case (there is a lot of metal there). As soon as it cooled, it would crack off (tried 3 times). :-\. Im just not game enough to really apply the heat, in case I stuff up my case (no spares!).

Just another tip. This stuff does not adhere to steel at all, so you can actually use steel as form work. I actually had the steel bolt in the case and welded over the top of it. When the thing cools, you can just screw the bolt out, and you have the new thread left behind (albiet a bit rough, but it still does the job).

Apparently it will weld most non ferrous metals, so have a play with it.

Mal
Thanks for that mal, i`ll have a look tonight.
Just hope SWMBO believes its for work :D :D