Author Topic: Mmm... First cafe racer project ever 81' CB650 engine into a 71' CB500 frame :)  (Read 25907 times)

0 Members and 1 Guest are viewing this topic.

Offline daewon774

  • Enthusiast
  • **
  • Posts: 154
Hey everyone, I've been posting here and there about questions regarding my project bike.  I decided to go ahead and just make a build thread.  I can't promise you how often I'll keep this updated, but I will do my best.

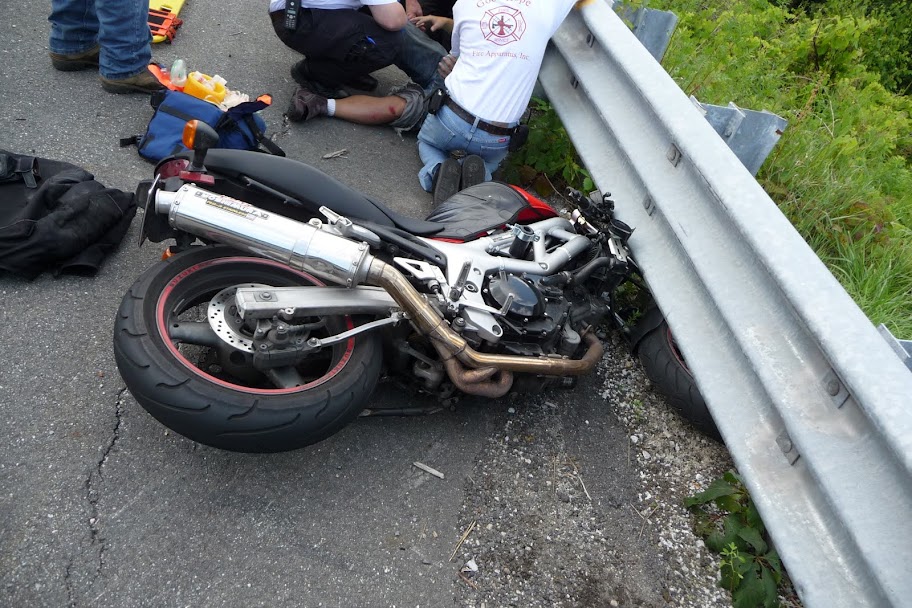
In July of this year, I had an accident with my previous bike (2000 Suzuki SV650).  It was my second bike ever, the first was a 2001 Honda VLX600.  


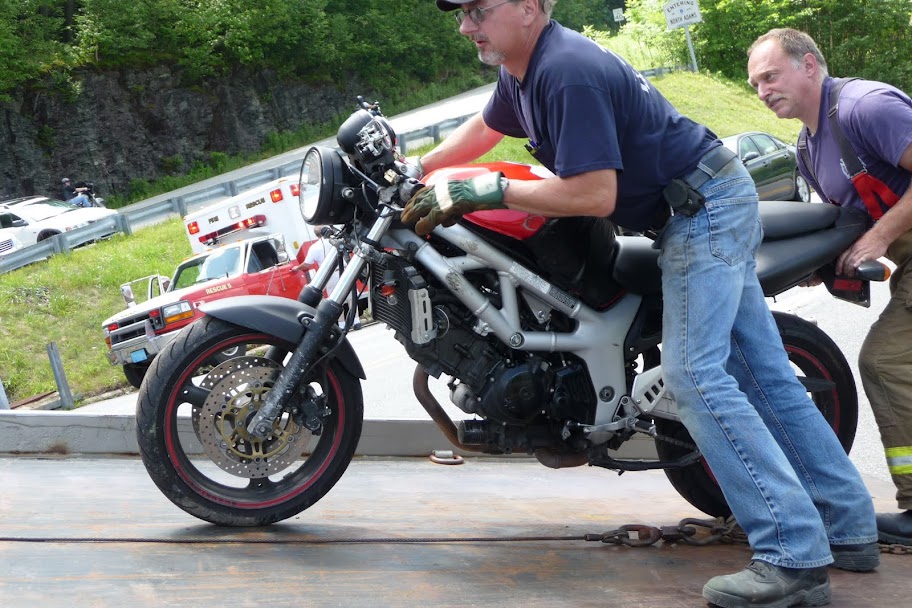
After the cruiser phase, I felt that I was more of a sport bike rider since all I did on the VLX was grind the pegs ALL THE TIME.  I loved the curves.  Anyhoo, I ended up getting SV and loved the naked sport bike class.  

The accident that I had separated my left clavicle from my shoulder.  Everything functions ok, but I just have a constant reminder whenever I look at the mirror.  I wasn't sure if I wanted to get into biking again since I realized accidents can permanently change your body and lifestyle, but I just couldn't live without the riding.  Plus, I could use a project for the upcoming winter.  I live in the Northeast... :(

The naked bike style really got to me though.  I've always loved the cafe look, and ended up appreciating it even more after having the naked bike.  

So, here we are today.  About 3-4 weeks ago, I picked up a 81' CB650 standard that was sitting around the side of a house.  I got it for $75.  :)  The bike looked decent, but had some things missing.  I'll go into specifics later into the thread.  About two weeks after I picked up the 650, I found a 71' CB500 rolling frame (front and rear bumper, forks, rear shocks, both wheels, and of course the frame).  Got this for around $100.  

I always loved CB as a platform for cafe racers, especially the 750, 550, and 500s.  Since I'm a little strapped for cash and couldn't find a decent 750 to buy, I went with the 650/500 route instead.

Here's a few pics


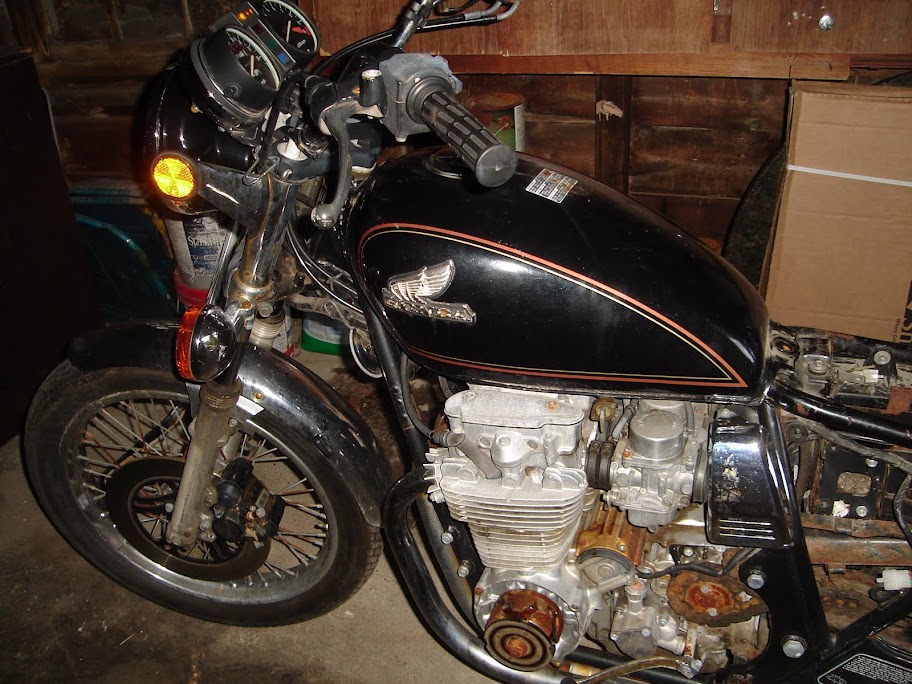
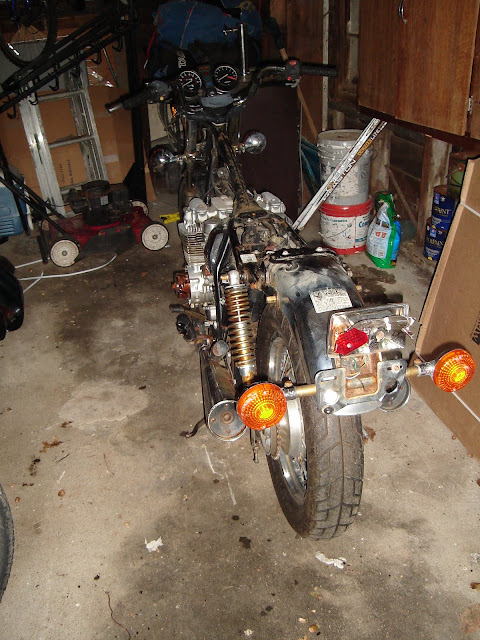
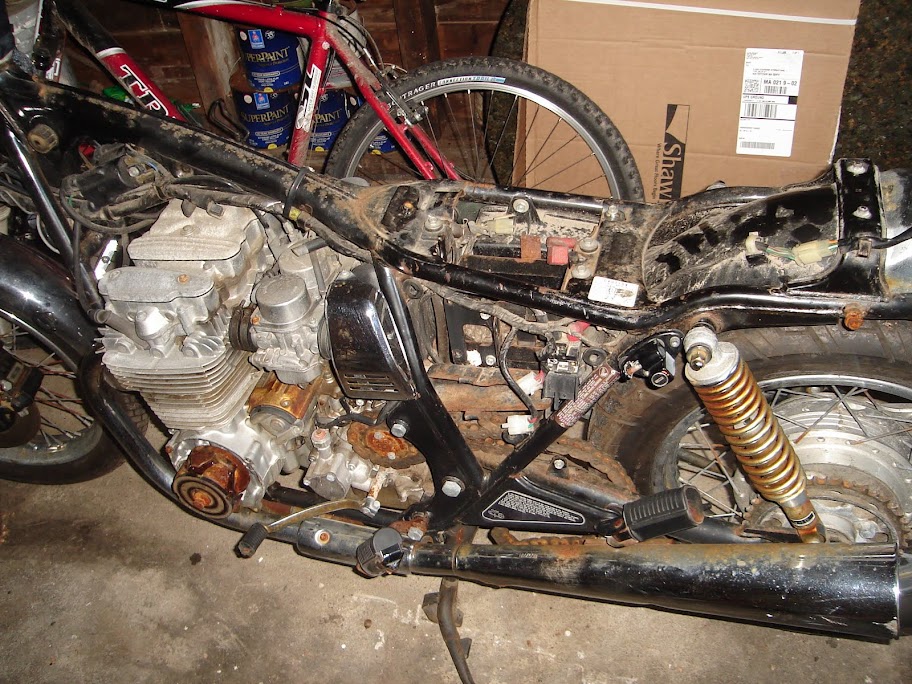
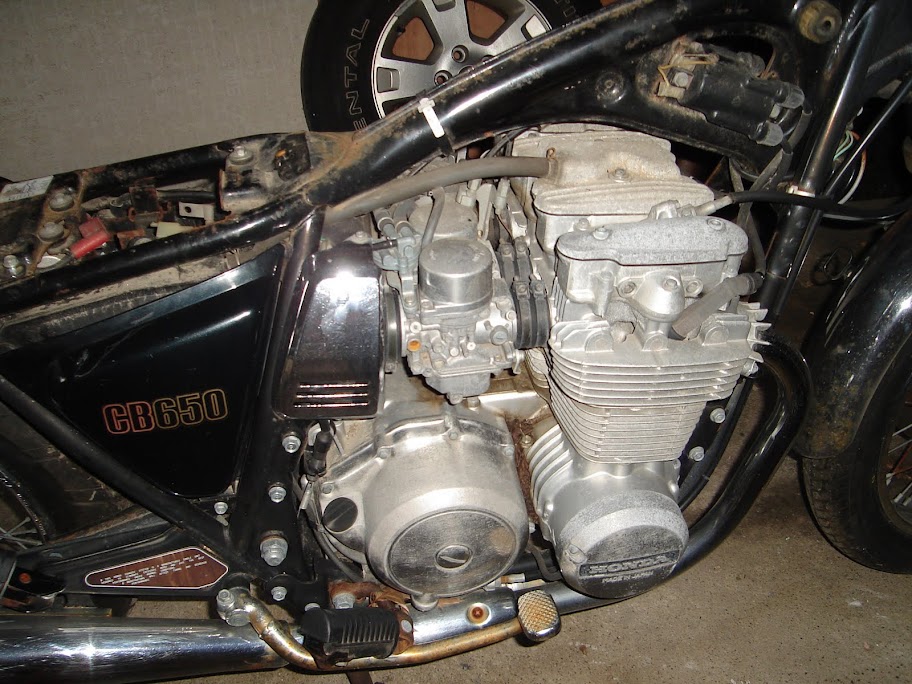
As you can see there's a few things missing: stator cover and stator, front brake lever, master cylinder, left side cover, rear brake linkage, and some other things I need to find out if they're missing and list  :o

Pics of the CB500 frame will be following!
« Last Edit: October 13, 2009, 06:02:23 am by daewon774 »
76' CB550
11' Ducati 848 EVO

Offline daewon774

  • Enthusiast
  • **
  • Posts: 154
Here's a question to anyone that might be reading this.  I wanted to see if the engine turned over or is seized.  I read somewhere that I could just do by putting in gear and rolling it.  My chain is busted and can't do this.  I did see that I could put a wrench to the motor and do it by hand.  Please tell me if I did this correctly.  I took a wrench to the end of the rotor of the left side of the engine.  It turned over a few times this way.  Is this a decent check?
76' CB550
11' Ducati 848 EVO

Offline daewon774

  • Enthusiast
  • **
  • Posts: 154
10/11/09 Rotor, stator, R/R check carb removal

I finally had some time yesterday to dig into the 650.  For the weeks prior, I've been gathering up parts and tools (lots o' Simple Green and cleaning supplies!)

First thing I wanted to check was the status of the rotor.  I knew that the stator and stator cover were missing, but I just wasn't sure if the rotor would still be good. 

Reading all the online material from this website, as well as checking the Clymer manual, it seems like the way to test the rotor is to measure resistance between the two rings.  After baselining my multimeter (2 Ohms when the probes make a connection to each other), I went ahead and checked the resistance on the rotors.  The reading was 6 Ohms.  So, after subtracting the 2 Ohms from the baseline, I guess I have 4 Ohms resistance on the rotor.  Anyone know if this is good?  I'd like to know if there's any other test I can do, other than starting up and charging a battery, to see if this rotor is still good.  Please chime in if you have any advice.

Rotor with missing stator and stator cover


I still have to order a stator and cover.  I didn't realize both of these average about $100 each on Ebay.  I may wait a while till I can find a good cheap source locally or if someone posts something in the parts section here to sell for cheap.

Going through the rest of the charging system, I find another surprise...  I got a missing regulator/rectifier as well.  :(

Where's my R/R???


After realizing there might be some other missing parts on this bike, I look around any see two open connections.  The connectors are located right next to the battery box on the left side of the frame just above the air cleaner.  Anyone know what these two connectors connect to???

Who's connects to these two connectors?


And it doesn't end there.  I have a my oil pressure connection cut clean off as well as a missing wire to my neutral indicator switch.  WTF?  Will it end?

Cut oil pressure connection


Missing neutral indicator switch connection and cut oil pressure connection


After my misery with missing wire/lines/connections in the charging system.  I decided to pull the carb off to see what needs to be done there.  I find that the fuel drain lines are missing.

Lost fuel drain lines


BTW, taking these carbs off are a real pain in the ass.  The carbs were seriously stuck to the engine.  I decided to take off the air box, rear fender and battery box to get some more room to work with.  After all that was out, alot of elbow grease and sweat got the carbs off.  Actually a little bit of leverage from a wrench helped as well.

Carbs are off!


Need to clean my engine soon, eww...


76' CB550
11' Ducati 848 EVO

Offline daewon774

  • Enthusiast
  • **
  • Posts: 154
Carb cleaning/dissembly

I took the carbs into the house to clean and take apart.  I have some questions...  There are some parts that Clymer suggests should be on the carbs, I just don't know if Clymer is wrong or if the previous owner didn't put the carbs back together properly.  Please see photo's below.

Accelerator pump assembly:  Clymer states there should be a o-ring at the end of this rod.  I didn't see one anywhere?  Only needle I see comes from the vacuum cylinder assembly


Pilot jet: Clymer also states that there should be a washer at the end of the jet.  I didn't see one in any of the carbs.


Carbs 1,2, and 4 looked fine.  I have to clean them up and possibly replace the float bowl cover gaskets.  When I opened up the 3rd carb I found a ton of white powder.  What does this mean?  Can anyone advise me on this?  It look like all it needs is a cleaning, but I was just wondering what in the world would cause this.

beach in my 3rd carb


How the carbs look so far


Time to drop everything into Simple Green for a day!


« Last Edit: October 12, 2009, 10:40:04 am by daewon774 »
76' CB550
11' Ducati 848 EVO

Offline 7145cb650

  • Full Member
  • *
  • Posts: 22
The two plugs under the seat are for the CDI units. These can be pretty costly if you are on a tight budget.

Offline daewon774

  • Enthusiast
  • **
  • Posts: 154
The two plugs under the seat are for the CDI units. These can be pretty costly if you are on a tight budget.

Thanks for the ID.  I've been busy with the carbs that I forgot to check on what those were.  I found a few on ebay for around $50 with shipping. 

This list of things that are missing is really adding up :(
76' CB550
11' Ducati 848 EVO

Offline daewon774

  • Enthusiast
  • **
  • Posts: 154
So to begin, I just wanted ask a question here on where I can find replacement T joints that go between carbs 1/2 and 3/4.  I found sources online for OEM parts, but they run $30 a piece for a piece of T joint rubber.  I don't know if I can just run to the local hardware store to pick one up since I'm pretty sure that fuel is running in these.  Anyone know where I can find a suitable replacement for cheap?


10/17/09 Simple Green, Carb dip, and elbow grease
So, after pulling the carbs of the bike, I decided to disassemble and clean with Simple Green overnight, followed by carb dip then some wire brushing.  Here are some pics for the update:

Carb dip!!!


Simple green and a little bit of elbow grease vs just simple green alone...


I also went ahead and ordered four carb rebuild kits from partsnmore.  The kits here were really cheap compared to everyone else.  I read some reviews and the kits seem to be ok.  I'll find out when I get them.
76' CB550
11' Ducati 848 EVO

Offline daewon774

  • Enthusiast
  • **
  • Posts: 154
Got some pics I'll be uploading tonight for the current progress on the bike...

BUT, I just wanted to post my excitement!!!  I won three things on Ebay last night for the project.  Stator, Stator cover, two spark units (CDI), AND regulator/rectifier all for $50 INCLUDING SHIPPING!!!  The guy says everything works and he guarantees for 7 days from delivery.  All is well today, all is well...
76' CB550
11' Ducati 848 EVO

Offline ColinMc

  • Expert
  • ****
  • Posts: 1,006
  • There aint no pickle like a super pickle...
Lol, you've made more progress in a month than I have in 6 on my CB project. I'd be curious what kind of shape the motor is in internally...especially after investing all that money in electrical parts and whatnot. But either way just cleaning things up and getting the bike all put together hopefully you could at least break even on it if you get it running.  :)
1976 CB750K - Cafe Project...taking forever
1984 Honda MB-5 - MB-8 conversion in process
2001 Ducati 748 - Built 996 motor sleeper

Offline daewon774

  • Enthusiast
  • **
  • Posts: 154
Lol, you've made more progress in a month than I have in 6 on my CB project. I'd be curious what kind of shape the motor is in internally...especially after investing all that money in electrical parts and whatnot. But either way just cleaning things up and getting the bike all put together hopefully you could at least break even on it if you get it running.  :)

I got a fever right now for bikes, lol.  Actually I've had it ever since I first got on one, so trying to get this bike done before next season.  :)

Yeah, hopefully I won't break the bank on this.  I'm trying to save here and there to keep the costs down.  But at the same time, I want to rebuild what I can to almost new spec.  Not a great idea when one is trying to save the cash.  I thought though, if it gets to expensive, I could def part out enough parts to make up most of the money.  I mean the 650 bike only cost my $75.  I should at least get that back if I sold the parts off it, lol.
76' CB550
11' Ducati 848 EVO

Offline manjisann

  • Hazardous Chemical Inhalation
  • Master
  • *****
  • Posts: 1,828
Nice I'm intersted to watch this progress, since it's similar to what I'm thinking of doing. Anyhow, whatching with interest :)

Brandon
Sure it's for sale! How much you ask?? Well, how much are you willing to pay??? Now triple it, that's the price!

1973 CB500 K2 - Sold the bike and bought a Mig, Miss the bike, Love the Mig :D
1980 CB650 Custom
1971 CB500 Frame 650 engine: Project

Trip and General Ramblings blog: manjisann.blogspot.com

Offline JohnG

  • Hot Shot
  • ***
  • Posts: 300
  • 1976 CB750F - original owner
detail on cleaning your carbs:  there appears to be a black plug on the downside
of each carb, near the main and secondary main jets.  you must remove that plug
and then clean the jet it covers up.  Cleaning it can be done with a #80 drill bit
or some very fine piano wire.  If you do not clean that passageway, you will have all kinds of starting and low speed problems.   If the black plugs fall apart you can get replacements for them.

The CV carbs you have are very similar to what the DOHC guys have and their website has considerable discussion of the details involved. (http://www.cb1100f.net/) as they were Honda's approach to meeting '80s emissions requirements

            John
1976 CB750F - original owner
1971 CB450
1979 CB750F
1982 CB900F
1983 CB1123F - Rick Stetson motor

Offline daewon774

  • Enthusiast
  • **
  • Posts: 154
detail on cleaning your carbs:  there appears to be a black plug on the downside
of each carb, near the main and secondary main jets.  you must remove that plug
and then clean the jet it covers up.  Cleaning it can be done with a #80 drill bit
or some very fine piano wire.  If you do not clean that passageway, you will have all kinds of starting and low speed problems.   If the black plugs fall apart you can get replacements for them.

The CV carbs you have are very similar to what the DOHC guys have and their website has considerable discussion of the details involved. (http://www.cb1100f.net/) as they were Honda's approach to meeting '80s emissions requirements

            John

Interesting...  Thanks for the info, I'm definitely going to look into this.  Is this the jet that is referred to as being "pressed in" in the Clymer/Honda manual?  If it is, I was wondering how and if I should try to clean it.

How do you remove the black plug btw?  Drill bit?
76' CB550
11' Ducati 848 EVO

Offline daewon774

  • Enthusiast
  • **
  • Posts: 154
Update to my project attempt
« Reply #13 on: November 01, 2009, 11:04:16 pm »
    Alrighty, haven't updated in a while so here it goes...

    • Here is the 71 CB500 rolling frame that I've been meaning to put a pic of up.  Fully disassembled, bagged and tagged.

1971 CB500 rolling frame ready to be ripped apart


  • I got my rebuild kit for the carbs.  It took a while to put it back together since I couldn't get the choke spring on right, but it's finally on.  Also, I bought two OEM T joints for $35 a piece.  Seriously, why is it $35 for little pieces of rubber and metal.  I don't get it.

WTF?  $35 for each of these???


  • I went to drain the oil from the engine and check the oil filter and the spark plugs.  Oil was dirty, filter was clean, and plugs looked fine

Dirty oil...


  • Ordered a compression tester from Harbor Freight.  
    Here's the results in order of cylinder number:  
    dry 50, 80, 120, 50
    with a little oil 120, 210, ?, ?
    question marks since I didn't get a reading on the last two cylinders.  I don't know what that means.  I wasn't sure if I got a lemon compression tester or not.  I should have retested the first two cylinders to make sure I was getting a correct reading from the tester, but... I got lazy.   ::)  I already knew this motor has to come out anyways.  Why bother at this point.

Lemon or not a lemon?


  • Now that I have a compression reading, with the first cylinder reading around ~50 PSI on average, I knew that the engine had to be pulled.  So...

Harness out

[/list]

Bars, headlamp, and harness out.  Ready to take off front end.


With everything but the engine and swing arm out, I laid the frame on its right side on the floor of my garage.  Bolts came off and it was ready to pull the motor off...  I might have made a bit of a mess with some oil, lol


And lastly, some parts...

CB500 and CB650 in a box...


So as of now, I got the motor out.  I never been this deep into working on a engine before.  This is going to be interesting.  I know I'll have a good time learning a bit about four banger motorcycle engines.  I just don't know how long that will last once I open her up and find out what the deal is with the motor.  

The next update will be of me taking the engine apart.  I'll start with the top end and see what's going on with the head.  I really don't want to split the cases, but I would really like to make sure everything is ok with the entire engine.  Does anyone know what I can do to test to see if anything wrong in the bottom end before opening it up?  I never had the chance to ride this bike or see if it even shifts well.  I don't want to pull this engine again down the road if I don't have to.  :(
« Last Edit: November 02, 2009, 12:11:57 pm by daewon774 »
76' CB550
11' Ducati 848 EVO

Offline daewon774

  • Enthusiast
  • **
  • Posts: 154
Well, I decided I'm just going to open the entire engine for a full tear down.  I know I don't have any experience in this at all, but I am willing to give it a shot.  I was thinking if I want a 100% reliable motor when on the road, I should just go through it all the first time around.

As a reference for the motor disassembly, I found two great threads.  If anyone is interested, here are the links:
http://forums.sohc4.net/index.php?topic=29364.0
http://forums.sohc4.net/index.php?topic=38242.0

I will be posting my own tear down and rebuild here on my thread.  

As far as progress goes, I picked up a strap wrench for the rotor and a impact driver set for the notorious screws on the motors.  The engine is still on the floor of my garage.  Hopefully I'll start opening her up tonight.  

More pics will be coming, but again, I can't promise I'll be great at real time updates.  
« Last Edit: November 03, 2009, 08:49:21 am by daewon774 »
76' CB550
11' Ducati 848 EVO

Offline Ogri

  • Thinks he's a
  • Hot Shot
  • ***
  • Posts: 331
A little advice on using an impact driver. I always take the phillips head bit out of the driver and gently tap it into the screw-head. If it fits properly it will stay there. If it falls out you've got the wrong bit.
The gentle tapping will also help loosen the thread if it's corroded in there.
I then place the impact driver onto the bit and use it normally.
Much better to hit it once with a big hammer than 5 times with a little hammer.
Hold the impact driver as close to the head as possible (mine has a knurled ring which I hold) and apply a gentle twisting force as you prepare to hit the end.
Use a dead-blow; not a whipping type blow. Imagine a bag of sand hitting the ground from a height. That's what I mean by a 'dead-blow'.  The heavier the hammer, the closer to the heavy end I hold it; for better control.
If you come across any phillips heads that are chewed up you can tap the heads flat with a small hammer. This will close up the 'cross' and allow the driver's bit to bite a bit better. (!)

Sermon over.
« Last Edit: November 03, 2009, 09:54:59 am by Ogri »

Offline daewon774

  • Enthusiast
  • **
  • Posts: 154
A little advice on using an impact driver. I always take the phillips head bit out of the driver and gently tap it into the screw-head. If it fits properly it will stay there. If it falls out you've got the wrong bit.
The gentle tapping will also help loosen the thread if it's corroded in there.
I then place the impact driver onto the bit and use it normally.
Much better to hit it once with a big hammer than 5 times with a little hammer.
Hold the impact driver as close to the head as possible (mine has a knurled ring which I hold) and apply a gentle twisting force as you prepare to hit the end.
Use a dead-blow; not a whipping type blow. Imagine a bag of sand hitting the ground from a height. That's what I mean by a 'dead-blow'.  The heavier the hammer, the closer to the heavy end I hold it; for better control.
If you come across any phillips heads that are chewed up you can tap the heads flat with a small hammer. This will close up the 'cross' and allow the driver's bit to bite a bit better. (!)

Sermon over.

Hey thanks for the advice.  I never used an impact driver before.  I was going to take a experimental stab at it tonight to see how it worked.  I'm glad you stopped by to make sure I didn't strip anything that I don't have to.   :o
76' CB550
11' Ducati 848 EVO

Offline manjisann

  • Hazardous Chemical Inhalation
  • Master
  • *****
  • Posts: 1,828
Nice progress so far  :)

Brandon
Sure it's for sale! How much you ask?? Well, how much are you willing to pay??? Now triple it, that's the price!

1973 CB500 K2 - Sold the bike and bought a Mig, Miss the bike, Love the Mig :D
1980 CB650 Custom
1971 CB500 Frame 650 engine: Project

Trip and General Ramblings blog: manjisann.blogspot.com

Offline daewon774

  • Enthusiast
  • **
  • Posts: 154
110509 Begin head removal...

So today I took the initiative to take apart the top end of the motor.  I have quite a few questions.  Now I just want to remind everyone that this is the first time I have ever attempted to rebuild a motor.  It is also the first time that I have seen the inside of one as well.  So...  I'm still not sure what even wear or uneven wear is when it comes to identifying properly worn parts.  I do have a micrometer and some other tools to check specs, but I will definitely be asking some questions on this thread to get some advice from you all, the experts.

So here we go!

Everything under the valve covers and the breather cover looks good


Rocker assembly removed.  Bearings and rocker pads look good.  No uneven wear or pits.


How the hell do I take out these cotter pins???
This was posted as a new thread in the general forum.  I was told just to bang away after getting a nut on the cotter pin to save the threads.  I tried this briefly but it doesn't want to budge.  I'll try again this week.  For the CB650s, should these just tap right out?  Should I put a bit more force into the tapping?


Rubber boots taken off to access head bolts.
I think I ruined these.  I had no idea how to take these out other than to try to pry them out with a flathead screwdriver.  I ended up puncturing all of them.  Gotta put these on the list of things to order.


Cam and chain from above
Didn't realize how easy it is to take this out.  I also didn't know how much the cams weigh.  I was really surprised.


Some closeups of the cam and the lobes.  Can someone comment on these pics in particular?
After I pulled the cam out, I took a closer look at each cam lobe as well as where the bearings seat to the rods.  The bearings seemed to look fine to me.  No obvious scratches or pitting.  When I looked at each lobe, it seemed that there were some noticeable pits where the lobe meets the rocker pads.  Could someone please take a good look at these at tell me if these are reusable?  The pits that I find can easily stop my fingernails if I run them across the lobes.  I never have seen what normal wear looks like on a cam, let alone seen what a cam looks like in my hands.  ;)  Here are the pics...


I did take measurements of the each lobe to see if the wear was in spec.  All of them are in spec.  I'm just unsure if they are still reusable.

Are these bearings in ok condition?
Lastly, I just wanted to get some input on these bearings for the cams.  There's some scratching, but no pitting.  Is this head ok to reuse?


Thanks in advance!
76' CB550
11' Ducati 848 EVO

Offline Ogri

  • Thinks he's a
  • Hot Shot
  • ***
  • Posts: 331
How the hell do I take out these cotter pins???

I'm not familiar with CB650s but I'd call them 'studs' not cotter pins - semantics; doesn't matter. Why do you need to remove the rocker assemblies? If there's no wear to the main central shafts (detected by diagonal wiggling) and the lobes of the rockers are okay, I would leave them in. What's to be gained from removing them?

Some closeups of the cam and the lobes.  Can someone comment on these pics in particular?

Well, there's certainly wear. My experience of camshafts isn't great but I've stripped and rebuilt engines with cam lobes in a similar condition and there hasn't been any issues. But, if I could've picked up a 'good as new' camshaft for $30 on ebay I probably would have replaced it. It depends how you're going to be using the finished bike. If you're going to be holding it on the redline and checking / changing the oil on Feb 29th every leap year; then I'd replace it. If you're going to ride the bike on sunny Sundays, gently cruising around; I'd let it be.

Are these bearings in ok condition?

A little wear obviously, that will add to general engine noise to a slight extent, but again; pretty normal and not life-threatening. Of course, if you have limitless funds replace the 'head and camshaft with new parts and sleep easily. But if you replace every part that has normal wear you'll find this a very expensive rebuild indeed. If you want 'perfect' I'd recommend you buy a new motorcycle. If you want to ride an old motorcycle with character then I haven't seen anything so far that needs to be replaced.
« Last Edit: November 06, 2009, 01:00:33 am by Ogri »

Offline scunny

  • Old Timer
  • ******
  • Posts: 4,615
  • don't call me expert
But if you replace every part that has normal wear you'll find this a very expensive rebuild indeed. If you want 'perfect' I'd recommend you buy a new motorcycle. If you want to ride an old motorcycle with character then I haven't seen anything so far that needs to be replaced.


as above
past-cb100,ts250,cb500,cb500,gs1000,gs650g.phillips traveller
present-CB 650 retro
            VTR1000F3
           XL250S riverbed rocket
           TS250[sold]
           TS185[sold]
           XL125S[sold]
           MT50 (white)
           MT50 (red)[sold]
           KN250/XS400 project
           XR/XL250 bitsa under construction
           SL100[sold]
           XL250R
           pedal(pub bike) leaks oil
my gallery http://gallery.sohc4.net/members/personal/scunny

Offline daewon774

  • Enthusiast
  • **
  • Posts: 154
Thanks for the replies.  I'll keep the camshaft as is then.  I'm not going for high performance on this build so if you say the camshaft is fine, it sounds good to me.  Just looking to rebuild for a reliable motor. 

As for the rockers, I just wanted to be thorough and pick everything apart.  But again, if you all think it is fine without any wiggle, then I'll keep these as is as well.  I'll save the learning experience of taking this assembly apart another time. 

Thanks again!  More progress reports as soon as I can get into the garage!
« Last Edit: November 06, 2009, 04:59:09 am by daewon774 »
76' CB550
11' Ducati 848 EVO

Offline manjisann

  • Hazardous Chemical Inhalation
  • Master
  • *****
  • Posts: 1,828
Nice pics. About the cam, I have no experience, but I know in talking with Soos that you can have th lobes welded and reground (??) Just tossing it out there, not saying it needs to be done, as I said, no experience.

Keep up the good work!

Brandon
Sure it's for sale! How much you ask?? Well, how much are you willing to pay??? Now triple it, that's the price!

1973 CB500 K2 - Sold the bike and bought a Mig, Miss the bike, Love the Mig :D
1980 CB650 Custom
1971 CB500 Frame 650 engine: Project

Trip and General Ramblings blog: manjisann.blogspot.com

Offline daewon774

  • Enthusiast
  • **
  • Posts: 154
Awesome, thanks for the info.  I was reading something about that in the Clymer manual.  Something about grinding and polishing?  I don't know if I go down that road if this cam shaft is fine as it is, especially for the needs I'm requesting from it.  hehe  ;D
76' CB550
11' Ducati 848 EVO

Offline manjisann

  • Hazardous Chemical Inhalation
  • Master
  • *****
  • Posts: 1,828
If everyone says it's fine I'd use it as is, just wanted to toss the info out there so you have all your options.

Brandon.
Sure it's for sale! How much you ask?? Well, how much are you willing to pay??? Now triple it, that's the price!

1973 CB500 K2 - Sold the bike and bought a Mig, Miss the bike, Love the Mig :D
1980 CB650 Custom
1971 CB500 Frame 650 engine: Project

Trip and General Ramblings blog: manjisann.blogspot.com