Author Topic: Iain's 1979 CB650 project log - 118 Pictures  (Read 31525 times)

0 Members and 1 Guest are viewing this topic.

Offline IainC

  • Enthusiast
  • **
  • Posts: 212
Re: IainC CB650 project log - 105 Pictures and Counting
« Reply #100 on: August 09, 2010, 07:34:29 PM »


A shot at night next to my dad's Road King. I've since flipped the headlight so it's no longer aiming at the sky.

I'll be getting some more work shots tomorrow apparently.

« Last Edit: August 09, 2010, 07:36:15 PM by IainC »

Offline IainC

  • Enthusiast
  • **
  • Posts: 212
Today we tore the clutch apart.
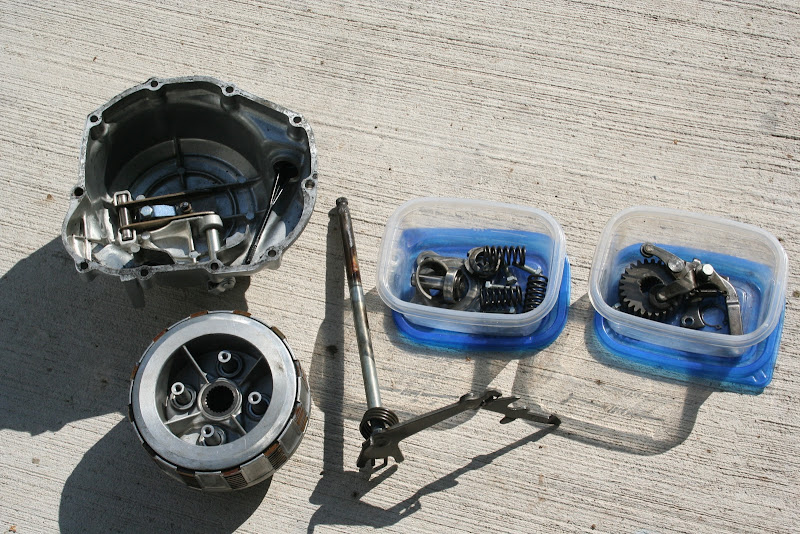


I packed up all the extra clutch parts I might need. My parts bike was a great buy.
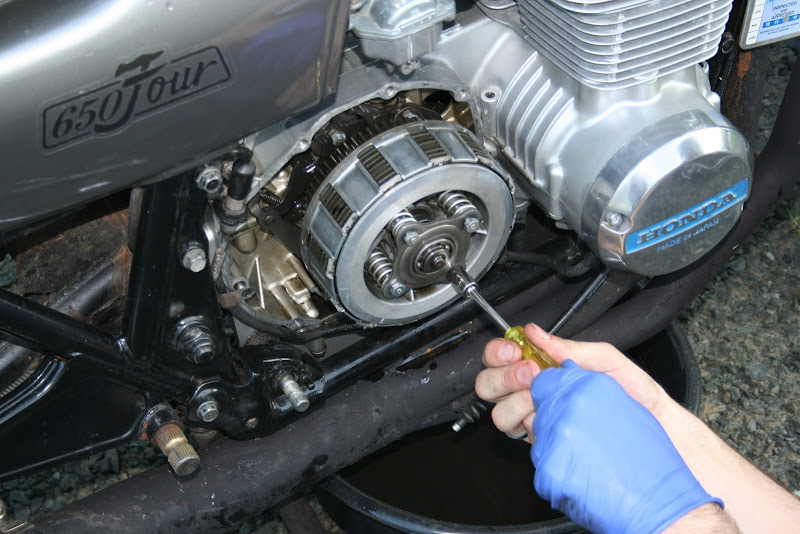


After getting the oil drained the first step was to remove the clutch cover. Once off we have 4 nuts to back out. I went around doing this in 4-5 passes on each screw letting the tension on the springs off evenly.
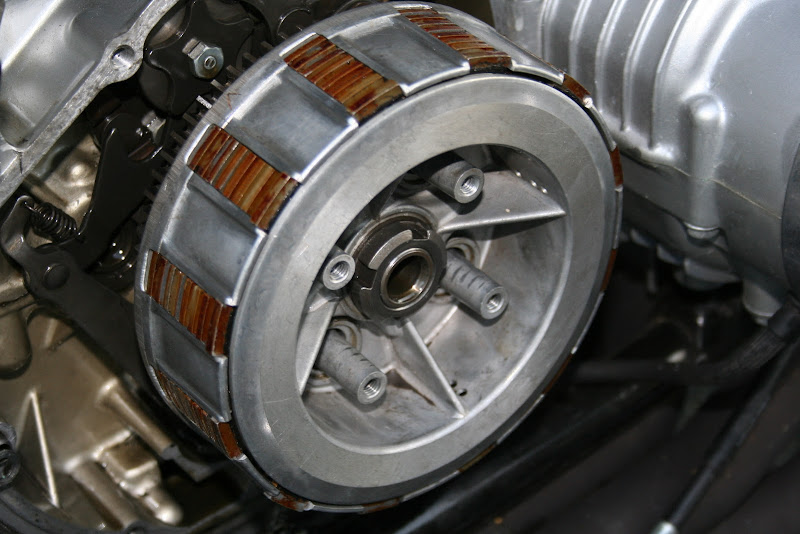


Once off our first problem was evident. The lock nut holding the clutch basket in had worked its way lose and the clutch basket was moving back and forth freely.
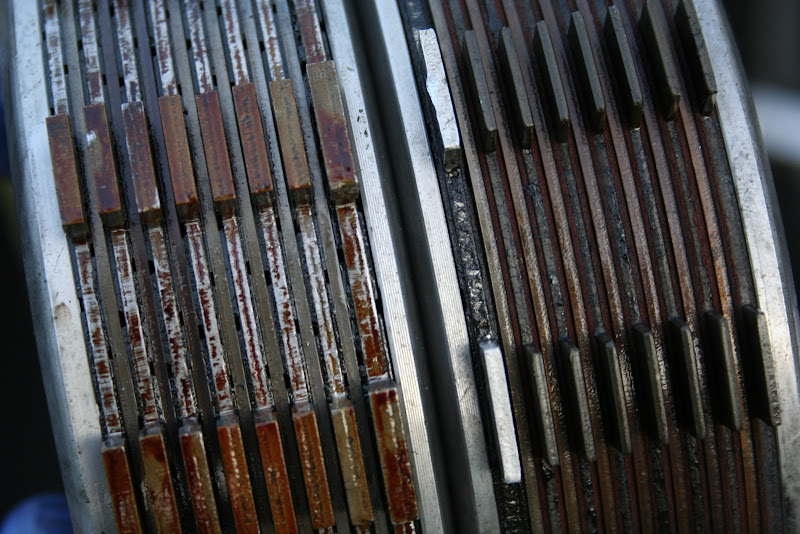


It's not the easiest to see, but our second major problem was the clutch plates were really worn down. See how the clutch on the left has little groves running along the plates, notice the one of the right dosn't.
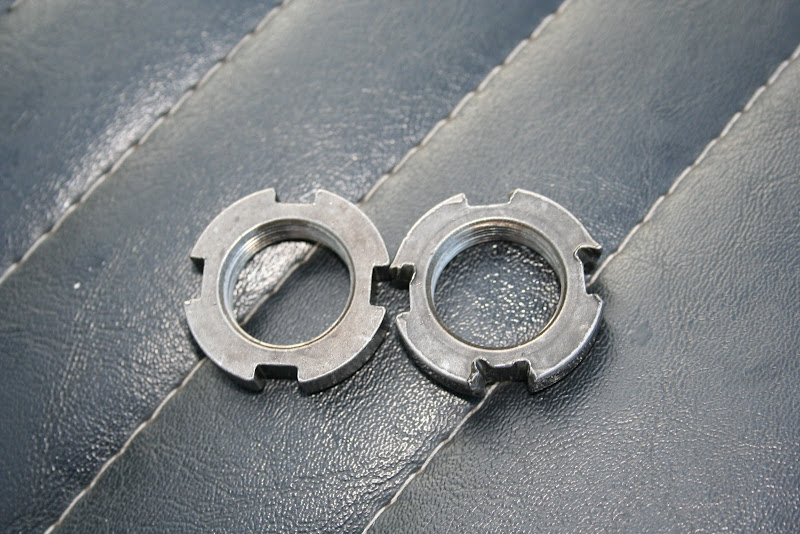


I have an extra lock nut in better shape so we reassembled using this one and the extra clutch basket. Everything else seemed to check out fine.


So once the bike was back together and full of oil again it was time to see if the clutch was working.

Low and behold its still stuck!!  >:( What's going on here? It's easy to find neutral and push the bike around. Pulling in the clutch lever actuates the arm fine, but the clutch refuses to disengage. We took it to the top of a small hill and by getting a push start can power shift into first and then ride around, power shifting through the first couple gears, but pulling the clutch lever isn't doing a thing for us.

Could we have tightened the lock nut down too tight? Would this prevent the clutch from operating properly? Is it possible we are just missing something completely obvious? Maybe the plates are just stuck together and disassembling them and getting a good coat of oil will free everything up.
« Last Edit: August 10, 2010, 06:55:45 PM by IainC »

Offline IainC

  • Enthusiast
  • **
  • Posts: 212


Like my new plug wires?  8) I'll get these installed once the clutch problem is worked out. One step at a time.


This is the new light bulb I installed. Well, not the one in the package, thats the broken old one, but you get the idea. Brighter but I'd like to have even more light output.
« Last Edit: August 11, 2010, 03:36:14 AM by IainC »

Offline IainC

  • Enthusiast
  • **
  • Posts: 212
Re: IainC CB650 project log - 114 Pictures - Clutch mostly fixed
« Reply #103 on: August 12, 2010, 07:43:51 AM »
Clutch seems better now. We made a stupid mistake reassembling the clutch.


Part #2 was installed behind the basket as opposed to through it. We realised our problem pretty quick, fixed it and also made sure the plates were well coated in oil.

It seems to be functioning fine now, however I'm at the end of the adjustment on both sides of the cable so I have a feeling I stretched it while it was broken and I was trying to get it to work. Its strange because now that I think about it and look at the cable, I'm almost positive this was a new replacement part last year. I must have just been pulling on the lever too hard. The lever is not fully disengaging the clutch, and the bike feels like it is pulling slightly when stopped and in first. I've been shifting to neutral at stops just to avoid burning out the clutch while waiting for lights to change and such. I'll get this replaced ASAP and avoid driving as much as possible.

We tried to compensate for the cable by screwing the adjusting screw in a little more than the recommended 3/4 of a turn out, but now I'm worried that I might be causing the clutch to not full engage while in gear which could also be devestating to my only set of good clutch plates. I can't really test this theory and I don't smell burning clutch, I'm likely just worrying too much but I'd rather be safe than sorry.

Offline IainC

  • Enthusiast
  • **
  • Posts: 212
Re: IainC CB650 project log - 117 Pictures - Another clutch fix delay
« Reply #104 on: August 16, 2010, 06:45:35 PM »


When I installed the new clutch we made sure to get the plates well coated in oil. :D :D


UGHHHH!! When I finally get it home and back together, I go to replace my clutch cable and look what happens!! They just broke like that. I didn't do anything but touch them and they fell off in my hand like that. How frustrating, now I have to clean all kinds of ugly paint off my extra cover and go through the polishing process again!!  >:( >:( >:( (Note how far the cable was adjusted in, I'm in dire need of a replacement at this point.)


Finally, someone please help me identify these ignition coils. They were on my parts bike and I would like to use them as they will make installing new plug wires a breeze and replace my cracked and hot glued one on the other bike. "TEC EW82-TRI Made In Japan"
« Last Edit: August 16, 2010, 06:47:21 PM by IainC »

Offline davesee

  • Enthusiast
  • **
  • Posts: 226
Re: IainC CB650 project log - 117 Pictures - Another clutch fix delay
« Reply #105 on: August 17, 2010, 05:21:29 AM »
i really like the look of your bike. don't know if you saw, but there is a running '79 cb650 on kijiji now for 900$.

i got your message about the carb tune...i'll be in touch, but first, another carb cleaning!!!
1980 honda cb650 with many weekends worth of modifications.

Offline IainC

  • Enthusiast
  • **
  • Posts: 212
Re: IainC CB650 project log - 117 Pictures - Another clutch fix delay
« Reply #106 on: August 20, 2010, 03:37:42 PM »
While replacing the clutch I decided I should swap this with my nicer one. Seems it took some hits from the lock nut.  :-[


Offline IainC

  • Enthusiast
  • **
  • Posts: 212
Re: IainC CB650 project log - 117 Pictures - Time to rejet
« Reply #107 on: September 10, 2010, 03:18:43 PM »
I've started with the rejetting process by installing 102 jets as suggested. Made sure all the adjustments were made and bike was ready to have the carbs synced before I started it up.

As a recap, 1979 CB650, stock air box with K&N filter, stock carbs, 4-1 mac headers with a laser can. I had the pilot screw set to stock 2 1/8th turns out from lightly seated and the needles in stock position.

So upon starting it was clear syncing was needed but as the adjustments got closer and closer the idle just sky rocketed. It's now sitting with the carbs all synced but idling around 4000rpm. I tried backing the pilot screws out more hoping that would help but hasn't seemed to do much, maybe I'm adjusting them wrong. The idle adjusment itself is turned back all the way so that it's not even doing a thing.

Suggestions? Time to try a smaller jet size? Or any tricks for trying to reign her in?

Offline Pinhead

  • Master
  • *****
  • Posts: 1,818
  • 1979 CB652-ST
Re: IainC CB650 project log - 117 Pictures - Time to rejet
« Reply #108 on: September 10, 2010, 04:37:50 PM »
Replied to your PM. Sounds like you have a vacuun leak. Spray around the catb boots with ether to see if the engine speds up any. If so, that's the problem. ;)

EDIT: After a little thinking, I remember having the same problem with my bike the first few times I worked on the carbs. I ended up having to take them apart and clean the crap out of them and after the 3rd try or so I got it to work (not really sure what the cause was, though).

On my CM400 I had the same symptoms and it ended up being a bad throttle cable. Can you slow the idle by forcing the slides into the idle position? Try idling without the throttle cables attached, perhaps?

Being rich in the main circuit shouldn't effect the idle speed to that degree (and not in the positive).
« Last Edit: September 10, 2010, 05:39:04 PM by Pinhead »
Doug

Click --> Cheap Regulator/Rectifier for any of Honda's 3-phase charging systems (all SOHC4's).

GM HEI Ignition Conversion

Quote from: TwoTired
By the way, I'm going for the tinfoil pants...so they can't read my private thoughts.
:D

Offline IainC

  • Enthusiast
  • **
  • Posts: 212
Re: IainC CB650 project log - 117 Pictures - Time to rejet
« Reply #109 on: September 10, 2010, 08:44:49 PM »
A vacuum leak is a possibility. Getting those carbs on properly is a real pain and I wouldn't be surprised if one of them isn't seated right. I'll check it out tomorrow afternoon see if that solves my problem.

I considered the throttle cable as well, and I'll check it again, but it seemed to be returning all the way, and twisting the throttle backwards didn't seem to slow it at all. Looking over a different shop manual is making me think I have it adjusted wrong though.

We'll see tomorrow when it's not to late to be starting a poorly running bike, haha.

Offline IainC

  • Enthusiast
  • **
  • Posts: 212
Re: IainC CB650 project log - 117 Pictures - Time to rejet
« Reply #110 on: September 11, 2010, 11:12:32 AM »
Got it sorted out. Turned out to be the throttle cable was adjusted wrong. Now it's idling nicely, starts easier, and feels better on the road. Not bogging down as bad as before.

I'm still getting backfiring when I'm pushing it into the higher rpm, say about 6500+. Maybe it's running to rich, or it could be the coils. One of them looks like it needs to be replaced as it was repaired at one time or another with hot glue.

Offline IainC

  • Enthusiast
  • **
  • Posts: 212
Re: IainC CB650 project log - 117 Pictures - Serious crack in head
« Reply #111 on: October 07, 2010, 08:04:34 AM »
Time for an unfortunate update.  :(

I've been enjoying the end of the summer and beginning of the fall on the bike, trying not to worry too much about the little adjustments I still need to make and just ride it through the rest of the season. But this may have been a big mistake.

I've noticed the bike is getting pretty warm. It's clearly running lean and I've ordered yet another set of jets to try and get my fuel mixture perfect. After swapping out the last ones I know I've been on to something, and moving in the right direction.

The other problem I've had is the cam chain seemed to be rattling a little when idling. Honestly it didn't sound too bad but I think it must have been a lot worse than I gave it credit for.

So... I've managed to put a two pretty bad cracks in my cylinder head. They are located in the middle front of the engine, running vertically up the two front edges of the cam journal. At first they were not bad at all, looked just like casting marks in the block so I assumed the leak was coming from one of the head bolts not being tightened down well and shoved a little paper towel in to help curb the flow of oil.

Rode it like this for a few hundred km but the problem only got worse to the point where it was pouring oil out and I was forced to take it home and reexamine the leak.

So far I've torn the engine down to the cam shaft. The cam chain is clearly far too loose, although It doesn't seem to show any damage. Maybe I don't know what to look for, or it can take a real beating before showing any. Or maybe my cam chain hasn't worn through the sides of the journal and this is just a problem from overheating and oil pressure causing the crack.

I guess I don't find out until I tear off the head and give it a real inspection. Pictures to follow tonight but this is a really hard spot to photograph so I'll see if I can get some better ones than what I have.  :(

Offline scunny

  • Old Timer
  • ******
  • Posts: 4,618
  • don't call me expert
Re: Serious crack in head - IainC CB650 project log - 117 Pictures
« Reply #112 on: October 07, 2010, 12:51:17 PM »
never heard of a cracked head before. look forward to your pics.
as an aside on the cam chain. when you pull the head, remove the cam chain tensioner and see if it has rubbing marks on the bottom tip, if it has it was installed wrong. been there done that.  ;D
past-cb100,ts250,cb500,cb500,gs1000,gs650g.phillips traveller
present-CB 650 retro
            VTR1000F3
           XL250S riverbed rocket
           TS250[sold]
           TS185[sold]
           XL125S[sold]
           MT50 (white)
           MT50 (red)[sold]
           KN250/XS400 project
           XR/XL250 bitsa under construction
           SL100[sold]
           XL250R
           pedal(pub bike) leaks oil
my gallery http://gallery.sohc4.net/members/personal/scunny

Offline IainC

  • Enthusiast
  • **
  • Posts: 212
Re: Serious crack in head - IainC CB650 project log - 117 Pictures
« Reply #113 on: October 07, 2010, 03:02:47 PM »
Yeah, I couldn't believe I managed to crack my head. That's why I assumed at first that it was something else leaking. Comparing it to the other I have it has two clear cracks.

Guess I might as well buy new rings and get the other head honed properly. Maybe a new cam chain too. We'll see as I tear things down but I've got all winter to decide how to approach this now.  :'(

Offline rahn75

  • Full Member
  • *
  • Posts: 2
Re: Serious crack in head - IainC CB650 project log - 117 Pictures
« Reply #114 on: October 21, 2010, 09:51:21 PM »
About your clutch issue.

Have you been running synthetic motor oil this whole time?

If so, from what I understand, non-synthetic and non-environmentally stamped oil is what is required to
keep these older clutches happy.

Something to consider.

Been following your posts for awhile. Love the project! I have 2 1980 CB650's that I'm turning into a cafe and your ideas have proved invaluable in my pursuit!

Keep it up!


Offline MRieck

  • Really Old Timer ...
  • *******
  • Posts: 10,561
  • Big ideas....
Re: Serious crack in head - IainC CB650 project log - 117 Pictures
« Reply #115 on: October 22, 2010, 04:56:25 AM »
never heard of a cracked head before. look forward to your pics.
as an aside on the cam chain. when you pull the head, remove the cam chain tensioner and see if it has rubbing marks on the bottom tip, if it has it was installed wrong. been there done that.  ;D
I have seen it.
Owner of the "Million Dollar CB"

Offline 754

  • Really Old Timer ...
  • *******
  • Posts: 29,058
Re: Serious crack in head - IainC CB650 project log - 117 Pictures
« Reply #116 on: October 22, 2010, 07:24:28 PM »
 Hey, I just happen to have an N.O.S. 650 head... and am in Canada.. I think its a CV carb head, but would have to check..


 Anyway 160 plus shipping takes it.. cant be a lot of new ones around..
Maker of the WELDLESS 750 Frame Kit
dodogas99@gmail.com
Kelowna B.C.       Canada

My next bike will be a ..ANFOB.....

It's All part of the ADVENTURE...

73 836cc.. Green, had it for 3 decades!!
Lost quite a few CB 750's along the way

Offline IainC

  • Enthusiast
  • **
  • Posts: 212
Crack in cylinder block - IainC CB650 project log - 118 Pictures
« Reply #117 on: October 28, 2010, 12:26:23 AM »


I'm always so slow at getting pictures uploaded.  :-[

This was really tough to photograph, but this one seems to be the best at showing the crack. I described it as the head, but should have said its in the cylinder block. This is running up the cam journal, in the front of the engine, on the right hand side. There is one just like it on the other side. My best guess is the chain wore through it as I rode all summer.

Plan is now to start ordering parts to make sure I have everything I need when I go to put it back together again. I've decided I'll get the other block honed and order a new set of rings to install on my pistons. Going to get some new gaskets as well. I'm not decided on the cam chain, I hear these things are tough, and as far as I can tell there is no visible damage but I want to make sure before I put it back together.

@754 Thanks for the offer but I have a whole extra engine I can tear parts off of.


Offline V4 Lover

  • Full Member
  • *
  • Posts: 13
Re: Crack in cylinder block - IainC CB650 project log - 118 Pictures
« Reply #118 on: March 25, 2012, 08:19:38 PM »
Well, it's been a LONG, SLOW year and a half since this thing died... BUT, it's on it's way back!

Just this evening we started the final re-assembly! Got the carbs in, valves set, and cables hooked up. Tomorrow comes the  :D

I'm not sure if there are many pictures coming from the re-re-build, but lets just say it was thorough. Split the cases, intense. Here's one from tonight to get it flowin' again!


The actual problem was the starter clutch. The cam chain ate through the cylinder block, and we were lucky enough to be able to reuse my prettied up head!

Iain will be along to post about all that shortly.
« Last Edit: March 25, 2012, 08:50:29 PM by V4 Lover »
2002 Honda VFR800 ABS
1987 Honda SuperMagna V45

I'm only on this board to help out that sucker Iain. :D

Offline IainC

  • Enthusiast
  • **
  • Posts: 212
Rebuilt engine ready to be started - IainC CB650 project log - 118 Pictures
« Reply #119 on: March 26, 2012, 07:27:01 AM »
Build log resurrection!

So yes, long year indeed. Since exploding the engine I figured it was necessary to just do it all over again. So a full bottom up rebuild was done again. I ended up having my replacement cylinder head professional cleaned and honed before painting it.

Since the cam chain actually chain sawed through the original cylinder head, I decided replacing all the transmission and lower end with the extra I had, was actually easier than cleaning all the metal shavings out of every nook and cranny. I did however use the original engine cases, so I made sure to clean all the oil passages really well. I also replaced the oil pump with my extra which was in better shape.

Since then it's been a slow reassembly to where we are now.

Set the valves last night, wrestled the carbs in, set the timing, etc. Tonight we try to bring the thing to life. *fingers crossed*

I'll see if I can dig up any photos I may have taken during the second rebuild and update with those as I find them.

Offline V4 Lover

  • Full Member
  • *
  • Posts: 13
This 50 second video pretty much sums up tonight...

http://youtu.be/rXVQKD8E-Ug

But apparently it was fixed just about an hour later. Now he just needs some new oil.  ;)
2002 Honda VFR800 ABS
1987 Honda SuperMagna V45

I'm only on this board to help out that sucker Iain. :D

Offline Greggo

  • Somebody's
  • Old Timer
  • ******
  • Posts: 4,164
  • Helmets Save Lives. Period.
You guys are pretty casual about all that!  Gave me a good laugh, so I'm glad the bike's okay too.

Offline IainC

  • Enthusiast
  • **
  • Posts: 212
Well, good news is it started up without a struggle.

As you can see from the video however, she decided to dump her oil all over the floor. Well, I found the problem.


Oil plug wasn't installed correctly or held in place by an attached alternator cover.  ::)

You may have heard I mentioned shiny oil... I saw some remnants of the metal shavings that were in it before the rebuild, floating in the oil on the floor. I hope this was only what was left in this drain hole, but as a precaution I'm going to be running it a bit, letting the oil settle, and draining it slowly to see if I get any more bits out.

Edit: Embedded video (Loud and I yell some expletives in celebration so watch your volume)

Back to life but bleeding to death...
« Last Edit: March 29, 2012, 07:49:08 PM by IainC »

Offline IainC

  • Enthusiast
  • **
  • Posts: 212
IainC CB650 project log - 118 Pictures
« Reply #123 on: June 17, 2012, 09:20:52 PM »
Running great now. Slowly putting the km on it as I get the opportunity to go out.

I did have a bad oil seal on the drive shaft. Replaced that with a similar seal and it seems to be working fine. The dimensions for the oil seal I purchased were 36mm inner diameter, 56mm outer and 8mm deep. This ID matches the Honda part, however it's OD is slightly smaller so it popped in quite easily. Also it's quite a bit thinner than the original and doesn't have the metal ring to fit the groove in the crank case. I didn't want another leak so I glued that baby in with a generous amount of liquid gasket and silicon. Wonder how long it will hold before I'm cursing myself for not getting the one with the 58mm outer diameter.  ;)

I've been diligently seeking out a rattle or buzz that I can't seem to get rid of. Seems to come and go sporadically but mainly when accelerating. I think it's just my exhaust starting to get comfy as I've been able to tighten down the nuts holding the header in place. Whatever it is I'll get it eventually, it doesn't sound destructive but I gotta know what it is.

Had the nut pop off the piece holding the pulse generator in place while out for a ride last week. Fortunately it happened while passing my favorite bike shop who were kind enough to let me charge my battery (I toasted it trying to get the thing to start again) while I'll poked around with my tool kit and quickly found the problem.

The Honda toolkit provided with this bike deserves applause. It has served me very well even when I've got a garage full of tools.

I took some time to sand the ugly laser logo off the exhaust.

I'll have to take the camera with me some morning this week before work and stop and grab some photos.