Author Topic: Sandcast #97 restoration  (Read 197288 times)

0 Members and 6 Guests are viewing this topic.

Offline Prospect

  • Expert
  • ****
  • Posts: 1,169
Re: Sandcast #97 restoration
« Reply #175 on: January 26, 2011, 11:59:46 am »
Meh, that can be brazed up pretty easily.

+1
Current Bikes

1969 CB750  Sandcast #256
1971 CB750K1
1972 CB750K1
1975 CB400F
1975 GL1000 Goldwing
1954 Harley Davidson Panhead
1957 Harley Davidson Panhead

Toronto Canada

Offline markb

  • When I finish my current project I might be a
  • Master
  • *****
  • Posts: 1,615
Re: Sandcast #97 restoration
« Reply #176 on: January 26, 2011, 05:01:08 pm »
I agree that it could be brazed but closer inspection revealed quite a few other soft areas.  The inside of the tank is a rusty mess.  I am going to save this tank but I think I'm going to use one off a later sandcast for this project, just to be safe.

On the crank I did find there is a tiny hole that connects the hole for the starter gear to the hole in the end of the crank.  A #60 drill just barely fit through.  Now I'm satisfied that all passage are clear.  I'm going to drop the crank off for ultrasonic cleaning tomorrow.
1969 CB750 sandcast #97 restored - Sold Restoration thread link
1969 CB750 sandcaxt #576 - Sold
1969 CB750 sandcast #1553 - Sold
1969 CB750 sandcast #1990 - Sold
1969 CB750 sandcast #5383 restored - Sold Restoration thread link
1970 CB750 K0 restored - Sold
2010 H-D Tri Glide Ultra Classic (Huh?)

Offline markb

  • When I finish my current project I might be a
  • Master
  • *****
  • Posts: 1,615
Re: Sandcast #97 restoration
« Reply #177 on: January 29, 2011, 04:35:28 pm »
My frames are back from the welder.  He also straightened the gusset…


…and the horn bracket.


The rear fender mount turned out good too.


But the big one was the side stand bracket.  It looks very close to factory appearance now.  But the important thing is it in the right place?  I put my other motor in the frame and put on the #2 exhaust pipe to check it out.  Bull’s-eye!  :o  It was about three hours of work that I could have been working on something else but it was worth it to know.


I don’t think it could be any closer.  I'm sure glad I caught this before everything was put together.


Here’s another view.  Now I can send it out for paint.  ;D ;D ;D

1969 CB750 sandcast #97 restored - Sold Restoration thread link
1969 CB750 sandcaxt #576 - Sold
1969 CB750 sandcast #1553 - Sold
1969 CB750 sandcast #1990 - Sold
1969 CB750 sandcast #5383 restored - Sold Restoration thread link
1970 CB750 K0 restored - Sold
2010 H-D Tri Glide Ultra Classic (Huh?)

Offline Old Scrambler

  • My CB750K3 has been in 39 States & 5 Provinces
  • Old Timer
  • ******
  • Posts: 3,803
Re: Sandcast #97 restoration
« Reply #178 on: January 29, 2011, 04:59:26 pm »
Good one Mark............I have a spare set of broken cases with empty barrells and head to use for fitting.  Still weighs in at about 90 lbs but it sure is easier to handle.  Maybe its the camera and lights, but the weld looks a little fat.
Dennis in Wisconsin
'64 Triumph Cub & '74 Honda CB750 Bonneville Salt Flats AMA Record Holder (6)
CB750 Classic Bonneville Racer thread - http://forums.sohc4.net/index.php/topic,135473.0.html
'63 CL72 Project(s)
'66 CL77 Red
'67 Triumph T100C
'73 750K3 Owned since New
'77 750F2 Cafe Project
2020 ROYAL ENFIELD Himalayan

Offline markb

  • When I finish my current project I might be a
  • Master
  • *****
  • Posts: 1,615
Re: Sandcast #97 restoration
« Reply #179 on: January 29, 2011, 05:29:38 pm »
You're right, it is a little fatter but not much more than my later frame.  Once it's painted it will be hard to tell the difference without someting to compare it to.  I guess it's hard for modern day welders to weld like they did forty years ago.
1969 CB750 sandcast #97 restored - Sold Restoration thread link
1969 CB750 sandcaxt #576 - Sold
1969 CB750 sandcast #1553 - Sold
1969 CB750 sandcast #1990 - Sold
1969 CB750 sandcast #5383 restored - Sold Restoration thread link
1970 CB750 K0 restored - Sold
2010 H-D Tri Glide Ultra Classic (Huh?)

Offline markb

  • When I finish my current project I might be a
  • Master
  • *****
  • Posts: 1,615
Re: Sandcast #97 restoration
« Reply #180 on: February 04, 2011, 06:23:19 am »
I got my cases, crank and oil tank back from the hot tank and ultrasonic cleaning.  They didn’t come out as fresh looking as I hoped but they are definitely cleaner and all the holes look great and the inside of the tank looks good.  I’m satisfied that all the oil galleries are clean.


You can see that the inside of the cases still has that brownish, stained look.  But it’s nice to be able to handle them without having to wipe my hands off afterwards.


I do have another issue though.  Upon closer inspection of the oil filter housing surface, there is some pitting at the bottom.


Here’s a closer shot.  Hard to see it well.  I’m obviously concerned about the o-ring sealing properly.  My first thought was to apply a thin layer of JB Weld with a putty knife to fill in the pits and then flat file it to make sure it’s smooth.  Anyone else have this issue?  Any thoughts?

1969 CB750 sandcast #97 restored - Sold Restoration thread link
1969 CB750 sandcaxt #576 - Sold
1969 CB750 sandcast #1553 - Sold
1969 CB750 sandcast #1990 - Sold
1969 CB750 sandcast #5383 restored - Sold Restoration thread link
1970 CB750 K0 restored - Sold
2010 H-D Tri Glide Ultra Classic (Huh?)

Offline CycleRanger

  • No comment about being an
  • Really Old Timer ...
  • *******
  • Posts: 5,366
  • Central Texas Shop Manual Advocate
Re: Sandcast #97 restoration
« Reply #181 on: February 04, 2011, 06:33:12 am »
Here’s a closer shot.  Hard to see it well.  I’m obviously concerned about the o-ring sealing properly.  My first thought was to apply a thin layer of JB Weld with a putty knife to fill in the pits and then flat file it to make sure it’s smooth.  Anyone else have this issue?  Any thoughts?

That sounds like a reasonable course of action.  At least it's accessible if you do have any issue with leaks later on.
Do you have a copy of the Honda Shop Manual or Parts List for your bike? Get one here:
https://www.honda4fun.com/materiale/documentazione-tecnica
CB750K5        '79 XL250s     CL350K3
CB750K3        '76 XS650      '76 CJ360T

Offline Roach Carver

  • Really Old Timer ...
  • *******
  • Posts: 6,725
Re: Sandcast #97 restoration
« Reply #182 on: February 04, 2011, 07:24:50 am »
I would think jb would fix it. I think the "proper" fix would be to have it built up in aluminum and then filed back down.

Offline ohiocaferacer

  • Hot Shot
  • ***
  • Posts: 616
  • www.OHIOCAFERACERS.com
    • OHIO CAFE RACERS
Re: Sandcast #97 restoration
« Reply #183 on: February 04, 2011, 11:40:10 am »
I would think jb would fix it. I think the "proper" fix would be to have it built up in aluminum and then filed back down.

Agreed.....proper way would be to have a good welder(someone used to welding cast alum) clean and weld it back up.....then have the surface remachined true and flat. Cast aluminum can be a pain to weld correctly if the proper steps arent taken. With that bike being a low number surviver.....i'd make sure to do it right.....its worth it.


Offline Legin

  • Full Member
  • *
  • Posts: 20
Re: Sandcast #97 restoration
« Reply #184 on: February 04, 2011, 12:00:00 pm »
I would just have it refaced. Check dimensions will allow.

Offline neverendingproject

  • Full Member
  • *
  • Posts: 76
  • Making the Northwest louder one road at a time
Re: Sandcast #97 restoration
« Reply #185 on: February 04, 2011, 08:28:58 pm »
I would either have a refaced or JB weld it. I think welding it would be too easy to screw up as in going into the surrounding area. Whatever you do don't take it to the same guy who welded the side stand mount  ;)
'75 CB550 K1 Cafe Project

'72 CB500 Japanese market

Offline markb

  • When I finish my current project I might be a
  • Master
  • *****
  • Posts: 1,615
Re: Sandcast #97 restoration
« Reply #186 on: February 05, 2011, 07:38:52 am »
I would either have a refaced or JB weld it. I think welding it would be too easy to screw up as in going into the surrounding area. Whatever you do don't take it to the same guy who welded the side stand mount  ;)
I assume you mean the first guy who welded it.  ;D
I've talked to a couple of machinists.  Fixturing the case on the mill is the challenge.  I've got a few more resources to check out before I make a decision. 
1969 CB750 sandcast #97 restored - Sold Restoration thread link
1969 CB750 sandcaxt #576 - Sold
1969 CB750 sandcast #1553 - Sold
1969 CB750 sandcast #1990 - Sold
1969 CB750 sandcast #5383 restored - Sold Restoration thread link
1970 CB750 K0 restored - Sold
2010 H-D Tri Glide Ultra Classic (Huh?)

Offline Old Scrambler

  • My CB750K3 has been in 39 States & 5 Provinces
  • Old Timer
  • ******
  • Posts: 3,803
Re: Sandcast #97 restoration
« Reply #187 on: February 05, 2011, 11:36:02 am »
Mark.......You may want to try contacting Mark at M3 Racing or the HONDA Superbike racing team (is it still HRC?) A few years ago a Suzuki rider hit a large rock while looking for a parking space at Road America. 3-quarts of that gooey stuff you see on the environmental show poured onto the earth.  I happened by after he had pulled the motor from the bike thinking he would do a JB-Weld patch. The hole was about 2-inches across.  I went to the suzuki race team in the pits to inquire about repairing the case. They directed me to HONDA because they have a specaial bonding material for the alloy cases that they share with other race teams.  Honda gave me a smalll amount about the size of a golf-ball and instructed to PRESS the bonding material into the hole from both sides...something like a large rivet......and let stand for 12 hours or more before grinding the interior for clearance.

It worked!   
Dennis in Wisconsin
'64 Triumph Cub & '74 Honda CB750 Bonneville Salt Flats AMA Record Holder (6)
CB750 Classic Bonneville Racer thread - http://forums.sohc4.net/index.php/topic,135473.0.html
'63 CL72 Project(s)
'66 CL77 Red
'67 Triumph T100C
'73 750K3 Owned since New
'77 750F2 Cafe Project
2020 ROYAL ENFIELD Himalayan

Offline 754

  • Really Old Timer ...
  • *******
  • Posts: 29,058
Re: Sandcast #97 restoration
« Reply #188 on: February 05, 2011, 01:43:42 pm »
  I have reservations about welding that;
 Partly because there is a risk of other damage.. like arcing marks, clamping marks..
 You got to build it up and over or you loose the crisp edge there.. Then you have to reTEXTURE it, and then still MACHINE it.

 If you machine say .030 off it ,take it off the bolt area too and be done..
 Key to fixturing this is to tack a bar to something  boltable, then put the main bores over the bar, that will line up the first plane..
 Looks a bit like salt damage..
« Last Edit: February 06, 2011, 09:26:26 am by 754 »
Maker of the WELDLESS 750 Frame Kit
dodogas99@gmail.com
Kelowna B.C.       Canada

My next bike will be a ..ANFOB.....

It's All part of the ADVENTURE...

73 836cc.. Green, had it for 3 decades!!
Lost quite a few CB 750's along the way

Offline markb

  • When I finish my current project I might be a
  • Master
  • *****
  • Posts: 1,615
Re: Sandcast #97 restoration
« Reply #189 on: February 06, 2011, 08:55:35 am »
Exactly my reservations about welding.  I've got a couple of machine shops to check with this week before I make a decision.  I agree it looks like salt damage but the bike was from Texas and Oklahoma.  After sitting a while doesn't the oil get acidic?  It had been sitting for over 20 years and you could see that oil had been leaking there.
1969 CB750 sandcast #97 restored - Sold Restoration thread link
1969 CB750 sandcaxt #576 - Sold
1969 CB750 sandcast #1553 - Sold
1969 CB750 sandcast #1990 - Sold
1969 CB750 sandcast #5383 restored - Sold Restoration thread link
1970 CB750 K0 restored - Sold
2010 H-D Tri Glide Ultra Classic (Huh?)

Offline Magpie

  • Old Timer
  • ******
  • Posts: 3,286
Re: Sandcast #97 restoration
« Reply #190 on: February 06, 2011, 09:29:49 am »
Mark, you posted:
"Here’s a closer shot.  Hard to see it well.  I’m obviously concerned about the o-ring sealing properly.  My first thought was to apply a thin layer of JB Weld with a putty knife to fill in the pits and then flat file it to make sure it’s smooth.  Anyone else have this issue?  Any thoughts?"
I'm far from many people's abilities on this forum however it seems to me sometimes the simplest solutions stare at us without us seeing them. I would think cleaning up the surface, using some JB weld to fill the imperfections and carefully and patiently dressing it to a smooth and flat finish would do the job. It's a big fat O ring on the oil filter housing which should mate with the new smooth surface. It's simple, cheap, no heating, welding, and grinding on irreplaceable parts.
Just my 2 cents and something I would try first.
Cliff.

Offline 754

  • Really Old Timer ...
  • *******
  • Posts: 29,058
Re: Sandcast #97 restoration
« Reply #191 on: February 06, 2011, 09:36:20 am »
 Was the housing for filter eaten away too? Is it the original smooth one?

 I measured a K2 case yesterday, looks like the machined flat area sticks out past the o-ring about 3mm.
Maker of the WELDLESS 750 Frame Kit
dodogas99@gmail.com
Kelowna B.C.       Canada

My next bike will be a ..ANFOB.....

It's All part of the ADVENTURE...

73 836cc.. Green, had it for 3 decades!!
Lost quite a few CB 750's along the way

Offline Greggo

  • Somebody's
  • Old Timer
  • ******
  • Posts: 4,164
  • Helmets Save Lives. Period.
Re: Sandcast #97 restoration
« Reply #192 on: February 06, 2011, 12:07:19 pm »
Was the housing for filter eaten away too? Is it the original smooth one?

 I measured a K2 case yesterday, looks like the machined flat area sticks out past the o-ring about 3mm.

IIRC, a finned cover came on the bike, and he was looking for the unobtanium smooth cover.  Ever find one Mark?  I've NEVER seen one for sale.  I imagine they cost a small fortune in SOHC4 land.

Offline fastbroshi

  • Puppet
  • Old Timer
  • ******
  • Posts: 2,645
Re: Sandcast #97 restoration
« Reply #193 on: February 06, 2011, 12:40:00 pm »
As much as it would be IF you found one of those, it would almost be worth it to machine the original smooth.  I think I've seen that done before.
« Last Edit: February 07, 2011, 09:32:24 am by fastbroshi »
Just call me Timmaaaaay!!!

Offline markb

  • When I finish my current project I might be a
  • Master
  • *****
  • Posts: 1,615
Re: Sandcast #97 restoration
« Reply #194 on: February 07, 2011, 06:39:45 am »
Still looking for that smooth cover.  If I find one I know I don't want to be clamping it down on a surface that isn't flat. Still mulling over what to do.
1969 CB750 sandcast #97 restored - Sold Restoration thread link
1969 CB750 sandcaxt #576 - Sold
1969 CB750 sandcast #1553 - Sold
1969 CB750 sandcast #1990 - Sold
1969 CB750 sandcast #5383 restored - Sold Restoration thread link
1970 CB750 K0 restored - Sold
2010 H-D Tri Glide Ultra Classic (Huh?)

Offline markb

  • When I finish my current project I might be a
  • Master
  • *****
  • Posts: 1,615
Re: Sandcast #97 restoration
« Reply #195 on: February 07, 2011, 07:13:48 am »
While I’m thinking about how to fix the case, I’m getting everything black ready for the painter.  I know it will be months before I’ll be ready to use it, especially on the frame, but I want to prevent any additional rust.  While I’m at it I’m going to send both of my frames out.

I always remove any bushing or bearings before the paint.  Here’s a pic of a tool I made that I use to remove the rear bushings of the swing arm/rear fork.


You can do the same thing with the right sized sockets and some threaded rod and some nuts but if you’ve got the resources to make one it works great.  It also works as an installation tool.

1969 CB750 sandcast #97 restored - Sold Restoration thread link
1969 CB750 sandcaxt #576 - Sold
1969 CB750 sandcast #1553 - Sold
1969 CB750 sandcast #1990 - Sold
1969 CB750 sandcast #5383 restored - Sold Restoration thread link
1970 CB750 K0 restored - Sold
2010 H-D Tri Glide Ultra Classic (Huh?)

Offline 754

  • Really Old Timer ...
  • *******
  • Posts: 29,058
Re: Sandcast #97 restoration
« Reply #196 on: February 07, 2011, 08:07:41 am »
I have turned down a filter hiusung it look great, might have to whip up a few.
  Your pitted suface once cleaned will really hold JB or Devcon well... I would just do that, document with photos, then if bike changes hands ever, they know what has been done.
Maker of the WELDLESS 750 Frame Kit
dodogas99@gmail.com
Kelowna B.C.       Canada

My next bike will be a ..ANFOB.....

It's All part of the ADVENTURE...

73 836cc.. Green, had it for 3 decades!!
Lost quite a few CB 750's along the way

Offline goaarongo

  • Enthusiast
  • **
  • Posts: 146
  • zen and the art of angle grinding
Re: Sandcast #97 restoration
« Reply #197 on: February 07, 2011, 09:33:34 am »
I've repaired pitted caliper pistons with JB weld before and had great success.  As long as you are patient with the finishing, I think it would work fine. 

Can't wait to see what those cases look like once you have them refinished and reassembled. 

Offline markb

  • When I finish my current project I might be a
  • Master
  • *****
  • Posts: 1,615
Re: Sandcast #97 restoration
« Reply #198 on: February 18, 2011, 11:34:12 am »
It’s been a busy week for me (too busy with everything but motorcycle stuff) so time for an update.  I’ve decided I’m going to have the oil filter housing surface machined off until it just cleans up.  One of the guys in the shop is going to help me tomorrow.  We had to wait until the mill opened up.  I’ll report back when it’s done.

In the meantime I’ve been spending a few minutes here and there on other stuff.  I’ve been trying to get the flat head screws out that hold on the exhaust flanges.  It’s taken many soak/heat cycles and an impact driver to get out seven of them.  The last one finally stripped out the cross.  So I drilled the head off and tried to work it out with a center punch on the outside edge of the screw.  It moved out about 1 thread and then didn’t want to go anymore.


So, I’ve heard of this trick but never tried it, I decided to weld a nut on the end of the screw.


I waited until cooled from red to grey, and while it was still hot, grabbed it with a pair of pliers and it turned out so easy.  Sweet!  Sometimes I wonder why I don’t just do the last thing first.

1969 CB750 sandcast #97 restored - Sold Restoration thread link
1969 CB750 sandcaxt #576 - Sold
1969 CB750 sandcast #1553 - Sold
1969 CB750 sandcast #1990 - Sold
1969 CB750 sandcast #5383 restored - Sold Restoration thread link
1970 CB750 K0 restored - Sold
2010 H-D Tri Glide Ultra Classic (Huh?)

Offline markb

  • When I finish my current project I might be a
  • Master
  • *****
  • Posts: 1,615
Re: Sandcast #97 restoration
« Reply #199 on: February 19, 2011, 08:25:28 am »
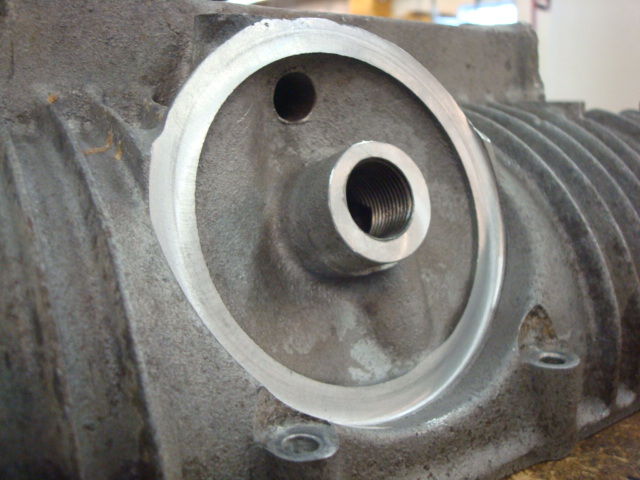
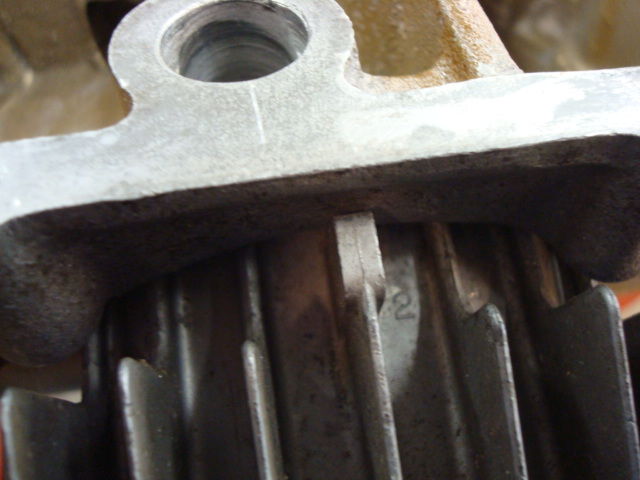
I finally tackled the repair of the mating surface for the oil filter housing.  I enlisted the help of one of the machinists in our shop.  The best part about it is I know he’s good and I can “stay in control” rather than just sending it out somewhere.  After much debate (mostly in my own head) I decided to machine the surface to just cleanup the pitting.  That way I eliminate any concerns about what might happen with welding.  I also figured that if it was welded it would be best to machine the whole surface anyway to make sure it’s flat so might as well skip the welding.  I examined everything carefully first.  The only issue I saw with this solution was that the locating tab on a finned housing might get a little too close to the case.  Since this engine at worst will at least have a replica smooth housing it’s not a concern.  I mention this as a heads-up in case someone else wants to try this at home.  Here’s a shot of what I’m talking about.


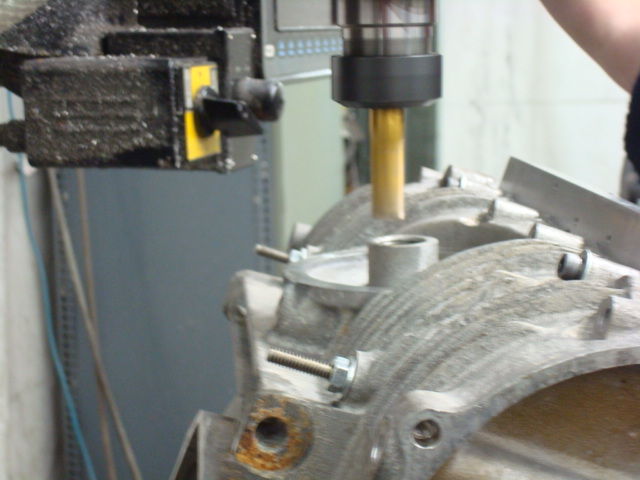
Before starting I stuffed a chunk of a shop rag in the center hole and put a rubber stopper in the other hole to prevent metal shavings from getting into the oil holes.


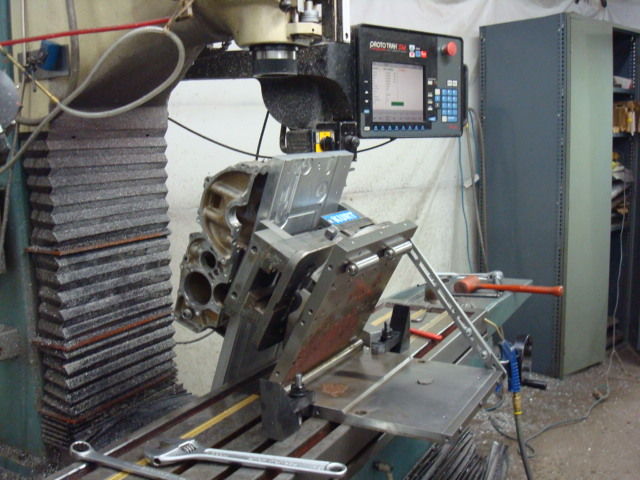
Here’s a shot of it on the mill.  The case is bolted to a piece of ground aluminum tooling plate which is held in a vice which is mounted to a sine plate.


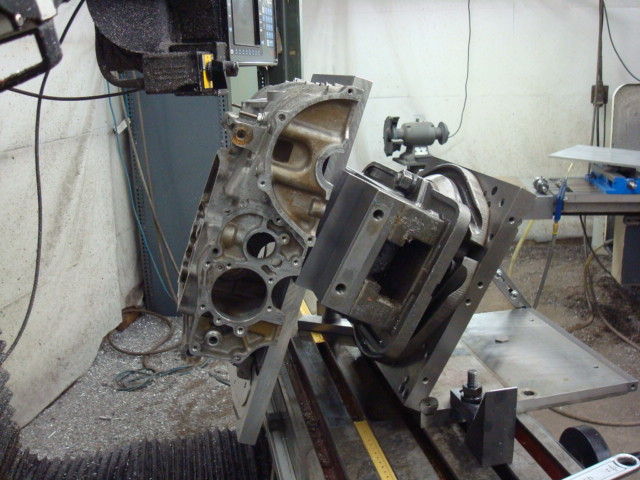
Here’s another view.  The mounting surface was indicated in to less than 0.001” (0.025mm).  We took off about .005” (.125mm) at a time to sneak up on it.  It took .030” (0.75mm) to get it although 0.025 might have been enough.  There’s a couple of small pits near the edge of the surface only.


We also machined the same amount of the center post just to make sure that all the internal relationships between the filter and spring and seals, etc., remained the same.  Start to finish was about 2 ½ hours.


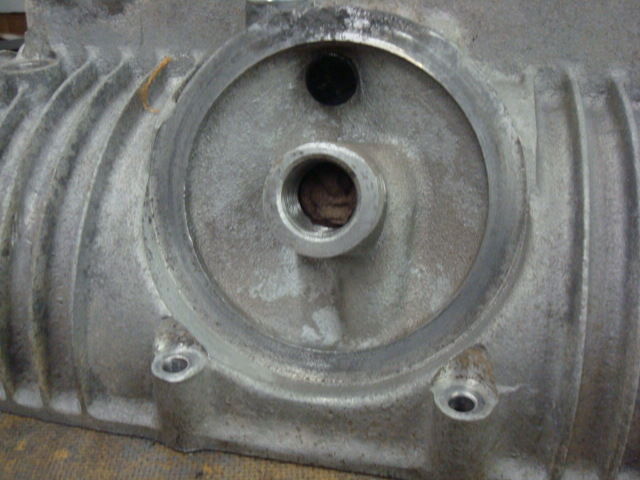
Here’s the finished product.  I put a housing on and snugged it up and turned it to make a mark from the o-ring.  It’s hard to see but the o-ring contacts flat surface all around.  It will not leak.  Better yet, I scored on a smooth filter housing (99% sure it’s real, I’ll post some pics) and now I know I have a perfectly flat surface to mount it to.  It’s good to have this task done.

1969 CB750 sandcast #97 restored - Sold Restoration thread link
1969 CB750 sandcaxt #576 - Sold
1969 CB750 sandcast #1553 - Sold
1969 CB750 sandcast #1990 - Sold
1969 CB750 sandcast #5383 restored - Sold Restoration thread link
1970 CB750 K0 restored - Sold
2010 H-D Tri Glide Ultra Classic (Huh?)