Author Topic: Adjusting needle clip with carbs on the bike. Not as hard as I thought!  (Read 5523 times)

0 Members and 1 Guest are viewing this topic.

Offline Beastman

  • Enthusiast
  • **
  • Posts: 108
My bike is a 1978 CB550K with the PD type carbs.  Might not work for all bikes, but it was easy enough for mine.

I had already removed the carbs to clean them and rejet.  The problem with getting at the needle clip was that tiny snap ring holding the assembly in place.  At the time I couldn"t figure out how to get the damn thing off.  So I put the carbs back on the bike, it ran better, but was still lean at lower throttle.

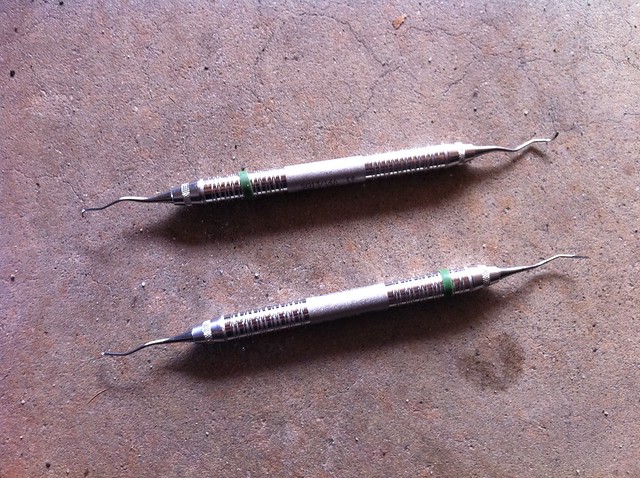
The essential tool(s) I found, was at my mom's office.  She's a DENTIST!


I started at carb 4 since it was the easiest to get to.  Figured if I could handle 4 then I'd move on...

1.  Remove the top cover of the carb (2 philips screws)

2.  Unscrew the set screw holding the arm to the throttle arm.

3.  I used a skinny allen wrench to hold the arm up, makes getting to the snap ring much easier:


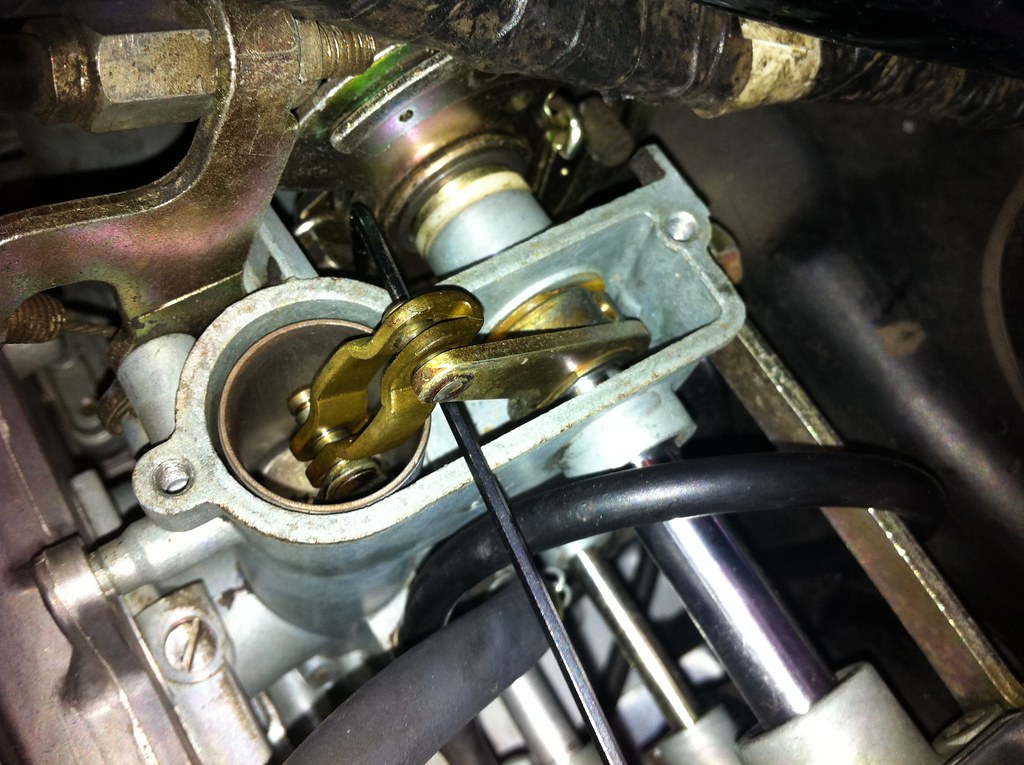
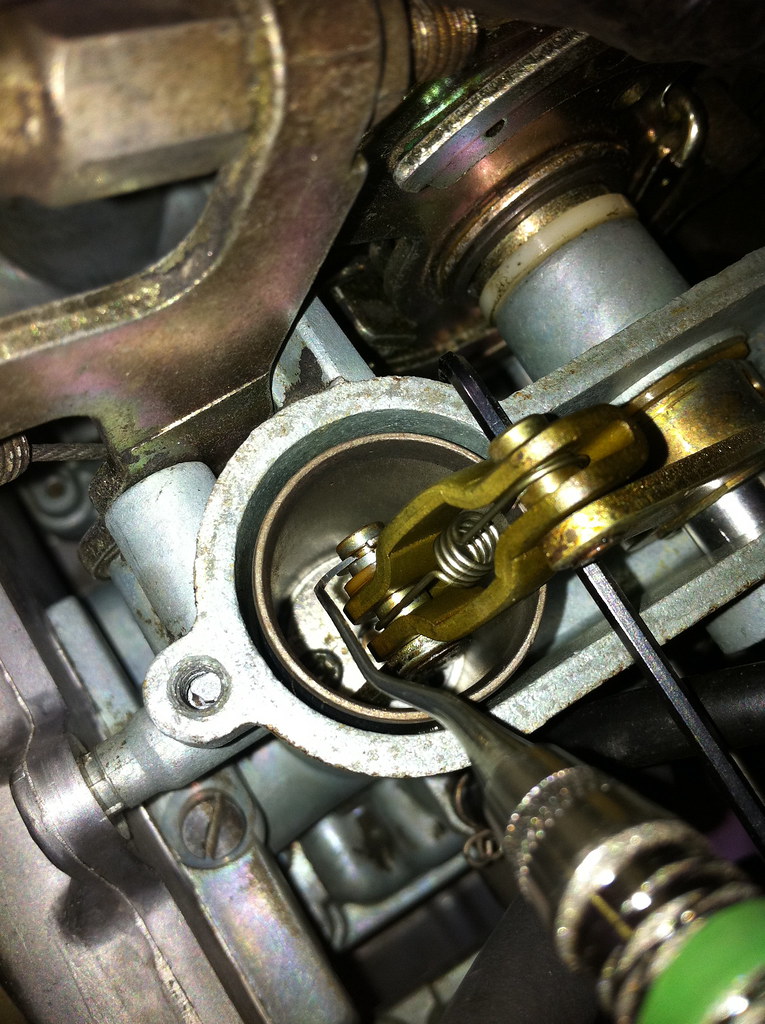
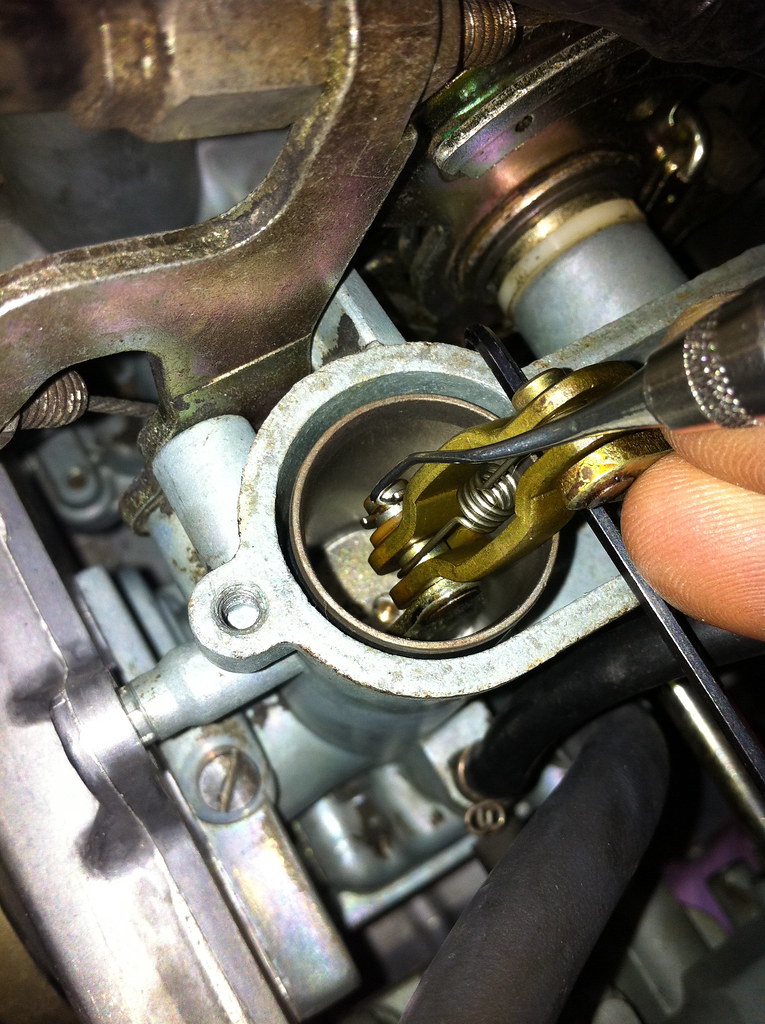
4.  Pop off that snap ring!  the dental pick tools need to be used simultaneously.  Unfortunately I couldn't take a picture and hold both, so I took a pic of how each was positioned.  Once you have them in the groove, use equal pressure and shoot the ring off, right into the bottom of the assembly, which is conveniently shaped like a bucket.  Let the plastic O-ring fall in there too.  Both are simple to fetch out later with one of the dental picks.

Position 1:

Position 2:


5.  Remove the spring between the two arms. (Dental picks make this easy too)  Slide the arm to the side and disconnect the joint.  Pull out the assembly.

6.  Fetch the snap ring and the O-ring before you go sticking a screwdriver down into the bucket.

7.  Unscrew the two philips bolts to get to the needle clip.  I read some peoples DYIs saying they rounded the bolts down there.  I didn't have this problem at all, but be careful and slide things over to get a straight angle:


8.  You can now adjust the needle clip, and reassemble.

9.  Repeat for the other three carbs.

The only tough part of reassembly was...you guessed it... the little snap ring.  I was able to pop it back on by holding it tightly with some little needle nose pliers.  If you drop it in the bucket, just fish it out with the dental pick.

Disclaimer:  I got these picks from my mom's office for free.  She said they throw them away after so many uses because they become worn out.  Ask your local dentist and see if you can get some old ones for free!  No guarantees though.  Not all dentists are as rad as my mom.


« Last Edit: April 13, 2011, 11:19:50 pm by Beastman »

Offline mrrch

  • Hot Shot
  • ***
  • Posts: 652
My PD41 for my 750 have the c-clips on the top pivot.
Be careful when reinstalling, I pushed mine down but it did not click into place then it proceeded to go into orbit(good thing I had a spare carb)
my build

1977 CB750K WITH 1976 CB750F ENGINE

Offline Duanob

  • Bold Timer
  • Old Timer
  • ******
  • Posts: 3,941
  • Gotcha!
I just did this on my 1976 CB550K with 087As, way different than your set up. My best tool was a pencil size telescoping magnet, a magnetic #2 philips screw driver, and a small flat blade screw driver. Also a side drive #2 philip, a small ratchet with #7 & #8 sockets. I didn't take pics I guess I should have.

Take the cover off.

Take the spring off the linkage and hook it on the linkage shaft so it doesn't fall down between the carbs.

use a number 8mm to loosen the top of the slide linkage. Use the small screw driver to push the locking metal out of the way.

Use a number 7mm to take the small bolt that holds the linkage to the arm. Use the small screw driver to push the locking metal out of the way. I used the magnet to keep the bolt, washer, and locking tin from falling down inside the carb.

Take the small screw driver and seperate the ball joint at the top of the linkage.

Pull the slide out. Again the magnet may be your best friend.

Take the two tiny screws out of inside the slide and linkage (#2 philips).

Twist the linkage 90 dgrees and pull straight up. The needle will fall out if you turn the slide upside down. Make the adjustment. This is a good time to make sure the needles are clean. I had some corrosion on mine so I used some 0000 steel wool and carb cleaner to clean them up. Sometimes this is all you need to do, leave the adjustment until you test the bike again.

Install the linkage back into the slide. Here is the tricky part is to make sure you twist the linkage the correct way. The cut out on the bottom of the slide always faces the intake side of the carb. Look at the linkage ball joint and the direction the slide linkage faces to make sure they match up. Line up the two tiny screw hols and use the magnetic screw driver to install the tiny screws into the slide.

Now you have to take the number 8mm screw cap off the linkage and the tiny top piece of the ball joint. Install the slide, it will only go in one way because of a notch on the inside of the carb slide area.

Here is another tricky part is attaching the ball joint. Holding it together while you put the top piece of the ball joint pointy side up. And put the washer tin and screw cap back into place. I got everything semi tightened up when the ball joint popped apart before completely tightening. Start all over. here is another place where the magnet is your best friend.

After the ball joint is tightened up the tin washer is bent back into place, now another tricky part is lining up the linkage with the bolt hole on the linkage shaft.

Once you get that bolt tightened up and the tin washer bent back into place, intall the cover making sure the gasket is still in good shape. This is a great time to replace all philip screws with ss allen head bolts. I believe 5mmx14mm 0.8 thread.

That's it. the two inner carbs are harder to work with of course, but not impossible.


"Just because you flush a butt-load of money down the toilet, doesn't make the toilet worth more",  My Step-Father the Unknown Poet

1974 CB360T
1976 CB550K2 Resurrected
1976 CB550F2 Barn Find
1979 CX500 Delux "HONDA-GUZZI"
2007 Moto Guzzi Breva 750ie
2015 BMW F700GS

  __o
_- \_<,
(*) /' (*)

Offline lucky

  • Really Old Timer ...
  • *******
  • Posts: 6,717
Re: Adjusting needle clip with carbs on the bike. Not as hard as I thought!
« Reply #3 on: September 21, 2011, 02:15:00 pm »
Why Honda used this complicated stupid design I will never understand.
I like the earlier simple versions. Pull on cable ...slides goes up. SIMPLE!

Offline Rgconner

  • Hot Shot
  • ***
  • Posts: 674
I just did this on my 1976 CB550K with 087As, way different than your set up. My best tool was a pencil size telescoping magnet, a magnetic #2 philips screw driver, and a small flat blade screw driver. Also a side drive #2 philip, a small ratchet with #7 & #8 sockets. I didn't take pics I guess I should have.

Take the cover off.

Take the spring off the linkage and hook it on the linkage shaft so it doesn't fall down between the carbs.


That's it. the two inner carbs are harder to work with of course, but not impossible.

I did something similar. I took off the 7mm first, then rotated the arm up and gave it a slight twist and levered gently with a screwdriver.

The ball popped right out of the socket, leaving the 8mm still in place.

I did that so that with the 8mm screw off, I would not lose the spring/ball joint bit if I failed my dexterity check.

1975 CB550K aka "Grease Monkey"