Author Topic: Project FrankenFour (Update w/ more pics!)  (Read 4545 times)

0 Members and 1 Guest are viewing this topic.

Offline Salaryman

  • Full Member
  • *
  • Posts: 12
Project FrankenFour (Update w/ more pics!)
« on: September 13, 2011, 08:13:23 PM »
Hello everyone, new member here. I've been lurking around for a little while, keeping my mouth shut and my ears (or eyes rather) open. There is a wealth of information on these boards that has proven to be very useful over the past few weeks. I must say, there are some very very smart and creative people on these boards. So where should I start?

Been riding for a few years. First bike was an '09 Ninja 250, traded that one in for an '08 Z1000. Wrecked that and almost killed myself (through no fault of my own however) so I've been away from bikes for a little over a year now. I was ok with stepping back from the motorcycle scene for awhile until my wife and I started watching a show called American Pickers. On occasion, this show would feature vintage motorcycles of all sorts that the hosts would dig out of the roughest areas and sell to enthusiasts. Long story short, I fell in love with motorcycles all over again. I mentioned this to one of my good friends and his response was "Hey, my dad has an old honda something he's had sitting in his garage for as long as I can remember." A couple of days later, he sends me a picture of this:
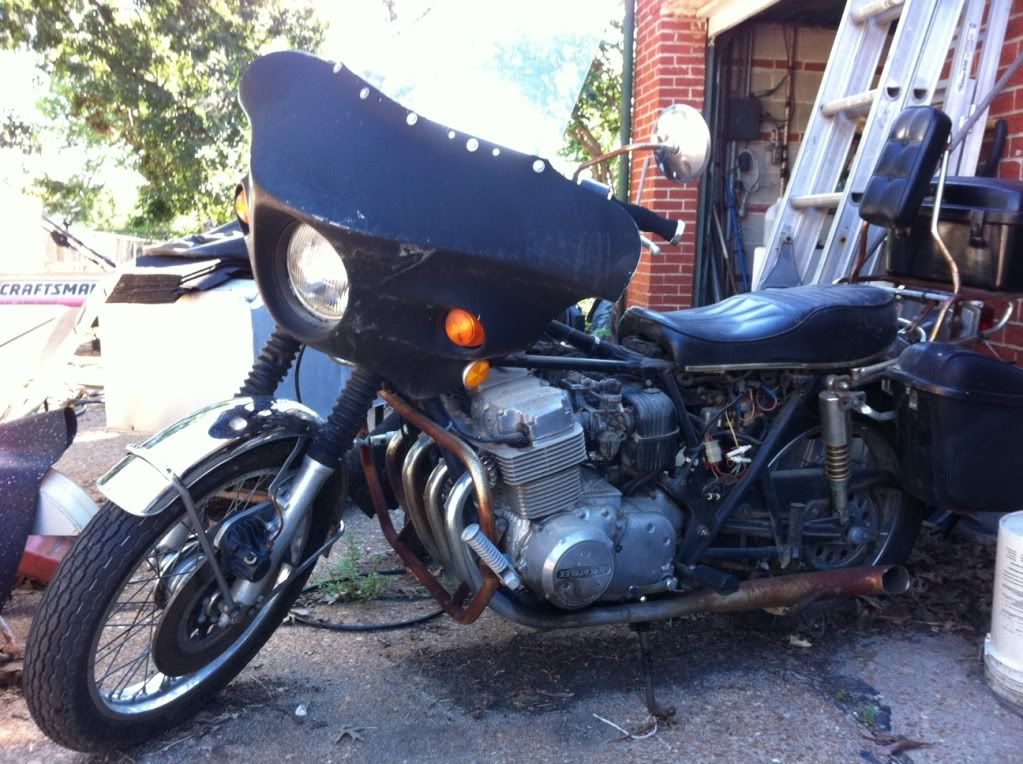


The most hideous 1974 Honda CB750K I've ever seen. The last time it was plated was in 1994 and the last time it ran was before that. It's gonna need alot of love to get back to riding (or running) condition. So I ask him how much he wants for it. Turns out it's a free bike with a clean title to boot! So I figure, "hell, what do I have to lose. I may even learn something along the way." A couple of my buddies pick it up and bring it over to my house after work one day. About an hour (and a six pack) later, the bike looks something like this:


So while I was tearing everything down and just getting a good idea of the condition of all the components, I was trying to decide what to do with the bike. Restoration? meh, I'm more of a custom kind of guy. Bobber? Those sure are cool but I like the cafe look too....hmm....decisions decisions. Then, when trolling one day, I came across this picture on these very forums:


One of the prettiest bikes I have ever seen. I'm sure some of you know who owns it. I can't remember his user name to save my life. Cafe racer it is then. So I have begun my first motorcycle build. While I've only ever done minor maintenance on my other bikes, I've been a mechanic for about a decade so alot of those fundamentals seem to carry over. What I don't know, I can readily learn from these boards within a few clicks.

I don't intend to copy my inspiration exactly (as it would no longer be my build then). I really like the look of a red frame with matte black paneling. So I think I'll use that as a base line. Here is what I've done so far over about 3 weeks:

Complete tear down:


When I took the carbs off the bike they showed every bit of the 15 years that they spent full of chemically destabilizing gas:
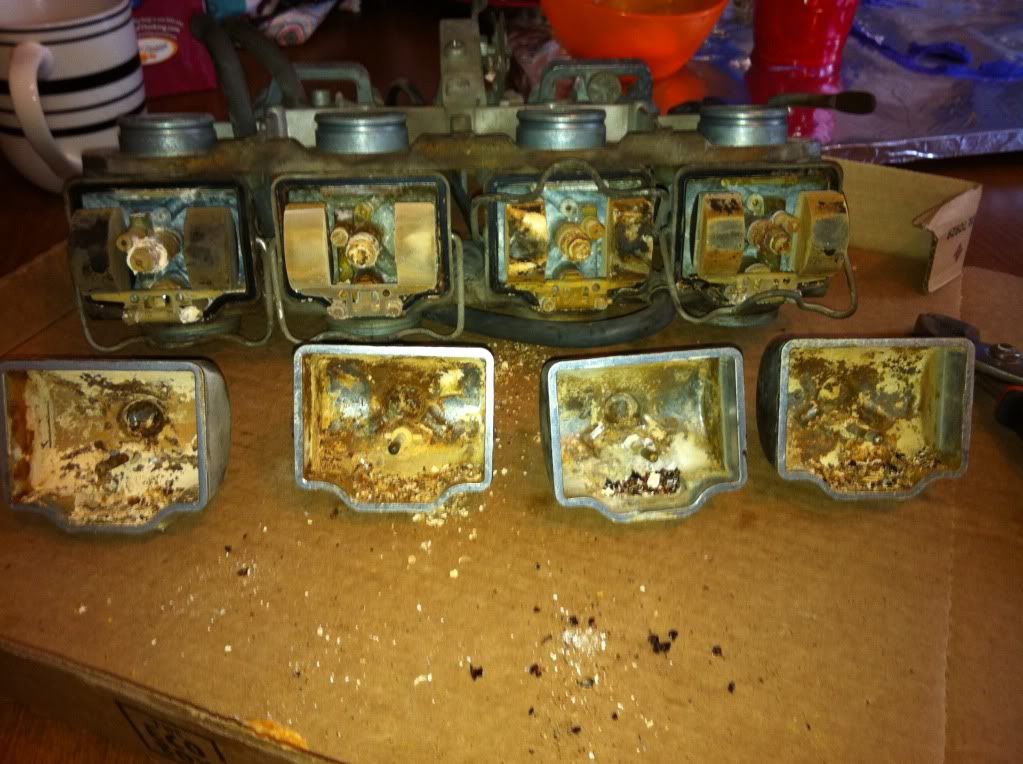


After a week with a gallon of chem-dip, some 3m abrasive pad, and wire. They look brand new! The brass all cleaned up great so the only thing I needed to replace was the float bowl gaskets.

I've taken pretty much every single nut and bolt off the bike to work and hit them with the bench wire wheel. What doesn't get painted will at least be cleaned thoroughly. Found a cheap gas tank from what seems to be a 70's Yamaha RD400 and a universal cafe fairing from a fellow enthusiast on craigslist. The gas tank has minimal rust but the body of it needs alot of love. But hey, what do you expect for $5. The fairing is fiberglass and will need trimming to look good but it was also cheap enough where I'm not afraid to cut it up. Kind of a rough mock up here of the general profile of the body work:


Took the frame to work and removed unnecessary (IMO) brackets. Then I brought it back home and sandblasted it in my driveway:


After sandblasting, I set up a paint booth in my garage and used the Dupli-color paint shop primer, color, and clear. From start to finish, it took about 4 hours of spraying and waiting to lay 4 coats of primer, 4 coats of color, and 5 coats of clear. Here are a couple shots of that process:


For my first rodeo with an actual spray gun and real paint, I thought it turned out pretty nice.

In addition to what labor I've accomplished so far, I also have a pile of parts in my garage awaiting their turn to be installed. From what I can remember off hand, I have the following:

Clubman handlebars
New throttle tube (cuz i'm dumb and broke the old one)
New push and pull throttle cables
Supersport style grips
One piece SS braided front brake line from slingshot cycles (beautiful piece)
Front and rear wheel bearing kits from All Balls (nice kits)
Fork seals
Float bowl gaskets
New 530x100 drive chain
Master cylinder rebuild kit
New headlight brackets (cuz the upper fork ears are as good as gone)
New wiring harness (it's so beautiful!)
Oil filter

I'm sure there is more but that's all I can think of off the top of my head. I intend to order the tapered steering neck bearing kit from All Balls as well but they were out of stock when I placed my other order. A few things that I can see will be necessary in the near future are:

Oil pan gasket and other cover gaskets (to fix a rather large oil leak).
Fork oil
Engine oil
Brass swing arm bushing kit
Front caliper piston and seal
Front brake pads
Battery
Tires (prolly the dunlop GT501's)

The motor should run (knock on wood) once it's all back together. We tested the electrical system before dismantling it and when kicking the motor over, it created a strong spark and 4 solid sounding compression strokes. Dumped some ATF in the cylinders to keep the rings loose while it sits in the corner awaiting my attention. Transmission? No idea. It will have to be a surprise I guess. The gear selector worked and the wheel/chain turns *shrug*.

All in all, I'm having a blast building this bike. I have big plans and I'm making slow but steady progress. I am hoping to have it rideable by next season. I'll keep this thread updated when I make any significant progress. If you have any questions or comments, don't hesitate to voice them. I'd have to be a fool to turn down advice from people that have been building these things much longer than I have.

I'll talk to you all again soon!
« Last Edit: April 30, 2012, 10:16:49 AM by Salaryman »

Offline theofam

  • I'm cold, give me a
  • Hot Shot
  • ***
  • Posts: 598
  • Suffering from MDD - Mechanical Deficit Disorder
Re: Me and My CB750
« Reply #1 on: September 13, 2011, 08:47:05 PM »
The frame looks awesome.  Nice first attempt with the compressor and gun!  Lookin' forward to seeing this one come together.

Offline lucky

  • Really Old Timer ...
  • *******
  • Posts: 6,717
Re: Me and My CB750
« Reply #2 on: September 13, 2011, 09:21:21 PM »
When you say you used "real" paint does that mean two part acrylic urathane?

Offline brandEn

  • Old Timer
  • ******
  • Posts: 3,205
Re: Me and My CB750
« Reply #3 on: September 13, 2011, 09:21:57 PM »
Your project is off to a very good start. Those rd400 tanks are great and it should look sweet.

Offline Salaryman

  • Full Member
  • *
  • Posts: 12
Re: Me and My CB750
« Reply #4 on: September 14, 2011, 09:48:24 AM »
"Real" compared to the rattle cans I'm used to using. The dupli color paint shop system is a laquer based automotive finish paint. I figured if it's tough enough to deflect rocks off of cars, it's worth a shot on a bike frame.

Offline HonderCB

  • Hot Shot
  • ***
  • Posts: 411
Re: Me and My CB750
« Reply #5 on: September 14, 2011, 01:04:16 PM »
good luck and a good start.  Cant wait to see how this one turns out.  You will love the 750 if you havent already ridden one and found out for yourself
-Scott, just a F'er from Illinois-

77' CB750F
81' CB650C - SOLD

Offline BeSeeingYou

  • Old Timer
  • ******
  • Posts: 3,913
Re: Me and My CB750
« Reply #6 on: September 14, 2011, 09:24:05 PM »
Looks good but get a real respirator next time.  What you used is just about worthless. 

Offline Salaryman

  • Full Member
  • *
  • Posts: 12
Re: Me and My CB750
« Reply #7 on: September 14, 2011, 09:51:11 PM »
Srust, you sir are quite correct! A dust mask does nothing for paint fumes and I'm missing the brain cells to prove it. Right as I was finishing up for the day, my neighbor came over and gave me a respirator to keep. Definitely learned that lesson the hard way.

Offline Salaryman

  • Full Member
  • *
  • Posts: 12
Re: Me and My CB750
« Reply #8 on: September 19, 2011, 10:02:17 AM »
So my project may be taking an interesting turn. Turns out, my buddy has a totalled (cosmetic damage only) 2002 R6 with all of the suspension, brakes, wheels, etc intact. A little digging revealed that I wouldn't be the first person to retrofit modern suspension onto a K4 chassis. Apparently, the 2002 generation r6 is more apt for retrofitting onto my bike than others. I'm interested at the possibilities!

Offline MrGardman

  • Enthusiast
  • **
  • Posts: 236
  • Northern Indiana
Re: Me and My CB750
« Reply #9 on: September 20, 2011, 05:10:23 AM »
I do love that red frame. Reminds me of my first Honda, a CL77, so many eons ago. I always thought the color combo of a red frame and silver bodywork looked perfect. Hmmm....maybe I should try that on something.

Offline Salaryman

  • Full Member
  • *
  • Posts: 12
Re: Me and My CB750
« Reply #10 on: September 25, 2011, 09:06:32 AM »
So I've made a little more progress since my last update. Been working on restoring my $5 gas tank. These pictures show after I heated up the two biggest dents in the front of the tank and pushed them out with a pry bar. As you can see, I'm not much of a body man but this will do after I putty everything:


I also removed the rear mounting tabs since they were nowhere near lining up with anything on my frame and were just in the way. Found a couple of pinhole leaks at the factory welds that the previous owner had tried to use tank sealing putty on. Guess it wasn't holding anymore. Off it came and rewelded the holes:
 

Then I used a bit of spot putty to work it into the wrinkles. I'll use actual 2 part putty over the spot putty after I sand down my first layer to regain my shape. Probably not the most perfect way of doing things but hey, I'm learning as I go with some of this stuff.

Next up is the more exciting part of todays update. I went to my buddies house the other night and procured a plethora (yeah I said plethora) of 2002 and 2004 Yamaha R6 parts. Got a whole front suspension, two sets of front brakes, two front wheels, two sets of rearsets, two sets of clip-ons with hand controls and cables, two rear shocks, and a set of rear brakes. It was like early christmas. Here are a couple shots of the front end mocked up:


In this one you can see my sub par spot putty job that I haven't sanded down yet:


Some time this week, I'll also be getting an '04 rear swing arm and rear wheel so I can begin to see what it's gonna take to fit it.
« Last Edit: September 25, 2011, 09:11:51 AM by Salaryman »

Offline Salaryman

  • Full Member
  • *
  • Posts: 12
Re: Project FrankenFour (formerly Me and My CB750)
« Reply #11 on: October 03, 2011, 09:41:11 AM »
Another update. Got my '04 R6 rear swing arm, wheel, and brake assembly. Looks like I'll have to mill some off the frame and a little bit off of the swing arm pivot housing and tube but it should fit without a whole lot of trouble. The only unknown at this point is what it's going to take to get the sprockets in line. I'll make sure to post a detailed report of exactly what I had to do once it's on.

In other news, I have my gas tank prettied up and primered. Here is a couple pictures of after the major dents were heated up and pushed out:


And here is after many many hours of putty and sanding:


I think it came out pretty nice considering what I had to work with and it was my first attempt at body repair. More to come as the engine gets cleaned up and painted!

Offline lucky

  • Really Old Timer ...
  • *******
  • Posts: 6,717
Re: Project FrankenFour (formerly Me and My CB750)
« Reply #12 on: October 03, 2011, 11:36:32 AM »
A lot of hard work. Those carbs were very ugly too.
I guess you will line the inside of that tank considering all the potential leaks.

If you use the CREME system use two coats and it will come out really white and opaque.
The two coats need a waiting period in between.

The frame looks great!

I liked the bike you found while "trolling" but a flat black bike or car will always seem unfinished to me and look like primer. Not finished.

Please consider a gloss paint job. LOL

Offline Salaryman

  • Full Member
  • *
  • Posts: 12
Re: Project FrankenFour (formerly Me and My CB750)
« Reply #13 on: October 03, 2011, 12:44:02 PM »
I have been reconsidering black actually. A nice gloss white was suggested to me a couple weeks back and I may go that route. It will still look great with the red frame and will also serve to mask the minor imperfections in my amature body work. Plus I have seen far less pictures of white cb's than black ones.

The tank does have a few pinhole leaks from where the old bracket was mounted. Someone had tried to use sealer putty at the joint but cutting the bracket off revealed several small leaks. Re-sealing the whole inside is on the to-do list after I've cleaned the minor rust out of it.

Offline Salaryman

  • Full Member
  • *
  • Posts: 12
Re: Project FrankenFour (formerly Me and My CB750)
« Reply #14 on: October 10, 2011, 06:58:15 PM »
Got the R6 swing arm mounted.  Had to grind off about 1/8" from each of the inward surfaces of the bushings for the factory swing arm pivot location to make room for the MUCH wider R6 arm. Also had to drill out the centers of the pivot bolt holes on the frame to .80" for the R6 bolt. In addition, the sides of the swing arm pivot and the pivot bolt tube had to be shaved about 1/8" on either side. Yamaha was nice enough to extend the outer races for the swing arm pivot bearings about 1/8" past the bearing depth so all they needed was a little tapping to move them both inward to make my overall pivot width shorter. The pivot was the easy part.

Enough explaining, on with the pictures!


This wasn't just a photo shoot. As you can see from the pictures, I'm using the floor jack to try and set ride height so I can begin working out the rear suspension geometry. The lower mount for the shock/dogbone thingy (very technical term) is easy. I just need to weld ears on at the correct length and axis so the force is applied directly into the lower cross member. The upper is proving to be the bear. It's not so much the angles that are the problem, it's the fact that the upper eyelet of the shock is hanging out in space (as you can kind of make out in the first picture. To make a subframe designed to support the weight of the bike and not apply any torque to the welds used to make it, it tends to take up very valuable space. Space that would normally be occupied by say, the battery, oil catch, electronics....yeah.

One of the things I was concerned with when deciding to mount the R6 swing arm was the wheelbase. While I love modern supersports, I'm not a huge fan of the stretched out crotch rockets. The factory wheelbase of the CB750 is 57.3". The bike as it sits now has a wheelbase of approximately 62.5" with the rear axle pushed all the way forward in the slides. An extension of 5.2" is a lot. Visually I don't think it looks that bad. The shape of the body work, the swing arm, and the fender mask the stretched look a little bit. I'm curious to see how it will handle once this thing is on the road. I do have the option of replacing my '04 swing arm for a '99-'02 design which is supposedly 2-3" shorter. If the bike handles like crap, I may look further into it.
« Last Edit: October 10, 2011, 07:36:27 PM by Salaryman »

Offline Donny_B

  • Full Member
  • *
  • Posts: 33
Re: Project FrankenFour (formerly Me and My CB750)
« Reply #15 on: October 10, 2011, 07:49:03 PM »
Looks good. I'm interested to see how you mount the rear shock.

Offline Greggo

  • Somebody's
  • Old Timer
  • ******
  • Posts: 4,164
  • Helmets Save Lives. Period.
Re: Project FrankenFour (formerly Me and My CB750)
« Reply #16 on: October 10, 2011, 07:58:46 PM »
Subscribed.  I'm interested to see how you run the chain.

maduncle

  • Guest
Re: Project FrankenFour (formerly Me and My CB750)
« Reply #17 on: October 10, 2011, 08:20:46 PM »

Subscribed. I am keen to see how all the R6 parts work out too.

Offline Retro Rocket

  • Eggs are hard due too a
  • Really Old Timer ...
  • *******
  • Posts: 19,279
  • ROCK & ROLL
Re: Project FrankenFour (formerly Me and My CB750)
« Reply #18 on: October 10, 2011, 10:54:04 PM »
Just a word of caution, spot putty is for tiny blemishes, nothing else, if you use it to fill anything larger than a tiny mark it will shrink eventually and  either fall out or wreck your paint job.... Just saying
750 K2 1000cc
750 F1 970cc
750 Bitsa 900cc
If You can't fix it with a hammer, You've got an electrical problem.

Offline Salaryman

  • Full Member
  • *
  • Posts: 12
Re: Project FrankenFour (Update w/ more pics!)
« Reply #19 on: April 30, 2012, 10:16:16 AM »
So it's been awhile! Over 180 days in fact (so the forums notify me). Had a bit of a financial and motivational hiatus over the winter but it's warming up and I'm not flat broke so I'm back at it.

The most notable additions to my bike are:

- Installed custom steering neck bearings from All Balls Racing (great site and customer service)
- Designed and installed a subframe for the R6 mono shock upper mount.
- Designed an adjustable lower link for the lower mono shock mount.

Onto the pics!


For now, all welds were done with a 110v I have access to at home. Once all the frame welding is done, it will be taken to work, cleaned up, and a final burn in will be done with a nice 240v MIG.

The next two items on the list are:

- Gather the rest of the rear axle/ brake pieces to hold the rear wheel tight.
- Work out chain clearance. This won't be too bad, a 520 chain conversion with custom front, rear, or both sprockets.
- Figure out final placement for the R6 rearsets. I'm thinking I'll make an adaptor plate so I can adjust them as needed.

So what do you guys think so far? Any comments or constructive criticism is welcome!

maduncle

  • Guest
Re: Project FrankenFour (Update w/ more pics!)
« Reply #20 on: April 30, 2012, 03:30:15 PM »

Hey - it all looks great to me, I do like a mono-shock swing arm conversion on a CB750.

How much longer than stock, is the wheel base with that swingarm?

I just wonder though, given you are using a Yamaha swing arm, Yamaha front end(?) and Yamaha tank, why not build it all into an old Yamaha frame?

(That's just the purist in me).

Offline Salaryman

  • Full Member
  • *
  • Posts: 12
Re: Project FrankenFour (Update w/ more pics!)
« Reply #21 on: May 02, 2012, 11:17:22 AM »
Logically speaking, that would make sense. I did get the honda for free though :).

The wheelbase is extended by 6-7" with all the superbike goodies on it.

I'm normally not a big fan of stretched bikes and I'm curious to see how it will ride once I'm done. I've made peace with the idea that once I ride it for the first time, It might suck...

Offline MCRider

  • Such is the life of a
  • Really Old Timer ...
  • *******
  • Posts: 14,376
  • Today's Lesson: One good turn deserves another.
Re: Project FrankenFour (Update w/ more pics!)
« Reply #22 on: May 02, 2012, 11:41:44 AM »
An interesting exercise nonetheless! Could be a burden in the short and brisk routes. May hold a line like a freight train on the high speed sweepers. Let us know.
Ride Safe:
Ron
1988 NT650 HawkGT;  1978 CB400 Hawk;  1975 CB750F -Free Bird; 1968 CB77 Super Hawk -Ticker;  Phaedrus 1972 CB750K2- Build Thread
"Sometimes the light's all shining on me, other times I can barely see, lately it appears to me, what a long, strange trip its been."