Author Topic: It has begun!!! Another 550 top end rebuild  (Read 9769 times)

0 Members and 1 Guest are viewing this topic.

Offline Adam_F

  • Enthusiast
  • **
  • Posts: 156
It has begun!!! Another 550 top end rebuild
« on: May 18, 2014, 03:57:35 PM »
Hello everyone!  Just wanted to start this thread with a HUUUUUGE thank you in advance.  Thanks for all the help in the past and thanks for all of the questions I'll probably have through this process.  Couldn't do this without all of the research I've done on the forum and help from its knowledgeable members. 

That said, I started to prep my bike (1977 CB550F, odometer reads 24k, but who knows how accurate that is) for a top end rebuild.  Why you might ask...?  Well, I've had a case of the good ol' cam chain tensioner bolt spinning and not actually adjusting.  Things have progressed and there's a significant amount of chain noise now.  I'm also leaking a bit from the head gasket.  Enough to get oil on my boot on longer rides.  My plan is to (fingers crossed) pull the head, clean everything up real good, lap the valves and put in new seals, have the matting surfaces decked, and hopefully put 'er all back together.  The bike is my daily ride, so I'm hoping to do this as quickly (and carefully) as possible.  I started today by riding around and warming it up.  Got home and did a compression test and here's how she read:

cylinder 1 - 125
cylinder 2 - 125
cylinder 3 - 130
cylinder 4 - 135

Pretty happy with that and hopefully it means I won't have to replace any rings.  I then drained the oil, removed the carbs, headers, and exhaust (picture below).  Battery is on a trickle charger and I'll most likely start on the head tonight or tomorrow after work. 

First couple questions...

Anyone have any strategies for removing old exhaust header gaskets?  I can see them in there, but they don't wanna budge.  Went after them with a small flat head screw driver, but didn't want to mar any surfaces. 

I;ve been collecting parts for the last few months and have almost everything I should need (including Honda head and base gaskets, alongside the Vesrah kit).  I've seen on a few threads that folks use copper crush washer on reassembly.  Anyone know a good place to order those?

That's all for now.  I'll do my best to take pics and document everything as I go along.  Thanks again!


'77 cb550F

Offline Adam_F

  • Enthusiast
  • **
  • Posts: 156
Re: It has begun!!! Another 550 top end rebuild
« Reply #1 on: May 18, 2014, 08:29:45 PM »
Took a little break and then went right back to it.  Had one hell of a time removing the breather cover.  Even with an impact driver, the screws on the sides were extremely difficult to budge.  Eventually they gave, but the bolts were equally though.  Doubt the PO used any anti seize.  As soon as I loosened the bolt above the cylinder two intake I heard a CRACK.  Bolt snapped right at the start of the threading (see pic below). 

I was a bit freaked out, but still managed to remove the cylinder head cover and pull the end of the bolt out with a pair of needle nose vise grips.  Everything seemed to be in order...  But what do I know, I've never been into the engine before.  Sorry for the fuzzy pics... will do better next time.

Do these rockers (I believe that what they're called) look good?


I eventually got the cam chain off the sprocket, and removed the camshaft.  I noticed a couple flat spots.  Is this normal wear?


From what I could tell, the camshaft bearing surfaces look smooth


Realized I didn't have a 12mm hex that was long enough for my ratchet to loosen the head, so I called it a night.  Gonna swing by sears after work tomorrow and get back at it.  Will post more pics.
« Last Edit: May 18, 2014, 08:39:28 PM by Adam_F »
'77 cb550F

Offline goldarrow

  • one day, i'll be an
  • Old Timer
  • ******
  • Posts: 3,360
It has begun!!! Another 550 top end rebuild
« Reply #2 on: May 18, 2014, 09:10:59 PM »
Looking good.  How far down are you going into the motor? Follow the sequence to unbolt the head bolts, but I'm sure you already know that
Life Is Full Of Challenges - And My Backyard Is Full Of SOHC4's

CB550 K0
CB750 K0, K2, K23 JDM, K45, K5
And the little ones z50r, xr50r, st90


750k5 http://forums.sohc4.net/index.php?topic=114817.0

Offline Adam_F

  • Enthusiast
  • **
  • Posts: 156
Re: It has begun!!! Another 550 top end rebuild
« Reply #3 on: May 18, 2014, 09:59:55 PM »
Looking good.  How far down are you going into the motor? Follow the sequence to unbolt the head bolts, but I'm sure you already know that

Thanks!  Planning on just doing the top end.  Gonna pull the head and jugs.  I plan on keeping this bike forever, so I imagine a full blown rebuild is in the future at some point ;)  I ride year around, but I want to have this back together ASAP so I can fully enjoy the summer sunshine.  I love Portland, but it makes for some wet riding most of the year.
'77 cb550F

Offline dave500

  • Really Old Timer ...
  • *******
  • Posts: 17,054
  • WHAT?no gravy?
Re: It has begun!!! Another 550 top end rebuild
« Reply #4 on: May 19, 2014, 12:26:03 AM »
looking good,that cam and rockers look fine,yours has the locked rocker shafts,those four cotter bolts in the cover hold the shafts from turning,no need to remove them,they can be difficult.

Offline my79650

  • Enthusiast
  • **
  • Posts: 209
  • old school 750 carbs on a cb650
Re: It has begun!!! Another 550 top end rebuild
« Reply #5 on: May 19, 2014, 06:50:32 AM »
Looks good .

Offline Adam_F

  • Enthusiast
  • **
  • Posts: 156
Re: It has begun!!! Another 550 top end rebuild
« Reply #6 on: May 19, 2014, 07:31:41 AM »
looking good,that cam and rockers look fine,yours has the locked rocker shafts,those four cotter bolts in the cover hold the shafts from turning,no need to remove them,they can be difficult.

Good to know. Thanks!
'77 cb550F

Offline Adam_F

  • Enthusiast
  • **
  • Posts: 156
Re: It has begun!!! Another 550 top end rebuild
« Reply #7 on: May 19, 2014, 07:18:51 PM »
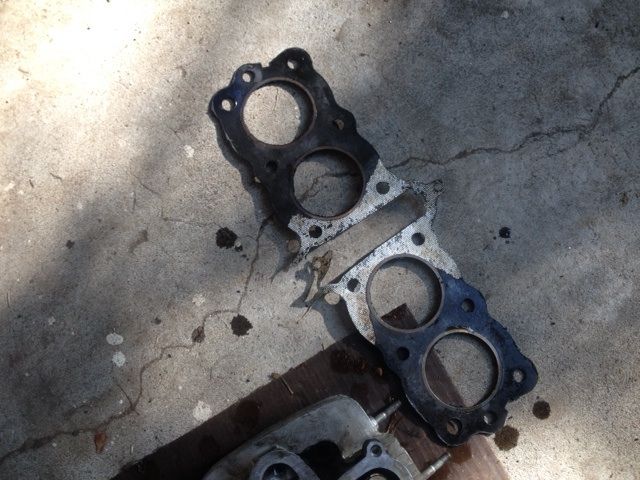
Pulled the head and the cylinders after work today.  Everything came apart really easily.  I've read stories on the forum of the cylinder being really stuck, but it came off easily with a light touch of the flat head screw driver.  As you can see from the photo below, the head gasket came off in one big piece.  There is some gasket debris left on the matting surfaces but it looked way cleaner than expected.  Leads me to believe that this may have been done in the not too distant past!?  But then why the head gasket leak...?  hmmm...


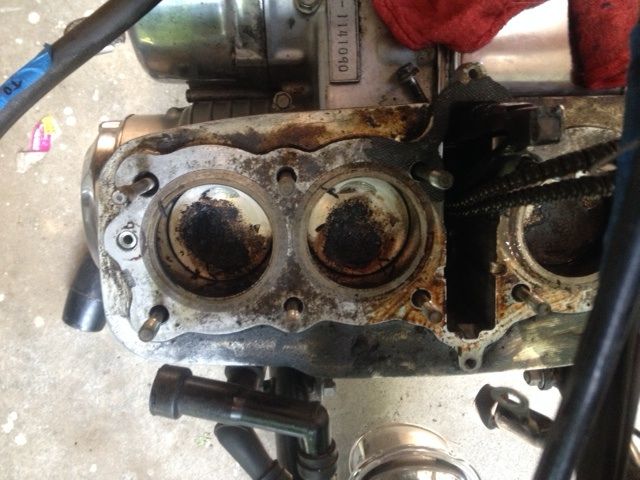
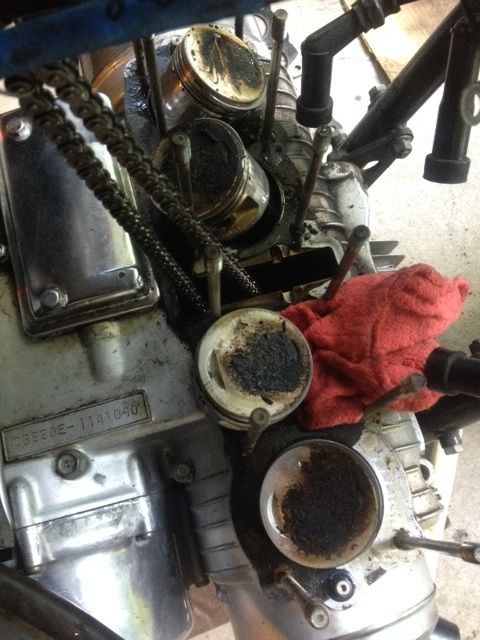
Some carbon on the top of the pistons, but I was expecting worse


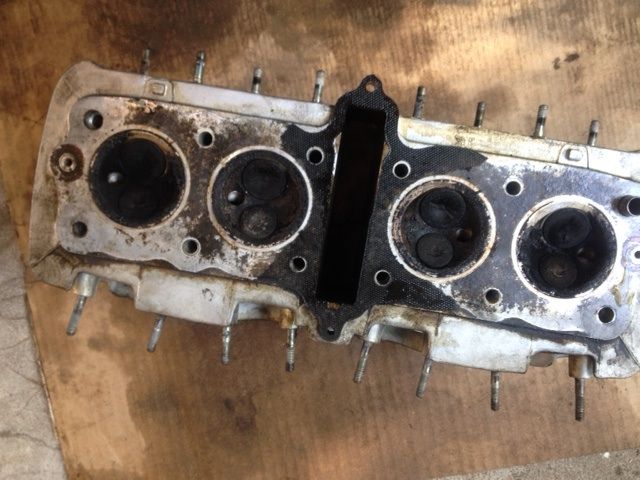
A bit more carbon on the top of the valve stems.  I'm curious what the best approach the cleaning this sensitive area is.  I bought a valve compressor and I'm planning to remove them, lap and replace the seals.  Should I remove them before cleaning or afterwards?  Also, any suggestions for removing the springs, seals, etc so I don't do any damage to the guides and/or stems? 


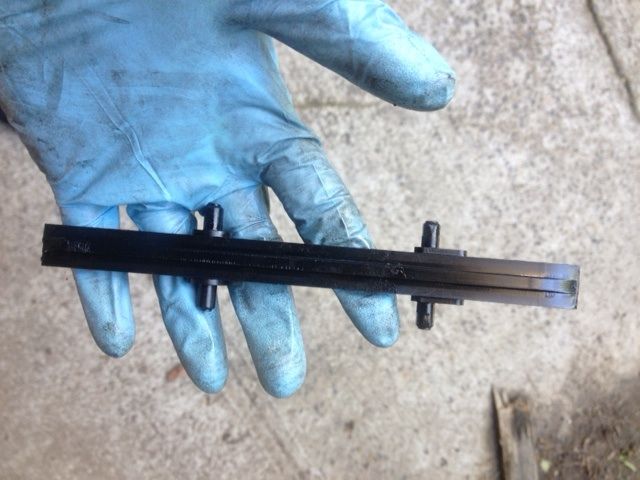
Cam chain tensioner was all f'ed up.  Hence the reason for the tear down to begin with.  There were multiple different groove lines.  I was actually able to get the mechanism back into the gears, but it still didn't function properly.  I have a replacement though so this one is garbage. 

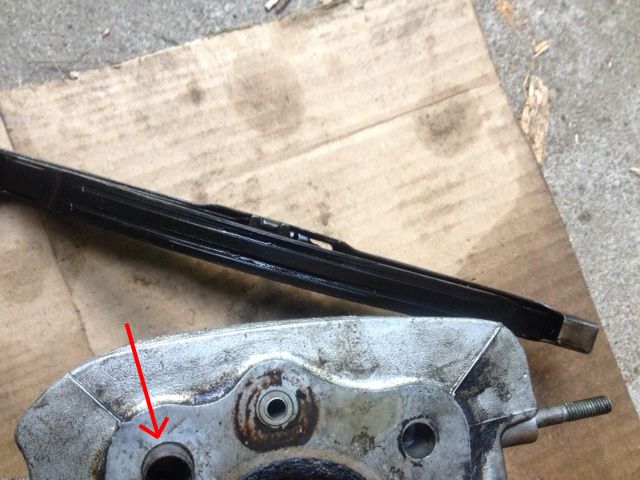
You see that red arrow?  There is a raised sleeve that you can see a little better in the above image (top right).  I noticed another one on the opposite corner in the top of the jugs.  My plan is to have these surfaces decked at the local shop.  Honestly didn't put much force on them but I'm assuming they will need to be removed before decking!?  Should I leave this up to the shop?  Any ideas?


Cam chain guide had a little wear, but not bad.  Please let me know if you beg to differ.


The top two piston rings were well in the range of operable.  But I couldn't find any number for the oil rings.  Anybody know?  Should I actually remove the pistons to clean them and the top of the case, or is it okay to do that carefully with the pistons still attached?


Pistons looked really clean, but I did notice slight rubbing marks on the front side of #3 and #4


Sleeves were mostly really clean and I can even still see evidence of crosshatching from their last hone.  Did notice corresponding marks that matched the pistons above...


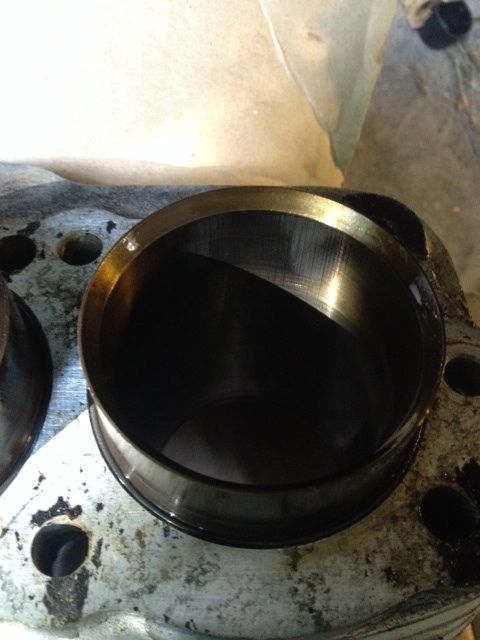
Should I plan on attempting to hone these bad boys?  Can I get away with a light fine sandpaper?  Or should I leave as is?

TONS of questions, I know :o  Really appreciate any help I can get.  You guys rule!!!
'77 cb550F

Offline goldarrow

  • one day, i'll be an
  • Old Timer
  • ******
  • Posts: 3,360
Re: It has begun!!! Another 550 top end rebuild
« Reply #8 on: May 19, 2014, 07:27:06 PM »
At the very least get flexhone and hone the jugs.  Those collars on the head can pull off.  Chamfer oil jet holes.
Life Is Full Of Challenges - And My Backyard Is Full Of SOHC4's

CB550 K0
CB750 K0, K2, K23 JDM, K45, K5
And the little ones z50r, xr50r, st90


750k5 http://forums.sohc4.net/index.php?topic=114817.0

Offline Adam_F

  • Enthusiast
  • **
  • Posts: 156
Re: It has begun!!! Another 550 top end rebuild
« Reply #9 on: May 19, 2014, 07:50:45 PM »
Quote from: goldarrow link=topic=137543.msg1552205#msg1552205 dat
"e=1400552826
At the very least get flexhone and hone the jugs.  Those collars on the head can pull off.  Chamfer oil jet holes.

Thanks Gold Arrow.  This question will reveal my complete Noobness... but where are the oil jet holes?
'77 cb550F

Offline goldarrow

  • one day, i'll be an
  • Old Timer
  • ******
  • Posts: 3,360
Re: It has begun!!! Another 550 top end rebuild
« Reply #10 on: May 19, 2014, 08:46:24 PM »
One on each end left and right side of the jug.  The jets orifice have tiny holes, clean them good
Life Is Full Of Challenges - And My Backyard Is Full Of SOHC4's

CB550 K0
CB750 K0, K2, K23 JDM, K45, K5
And the little ones z50r, xr50r, st90


750k5 http://forums.sohc4.net/index.php?topic=114817.0

Offline my79650

  • Enthusiast
  • **
  • Posts: 209
  • old school 750 carbs on a cb650
Re: It has begun!!! Another 550 top end rebuild
« Reply #11 on: May 20, 2014, 07:31:06 AM »
good work so far; keep the photos coming

Offline Adam_F

  • Enthusiast
  • **
  • Posts: 156
Re: It has begun!!! Another 550 top end rebuild
« Reply #12 on: May 20, 2014, 07:58:46 AM »
good work so far; keep the photos coming

Thanks and will do!

Any one have any opinions on cleaning the head and then pulling the valves, or pulling valves first then cleaning the head? Was hoping not to have to remove the guides at all.

Thanks!
'77 cb550F

Offline goldarrow

  • one day, i'll be an
  • Old Timer
  • ******
  • Posts: 3,360
Re: It has begun!!! Another 550 top end rebuild
« Reply #13 on: May 20, 2014, 08:15:26 AM »
To pull the valves, you will need special tool, or make your own. Change the valve seals while you're at it.
Life Is Full Of Challenges - And My Backyard Is Full Of SOHC4's

CB550 K0
CB750 K0, K2, K23 JDM, K45, K5
And the little ones z50r, xr50r, st90


750k5 http://forums.sohc4.net/index.php?topic=114817.0

Offline Adam_F

  • Enthusiast
  • **
  • Posts: 156
Re: It has begun!!! Another 550 top end rebuild
« Reply #14 on: May 20, 2014, 08:33:07 AM »
To pull the valves, you will need special tool, or make your own. Change the valve seals while you're at it.

Yeah, I have a valve compressor and new seals. Just wondering if it's best to wait clean until they are pulled?
'77 cb550F

Offline goldarrow

  • one day, i'll be an
  • Old Timer
  • ******
  • Posts: 3,360
Re: It has begun!!! Another 550 top end rebuild
« Reply #15 on: May 20, 2014, 08:35:18 AM »
Pull and clean.  You'll want to clean and lap the valves also
Life Is Full Of Challenges - And My Backyard Is Full Of SOHC4's

CB550 K0
CB750 K0, K2, K23 JDM, K45, K5
And the little ones z50r, xr50r, st90


750k5 http://forums.sohc4.net/index.php?topic=114817.0

Offline Duanob

  • Bold Timer
  • Old Timer
  • ******
  • Posts: 4,011
  • Gotcha!
Re: It has begun!!! Another 550 top end rebuild
« Reply #16 on: May 20, 2014, 10:10:43 AM »
Took a little break and then went right back to it.  Had one hell of a time removing the breather cover.  Even with an impact driver, the screws on the sides were extremely difficult to budge.  Eventually they gave, but the bolts were equally though.  Doubt the PO used any anti seize.  As soon as I loosened the bolt above the cylinder two intake I heard a CRACK.  Bolt snapped right at the start of the threading (see pic below). 


Funny! I just broke the same bolt last night removing the cover. Then broke another one putting the cover back on. I'm on my way today to get some SS allen head bolts and replace all of them on the cam cover, I think it's money and time well spent.

BTW your cam chain guide and tensioner are in pretty good shape. You don't want to have to buy a new one. Pretty damn expensive. Just make sure the tensioner works properly while you have it our. You shouldn't have to twist the adjuster screw much more than a 1/4 turn.
« Last Edit: May 20, 2014, 10:13:09 AM by Duanob »
"Just because you flush a boatload of money down the toilet, doesn't make the toilet worth more",  My Stepfather the Unknown Poet

1974 CB360T
1976 CB550K2 Resurrected
1976 CB550F2 Barn Find
1979 CX500 VG "HONDA-GUZZI"
2007 Moto Guzzi Breva 750ie
2015 BMW F700GS
Another 1976 CB550K Cafe?

  __o
_- \_<,
(*) /' (*)

Offline Adam_F

  • Enthusiast
  • **
  • Posts: 156
Re: It has begun!!! Another 550 top end rebuild
« Reply #17 on: May 20, 2014, 01:46:31 PM »

Funny! I just broke the same bolt last night removing the cover. Then broke another one putting the cover back on. I'm on my way today to get some SS allen head bolts and replace all of them on the cam cover, I think it's money and time well spent.


Bummer!  Hopefully you didn't struggle too much getting the rest of the bolt out.  I picked up a set of SS allen bolts off ebay.  They came with a warning saying something about not torquing to factory specs when using anti seize...  Not sure what to make of that.  As far as putting the cover back on, I heard that can be a challenge (read something about it on this forum).  Good Luck!!!
« Last Edit: May 20, 2014, 01:49:14 PM by Adam_F »
'77 cb550F

Offline dave500

  • Really Old Timer ...
  • *******
  • Posts: 17,054
  • WHAT?no gravy?
Re: It has begun!!! Another 550 top end rebuild
« Reply #18 on: May 20, 2014, 02:24:34 PM »
never torque any 6mm bolt,just nip them down snugly.

Offline Adam_F

  • Enthusiast
  • **
  • Posts: 156
Re: It has begun!!! Another 550 top end rebuild
« Reply #19 on: May 20, 2014, 10:28:08 PM »
Got home from work today and started working on cleaning off the old gaskets and varnish.  Only got so far (about as much as I can stand for one day) and started to pull the valves.  Everything was going fine and super easy.  7 of 8 done, no problem.  On the last valve (cylinder 4 inlet), I compressed the spring, removed the two little pieces.  After I removed the springs and seal, I realized I couldn't get the stem out of the valve.


Not sure if you can see from this pic, but I noticed a little horizontal scratch on the stem


First snag of the tear down...  >:( I assume this means that I somehow bent the stem or messed up the guide?  Anyone have any ideas/suggestions? 

 :(
'77 cb550F

Offline dave500

  • Really Old Timer ...
  • *******
  • Posts: 17,054
  • WHAT?no gravy?
Re: It has begun!!! Another 550 top end rebuild
« Reply #20 on: May 20, 2014, 10:36:07 PM »
itll have a tiny burr you need to file off on the tip,unless the valve is bent?

Offline Adam_F

  • Enthusiast
  • **
  • Posts: 156
Re: It has begun!!! Another 550 top end rebuild
« Reply #21 on: May 20, 2014, 10:40:07 PM »
itll have a tiny burr you need to file off on the tip,unless the valve is bent?

Would the burr be on the guide or the stem?  Any way to know for sure if the valve is bent?  It moves smoothly up to a point then just won't go any further.  no side to side free play.

Thanks for the help!
'77 cb550F

Offline dave500

  • Really Old Timer ...
  • *******
  • Posts: 17,054
  • WHAT?no gravy?
Re: It has begun!!! Another 550 top end rebuild
« Reply #22 on: May 20, 2014, 11:33:14 PM »
itll be on the stems tip,its caused by the rockers action,sometimes youll have three or four that wont slide through easy,dont force them,just look close and file around the tip with a fine warding file,clear any debris away before you pull it through,wire wheel the valves to strip that carbon off,then polish the stems with autosol after a 0000 steel wool rubbing.

Offline Adam_F

  • Enthusiast
  • **
  • Posts: 156
Re: It has begun!!! Another 550 top end rebuild
« Reply #23 on: May 20, 2014, 11:42:17 PM »
itll be on the stems tip,its caused by the rockers action,sometimes youll have three or four that wont slide through easy,dont force them,just look close and file around the tip with a fine warding file,clear any debris away before you pull it through,wire wheel the valves to strip that carbon off,then polish the stems with autosol after a 0000 steel wool rubbing.

Thanks Dave.  Problem is, it gets stuck before the tip.  Just before the line below the tip...  No burrs that I can see anywhere other than scratches in the stem.  Definitely not gonna try to force it through, as it feels like it would take a good amount of pressure.
'77 cb550F

Offline dave500

  • Really Old Timer ...
  • *******
  • Posts: 17,054
  • WHAT?no gravy?
Re: It has begun!!! Another 550 top end rebuild
« Reply #24 on: May 21, 2014, 12:25:00 AM »
de burr it and try again,try rotating it to see any bend?sometimes a burr that low is caused by slack use of a spring compressor and rough hand fitting of the valve collets(keepers).