Author Topic: My Ebay Project Bike  (Read 25316 times)

0 Members and 1 Guest are viewing this topic.

Offline HedNut

  • Underwater Basket Weaving
  • Expert
  • ****
  • Posts: 844
  • CB750...A Two-wheeled hellcat from Planet Kickass
Re: My Ebay Project Bike
« Reply #25 on: September 23, 2009, 11:53:59 AM »
Very cool! Looks tight....almost like you could ride her just like that

Offline Ogri

  • Thinks he's a
  • Hot Shot
  • ***
  • Posts: 331
Re: My Ebay Project Bike
« Reply #26 on: September 25, 2009, 06:50:22 AM »
  Yesterday I took out the battery box to prepare it for painting. I like to do the difficult stuff first, get it out of the way before tackling the easier stuff. The battery box was very rusty, almost flaking. It was a nightmare to wire-brush off all the loose stuff.
 I'd bought some stuff on ebay called Vactan
  http://cgi.ebay.co.uk/VACTAN-RUST-CONVERTER-AND-PRIMER-500ml-RUST-TREATMENT_W0QQitemZ110432469907QQcmdZViewItemQQptZUK_CarsParts_Vehicles_CarParts_SM?hash=item19b649c393&_trksid=p3286.c0.m14    
 I did a bit of Googling and it seemed to be universally praised, especially by owners on cast iron canal boats. Apparently you can paint on to it as well as it acts as a primer.

 It arrived today and I slapped on the first coat, it's milky white in the bottle and turns a pale blue as it touches the rust. I found a little went a long way and left it to dry. Results were fantastic, I'd used similar stuff from Loctite but found it to be very flaky when dry, hardly a good base for primering. Vactan, on the other hand, sets like thick gloss black paint - almost a powder coating quality. I rubbed a little section down with wet and dry and found it was amazingly tough.
As usual, i forgot to take a 'before' pic but it was pretty close to what the underside of the original seat looked like. The second pic shows a close-up of the base - you can see the corrosion.


Today I spent attaching spike strips to the seat to hold the cover on, they're sold on ebay.


http://cgi.ebay.co.uk/RE-COVER-THAT-OLD-BIKE-SEAT-PROFESSIONALLY-SEE-HOW-CB_W0QQitemZ260480486304QQcmdZViewItemQQptZUK_Motorcycle_Parts?hash=item3ca5d8cba0&_trksid=p3286.c0.m14

Offline Ogri

  • Thinks he's a
  • Hot Shot
  • ***
  • Posts: 331
Headlight brackets
« Reply #27 on: September 26, 2009, 01:34:46 AM »
I scored these on ebay for less than the price of the nasty chinese rip-offs. These are genuine Tommaselli :


Offline Ogri

  • Thinks he's a
  • Hot Shot
  • ***
  • Posts: 331
Re: My Ebay Project Bike
« Reply #28 on: September 26, 2009, 06:30:50 AM »
I've spent the last couple of days sorting out the rear light.
The cat's eye one I'd previously planned on fitting had arrived but it didn't look right, it was also really nasty plastic chrome and just cheap and nasty.
Luckily, I'd won a truck tail-light for a couple of quid - yet another impulse buy. I made a combined lamp holder and license plate bracket and welded it on; looked great:


It was only when I mounted the fender back on the bike that I realised the angle was all wrong. The tail-light pointed down and the license plate, when fitted, would rub on the tire with the rear shocks at full extension (let alone compressed.) BUGGER!
I didn't want to relocate the light bracket as it was tricky to weld in there in the first place and the necessary relocation would have it sticking out the back like the proverbial sore thumb. I couldn't bend the licence plate part away from the tire as it would end up almost horizontal. So I bodged it. I kicked the fender up at the back:


« Last Edit: September 26, 2009, 06:33:24 AM by Ogri »

Offline Ogri

  • Thinks he's a
  • Hot Shot
  • ***
  • Posts: 331
Re: My Ebay Project Bike
« Reply #29 on: September 28, 2009, 04:40:04 AM »
The only thing stopping me from tearing the bike all apart, prior to painting, is the fact that I'm still waiting for my exhaust to turn up
from Holland. I want to make sure it fits and doesn't need any frame alterations/tabs welding on before I paint the frame.
As I kicked up the rear fender I had to make up new brackets for it as the holes I had drilled in the sides of the fender no longer align. I did this yesterday and this morning I checked to see whether the fender's new position interfered with the rear end of the seat. It did, so I beat a furrow into the top edge allowing the seat enough clearance.
I took a couple of pics of the seat/fender combo, although, due to the seat-cover spikes not being folded down yet the seat didn't quite sit down all the way. You get the idea though, the tail-light is fitted in the pics but nicely tucked away so that it's only visible from the rear:


EDIT:
 
30 minutes after posting this the exhaust arrived! Looks great, went on okay but I've got most of the loom disconnected so couldn't fire her up.


« Last Edit: September 28, 2009, 07:58:03 AM by Ogri »

Offline Aaron Richard

  • Enthusiast
  • **
  • Posts: 209
  • 1975 CB550 cafe
    • shop
Re: My Ebay Project Bike
« Reply #30 on: September 28, 2009, 05:49:33 AM »
 I had the same issues with the seat I built. I ended up side mounting the license plate.


I've spent the last couple of days sorting out the rear light.
The cat's eye one I'd previously planned on fitting had arrived but it didn't look right, it was also really nasty plastic chrome and just cheap and nasty.
Luckily, I'd won a truck tail-light for a couple of quid - yet another impulse buy. I made a combined lamp holder and license plate bracket and welded it on; looked great:


It was only when I mounted the fender back on the bike that I realised the angle was all wrong. The tail-light pointed down and the license plate, when fitted, would rub on the tire with the rear shocks at full extension (let alone compressed.) BUGGER!
I didn't want to relocate the light bracket as it was tricky to weld in there in the first place and the necessary relocation would have it sticking out the back like the proverbial sore thumb. I couldn't bend the licence plate part away from the tire as it would end up almost horizontal. So I bodged it. I kicked the fender up at the back:


Offline Ogri

  • Thinks he's a
  • Hot Shot
  • ***
  • Posts: 331
Re: My Ebay Project Bike
« Reply #31 on: September 28, 2009, 08:19:04 AM »
Looks very good shiz, trouble is; in the UK our licence plates have to be 9" X 7" to be legal. A plate that size, mounted like yours just looks dumb. 
You can fit smaller ones but the bike won't pass a vehicle inspection and you will eventually get stopped by Johnny.

You don't know how lucky you are having sensible sized plates in the U.S!

Offline Aaron Richard

  • Enthusiast
  • **
  • Posts: 209
  • 1975 CB550 cafe
    • shop
Re: My Ebay Project Bike
« Reply #32 on: September 29, 2009, 08:12:20 AM »
that's right..totally spaced that out. You should just bolt it to the back of your helmet!:)

Offline Ogri

  • Thinks he's a
  • Hot Shot
  • ***
  • Posts: 331
Re: My Ebay Project Bike
« Reply #33 on: September 29, 2009, 10:22:58 AM »
that's right..totally spaced that out. You should just bolt it to the back of your helmet!:)


Hmmm... <strokes chin>

Offline Ogri

  • Thinks he's a
  • Hot Shot
  • ***
  • Posts: 331
Re: My Ebay Project Bike
« Reply #34 on: October 05, 2009, 06:06:16 AM »
I've been preparing the tank. It'll be a relatively cheap rattle-can paintjob, lacquer over black. I used Vactan rust killer and primer on the tank, then a filler primer and now Hycote gloss black. It's had about 3 light coats of black, I'm going to leave it a week then 1200-grit it smooth. Hopefully it won't need any more black, and I'll be able to lacquer. Once the lacquer is on I'm just going to leave the tank somewhere warm, dry and peaceful; not polishing the lacquer until everything else on the bike is finished.

Incidentally, I painted the rectangular filler cap cover first to make sure there were no nasty reactions between the rust killer and the subsequent layers. I figured it would be easier to strip disasters from that little piece then the tank itself.

Here's how it stands at the moment:


Yeah, I know it's a lousy pic but I kinda like this one; as if the tank is buzzing with the excitement of getting new paint:


Whilst waiting for coats of paint to dry I removed the anodizing from the throttle housing (with oven cleaner) and gave it a bit of a polish. The Run switch had faded to an unattractive 'dried blood' colour so it got its first coat of glorious red gloss (which is a bit darker than in the pic):

« Last Edit: October 05, 2009, 06:15:19 AM by Ogri »

Offline tortelvis

  • Hot Shot
  • ***
  • Posts: 537
Re: My Ebay Project Bike
« Reply #35 on: October 05, 2009, 07:35:28 AM »
Hi Kerry - yes, I was thinking about the the seat length ..the seat will end at the bridge between the rails over the rear wheel so  passengers will have to be very close friends. Sort of a roomy, stretched solo seat.

 I hadn't considered mirrors until you mentioned it, they're not required at the annual vehicle inspection test over here so I might leave them off; like indicators I'm not a big fan of them.

 Here's that finned engine cover set which I've been polishing with Solvol Autosol:


 They're actually a bit more polished than they appear, although still not up to the standards of some on this forum they're better  than they were (see 8 posts up)

Never did like Autosol! Try Happich Simichrome; that stuff will polish anything metal.

Offline Ogri

  • Thinks he's a
  • Hot Shot
  • ***
  • Posts: 331
Re: My Ebay Project Bike
« Reply #36 on: October 05, 2009, 09:28:57 AM »
Cheers tortelvis, I'll see if it's available over here.

Offline Ogri

  • Thinks he's a
  • Hot Shot
  • ***
  • Posts: 331
Re: My Ebay Project Bike
« Reply #37 on: October 06, 2009, 09:12:59 AM »
Took some ancillary stuff off today to get ready for painting, rear brake torque arm, rider footrests & sidestand.


Kerosene, Paint stripper, White Spirit and a wire wheel in the lathe got them ready for painting:


« Last Edit: October 13, 2009, 04:14:14 AM by Ogri »

Offline Ogri

  • Thinks he's a
  • Hot Shot
  • ***
  • Posts: 331
Re: My Ebay Project Bike
« Reply #38 on: October 08, 2009, 08:14:41 AM »
I took the swing arm off today, along with the chainguard. Both pretty nasty, especially the back of the chainguard. Stripping the paint was interesting as the original stuff on the swing arm was wafer thin, looked like one coat with no primer. The chainguard had some beefy primer on it and looked like it had been repainted at some stage.

#


Stripped and wire-brushed ready for rustkiller primer!

Offline Ogri

  • Thinks he's a
  • Hot Shot
  • ***
  • Posts: 331
Re: My Ebay Project Bike
« Reply #39 on: October 12, 2009, 04:11:15 PM »
Scored a Newtronics reg/rectifier unit on ebay for under £25. Very happy as they seem to be quite highly regarded by those who have fitted them.

http://cgi.ebay.co.uk/ws/eBayISAPI.dll?ViewItem&item=250507145055&ssPageName=STRK:MEWNX:IT  

Not sure if it comes with a wiring diagram, should be easy enough.

EDIT: I wrote to the new owners of Newtronics last night and awoke to find that they'd sent me wiring diagrams!

I think the one pictured below is the right one as the unit in the ebay ad shows a white wire which hooks up to the field control wire (also white) coming from the alternator. I checked the official Honda workshop manual wiring diagram and it shows the field control thingy next to the alty with a white wire. I'm assuming all is correct.


(click for bigger)

They also sent me diagrams for their other non-field control type regulator rectifier units so if anybody needs such a diagram, let me know.

In other news, the seat has been taken to an upholsterer and should be ready by the end of the week. The rear shocks on the bike were really grotty and I was intending to find better ones on ebay. On a whim I used a homemade shock compresser to take one of the them apart. Damping action was found to be perfect so I set to with rust killer and wet and dry. I've resprayed the once rusty chrome body in black and polished the alloy top mount and spring retainer. When the paint's cured I'll take a pic of it next to the manky one.
The rear fender, swingarm and chainguard have had a couple of brushed coats of exterior black gloss. I'll flat them down with fine wet & dry once they're fully dry (2012 ish) and rattle-can lacquer them.
Footrests, rear torque arm and sidestand all finished and assembled; I've added the final pic to the others above so you'll need to scroll up to take a look.
« Last Edit: October 13, 2009, 04:12:22 AM by Ogri »

Offline Ogri

  • Thinks he's a
  • Hot Shot
  • ***
  • Posts: 331
Re: My Ebay Project Bike
« Reply #40 on: October 13, 2009, 05:40:28 AM »
Just picked up the seat! Quick work huh ?

Side view, rear of the seat is on the left :


Front view, stitches hidden by gas tank - nice:


Rear view:


Close up of "tuck & roll" stitching method and textured vinyl used, good tough stuff.

« Last Edit: October 13, 2009, 05:48:23 AM by Ogri »

Offline Ogri

  • Thinks he's a
  • Hot Shot
  • ***
  • Posts: 331
Re: My Ebay Project Bike
« Reply #41 on: October 14, 2009, 02:32:11 AM »
As promised, the pic of the rejuvenated shock and its decrepit brother:


Better; a long way from perfect  but at this stage I'm trying to save money wherever I can.
« Last Edit: October 14, 2009, 02:40:51 AM by Ogri »

Offline voxonda

  • Master
  • *****
  • Posts: 2,231
Re: My Ebay Project Bike
« Reply #42 on: October 14, 2009, 03:11:56 AM »
Looks promising, like to see the end result.

Carry on!

Regards, Rob
Better sorry for failing then for the lack of trying.

Offline KB02

  • Take it easy there, Sonny, I'm an
  • Old Timer
  • ******
  • Posts: 3,760
Re: My Ebay Project Bike
« Reply #43 on: October 14, 2009, 05:15:24 AM »
That seat came out great.
1978 CB750K Project
2000 Ducati ST2
...and a pedal bike

Join the AMA today!!

My project thread Part I: K8 Project "Parts Bike"
My project thread Part II: Finishing (yeah, right) touches on Project "Parts Bike"

Offline dilbone

  • Enthusiast
  • **
  • Posts: 104
Re: My Ebay Project Bike
« Reply #44 on: October 14, 2009, 10:54:24 AM »
I already had gotten some extra vinyl to redo my first attempt on a seat but wasn't sure if I wanted to do the quilt top on it...definitely doing a quilt top now...that looks great.  I'm thinking about building a whole new pan similar to yours for mine and not use that old king/queen pan like I did on the last one.  Great ideas here!!!!

How heavy was the sheet metal you used?

Offline Ogri

  • Thinks he's a
  • Hot Shot
  • ***
  • Posts: 331
Re: My Ebay Project Bike
« Reply #45 on: October 14, 2009, 11:17:10 AM »
The base is 3mm thick, fairly heavy. I think 2mm would be more than enough but seeing as how I had to beg for the steel I couldn't really be choosy.

Thanks for all the comments BTW, much appreciated!  ;D

Offline greasy j

  • lanesplitting
  • Expert
  • ****
  • Posts: 853
  • non serviam
    • Dimale Painting & Restoration
Re: My Ebay Project Bike
« Reply #46 on: October 14, 2009, 10:45:02 PM »
that seat looks killer, great job!

Offline Ogri

  • Thinks he's a
  • Hot Shot
  • ***
  • Posts: 331
Re: My Ebay Project Bike
« Reply #47 on: October 15, 2009, 09:41:34 AM »
Decided to take the oil tank off today, and drained the engine oil. I knew I was going to make an oily mess so I put down an old bit of carpet in the middle of the back yard and went to park the bike on it. Rolled it off the centre-stand...

Now, those up to date with this account will have realised my error. For those not quite up to speed, here's a pic of some parts of mine I posted earlier in the thread.. to help you guess what happened next.
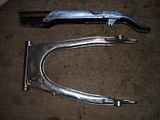


Yes dear reader, call it a Senior Moment, call it a rush of blood to the head, call it bloody stupid, but I'd forgotten there was no rear end attached to the bike.

Luckily, thanks to the partly seized centrestand axle pin the bike didn't really crash to the ground, but made stately, almost regal progress in a downward manner.

Due to my rippling, manly muscles (or lack thereof) I used a wooden prop to help lever it back up and managed to get the centrestand back down. No damage done.

So, oil tank off and currently getting de-rusted. The oil hoses were a bit horrible so I cleaned up the metal parts with a rotary wire brush. I tried black boot polish on the fabric covering the hoses and it seems to have worked very well. Before and after:
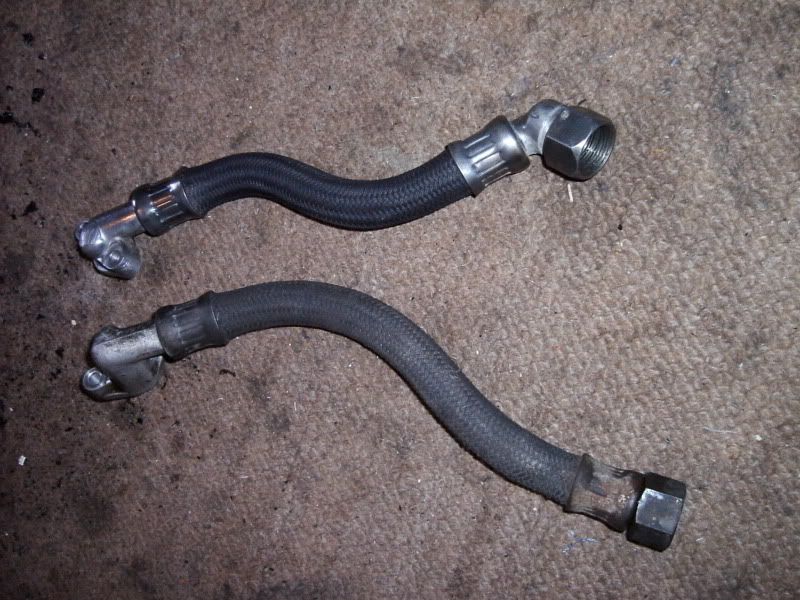


« Last Edit: October 15, 2009, 09:44:18 AM by Ogri »

Offline kerryb

  • Not a very
  • Expert
  • ****
  • Posts: 1,155
  • 78 750k 74 cb550k, '83GL1100 FXSTC, 1979 Wilmac
Re: My Ebay Project Bike
« Reply #48 on: October 15, 2009, 05:48:32 PM »
Love that seat, nice  1st class job.  But I REALLY liked the description of the oil drain procedure!!!

Keep up the great work!
intrigued by the wail...seduced by the scream.

Offline Ogri

  • Thinks he's a
  • Hot Shot
  • ***
  • Posts: 331
Re: My Ebay Project Bike
« Reply #49 on: October 16, 2009, 09:09:09 AM »
Thanks Kerry, glad you're still watching the progress.

I took off the top yoke today, stashed the handlebars in the ever increasing parts pile and suddenly the bike; or rather its remains, looks very small.

Stripped the paint off the yoke and with much wetting & drying and polish (no dremel) got a half decent result:


I'm tempted to cut off the lugs that hold the speedo/tacho bracket (I'll be fitting a bicycle computer speedo) but have found in the past they're useful for bolting on unanticipated accessories (indicators, mirrors, moose antlers.)
« Last Edit: October 16, 2009, 09:15:02 AM by Ogri »