Author Topic: CB550 top end rebuild  (Read 11543 times)

0 Members and 2 Guests are viewing this topic.

Offline DustyRags

  • I'm not skilled, I'm just a
  • Hot Shot
  • ***
  • Posts: 720
  • Just try it and see what happens
Re: CB550 top end rebuild
« Reply #25 on: December 12, 2013, 11:52:30 AM »
IIRC, my cylinder head had long bolts coming out of it- in order to get the carbs off, I would have had to move them back quite a ways, which wasn't happening. Better to move them back a bit less.

Carb cleaner works OK on varnish, but for all the flat surfaces (where the gaskets were) I used 300 grit sand paper laid on a FLAT board. Then, just move it in circles using the weight of the part or the board (very little pressure necessary) and that'll knock down the high bits (leftover gasket, knicks) and soft bits (varnish), but only wear the hard, flat bits (mating surface) very minimally. A former Honda race mechanic taught me that trick, otherwise I never would have tried it. Works a treat!
1976 CB550K- sold
2005 Kawasaki Vulcan 500- sold
2000 CB750 Nighthawk - sold
1975 XL350 - crashed
2004 Suzuki Vstrom 650 - sold

Offline Maurice

  • Hot Shot
  • ***
  • Posts: 450
Re: CB550 top end rebuild
« Reply #26 on: December 12, 2013, 12:02:13 PM »
Dusty,

yes I remember you suggesting that. I'm afraid I'm not that brave to take a whole sheet of even 1200 grit sandpaper to the head gasket surface :) I can believe it must be very effective, maybe next job I'll look into it. Here I don't want, or hopefully need, to disturb the base gasket since tensioner stays in place, I can't imagine having to go through the same with the jugs and case...

Engine had 120 PSI across the board before it ran, and I hope that the smoke was valve seals. They are darned hard and brittle, so far valves don't wobble in their guides keep my fingers crossed.

Thanks

Offline DustyRags

  • I'm not skilled, I'm just a
  • Hot Shot
  • ***
  • Posts: 720
  • Just try it and see what happens
Re: CB550 top end rebuild
« Reply #27 on: December 12, 2013, 01:53:35 PM »
They key is to use a very flat surface to back it. It's a a pressure-over-area thing :)

For varnish, carb cleaner works well. For baked-on gasket glue (which I suspect is what I had), not much did it short of lapping.

120 ain't bad. Was that a hot engine with the throttle open and all the plugs out?
1976 CB550K- sold
2005 Kawasaki Vulcan 500- sold
2000 CB750 Nighthawk - sold
1975 XL350 - crashed
2004 Suzuki Vstrom 650 - sold

Offline Maurice

  • Hot Shot
  • ***
  • Posts: 450
Re: CB550 top end rebuild
« Reply #28 on: December 12, 2013, 02:46:13 PM »
120 was when I first got the bike, first thing I did was put a bit of oil in the plug holes, compression gauge, WOT and kick. That's when I saw #2 hole half-stripped, the compression gauge has short threads and barely grabs, not even 1 turn, but luckily still holds compression.

Never checked compression hot actually. Got it started, verified ignition and charging systems work well, carbs work meh (need tuning, I'm trying pods, don't throw things at me!...) but then it started smoking, oil pump and tappet cover leaking etc.

Can't wait to ride it.

Offline DustyRags

  • I'm not skilled, I'm just a
  • Hot Shot
  • ***
  • Posts: 720
  • Just try it and see what happens
Re: CB550 top end rebuild
« Reply #29 on: December 12, 2013, 03:43:39 PM »
Sounds about right. As long as it's even that's the most important thing. Compression gauges aren't all that accurate, I hear.

I'm pods-agnostic, but I got two questions: a) why? And b) have you considered getting it running solid first, before you start throwing in variables? I mean, if it was me, I wouldn't start mucking with something like that until I knew my carbs were sorted, just to make sure I'm not trying to fix the wrong part, ya know?

Oh, and read this thread on pods: Some really good info there I didn't have: http://www.caferacer.net/forum/technical/19639-pod-filter-thread-geeto.html
« Last Edit: December 12, 2013, 03:55:36 PM by DustyRags »
1976 CB550K- sold
2005 Kawasaki Vulcan 500- sold
2000 CB750 Nighthawk - sold
1975 XL350 - crashed
2004 Suzuki Vstrom 650 - sold

Offline Maurice

  • Hot Shot
  • ***
  • Posts: 450
Re: CB550 top end rebuild
« Reply #30 on: December 12, 2013, 04:58:29 PM »
I run pods on my XS650 with EX500 carbs. Apples and oranges I know but CV carbs are finicky with those and it's fairly dialed for the street.

But I see what you're saying and I do have the stock airbox that I will probably use to sort things out first. I just don't see why pods (UNI btw, bit different from pleated pods) wouldn't work.

Way ahead, let's get this motor together and cleaned up, there's the wiring to finish etc :)

Thanks!

Offline DustyRags

  • I'm not skilled, I'm just a
  • Hot Shot
  • ***
  • Posts: 720
  • Just try it and see what happens
Re: CB550 top end rebuild
« Reply #31 on: December 12, 2013, 10:34:42 PM »
Good call- let's not burn that bridge 'till we get to it ;)
1976 CB550K- sold
2005 Kawasaki Vulcan 500- sold
2000 CB750 Nighthawk - sold
1975 XL350 - crashed
2004 Suzuki Vstrom 650 - sold

Offline Maurice

  • Hot Shot
  • ***
  • Posts: 450
Re: CB550 top end rebuild
« Reply #32 on: December 14, 2013, 03:21:10 PM »
Finally, the spark plug time-serts arrived. Bout time.


This is what the threads looked like before, only about the lower half near the combustion chamber was still good, and even then...


There's a special tool, quite pricey but it works really well. The first part is a double tap, that starts by threading in what remains of the existing threads and steps up to the insert size.


Thread it all the way. Easier said than done, turn 1/4, back out, start over etc. until it goes all the way through. Then keep turning until the top cutting thread is 1/4" below the top of the hole.


Crappy pic of the top. It's cold here, fogs up the lens.


Second part is this cutting tool, goes over the tap so it's centered, and you cut a seat for the insert.


So it looks like this. Once the outer part is shiny you're done. It takes some doing since the cutting tool needs to cut quite a bit of the inside.


I believe the above already has the insert, but the important is the shiny outside.

The insert. Third step is to lubricate the third part of the tool because it needs to finish cutting the insert. The tool.
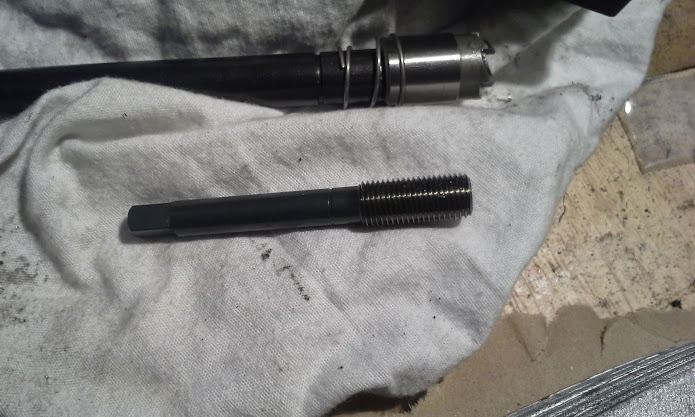


Start the insert on it. Doesn't go very far.


Then off you go.


Done.


I believe we're good now.


Never did this, it was a bit stressful but went well. I think. Only one way to find out I guess.
« Last Edit: December 17, 2013, 11:10:42 AM by Maurice »

Offline Maurice

  • Hot Shot
  • ***
  • Posts: 450
Re: CB550 top end rebuild
« Reply #33 on: December 14, 2013, 03:27:12 PM »
While we're here I did a bit of valve lapping:


Intake seat after.


Intake valve.


Exhaust seat.


Valve.


Didn't take any shots before....

Does this look ok or does exhaust need a bit more? I really don't want to eat too much into the metal...

The great part is that I put the valves back in the springs with the little retainers either falling into the spring well or rolling down the floor, only to realize I forgot to install the new valve seals.

I'll take a pic of the homemade spring compressor, ghetto.
« Last Edit: December 16, 2013, 03:53:57 PM by Maurice »

Offline DustyRags

  • I'm not skilled, I'm just a
  • Hot Shot
  • ***
  • Posts: 720
  • Just try it and see what happens
Re: CB550 top end rebuild
« Reply #34 on: December 14, 2013, 08:40:07 PM »
Man, that insert is awesome! I had no idea those things existed- filing that away for when I need it.

I'd say your valves look good, but what do I know- only done i once, and I was shooting pretty blind then. :P
1976 CB550K- sold
2005 Kawasaki Vulcan 500- sold
2000 CB750 Nighthawk - sold
1975 XL350 - crashed
2004 Suzuki Vstrom 650 - sold

Offline dave500

  • Really Old Timer ...
  • *******
  • Posts: 17,046
  • WHAT?no gravy?
Re: CB550 top end rebuild
« Reply #35 on: December 14, 2013, 09:02:38 PM »
that all looks great,your doing a good job,take your time.

Offline DustyRags

  • I'm not skilled, I'm just a
  • Hot Shot
  • ***
  • Posts: 720
  • Just try it and see what happens
Re: CB550 top end rebuild
« Reply #36 on: December 14, 2013, 09:18:59 PM »
BOOM! You got the Dave seal of approval! All set now!  ;D
1976 CB550K- sold
2005 Kawasaki Vulcan 500- sold
2000 CB750 Nighthawk - sold
1975 XL350 - crashed
2004 Suzuki Vstrom 650 - sold

Offline Maurice

  • Hot Shot
  • ***
  • Posts: 450
Re: CB550 top end rebuild
« Reply #37 on: December 15, 2013, 04:33:27 PM »
Thanks guys, appreciate it.

I finished the valves, new seals and all lapped, and I didn't lose any of the retainers it's a miracle (one made me sweat, I didn't see where it fell but found it quickly). Didn't seem to need a whole lot of lapping to get nice rings so I didn't go crazy. The new seals are a lot tighter, definitely needed new ones. Started cleaning the whole thing with kerosene, while I was at it I poured some in the ports for a quick leak test and it looks good there.

Never used kerosene before, this time I got a gallon and a squirt bottle and it's nice! Well apart from the smell... Better than mineral spirits I find.

We're still snowed out so this is good I'll take my time :)

Offline dave500

  • Really Old Timer ...
  • *******
  • Posts: 17,046
  • WHAT?no gravy?
Re: CB550 top end rebuild
« Reply #38 on: December 15, 2013, 10:44:05 PM »
i like the smell of kerosine,it smells like........victory!with your valves now reinstalled place a rag over the stem end and carefully with the ball end of a hammer just give them a gentle settling rap enough to just open the valve say once or twice,itll square the retainers down and if one is going to pop out itll do it now not later once you crank it over,dont hit the retaining cap just the very valve stem the tappet hits.

Offline Maurice

  • Hot Shot
  • ***
  • Posts: 450
Re: CB550 top end rebuild
« Reply #39 on: December 16, 2013, 03:53:00 PM »
Spring tool. The plastic bit is from some dremel fitting, no idea which, I just found it laying around and it fits perfect. It takes some finesse to position the thing but after a few times does the job well. Not sure where the blue hue comes from, I swear I'm not into colored neons on my vehicles.


These come in handy for grabbing the keepers.


So the suction cup tool works easier, this needs to be achieved.


Another thing, the valve seals have a washer inside them towards the tip. I found that grabbing that was an efficient way to get them off without risking any damage. Grab like such, squeeze, pull straight out (that's what she said...).


Well the thing does not necessarily come out intact, but the point is that even then the pliers never touch the guide underneath.


I'm not saying it's foolproof, but if I can do this chances are nobody will mess it up.

Too cold to do anything today, I'm tired anyway. Sometimes I wish I could quit my day job it's frustrating to leave this stuff laying around...

Offline Maurice

  • Hot Shot
  • ***
  • Posts: 450
Re: CB550 top end rebuild
« Reply #40 on: December 16, 2013, 03:57:30 PM »
Oh, I have questions.

Since it's cold, below freezing or around that where I work these days, does it affect torque readings or settling thereafter?

I have other questions but I forget... It'll come back no doubt.

Thanks


Offline DustyRags

  • I'm not skilled, I'm just a
  • Hot Shot
  • ***
  • Posts: 720
  • Just try it and see what happens
Re: CB550 top end rebuild
« Reply #41 on: December 16, 2013, 08:48:12 PM »
I wouldn't worry about temperature differentials- the bike changes up and down a hell of a lot more in the course of a day ride than it does all year with ambient temperatures. I'd re-torque the head bolts after a good ride or three just to make sure nothing's worked loose, but otherwise I think you're fine.
1976 CB550K- sold
2005 Kawasaki Vulcan 500- sold
2000 CB750 Nighthawk - sold
1975 XL350 - crashed
2004 Suzuki Vstrom 650 - sold

Offline edwardmorris

  • Youngish
  • Old Timer
  • ******
  • Posts: 3,142
  • Do not cause harm, nor respond to harm with harm.
Re: CB550 top end rebuild
« Reply #42 on: December 17, 2013, 09:18:30 AM »
.......Sometimes I wish I could quit my day job it's frustrating to leave this stuff laying around...

I hear ya. I don't quite wanna quit, just a good chunk of uninterrupted time off would suffice :)

Offline Maurice

  • Hot Shot
  • ***
  • Posts: 450
Re: CB550 top end rebuild
« Reply #43 on: December 17, 2013, 10:47:18 AM »
.......Sometimes I wish I could quit my day job it's frustrating to leave this stuff laying around...

I hear ya. I don't quite wanna quit, just a good chunk of uninterrupted time off would suffice :)

Yeah well, college for the kids isn't going to pay itself these days. F'n greed in this world...

I have this question: when I go to put the camshaft back on, is plain motor oil ok or is assembly lube required?

Keeping fingers crossed that head gasket won't leak.

Offline edwardmorris

  • Youngish
  • Old Timer
  • ******
  • Posts: 3,142
  • Do not cause harm, nor respond to harm with harm.
Re: CB550 top end rebuild
« Reply #44 on: December 17, 2013, 10:50:51 AM »
.......................

I have this question: when I go to put the camshaft back on, is plain motor oil ok or is assembly lube required?

Keeping fingers crossed that head gasket won't leak.

I can't find the thread that discussed this but if I recall correctly, the idea was that if you're gonna be running your bike pretty soon after reassembly, oil will do and if you plan on waiting a while before starting it, assembly lube is better. BUT, I'll let the experts weigh in on this :)

Offline Maurice

  • Hot Shot
  • ***
  • Posts: 450
Re: CB550 top end rebuild
« Reply #45 on: December 17, 2013, 11:20:12 AM »
Ok, definitely won't wait much until I at least attempt to run it. Carbs are clean and ready to go, it's just a matter of finding a stretch of "free" time long enough.

It's so cold it's almost good, because I don't have to contend with humidity in the air. That and I guess the oil will remain a bit thicker and not run down into the pan (or the floor) so quick. Problem is when I hit my fingers it seems to hurt 10x more, with a delay, so it goes "whack your knuckles, watch as the pain will start anytime now"... Dexterity goes out the window too.

A re-torque is going to require removing the cover, then. I guess I'll hold off on putting sealer on the pucks, install them dry, run the beast a bit, re-torque, glue the pucks.

Offline DustyRags

  • I'm not skilled, I'm just a
  • Hot Shot
  • ***
  • Posts: 720
  • Just try it and see what happens
Re: CB550 top end rebuild
« Reply #46 on: December 17, 2013, 01:24:15 PM »
Oh yeah, huh, I forgot about the pucks- been over a year since I did this. I'd lube the pucks for sure. I always put SOMETHING wet on all the rubber, just to make sure it doesn't stick and go in under tension. But that's just me.

I can see assembly lube making sense if it's gonna be stored for a bit, but let's face it, once that baby starts and roars, you're gonna have hot oil and machined steel scrubbing it off pretty quick. Wouldn't worry about it. :)
1976 CB550K- sold
2005 Kawasaki Vulcan 500- sold
2000 CB750 Nighthawk - sold
1975 XL350 - crashed
2004 Suzuki Vstrom 650 - sold

Offline Maurice

  • Hot Shot
  • ***
  • Posts: 450
Re: CB550 top end rebuild
« Reply #47 on: December 18, 2013, 05:30:52 AM »
I like to use silicone lubricant on rubber, seems to make it more pliable and is fairly neutral. Great for installing carb boots, holding o-rings in place, etc. It smells like donkey but hey.

I got the carb boots replaced, actually. Carbs are ready to go, I gave the head a good scrubbing (not that one, silly) on the outside, it's amazing all the nooks and crannies in there. Re-installed the oil pan, it's squeaky clean inside. Was. Then I went back home before my nose froze off.

Offline rb550four

  • Master
  • *****
  • Posts: 2,474
  • I'm nobody's slave and nobody's master
Re: CB550 top end rebuild
« Reply #48 on: December 18, 2013, 03:21:04 PM »
Looking good. The rubber items don't have to smell like donkey butt, a freezer bag with some simple green in the bottom of it, drop all your rubber items in and zip it, comes out pliable and has that great simple green aroma . Works on anything rubber and in the bag  parts don't get lost.
For stubborn rubber parts , say like when you are trying to push the carbs back in, or popping on those plastic side covers,
I always put a hairdryer to them a few mins. before popping those items in . Especially when reinstalling carbs... no damage ... goes in way smoother and you won't have to push your nuts off to get them to seat.
    Hairdryer is one of the handiest tools in the shop... Loosens up varnish in stuck carbs so you can take them apart with out breaking things, the floats are a little trickier , sometimes I warm up the brass with a soldering iron when they are really stuck, but most times its the hairdryer. stuck slides...hairdryer... anything rubber ...hairdryer... engine paint with no drips ...hairdryer.  If you don't have one , don't use the wife's, unless you were planning on getting her a new one anyways......
    Starting to sound like Bubba and shrimp (Forest Gump). gonna go now.
A few Honda 500's, a few Honda 550's, a few Honda 650's, '72 cb 450, a couple 500/550/650 hybrids, and 2001 750. 
  550 Snowbike -Somebody had to do it.
  http://forums.sohc4.net/index.php/topic,101678.0.html             
http://forums.sohc4.net/index.php/topic,137317.msg1550907.html#msg1550907

Offline Maurice

  • Hot Shot
  • ***
  • Posts: 450
Re: CB550 top end rebuild
« Reply #49 on: December 19, 2013, 05:21:30 AM »
Hah, Bubba, thanks for the simple green tip, will think of it when I need to re-use rubber. Right now every single o-ring or gasket just snaps off they're so old.

I use a heat gun actually, had to the other day it was below freezing and the rubber was hard. The heat gun on high is not to be confused with a hair dryer: it'll set your hair on fire or at the very least give you a nice afro :D

Should I be concerned with this? I just noticed while wiping down the camshaft:


Zoomed out:


Follower doesn't seem to have suffered (this is before I cleaned, don't yell).


At any rate I place the head gasket and o-rings. The engine cases look like crap and they'll stay that way. It's not that I'm lazy (well, I am), but I happen to like the looks. I think they look nice once cleaned but weathered.


The dowels are great for positioning the gasket.


I made sure the o-rings were in place. This is the gasket with head just laid on top still not torqued down. The cylinder fins will get cleaned once it's all buttoned up, didn't want to throw dirt particles into the engine.


Cell phone is tough to take nice pictures, that and lack of good lighting.


After scratching my head a bit, I decided to try this to start the nuts. The washers were more or less easy with tweezers.


Then I cleaned the head cover and called it a night.