Author Topic: '77 550 Resto-Mod  (Read 8046 times)

0 Members and 1 Guest are viewing this topic.

Offline youngerthanmybike

  • Enthusiast
  • **
  • Posts: 104
'77 550 Resto-Mod
« on: September 25, 2008, 06:55:28 PM »
I bought this as my first bike in late spring. Well, first real bike. I've done a lot of work on Jeeps in the past, so I'm not afraid to tear into something, but I was sure this would open up a few new projects. Had about 30k on it when I bought it, was running decently. Had it tuned up and inspected when I bought it and started riding it shortly thereafter. As the summer went on, it started leaking more and more oil, to the point that I had to pay attention to what pants and shoes I was wearing if I didn't want them stained. Or, burn my shins if I was wearing shorts. So about a month ago, I started planning for a rebuild. The tank needs to be repainted, but that's a winter project. Everything else seems to be in pretty good shape, just a little aged, and that's to be expected.

Here's how she looked when we brought her home- complete with crash bars and fuddy duddy handlebars.


Pulled the crash bars, a new set of sport bars, and it's a whole new look. You can see the beginnings of the oil leaking problems evidenced by the stained driveway...


Offline youngerthanmybike

  • Enthusiast
  • **
  • Posts: 104
Re: '77 550 Resto-Mod
« Reply #1 on: September 25, 2008, 07:03:19 PM »
My work schedule has been slow, so this past week I dove into the engine. In fact, I dove in so fast, I kinda forgot to take pictures of my progress the first day or two.

I pulled the tank, the rocker cover, and tied the carbs back. Then I removed the exhaust and wrestled the head out. In the process, because I didn't see the two small bolts that hold the head to the cylinders, I unintentionally pulled the cylinders out too.

The next day I was planning on taking the head and cylinders over to the machine shop to have them cleaned up and honed. Unfortunately I don't have the cash for a valve job right now, but I at least wanted to have it checked out. Right before I left, I figured I should pull the pistons to bring with me. Bad idea to do in a hurry. I lost one (just one) of the wrist pin spring clips. It went "ping" out into the yard somewhere- I never heard it land. And if that wasn't enough, my oily fingers managed to drop the 10mm deep socket I was using as a pusher into the crankcase. I still haven't got it back out yet- any ideas?

After I got home, I pulled the carbs out, the stock air box and set them aside.


Offline youngerthanmybike

  • Enthusiast
  • **
  • Posts: 104
Re: '77 550 Resto-Mod
« Reply #2 on: September 25, 2008, 07:10:58 PM »
Today I went to town and really made some progress. Because I had everything else off and out, I decided that as long as I was this close, I'd pull the rest of the engine, that way I could clean and paint it along with everything else. And maybe get that 10mm socket out too..... :-\

I started by cleaning the carbs- from the outside. I didn't pull any of it apart just yet, except to polish the top cover pieces. Here's the before and after shots-


I pulled the footpegs, the sidecovers, the starter, etc, etc. so all that was left was the engine. Then I disconnected everything except the rear engine mount bar, which I pulled last while I was supporting the engine. And yes, I pulled it all out myself without torquing my back too bad.


After I had the engine out, I pulled the bike out of the shed into the yard so I could degrease the frame good and touch up a few areas of paint on it.

« Last Edit: September 29, 2008, 06:05:10 PM by youngerthanmybike »

Offline youngerthanmybike

  • Enthusiast
  • **
  • Posts: 104
Re: '77 550 Resto-Mod
« Reply #3 on: September 25, 2008, 07:23:01 PM »
After that, I went to town on the cleaning. First I cleaned up the engine. Two cans of brake cleaner, a toothbrush and a small scrub brush later, it looked pretty good. I forgot to take a close up of it though.


Next I cleaned up the oil filter housing and prepped it for paint. I used the Duplicolor 500 degree stuff, I forget which code, 1615 I think?


Next shots are all of polishing the aluminum pieces. I didn't want the expense of buying an entire buffer, so I opted to buy a 4" wheel which I fitted to my angle grinder. I also didn't use the red rouge at all, I just cleaned good with brake cleaner and steel wool, followed by the white rouge. I think it came out great. It is quite polished, though there are still imperfections here and there. Most of the pieces have not been cleaned and waxed yet though, so there is still some residue from the polishing. The only downside to using the angle grinder is that it spins at like 10K rpms, so stuff flies everywhere. I was a mess by the time I was done. You can see how dirty my angle grinder is. And my buffing wheel is toast, there isn't anything left of it- only a 2.5" disk, which doesn't reach into anything. I'll have to buy another one to finish the project.


To get the black paint in, I just taped over the whole thing, as you can see, and cut out around the oval. Right after I sprayed it with the black paint, I took a rag with paint thinner on it and lightly wiped off the letters. It came out great.

Offline youngerthanmybike

  • Enthusiast
  • **
  • Posts: 104
Re: '77 550 Resto-Mod
« Reply #4 on: September 25, 2008, 07:28:01 PM »
Late this afternoon I picked up my parts from the machine shop, so tomorrow I'm going to prep the cylinders, the head, and the rocker cover for paint, and hopefully get a coat on them.

I just ordered a 650 cam to drop into this thing when I put it back together, so I'm anxiously awaiting it's arrival. I think I'm going to have to order a new cam chain guide as mine is worn pretty ugly.

Is there any way for me to tell whether or not I need new rings for my pistons? My machinist suggested that I should do it, but I know he's speaking from principle, not necessarily from familiarity with old Hondas.

Any other suggestions or feedback is totally welcome. Having the awesome resource of this forum makes tackling something like this a much more fun and do-able project. ;D

Offline Ecosse

  • Really Old Timer ...
  • *******
  • Posts: 5,051
  • Member #4139
    • My 550 walk around video
Re: '77 550 Resto-Mod
« Reply #5 on: September 25, 2008, 07:48:29 PM »
Glad to see those ape hangers go!

What are your plans for bodywork- if any?
1974 CB550K     
                 
            Help stop TORTURE and SLAUGHTER of cats, dogs, and other kept animals.                                                  www.animalsasia.org

                                  Your 1%er name

                                                A WORTHY EFFORT: http://www.honorflight.org.

Offline scunny

  • Old Timer
  • ******
  • Posts: 4,618
  • don't call me expert
Re: '77 550 Resto-Mod
« Reply #6 on: September 25, 2008, 08:03:39 PM »
you can gap the rings to see if they are in spec. but if you can afford it, go with new ones
past-cb100,ts250,cb500,cb500,gs1000,gs650g.phillips traveller
present-CB 650 retro
            VTR1000F3
           XL250S riverbed rocket
           TS250[sold]
           TS185[sold]
           XL125S[sold]
           MT50 (white)
           MT50 (red)[sold]
           KN250/XS400 project
           XR/XL250 bitsa under construction
           SL100[sold]
           XL250R
           pedal(pub bike) leaks oil
my gallery http://gallery.sohc4.net/members/personal/scunny

Offline youngerthanmybike

  • Enthusiast
  • **
  • Posts: 104
Re: '77 550 Resto-Mod
« Reply #7 on: September 25, 2008, 09:12:17 PM »
Those tall bars were actually kinda comfy, as much as I hate to admit it.... but I was glad to see them gone too.

I don't have plans for bodywork at this point in time. I'll probably paint the tank and covers over the winter, but other than that, nothing yet. I like the look of some of the more mild looking cafe bikes. I'd probably shorten the rear fender, but not lose it totally, maybe the same with the front. As far as a seat, again, something tasteful and primarily comfortable. I want to be able to go for a two or three hour ride and not be dying by the end of it, like my buddy on his CBR is.

I'll have to look into gaping the rings. I was caught off guard when I realized that what they charge for a set of rings is only for one piston.....my bad. Anybody know of a place to pick up rings on the cheap?

This whole thing started with the statement- "honey, I'm just going to go ahead and order the entire engine gasket set so I can do the whole thing and not worry about it." I was thinking I'd be able to put this back together for less than $200....boy was I wrong :o

It's hard to justify (what feels like) pouring money into a bike when my wife is 8.5 months pregnant. Needless to say, the bike is the furthest thing from her mind. Some might say that's just the time to slip one past the wifey, but that's not the way I roll.

So far:
Gaskets - 90
Machine Shop - 180
Cleaning supplies - 50
Buffing/polishing supplies - 20
650 cam - 30

To go:
Rings
Cam chain slipper
Choke and throttle cables


I think that's it.....


.....but I'm sure I'm wrong.

Offline scunny

  • Old Timer
  • ******
  • Posts: 4,618
  • don't call me expert
Re: '77 550 Resto-Mod
« Reply #8 on: September 25, 2008, 09:20:58 PM »
just consider it cheap therapy  :D
past-cb100,ts250,cb500,cb500,gs1000,gs650g.phillips traveller
present-CB 650 retro
            VTR1000F3
           XL250S riverbed rocket
           TS250[sold]
           TS185[sold]
           XL125S[sold]
           MT50 (white)
           MT50 (red)[sold]
           KN250/XS400 project
           XR/XL250 bitsa under construction
           SL100[sold]
           XL250R
           pedal(pub bike) leaks oil
my gallery http://gallery.sohc4.net/members/personal/scunny

Offline youngerthanmybike

  • Enthusiast
  • **
  • Posts: 104
Re: '77 550 Resto-Mod
« Reply #9 on: September 25, 2008, 09:28:59 PM »
That's even funnier when you take into consideration that I have my master's degree in counseling......

Offline Ecosse

  • Really Old Timer ...
  • *******
  • Posts: 5,051
  • Member #4139
    • My 550 walk around video
Re: '77 550 Resto-Mod
« Reply #10 on: September 25, 2008, 09:29:19 PM »
Think about the day you can pass the keys along to your son or daughter.
1974 CB550K     
                 
            Help stop TORTURE and SLAUGHTER of cats, dogs, and other kept animals.                                                  www.animalsasia.org

                                  Your 1%er name

                                                A WORTHY EFFORT: http://www.honorflight.org.

comp

  • Guest
Re: '77 550 Resto-Mod
« Reply #11 on: September 25, 2008, 10:32:37 PM »
i need to try polishing that way

Offline KB02

  • Take it easy there, Sonny, I'm an
  • Old Timer
  • ******
  • Posts: 3,760
Re: '77 550 Resto-Mod
« Reply #12 on: September 26, 2008, 04:52:20 AM »
1978 CB750K Project
2000 Ducati ST2
...and a pedal bike

Join the AMA today!!

My project thread Part I: K8 Project "Parts Bike"
My project thread Part II: Finishing (yeah, right) touches on Project "Parts Bike"

Offline youngerthanmybike

  • Enthusiast
  • **
  • Posts: 104
Re: '77 550 Resto-Mod
« Reply #13 on: September 26, 2008, 10:25:19 PM »
Thanks for the compliments so far, I like having the outside feedback.

So I ordered my next batch of parts from www.motogrid.com
They had the best prices and shipping rates- rings were $28/set, cam chain slipper was $54 I think.
That, a few other misc odds and ends should be here in a week or so.

Here's what I got done today-
I spent a good bit of time cleaning up the head further, but I feel like I still have a long way to go.
I swapped out my old polishing wheel for a new one, I think this one is better quality.
I cleaned up the pistons, and stripped the finish from the rocker cover and the right crankcase cover with aircraft remover.


When I picked up my stuff from the machine shop, the owner/machinist explained to me how to remove the old and install new rings. He even made me practice before I left his shop. He was really helpful. He also told me to wipe down the honed cylinder walls with ATF fluid, which has a high detergent content to help remove all of the honing compound. He said that'll help keep my new rings in good shape. I still have a good bit of work left to do to the head, and in hindsight, I'm not entirely sure what I paid him to do, but I can't sweat that now.

He said that he checked the seals of the valve seats and they were good. That being said, I have new valve guide oil seals with my gasket set and the head is still a good bit dirtier than I'd like. It just seems like now is the time to really clean this up.  I'm thinking that I should at least lap the valves, even if I'm not having the entire head redone. Thoughts on that? How clean should this be? The intake ports are clean, but the exhaust ports are filthy, should I be concerned?


Offline youngerthanmybike

  • Enthusiast
  • **
  • Posts: 104
Re: '77 550 Resto-Mod
« Reply #14 on: September 29, 2008, 05:46:04 PM »
Alrighty, progress is being made. I spent a lot of time taping things off, and thinking "there has to be an easier way..."


I filed down, then sanded the fins on the cylinders so that I can easier wipe the black paint off of them after I get them painted. They're pretty inconsistent to one another, so the file worked good to even them up a bit. After I filed them, I hit them with a couple different grits of sandpaper around a block to polish them up a bit.


I also got my 650 cam in the mail over the weekend, and it looks pretty good for a used cam. You can see the difference in the lobes just by eye. The cam on the left is the stock 550 cam, the one on the right is the stock 650 cam.


Offline youngerthanmybike

  • Enthusiast
  • **
  • Posts: 104
Re: '77 550 Resto-Mod
« Reply #15 on: September 29, 2008, 06:03:05 PM »
I decided to try my luck at soda blasting some of the rest of the parts that still needed cleaning. I had already used up a few toothbrushes and close to a dozen cans of brake cleaner, and despite the gloves, my fingertips are disintegrating because of the chemicals, and I don't have dish-pan hands either.

I picked up a gravity feed blaster gun from Harbor Freight, and went about finding some baking soda. I tried my luck at the pool supply store first - $18 for 12lbs. Then I decided to check Walmart. They were out of big containers, but even the small 1lb boxes were only $.50 each, so I bought 20  ;D

The gravity feed gun works okay, but not great. The baking soda is so fine that it doesn't seek it's own level or run to the hole very well. The hopper isn't exactly funnel shaped either, it's more of a box with a hole in the bottom. My small pancake air compressor can't keep up very well either. Other than that- the blasting is working great. I tried it first on an empty aluminum can, and it quickly blew the paint right off. Then I set off to clean up the cylinders so I could get some paint on them. The pic I posted above shows how well they are cleaned inside the fins. Here's a comparison on the cylinder head of one exhaust port mostly done, and one that hasn't been touched.


I was able to get some paint on the rocker cover and on the cylinders, so here's those pics as well. I didn't paint them in the laundry room, but it makes a good drying room-


I also picked up the stuff I needed to lap the valves and clean them up as well. I let the head sit overnight yesterday with some lubricant in each port, and 3 or 4 of the valves had leaked through overnight. I couldn't find a cheap C-clamp valve spring compressor, so I took a page from somebody else's book and made my own with a C-clamp and a cut-away socket. I used an old 3/4" socket, and in hind sight I would recommend something closer to a 5/8" because it would sit nicer on top of the spring collar. I almost lost one of the valve keepers because of my 3/4" socket. Here's a pic of my before and after exhaust valves. I have them all cleaned, I'll lap them tomorrow.


comp

  • Guest
Re: '77 550 Resto-Mod
« Reply #16 on: September 30, 2008, 11:26:00 AM »
looking good ,keep the pics coming  ;D

Offline youngerthanmybike

  • Enthusiast
  • **
  • Posts: 104
Re: '77 550 Resto-Mod
« Reply #17 on: September 30, 2008, 07:51:47 PM »
If you've been reading any of my thread on cleaning/porting my 550 head, you've already seen some of this, but for the sake of finding it all, I'll post it up again. Here's a link to the head-thread: http://forums.sohc4.net/index.php?topic=41291.0
Here's another couple links with some great info on porting:
http://forums.sohc4.net/index.php?topic=19587.0
http://forums.sohc4.net/index.php?topic=17374.0

~~~~~~~~~~~~~~~~~~~~~~~~~~~~~~
Well, I ported.

But I started off with a few other things. First I lapped the valves. Kind of an annoying repetitive process, but I could see the progress I was making, so that helped. Here's a few pics of that. I used a water based compound. The compound and the tool I got at NAPA for about $14.


If you look closely, you can see that I've lapped the intake valve on the right, but not the one on the left. What you'll notice is the slight gray ring that matches up on both the valve and the seat. On the other valve, everything is black.


Then I finished up my soda blasting. Overall, it worked pretty good, not quite as abrasive as I would have hoped, but I think with a better compressor and gun things would have worked out better.

When I finished that up, I found my Dremel (actually my Grandfather's Dremel- it has a build date on it of 1942), realized I had all the bits I needed to get started, and I went to it. The first time through, I just cleaned up all of the casting marks. Even using the steel cutters, I think my tooling marks are smoother than most of the casting. I started on the exhaust ports, figuring those were less crucial if I goofed something up. After I finished round one on both the exhaust and intake, I came back into the house and re-read Jonesy's thread and the "Porting the Honda Head" article on Branch's work. Then I went back out and took a bit more out of the intake ports, especially around the valve bosses. Nothing has been sanded or polished yet, a few of the ports I hit with a scotchbrite wheel, but nothing is "done."

I'd love to hear some feedback on how it looks, what I could do more of or better-

Before:


Round One:


Round Two (intake, then exhaust):


That's not all I got done today either  ;D

The engine is all painted up-


As are the cylinders. I tried to just use a rag with paint thinner on it to wipe down the fins right after I sprayed them, but I felt like I made too much of a mess. In hindsight, I should have worked on my technique a bit to be able to do it better as wiping it down with a rag each coat would have been much easier than wet-sanding, cleaning and doing touch-up for the chipped spots. All said and done, it looks pretty sweet! I'm painting the head similarly, and the rocker cover will be the same silver as the case with the tappet covers polished.


comp

  • Guest
Re: '77 550 Resto-Mod
« Reply #18 on: October 01, 2008, 12:43:31 PM »
looks good here ,,,,i'd wet test your valves before you install the head just in case

troppo

  • Guest
Re: '77 550 Resto-Mod
« Reply #19 on: October 02, 2008, 02:49:43 AM »
Quote
As are the cylinders. I tried to just use a rag with paint thinner on it to wipe down the fins right after I sprayed them, but I felt like I made too much of a mess. In hindsight, I should have worked on my technique a bit to be able to do it better as wiping it down with a rag each coat would have been much easier than wet-sanding, cleaning and doing touch-up for the chipped spots. All said and done, it looks pretty sweet! I'm painting the head similarly, and the rocker cover will be the same silver as the case with the tappet covers polished.
If theres a next time, try wrapping a rag dampened with thinners around a small block of wood or something, it will prevent the rag folding around the edges of the fins

Offline youngerthanmybike

  • Enthusiast
  • **
  • Posts: 104
Re: '77 550 Resto-Mod
« Reply #20 on: October 02, 2008, 04:03:32 AM »
Yeah, I was figuring on testing the seal of the valves again before it all goes back together, but thanks for reminding me to do that before I paint.

I'm going to paint the head the same as the cylinders, so I'll try the block of wood technique, that sounds like it should work out much better.

Offline youngerthanmybike

  • Enthusiast
  • **
  • Posts: 104
Re: '77 550 Resto-Mod
« Reply #21 on: October 09, 2008, 06:36:20 PM »
A little update:
I painted the head, and worked on my fin technique some, but the fins on the head are all over the place with each other in comparison to the cylinders. It took some screwing around, but I got them all filed down and lightly sanded. I put the first coat of paint on tried the rag over the wood block idea and it still didn't work out too great. I ended up scraping them and lightly sanding them before the paint cured so that it wouldn't chip. With the rag, the paint seemed to set up too fast for me to be able to just wipe it off. It still looks good though.


I guess I didn't take any of it by itself with the paint finished.

I got the head put back together, with a little fighting with the valve keepers. I wet tested the valve seals right away, and they were a little leaky. I was frustrated, so I left it for the next day.

I decided I'd work on something else, so I installed the new rings on the pistons and installed the pistons back onto the rods.


Made sure everything else was ready to go, oil seals and what not, and dropped the cylinders on. I heard I might need a ring compressor, but with the shape of the bottom of the cylinders, I was able to lightly work them on with a little wiggling.


Offline FunJimmy

  • Who you calling
  • Old Timer
  • ******
  • Posts: 3,802
  • Vancouver
Re: '77 550 Resto-Mod
« Reply #22 on: October 09, 2008, 07:45:08 PM »
Nice work.
Everything looks like it's coming along real well.

FJ
You never see a motorcycle parked outside of a psychiatrist's office!

CB550 Cafe Interceptor a Gentlemans Roadster
http://forums.sohc4.net/index.php?topic=27159.0

Offline youngerthanmybike

  • Enthusiast
  • **
  • Posts: 104
Re: '77 550 Resto-Mod
« Reply #23 on: October 09, 2008, 08:24:33 PM »
I already wrote this once, but my cpu decided to take a crap, so I'll write it again.

I got the head on, but realized that I somehow managed to lose three of the washers for the cylinder head bolts, so I had to run out for those. I worked on setting the camshaft in the mean time.
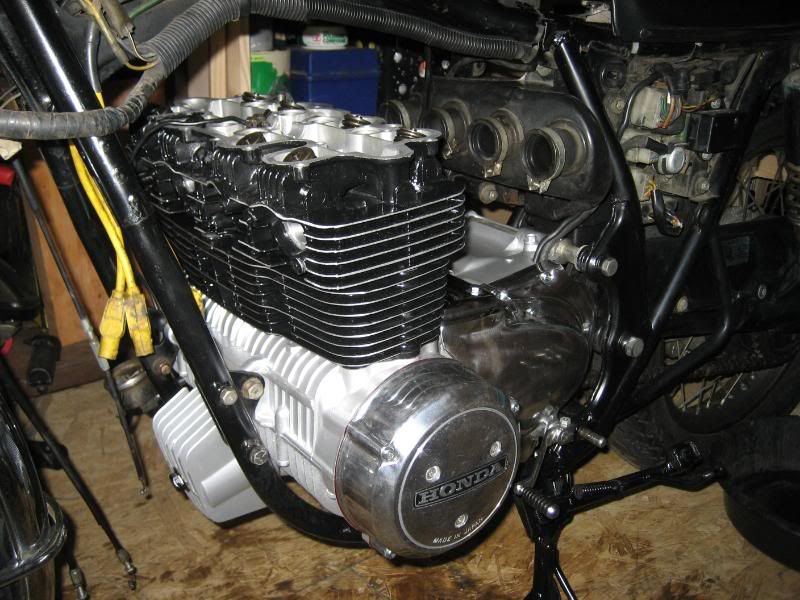


I put a 650 cam in, looked basically identical to the 550 cam in most respects except for the lobes being bigger and the sprocket was quite different. I guess that means it didn't look too much like the 550 afterall... there's not much else to a camshaft now is there?  :D

I fought with the camshaft, sprocket and chain for about a half hour before I realized that I had the cam chain tensioner system all screwed up. Thankfully, because I didn't have the washers, I hadn't torqued down the head yet. Apparently, I was looking at the picture of the CB350 system in my manual, and not the pic for my 550, so I forgot that the cam chain guide goes inside the cam chain loop, not outside, so I didn't have enough slack chain to fit it over the sprocket. But I got it all straightened out. I did a rough check of the timing as per the Clymer manual, and was only 2 teeth off on the cam chain sprocket, which was pretty good for a guess...
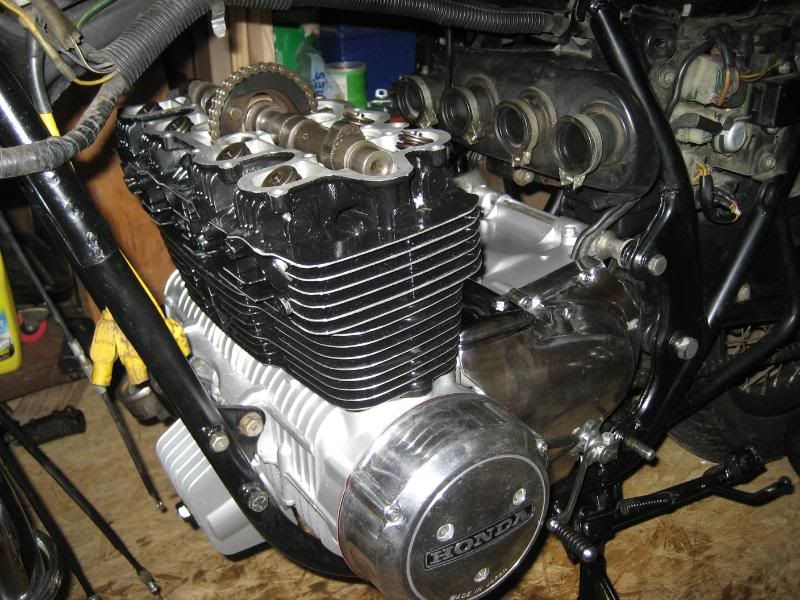


Wrapping things up, I didn't take too many pics because I was so close to the end I could taste it. I used the rubber band trick to hold up the rockers when I put the rocker cover on, that worked out great. My progress slowed a bit here because I still had to clean and polish a number of my fasteners. Put on the breather covers and called it good.


I actually worked out a pretty good way to get the carbs back in even though I already had the head in. As you can see from the pic, I put the exhaust and intake studs back into the cylinder head and reinstalled the air chamber and airbox. In order to get the carbs in, I took the airbox back out, but left the air chamber in. I pushed the air chamber low, and tilted the carbs at the same angle as the air chamber so that the carb intakes were above the air chamber boots, but so that the intake manifold flanges were below the intake studs. I hope that makes sense. It worked out pretty good, still had to fight it a little bit.

I cleaned up the exhaust while I had it off and realized that it's in pretty good shape. Only one of the pipes really has any rust at all to it, which I was surprised by. A few of the others have some rust and bluing up at the head, but not too bad. Doesn't matter too much because I have a Kerker 4into1 showing up sometime in the next few days. I also dropped in a UNI filter into the stock box, which I'll probably leave the lid off for more flow. I have larger main jets on the way too. I wanted to get the carbs and exhaust hooked back up so that I could play with the timing and stuff like that while I wait for my other parts.
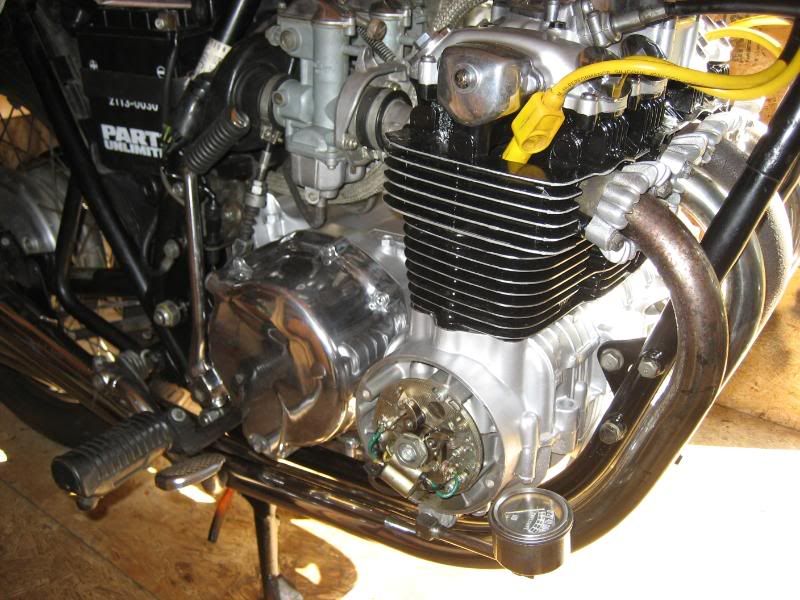
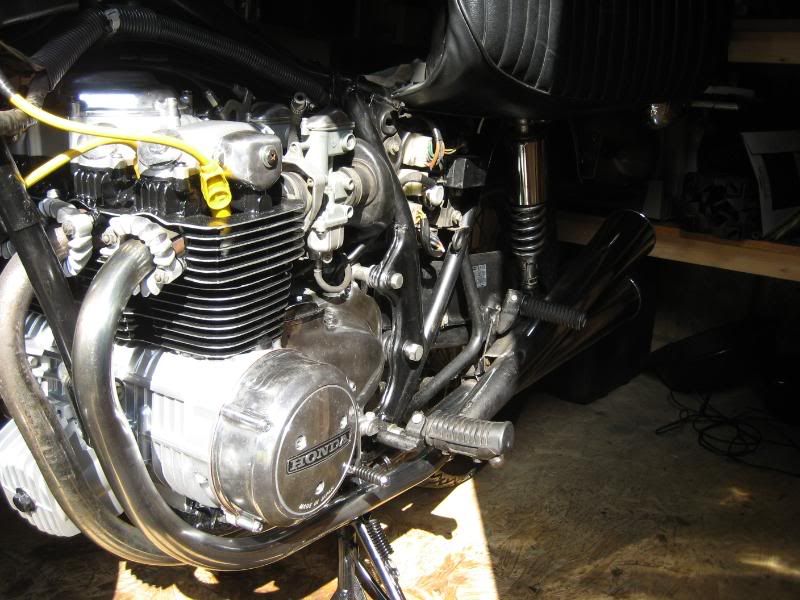


I got it outside and started attempting to get it running. It didn't take too much which was a good thing, but I could tell it was running rough. Soon I realized I was only running on two cylinders.... I troubleshot the system, and with a little help from TT among others on the board here, it looks like I have a couple spark plug wires to replace. Here's that discussion:
http://forums.sohc4.net/index.php?topic=41771.new;topicseen#new

I'll hopefully have it running this weekend, and all done by next weekend! That's the goal anyway, but that's also assuming nothing else goes wrong..... ;D

Offline Ecosse

  • Really Old Timer ...
  • *******
  • Posts: 5,051
  • Member #4139
    • My 550 walk around video
Re: '77 550 Resto-Mod
« Reply #24 on: October 09, 2008, 09:48:50 PM »
1974 CB550K     
                 
            Help stop TORTURE and SLAUGHTER of cats, dogs, and other kept animals.                                                  www.animalsasia.org

                                  Your 1%er name

                                                A WORTHY EFFORT: http://www.honorflight.org.