Hey everybody, just wanted to say that I've been lurking for a couple months now and figured I should probably CONTRIBUTE for once... Well here's a quick intro: Bought this bike a few years back, a 1978 cb750F, and it never really ran very well. I always knew it needed carb work, but I was hesitant to take the jump and really get in there and open them up. But because of everyone on this site, I got the guts to tear them down last October and I'm am really glad I did. You wouldn't believe some of the stuff I found going on in there.. but that's another story! So, I've had the carbs off all winter, and they've been updated with new gaskets and o-rings, #125 mains, and #42 slows. Cleaning them was a PITA but the stuff I've learned in the process because of everyone's info has made it really worth it. So, before I put the carbs back on the bike, I figured I'd take a few pics and label them with the main parts, and a brief description of what you should see when cleaning them, just to provide a really basic starting point to convince others to get in there!!
First, the intake side of the #2 carb:
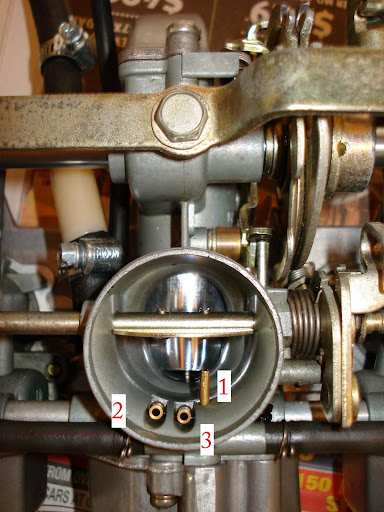
1 -- Accelerator Pump Nozzle -- You should see fuel squirting out of this litle brass post into the carb under quick throttle application. This was probably the HARDEST part to clean. I used a high E string from an old guitar and that worked pretty well.
2 -- Slow circuit -- Spray carb cleaner into this hole and watch the slow jet located in the underside of the carb body. You should see fluid squirting through the brass slow jet.
3 -- Main Circuit -- Spray cleaner through this hole, and make sure you see fluid exit from the main jet located in the underside of the carb body.
Underside of the #1 Carb:
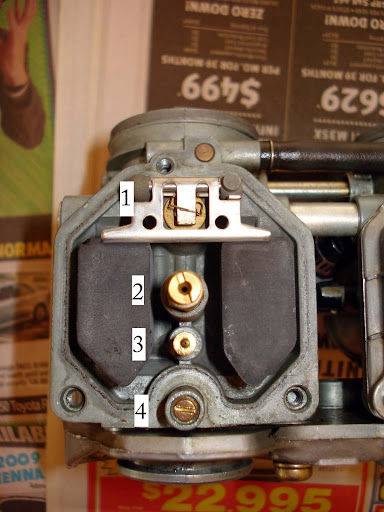
1 -- Float pin -- Works with the float to maintain a constant level of fuel in the float bowl.
2 -- Main Jet -- Screws into an emulsifier tube, which screws into the carb body. When I opened up this carb for the first time.. this WAS LAYING IN THE BOTTOM OF THE BOWL. Wow. Unscrew and make sure it's clean.
3 -- Slow Jet -- Pressed into the carb body and comes out with a gentle tug of some pliers. These are also very hard to clean because of the small passageway. Make sure they are PRISTINE.
4 -- Pilot Jet/Needle -- A pin, spring, washer, and O-ring that is basically a fine tuning air/fuel mixture screw. Make sure the taper on the needle is clean.
Well, thanks again to everyone, and if anyone has ANY requests for pics in the next few weeks before they go back on the bike, please don't hesitate to ask!


