Author Topic: How I got fork-cap threads started with spacer + progressive springs (CB750)  (Read 5424 times)

0 Members and 1 Guest are viewing this topic.

Offline ksteve

  • Full Member
  • *
  • Posts: 65
After reading glowing testimonials here, i bought progressive front-fork springs for my CB750K2.

As others here warned, it was a bear trying to compress the spring under the spacer  to get the cap threaded: I tried for 2 hours to muscle it down in with a 23 mm socket on my ratchet before giving up.

Here's what you have to cram down into the tube as you compress the spring:
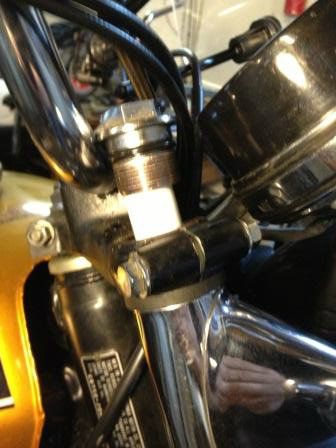


Then I tried this:


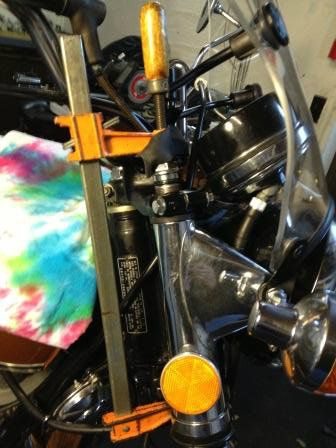
That's a woodworking clamp, with a square of old inner tube rubber under the clamp's foot to keep it from slipping off the domed fork cap. I turned the clamp down slowly, keeping the foot centered, until the cap's threads met the tube's threads.

Then I used an open-end wrench to start turning the bolt (while continuing to snug down the clamp) until the threads engaged for several turns, thus:


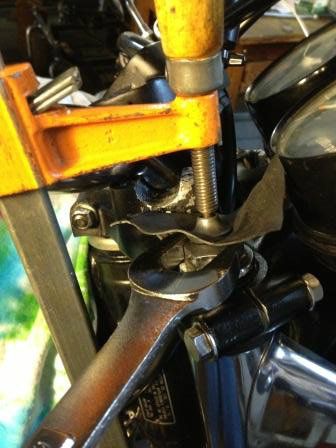
Once I figured out the whole arrangement, it took about 5 minutes to get each cap on.

-Steve


Offline ekpent

  • Really Old Timer ...
  • *******
  • Posts: 13,508
  • To many bikes-but lookin' for more
Was the bike on the centerstand and front wheel off the ground and did you do just one side at a time ? How does it feel all done?  Seems like a lot of preload but no expert here,never tried them yet.

Offline ksteve

  • Full Member
  • *
  • Posts: 65
Yes, on centerstand with front wheel off the ground.

With the socket alone, I could get the cap all the way in. But it took too much to keep pressing down with one hand while trying to turn the wrench with the other hand to engage enough threads.

Offline bwaller

  • Really Old Timer ...
  • *******
  • Posts: 7,449
20-30mm should be all you need, too much & you compress the top out spring. If it takes so much effort to assemble it may take a lot to compress those springs too! Find a good site that explains the process to set your "sag" (Racetech, Sonic Springs sites each do)

Good luck

Offline ksteve

  • Full Member
  • *
  • Posts: 65
20-30mm should be all you need, too much & you compress the top out spring. If it takes so much effort to assemble it may take a lot to compress those springs too! Find a good site that explains the process to set your "sag" (Racetech, Sonic Springs sites each do)

Good luck

Thanks. I used the PVC spacer that came with the Progressive kit and which the instructions specified for a stock fork setup on a CB750K2.

It didn't actually take much to compress it. It was just KEEPING it compressed while turning that was a bear. I didn't help that the first thread on one of the caps was kinda flattened.

Offline derelicte

  • Enthusiast
  • **
  • Posts: 133
  • '74 CB750
Great idea, better than levering a wrench underneath the handlebar  :D

Offline bwaller

  • Really Old Timer ...
  • *******
  • Posts: 7,449
I forgot to mention part of that 20-30mm is taken up by the fork cap itself.

Offline ksteve

  • Full Member
  • *
  • Posts: 65
Great idea, better than levering a wrench underneath the handlebar  :D

Haha. I tried that, too, but found it kept slipping without a third hand.

Just took it for a spin and there's a big difference: the bumps are less jarring.

Offline Kickstart

  • Expert
  • ****
  • Posts: 800
Great idea to use the clamp!

I was able to install mine using a deep well socket.  Like you said, it's not so hard to push it down, but it's hard to turn it enough to catch enough threads and still keep pushing.  I found with the deep well socket I could get a good 180 degreess of turn before I had to re-position (and thus loose the downward pressure).

Oh... you may have forgotten to make loud grunting noises and curse a couple times.  Maybe had you done that you wouldn't have needed to use the clamp :) 
- Chris
75' CB750F Orange flake (rider)
75' CB750F Blue (Project)
75' CB750F Painted black (Project)
No Reserve Racing #171 AHRMA

Offline ofreen

  • Old Timer
  • ******
  • Posts: 4,216
A T-handle for your socket makes it easy to get the caps started.  You'll find a lot of other jobs you'll like the T-handle for, too.
« Last Edit: January 26, 2013, 07:52:37 PM by ofreen »
Greg
'75 CB750F

"I would rather have questions I cannot answer than answers I cannot question." - Dr. Wei-Hock Soon

Offline PeWe

  • Really Old Timer ...
  • *******
  • Posts: 16,537
  • Bike almost back to the 70's 2015
I installed progressive fork springs the last year I used my bike. 1990. I do not remember any hard struggle during installation as written here.

I think I put a jack under my engine (frame) and lifted so the fork could extend in its full lenght. I have the description shipped with the springs.
The document from feb 1988: CB750 69-82 note 5. "Spacer required is furnished with springs."
Same on the website: http://www.progressivesuspension.com/prodSearchResults.aspx?yearID=1976&makeID=40&modelID=786

I found same installation instructions on Internet
http://www.progressivesuspension.com/pdfs/forkSprings/3055.pdf

I think I had spacer lenght so it filled the fork as fig.3

I have adjustments to do with that. I remember that my bike got fork wobbling tendencies at 170km/h-->. With stock springs not.
I'll try without spacers or/and other oil levels.
« Last Edit: January 27, 2013, 10:55:42 AM by PeWe »
CB750 K6-76  970cc (Earlier 1005cc JMR Billet block on the shelf waiting for a comeback)
CB750 K2-75 Parts assembled to a stock K2

Updates of the CB750 K6 -1976
http://forums.sohc4.net/index.php/topic,180468.msg2092136.html#msg2092136
The billet block build thread
http://forums.sohc4.net/index.php/topic,49438.msg1863571.html#msg1863571
CB750 K2 -1975  build thread
http://forums.sohc4.net/index.php/topic,168243.msg1948381.html#msg1948381
K2 engine build thread. For a complete CB750 -75
http://forums.sohc4.net/index.php/topic,180088.msg2088008.html#msg2088008
Carb jetting, a long story Mikuni TMR32
http://forums.sohc4.net/index.php/topic,179479.msg2104967.html#msg2104967