Author Topic: Gordon Frame Kit install w/ Pics  (Read 6931 times)

0 Members and 2 Guests are viewing this topic.

Offline SKOL

  • Hot Shot
  • ***
  • Posts: 271
Gordon Frame Kit install w/ Pics
« on: August 22, 2016, 06:01:37 AM »
Just thought I would post this for whomever in the future is planning on installing one of these. I ordered the kit through Gordon on Thursday, it was at my house Saturday morning, I was drinking a beer and looking at the finished product Saturday evening. I'm by no means a mechanical expert, but this was about as straightforward of an install as possible. Diagram and directions were easy to comprehend. Here we go....

Following the directions... I taped of the areas to be cut and measured, per the diagram where my cut lines would be.
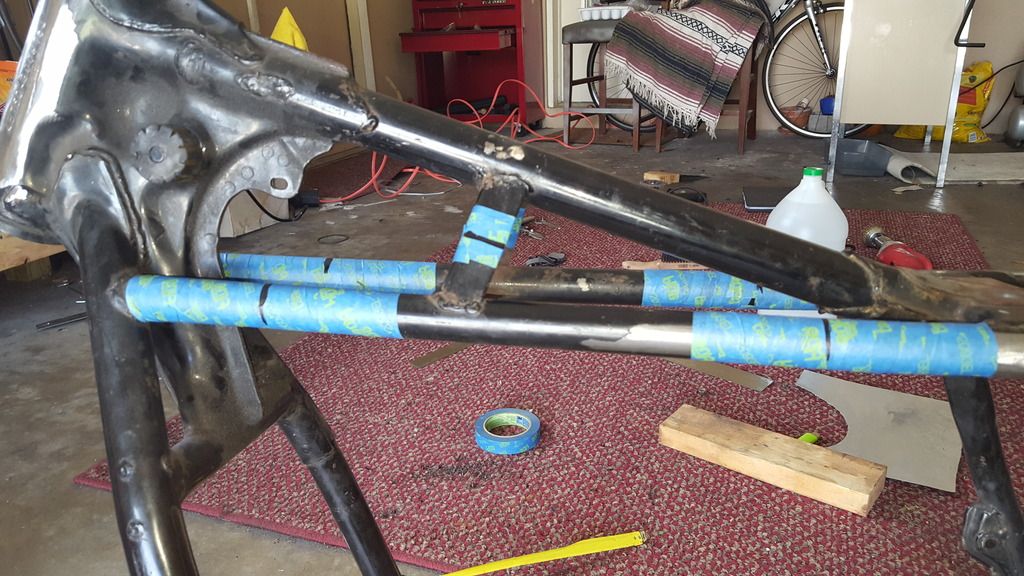


After measuring a couple of times, I went ahead and cut the frame. This part had me a little on edge to say the least but it really shouldn't have.
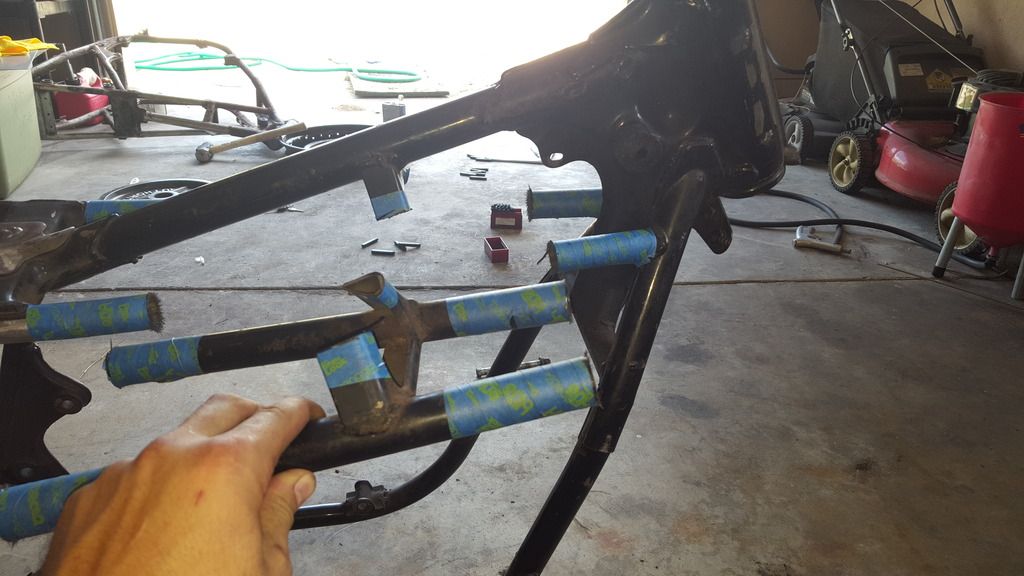


Here's the piece after I cut it out and stripped the paint of the ends...
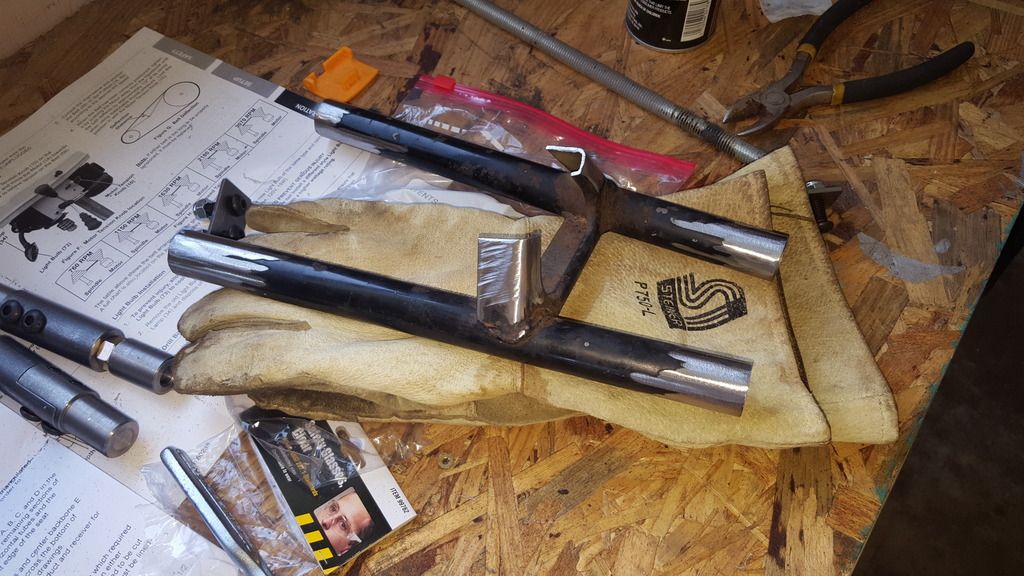


Once you put the adaptor pieces into your frame, and hold it up, you realize... oh sh**, I need to cut back a good bit of this piece to make room for the adaptors. So from this point, it was a lot of measure, mark cut. Slowly trimming it back until I had as snug of a fit as possible.
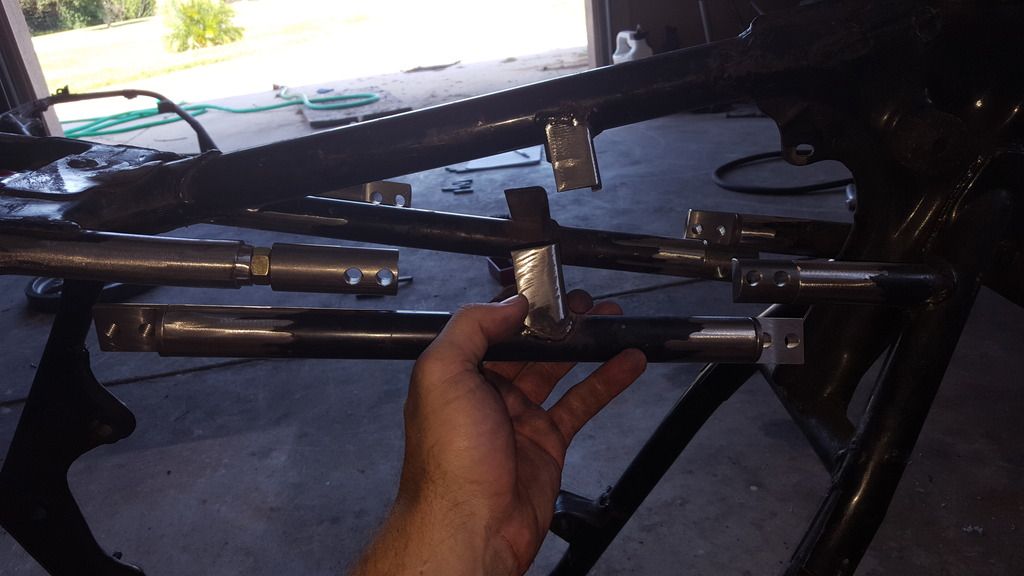


I thought I had a picture of the test fit, but you'll see something similar in a second. Once I did a test fit, I made the personal choice of drilling holes in all ends that have a piece welded into them. On the front tubes, all four ends on the removeable piece and on the back tubes. I drilled these holes for additional welding support. I used them for plug welding. I'm not the best welder in the world, and I thought since the pieces were being welded into place anyway, to plug weld them into place too wouldn't hurt. So here's a couple pictures of where I drilled holes and a test fit before welding the plugs...

You can see permanent marker lines, that is how deep the inserts go so I knew to drill my holes somewhere between the mark and the end of the tubing.
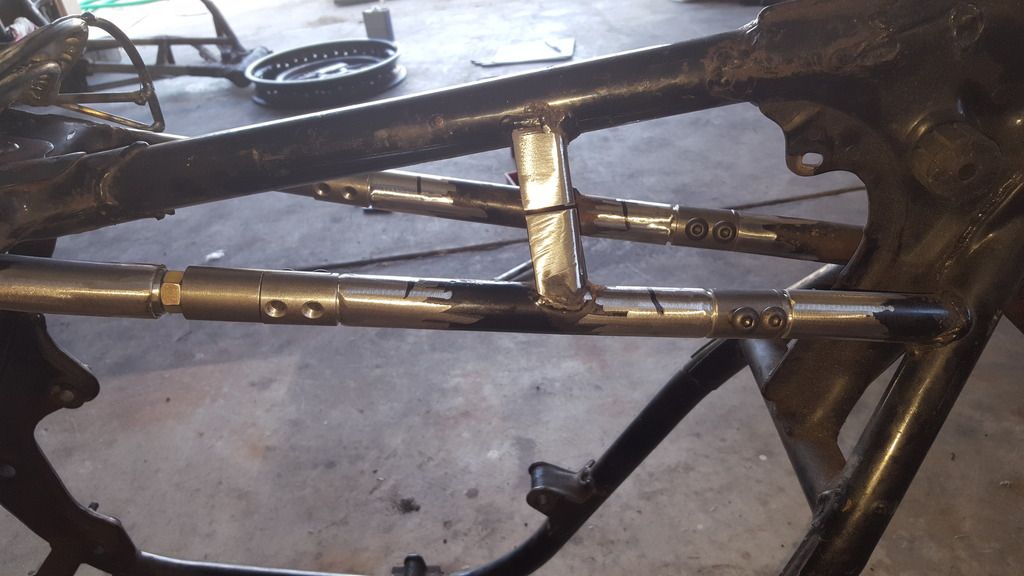
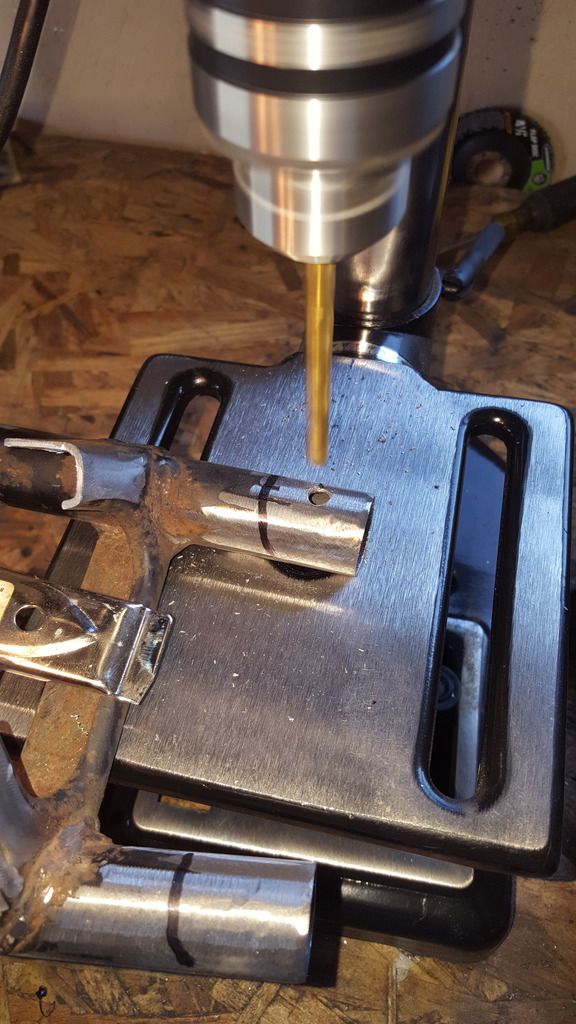


Here's one of a test fit with all plug weld holes drilled  (I did 2 plug holes per tube on each side), as well the triangled bar from the top down tube drilled and fitted with the tabs supplied in the kit. 
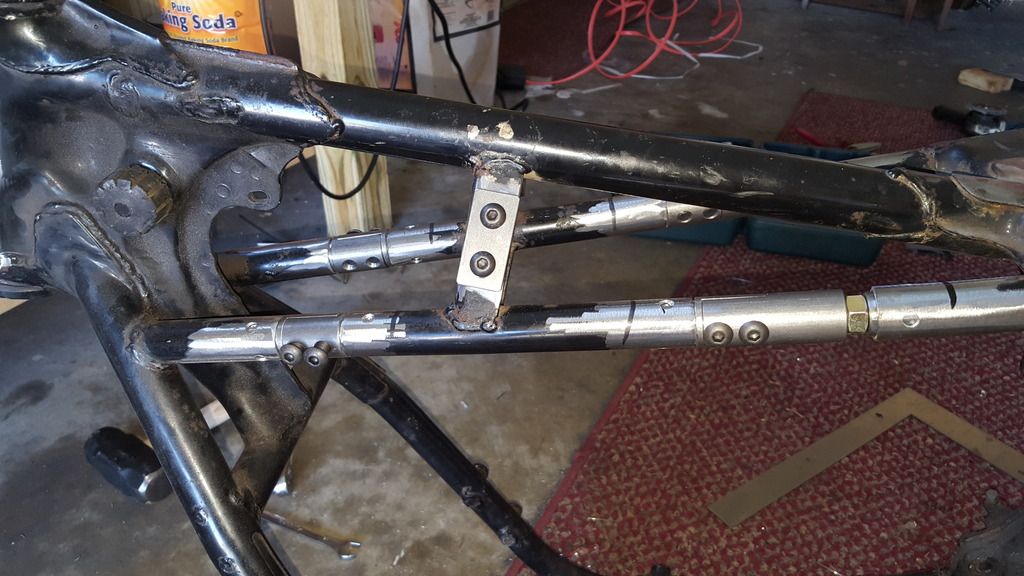


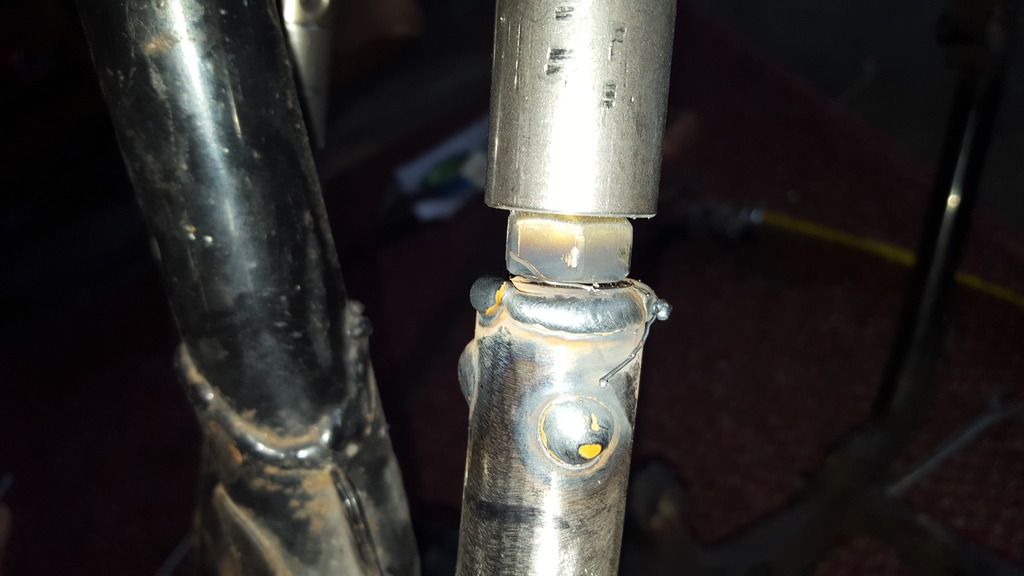
With this ^^^ test fit sitting good, I was confident in beginning the welding process. I went around and did one plug per tube, then went back around and filled the other plugs. Heres a picture after the first one was finished. Sorry it's blurry, my phones camera doesn't do well with really close pictures.
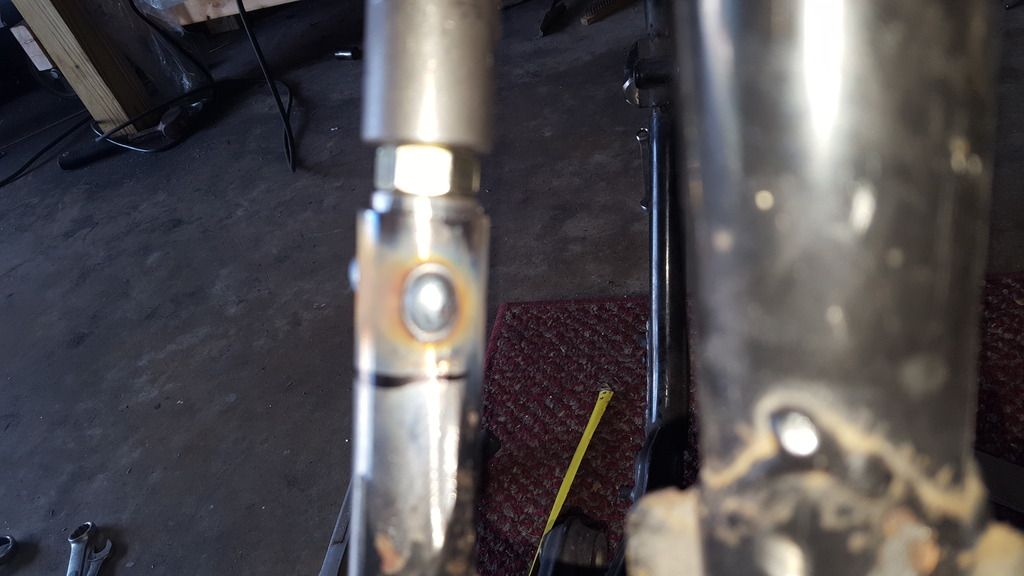


After all the plug welds were finished, I let the metal cool down, had a beer, and decided to finish the project off. I went back and welded the pieces completely into the tubes. This was tricky as the frame tubes are quite small and trying to get all the way around on some of them proved to be difficult. But I got it done, albeit some of them weren't the prettiest but they will work (especially coupled with the plug welds, these guys aren't moving). Here's on of the welds around the tubing to lock one of the pieces in place...


And after flap disc'ing everything... here's what she looked like.
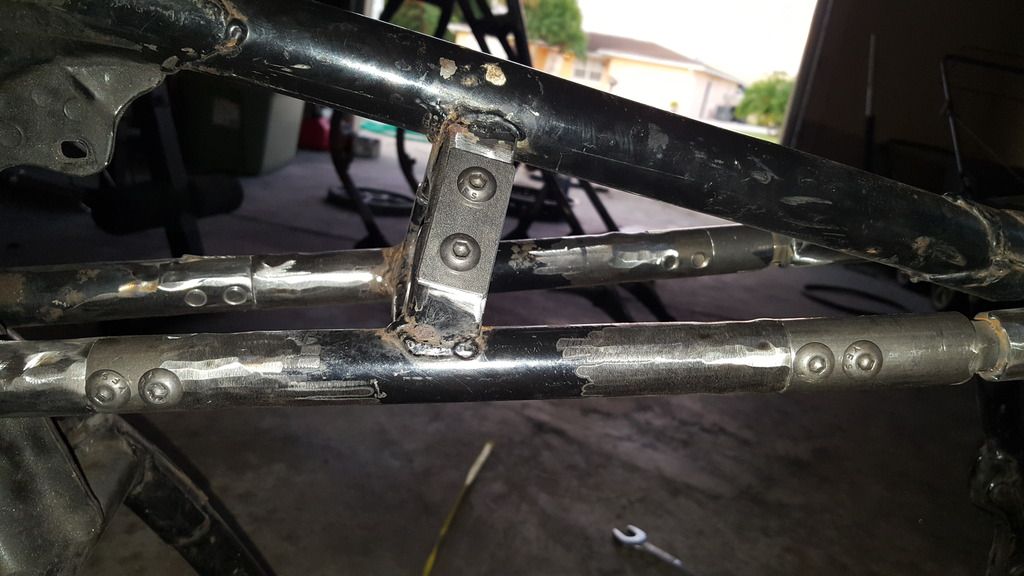


Zoomed in on one of the joints...


And that's about it. It's a pretty fuggin snug fit, but the more I take the piece out and put it back in I'm starting to figure out the right way to maneuver it in. Great product in all! Gordon was very helpful, had quick response times, I would suggest this to anyone. I hope I never have to use it, but know that it is there if I ever have to take my top end off or remove the engine again, this was well worth the money and the piece of mind.

Thanks!


« Last Edit: August 22, 2016, 06:06:45 AM by DickBojangles »

Offline RRRToolSolutions

  • Expert
  • ****
  • Posts: 1,167
  • I love old Japanese bikes!
Re: Gordon Frame Kit install w/ Pics
« Reply #1 on: August 22, 2016, 07:15:46 AM »
Nick, you need to give me a call. Check your message.

Thanks, Gordon
Kaws, Hondas, Yamahas, and Suzukis - especially Kaws

Offline SKOL

  • Hot Shot
  • ***
  • Posts: 271
Re: Gordon Frame Kit install w/ Pics
« Reply #2 on: August 22, 2016, 07:25:50 AM »
Heads up everyone, I'm an idiot and put it in backwards. Don't follow this thread. I'm going to cut all the pieces out, reweld in some tubing, and re-do it the correct way. Maybe I shouldn't have had that beer.

Offline beemerbum

  • Expert
  • ****
  • Posts: 1,060
Re: Gordon Frame Kit install w/ Pics
« Reply #3 on: August 22, 2016, 08:34:37 AM »
Heads up everyone, I'm an idiot and put it in backwards. Don't follow this thread. I'm going to cut all the pieces out, reweld in some tubing, and re-do it the correct way. Maybe I shouldn't have had that beer.
Once again, sadly, alcohol played a part in this tragedy

Offline SKOL

  • Hot Shot
  • ***
  • Posts: 271
Re: Gordon Frame Kit install w/ Pics
« Reply #4 on: August 22, 2016, 08:40:17 AM »
Heads up everyone, I'm an idiot and put it in backwards. Don't follow this thread. I'm going to cut all the pieces out, reweld in some tubing, and re-do it the correct way. Maybe I shouldn't have had that beer.
Once again, sadly, alcohol played a part in this tragedy

Yeah lol, it's not too bad. Luckily I already have tubing left over from when I had to fix a spot my frame. So its a simple cut out, flap the tubing that's on the inserts off, weld in an inch or two of replacement tubing, and re-install. Another days worth of work. Oh well. Live and learn. 

Offline calj737

  • Really Old Timer ...
  • *******
  • Posts: 21,070
  • I refuse...
Re: Gordon Frame Kit install w/ Pics
« Reply #5 on: August 22, 2016, 08:49:04 AM »
If I could offer a bit of advice: when you MIG weld it, tack and move, don't try to weld a continuous bead around it. The stock tubing is thin and you're chasing a warped cylinder. And, don't grind it all off afterwards. You've ground into the tubing wall thickness and actually weekend the joint anyway. Just use a hand file and cut the edges. Paint it up, and be proud of your fabrication skills.
'74 550 Build http://forums.sohc4.net/index.php?topic=126401.0
'73 500 Build http://forums.sohc4.net/index.php?topic=132935.0

"Of all tyrannies, a tyranny sincerely exercised for the good of it's victim may be the most oppressive. It may be better to live under robber barons than under omnipotent moral busybodies. The robber baron's cruelty may sometimes sleep, his cupidity may at some point be satiated, but those who torment us for our own good will torment us without end for they do so with the approval of their own conscience." - C.S. Lewis

Offline SKOL

  • Hot Shot
  • ***
  • Posts: 271
Re: Gordon Frame Kit install w/ Pics
« Reply #6 on: August 22, 2016, 08:51:00 AM »
If I could offer a bit of advice: when you MIG weld it, tack and move, don't try to weld a continuous bead around it. The stock tubing is thin and you're chasing a warped cylinder. And, don't grind it all off afterwards. You've ground into the tubing wall thickness and actually weekend the joint anyway. Just use a hand file and cut the edges. Paint it up, and be proud of your fabrication skills.

Thanks, will do. Yeah, stupid mistake putting it in backwards but luckily everything I have done can be un-done and re-installed, albeit with a couple hours of work... but it's not by any means a seriously crazy fix.

Offline 540nova

  • Hot Shot
  • ***
  • Posts: 593
Re: Gordon Frame Kit install w/ Pics
« Reply #7 on: August 22, 2016, 08:51:46 AM »
Kudos to you for sharing your f$&k up, we ALL do it occasionally, and someone will benefit from your humbleness. Rock on!


1974 CB450, 2006 CBR1000RR

Offline SKOL

  • Hot Shot
  • ***
  • Posts: 271
Re: Gordon Frame Kit install w/ Pics
« Reply #8 on: August 22, 2016, 08:53:52 AM »
Kudos to you for sharing your f$&k up, we ALL do it occasionally, and someone will benefit from your humbleness. Rock on!


1974 CB450, 2006 CBR1000RR

Thanks man. I will definitely update the post in a couple days with pictures of the fix.

Offline 754

  • Really Old Timer ...
  • *******
  • Posts: 29,058
Re: Gordon Frame Kit install w/ Pics
« Reply #9 on: August 22, 2016, 09:03:17 AM »
It may still work.. How far back from the front weld are the front pieces ?
Also use a file more than a grinder , when cleaning up the welds, your tubing will stay rounder..
Maker of the WELDLESS 750 Frame Kit
dodogas99@gmail.com
Kelowna B.C.       Canada

My next bike will be a ..ANFOB.....

It's All part of the ADVENTURE...

73 836cc.. Green, had it for 3 decades!!
Lost quite a few CB 750's along the way

Offline SKOL

  • Hot Shot
  • ***
  • Posts: 271
Re: Gordon Frame Kit install w/ Pics
« Reply #10 on: August 22, 2016, 09:06:43 AM »
It may still work.. How far back from the front weld are the front pieces ?
Also use a file more than a grinder , when cleaning up the welds, your tubing will stay rounder..

Yeah I'm going to use a file next time. As for how far back... 3.5" from where the rail tubing meetings the vertical front tube. I don't know if there is enough room. Gordon spoke with me on the phone and said there wouldn't be enough room. It's okay, an extra day or two of work to do it right. And this time use a file to clean everything up. New tubing. Should be smooth sailing. 
« Last Edit: August 22, 2016, 09:11:28 AM by DickBojangles »

Offline 754

  • Really Old Timer ...
  • *******
  • Posts: 29,058
Re: Gordon Frame Kit install w/ Pics
« Reply #11 on: August 22, 2016, 09:14:34 AM »
At 3.5 you should be ok.
I would just leave it till you need to pull the topend, then change it , if you must..
Maker of the WELDLESS 750 Frame Kit
dodogas99@gmail.com
Kelowna B.C.       Canada

My next bike will be a ..ANFOB.....

It's All part of the ADVENTURE...

73 836cc.. Green, had it for 3 decades!!
Lost quite a few CB 750's along the way

Offline SKOL

  • Hot Shot
  • ***
  • Posts: 271
Re: Gordon Frame Kit install w/ Pics
« Reply #12 on: August 22, 2016, 09:20:38 AM »
At 3.5 you should be ok.
I would just leave it till you need to pull the topend, then change it , if you must..

As much as I want to, I'm going to have the frame powder coated and really don't want to have to hack up the frame and sand away powder to fix something that I have to ability to do now without too much issue. I want to fix my dumb mistake otherwise it's going to eat at me.

Offline 754

  • Really Old Timer ...
  • *******
  • Posts: 29,058
Re: Gordon Frame Kit install w/ Pics
« Reply #13 on: August 22, 2016, 09:30:17 AM »
That will be a lot of work..
Maker of the WELDLESS 750 Frame Kit
dodogas99@gmail.com
Kelowna B.C.       Canada

My next bike will be a ..ANFOB.....

It's All part of the ADVENTURE...

73 836cc.. Green, had it for 3 decades!!
Lost quite a few CB 750's along the way

Offline SKOL

  • Hot Shot
  • ***
  • Posts: 271
Re: Gordon Frame Kit install w/ Pics
« Reply #14 on: August 22, 2016, 09:37:11 AM »
That will be a lot of work..

Yes. I'm picturing, cutting out all the inserts. Sanding all the tubing that the inserts have been welded inside, off, and getting the inserts close to circular so they can slide back in tubing. Welding new tubing back onto the frame. Cutting that tubing to size. re-installing inserts, plug welding inserts, tack welding the ends, file down welded joints.

I'd say 3 days of work.

Offline calj737

  • Really Old Timer ...
  • *******
  • Posts: 21,070
  • I refuse...
Re: Gordon Frame Kit install w/ Pics
« Reply #15 on: August 22, 2016, 09:57:56 AM »
I might offer, you may be better off simply making your own "frame kit" at this point. The half lap slugs can be installed at any distance to each other, and then you simply fab the spreader section. I made one from solid aluminum rod bolted to 303 stainless slugs, TIG welded into the stock tubing. The PO had hacked the frame to nearly nubs and left little tubing to work with. Same principle really, and the material (solid aluminum tubing I had on hand).

It is VERY strong and lightweight. A side benefit of the PO hacking tubes too short, is engine removal is really easy with 13" long tubes! I wouldn't encourage over-cutting the length out, but simply making a point.  ;)
'74 550 Build http://forums.sohc4.net/index.php?topic=126401.0
'73 500 Build http://forums.sohc4.net/index.php?topic=132935.0

"Of all tyrannies, a tyranny sincerely exercised for the good of it's victim may be the most oppressive. It may be better to live under robber barons than under omnipotent moral busybodies. The robber baron's cruelty may sometimes sleep, his cupidity may at some point be satiated, but those who torment us for our own good will torment us without end for they do so with the approval of their own conscience." - C.S. Lewis

Offline SKOL

  • Hot Shot
  • ***
  • Posts: 271
Re: Gordon Frame Kit install w/ Pics
« Reply #16 on: August 22, 2016, 10:08:27 AM »
Thanks CalJ, I'm going to try fixing my error first. If I end up more fu***ed than I already am, measures similar to this will probably be taken but I think I can salvage my work. 13" tubes probably makes entire engine removal a breeze!

Offline SKOL

  • Hot Shot
  • ***
  • Posts: 271
Re: Gordon Frame Kit install w/ Pics
« Reply #17 on: August 22, 2016, 01:23:31 PM »
I guess I'll turn this into a mini build thread. Just got home from work, cut the inserts out, flap sanded the surrounding frame tubes off. They obviously didn't retain their crisp lip, but they still fit in and will work fine especially with plug welding and welding the lip. Here's an update of all the inserts out


It was easy enough to make the measurementsame for the additional frame tubing that needs to be added
 Will cut and splice those into the frame tomorrow. Will update. Thanks for not busting my balls.

Offline PeWe

  • Really Old Timer ...
  • *******
  • Posts: 15,647
  • Bike almost back to the 70's 2015
Re: Gordon Frame Kit install w/ Pics
« Reply #18 on: August 22, 2016, 01:43:32 PM »
Ok, different way of doing it. Why change it?
Most important it sit tight, tank will fit. Removable so valve cover+ head + cyl can be lifted

My removable frame kit look like this direct after assembly and I have used it a lot the last 1.5 year. Changed and timed cam several times, lifted head and cyl.
Pulled engine twice that is 1 man job with a strap around cases when head and cylinder + pistons are off.
CB750 K6-76  970cc (Earlier 1005cc JMR Billet block on the shelf waiting for a comeback)
CB750 K2-75 Parts assembled to a stock K2

Updates of the CB750 K6 -1976
http://forums.sohc4.net/index.php/topic,180468.msg2092136.html#msg2092136
The billet block build thread
http://forums.sohc4.net/index.php/topic,49438.msg1863571.html#msg1863571
CB750 K2 -1975  build thread
http://forums.sohc4.net/index.php/topic,168243.msg1948381.html#msg1948381
K2 engine build thread. For a complete CB750 -75
http://forums.sohc4.net/index.php/topic,180088.msg2088008.html#msg2088008
Carb jetting, a long story Mikuni TMR32
http://forums.sohc4.net/index.php/topic,179479.msg2104967.html#msg2104967

Offline SKOL

  • Hot Shot
  • ***
  • Posts: 271
Re: Gordon Frame Kit install w/ Pics
« Reply #19 on: August 22, 2016, 01:46:05 PM »
I had the inserts that have the jam nUT on the back and not the front. When they're on the front, all of it is able to be removed. As it was, those inserts in the front wouldn't be able to be unscrewed and pulled out, leaving the head not able to pivot and be removed

Online Don R

  • My Sandcast is a
  • Really Old Timer ...
  • *******
  • Posts: 20,042
  • Saver of unloved motorcycles.
Re: Gordon Frame Kit install w/ Pics
« Reply #20 on: August 22, 2016, 01:55:50 PM »
 I thought I was having a bad week mechanic wise. Seems like one I'd do.
No matter how many times you paint over a shadow, it's still there.
 CEO at the no kill motorcycle shop.
 You don't need a weatherman to know which way the wind blows.

Offline RRRToolSolutions

  • Expert
  • ****
  • Posts: 1,167
  • I love old Japanese bikes!
Re: Gordon Frame Kit install w/ Pics
« Reply #21 on: August 26, 2016, 01:13:31 PM »
Hi Nick, how is the re-work coming? As I mentioned the other day, if I can help you with replacement parts - just let me know. I've got extra blind inserts made-up and I'll send those to you free if that helps you.

Best Regards, Gordon
Kaws, Hondas, Yamahas, and Suzukis - especially Kaws

Offline SKOL

  • Hot Shot
  • ***
  • Posts: 271
Re: Gordon Frame Kit install w/ Pics
« Reply #22 on: August 27, 2016, 06:15:03 AM »
Hey Gordon, I think it's all going to work out okay. I was able to salvage all the parts. One of the inserts that go in the rear section, the part that doesn't have threads but had the holes for the bolts had a little too much taken off of it so it fits kind of loose when I put it back in the tubing, but I think that it will be okay when I weld everythING back up. I've got everything ready to go, just waiting on the tubing I purchased to get here.

If I don't feel comfortable putting that piece in, would you be open to selling one of the individual pieces? I don't want to screw up any of your sets though.

Offline RRRToolSolutions

  • Expert
  • ****
  • Posts: 1,167
  • I love old Japanese bikes!
Re: Gordon Frame Kit install w/ Pics
« Reply #23 on: August 27, 2016, 06:25:30 AM »
Nick, I'll help you get this on track - so, yes and happy to do it. Regards, Gordon
Kaws, Hondas, Yamahas, and Suzukis - especially Kaws

Offline RRRToolSolutions

  • Expert
  • ****
  • Posts: 1,167
  • I love old Japanese bikes!
Re: Gordon Frame Kit install w/ Pics
« Reply #24 on: October 06, 2016, 06:31:42 PM »
Hi Nick, is there an update you can give us?
Kaws, Hondas, Yamahas, and Suzukis - especially Kaws