Author Topic: Another project-1976 Honda CB550K  (Read 17787 times)

0 Members and 2 Guests are viewing this topic.

Offline denward17

  • Expert
  • ****
  • Posts: 1,488
Re: Another project-1976 Honda CB550K
« Reply #425 on: May 07, 2024, 07:53:24 PM »
How did your valve guides feel,not too loose of a fit with their orig. valve stems?
The guides will wear in an oval pattern:front to back.
I also like to make sure each valve goes back in the same position/cylinder it was removed from.
All the valve to guide clearances were tight, and all valves went back in their original holes.

Offline grcamna2

  • Not a
  • Really Old Timer ...
  • *******
  • Posts: 15,274
  • I love to restore & travel. Keep'em Going Strong !
Re: Another project-1976 Honda CB550K
« Reply #426 on: May 07, 2024, 07:59:58 PM »
How did your valve guides feel,not too loose of a fit with their orig. valve stems?
The guides will wear in an oval pattern:front to back.
I also like to make sure each valve goes back in the same position/cylinder it was removed from.
All the valve to guide clearances were tight, and all valves went back in their original holes.

Very good  ;)
75' CB400F/'bunch o' parts' & 81' CB125S modded to a 'CB200S'
  I love the small ones too !
Do your BEST...nobody can take that away from you.

Offline denward17

  • Expert
  • ****
  • Posts: 1,488
Re: Another project-1976 Honda CB550K
« Reply #427 on: May 08, 2024, 09:55:50 AM »
Delkevic 4into4 system arrived today, need to get busy this afternoon.

Packaged well, and looks awesome.

Offline BenelliSEI

  • Really Old Timer ...
  • *******
  • Posts: 10,309
  • 1969 cb750
Re: Another project-1976 Honda CB550K
« Reply #428 on: May 08, 2024, 12:52:33 PM »
That looks stunning!

Offline denward17

  • Expert
  • ****
  • Posts: 1,488
Re: Another project-1976 Honda CB550K
« Reply #429 on: May 08, 2024, 12:58:39 PM »
Installed the exhausts this afternoon.....

Fit and finish is very nice, sound pretty good too.

Next up is checking valve clearance, cam chain tension and making sure oil is getting to top end as it should.

Offline RAFster122s

  • I feel like a really really
  • Really Old Timer ...
  • *******
  • Posts: 12,544
  • SOHC4 member # 2605
Re: Another project-1976 Honda CB550K
« Reply #430 on: May 08, 2024, 04:02:13 PM »
What does that run $, looks really nice!!
Bet it will be throatier than stock, I'm not a fan of loud bikes, some noise, but not loud stuff. I enjoy listening to music at other times too much to ruin it with loud exhausts and road noise...
David- back in the desert SW!

Offline denward17

  • Expert
  • ****
  • Posts: 1,488
Re: Another project-1976 Honda CB550K
« Reply #431 on: May 08, 2024, 04:19:52 PM »
What does that run $, looks really nice!!
Bet it will be throatier than stock, I'm not a fan of loud bikes, some noise, but not loud stuff. I enjoy listening to music at other times too much to ruin it with loud exhausts and road noise...

$999.99
https://delkevic.com/delkevic-cb500-four-71-73-cb550-four-74-76-complete-oem-replica-4-into-4-chrome-exhaust/

Yes, the 4into1 was a little too loud for my liking.

Offline BenelliSEI

  • Really Old Timer ...
  • *******
  • Posts: 10,309
  • 1969 cb750
Re: Another project-1976 Honda CB550K
« Reply #432 on: May 08, 2024, 04:20:35 PM »
Paint  + pipes = perfect!

Offline denward17

  • Expert
  • ****
  • Posts: 1,488
Re: Another project-1976 Honda CB550K
« Reply #433 on: May 08, 2024, 06:49:17 PM »
Paint  + pipes = perfect!

Thanks John!

Offline denward17

  • Expert
  • ****
  • Posts: 1,488
Re: Another project-1976 Honda CB550K
« Reply #434 on: May 09, 2024, 04:15:53 PM »
The top end noise was getting worse so decided I needed to investigate.  See thread here:  http://forums.sohc4.net/index.php/topic,194909.0.html

I have a replacement ordered and will replace as time permits.

Offline denward17

  • Expert
  • ****
  • Posts: 1,488
Re: Another project-1976 Honda CB550K
« Reply #435 on: May 13, 2024, 11:51:39 AM »
Looks like there will be a delay in shipping of the "new" used valve cover, and with some travel coming up, I won't be able to install for a couple of weeks.


Looking forward to wrapping this one up.

Offline denward17

  • Expert
  • ****
  • Posts: 1,488
Re: Another project-1976 Honda CB550K
« Reply #436 on: May 23, 2024, 12:40:12 PM »
Received the valve cover today, will spend the next few days cleaning it up, inspecting, and polishing it up before install.

Offline BenelliSEI

  • Really Old Timer ...
  • *******
  • Posts: 10,309
  • 1969 cb750
Re: Another project-1976 Honda CB550K
« Reply #437 on: May 23, 2024, 04:57:47 PM »
That machine just keeps getting better!

Offline denward17

  • Expert
  • ****
  • Posts: 1,488
Re: Another project-1976 Honda CB550K
« Reply #438 on: May 23, 2024, 05:05:37 PM »
That machine just keeps getting better!

I really hope this is the fix...

Offline BenelliSEI

  • Really Old Timer ...
  • *******
  • Posts: 10,309
  • 1969 cb750
Re: Another project-1976 Honda CB550K
« Reply #439 on: May 23, 2024, 06:34:03 PM »
I’d bet on it.

Offline denward17

  • Expert
  • ****
  • Posts: 1,488
Re: Another project-1976 Honda CB550K
« Reply #440 on: May 25, 2024, 05:52:17 PM »
Got the paint off the "new" used valve cover today, did some polishing.

Hope to install early next week.

Offline RAFster122s

  • I feel like a really really
  • Really Old Timer ...
  • *******
  • Posts: 12,544
  • SOHC4 member # 2605
Re: Another project-1976 Honda CB550K
« Reply #441 on: May 25, 2024, 06:35:48 PM »
Dang that looks nice, how long did it take to sand and polish that up?
David- back in the desert SW!

Offline denward17

  • Expert
  • ****
  • Posts: 1,488
Re: Another project-1976 Honda CB550K
« Reply #442 on: May 25, 2024, 08:05:39 PM »
Dang that looks nice, how long did it take to sand and polish that up?

Thanks!

About 4-5 hours or so..

Offline Oddjob

  • Hot Shot
  • ***
  • Posts: 625
Re: Another project-1976 Honda CB550K
« Reply #443 on: May 26, 2024, 04:17:40 AM »
As someone renowned in the UK as a polisher I can say with intimate knowledge how hard it is to get any sort of finish on a 500/550 rocker cover, lots of casting marks on them that needs to be removed and very small intricate areas that make it very hard for a polishing mop to reach. I'm doing a camcover ATM but not going the polished route, need to get it really smooth so the ceramic coat finish is as best as it can be.

Well done, I may do one of my spare covers after and polish it, I've done a carb as a laugh and it came out pretty well considering.


Offline MauiK3

  • A K3 is saved
  • Old Timer
  • ******
  • Posts: 4,408
  • Old guy
Re: Another project-1976 Honda CB550K
« Reply #444 on: May 26, 2024, 07:42:33 AM »
Wow!
1973 CB 750 K3
10/72 build Z1 Kawasaki

Offline Oddjob

  • Hot Shot
  • ***
  • Posts: 625
Re: Another project-1976 Honda CB550K
« Reply #445 on: May 26, 2024, 07:53:12 AM »
I don't want anyone to think that's as good as it looks, it was just one side of the carb and just the one carb, I did however consider doing a whole bank along with a ceramic chromed hanger bracket, just to see how it looked. However that's a 550 069A carb and my bike uses 623B carbs so I'd really have to start again. I was testing out some new polishing tools, quite expensive but they turned out to be excellent at really getting into tight spaces, hence why I choose a carb body to test them out on, I finished one side just because I was curious as to how it would look and TBH it's not bad at all, how long the finish would last though is up for debate  ;D ;D

I even considering have the throttle butterfly and the linkage system gold plated, just for the bling factor  8) 8)

Offline denward17

  • Expert
  • ****
  • Posts: 1,488
Re: Another project-1976 Honda CB550K
« Reply #446 on: May 26, 2024, 08:06:25 AM »
^Wow oddjob, that carb looks fantastic!
I could have used those expensive tools on that valve cover.

Offline grcamna2

  • Not a
  • Really Old Timer ...
  • *******
  • Posts: 15,274
  • I love to restore & travel. Keep'em Going Strong !
Re: Another project-1976 Honda CB550K
« Reply #447 on: May 26, 2024, 08:21:39 AM »
I don't want anyone to think that's as good as it looks, it was just one side of the carb and just the one carb, I did however consider doing a whole bank along with a ceramic chromed hanger bracket, just to see how it looked. However that's a 550 069A carb and my bike uses 623B carbs so I'd really have to start again. I was testing out some new polishing tools, quite expensive but they turned out to be excellent at really getting into tight spaces, hence why I choose a carb body to test them out on, I finished one side just because I was curious as to how it would look and TBH it's not bad at all, how long the finish would last though is up for debate  ;D ;D

I even considering have the throttle butterfly and the linkage system gold plated, just for the bling factor  8) 8)

Do you have a picture of the set of new polishing tools ?  8)
75' CB400F/'bunch o' parts' & 81' CB125S modded to a 'CB200S'
  I love the small ones too !
Do your BEST...nobody can take that away from you.

Offline Oddjob

  • Hot Shot
  • ***
  • Posts: 625
Re: Another project-1976 Honda CB550K
« Reply #448 on: May 26, 2024, 08:32:05 AM »
Seriously though, if you saw a bike parked up with a full bank of carbs all looking like that, what would you think? Way OTT or wow or something else, I'm curious to know. I've seen carbs chromed before BTBH they don't normally last, they flake off within a short period and look awful, mainly because Japanese alloy is so poor, Mazac I believe it's called. It's why your clutch cover chrome flakes off so easily. I'm in the process of restoring my 500 again, the last time it was done back in the late 70s early 80s the bike had a huge amount of chrome on it, however it didn't last the first winter so all told it turned out to be a waste of time and money. This time I want the bike to look the part but without the problems of the first restoration, so I'm testing having parts done in ceramic chrome instead of chrome, I'm doing more polishing instead of chroming. However I do like chrome, it's my age, so if I can get a part to look like it's been chromed when it's not that's a way forward for me. The carb actually isn't really polished at all, it's just sanded to a very high level but the tools used do contain polishing compound at the same time so maybe it's partly polished?

I like to try and restore parts that most would throw away, it's just a quirk of mine, the worse it is the more of a challenge so to speak, covers that have been thrown down the road are a good test.
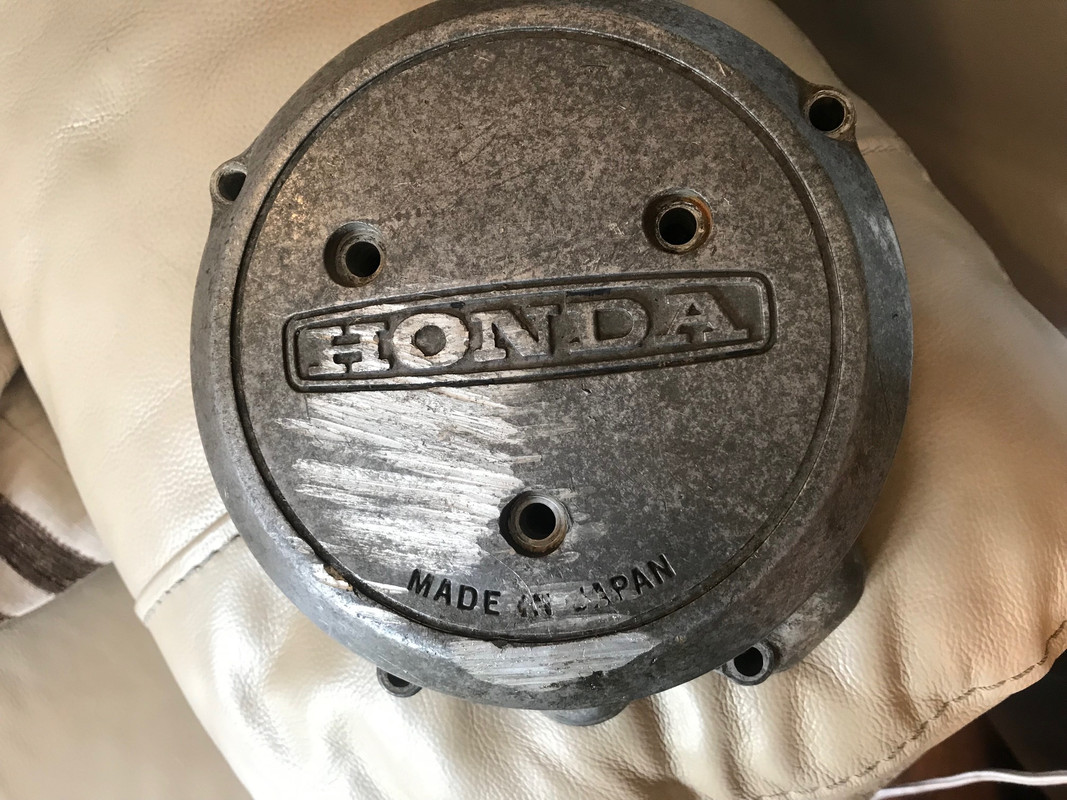
Like this one.


Which after some hours spent on it ended up like this. It's the one on the left, the other was another cover I rescued. I gave the one on the right away to a mate, cost me almost nothing it was so bad.

« Last Edit: May 26, 2024, 08:34:07 AM by Oddjob »

Offline Oddjob

  • Hot Shot
  • ***
  • Posts: 625
Re: Another project-1976 Honda CB550K
« Reply #449 on: May 26, 2024, 08:37:09 AM »
I don't want anyone to think that's as good as it looks, it was just one side of the carb and just the one carb, I did however consider doing a whole bank along with a ceramic chromed hanger bracket, just to see how it looked. However that's a 550 069A carb and my bike uses 623B carbs so I'd really have to start again. I was testing out some new polishing tools, quite expensive but they turned out to be excellent at really getting into tight spaces, hence why I choose a carb body to test them out on, I finished one side just because I was curious as to how it would look and TBH it's not bad at all, how long the finish would last though is up for debate  ;D ;D

I even considering have the throttle butterfly and the linkage system gold plated, just for the bling factor  8) 8)

Do you have a picture of the set of new polishing tools ?  8)

I'll see if I can find a link, they may not be available to buy in the USA or they may be made there, who knows?

You'll need a Dremel or similar to use them though.

Found a couple of links.

https://www.ebay.co.uk/itm/196361686546

https://www.ebay.co.uk/itm/116039030208?itmmeta=01HYTSMXT0RBD754NYAD2AY690&hash=item1b047715c0:g:QLkAAOSwONtlo7ir&itmprp=enc%3AAQAJAAAA8MT9z53rKTamXgU3%2BklSsW%2FOdgMbwdM%2BWKYg6sr3Ix27%2BXkcP4lwRYAVT8%2BZFGZ0Ced6dPMpEqGgbWTo7myzmIQZk2QtCXE5y1szI08AdxIu1xOaTwletpYsL50AbcPgEoXF0c%2BZWAtCleUONy%2FGKG%2FGpjMiICdZGnKv2iRDcgwjBRiIwUjxJRjsR0yQhDYkbK0PPXqTBu4uQ3Or9dfsZUibCUxnWTN%2F5UgsjXoUoYjxsInPfBo%2BNXOZbMA%2BQz6Cr1slpOMItXkFQXkR9qhoPQ39M9YBxkolnAblcXpLFMTI3BUhjaW%2BaTlpF%2FSE9hxSnw%3D%3D%7Ctkp%3ABk9SR57d09n2Yw

The needle point ones are really good at getting down into the deep places, however they wear quite quickly, the cylinders are better and cheaper, you can even put them in a pencil sharpener and give them a point if needed. If buying the needle point ones just use them on the areas that you really need to, use the cylinders on the others. I found they spun off the mandrel too easily as well so try the mandrels that Dremel supply for the felt tips, they fit better but can split the rubber so be careful fitting them. The rest of the body was sanded using abrasive discs, same as I use on the covers above to get rid of the damage and corrosion.
« Last Edit: May 26, 2024, 09:09:19 AM by Oddjob »