Author Topic: 1975 CB550 help! (new questions in first post)  (Read 10392 times)

0 Members and 1 Guest are viewing this topic.

Offline speedy_the_drummer

  • Enthusiast
  • **
  • Posts: 139
1975 CB550 help! (new questions in first post)
« on: September 05, 2011, 04:14:06 PM »
DISCLAIMER: I will probably ask some dumb questions, but please bear with me. This is my first ground-up build.
---------------------------------------

1975 CB550F

---------------------------------------

1-When I pull in the clutch, it doesn't snap back. It just stays pulled in. Is that right? The bike isn't running and hasn't in two years. (it has a new cable)

2-When I twist the throttle, it stays in place. I have to manually un-twist the throttle. Is that right? The bike isn't running and hasn't in two years. (it has a new cable)

3-Can someone take a picture of the back brake set up. (specifically where the rod the brake pedal connects to, connects to the long rod that connects to the rim.)
« Last Edit: September 11, 2011, 04:49:58 PM by speedy_the_drummer »

bollingball

  • Guest
Re: 1975 CB550 help!
« Reply #1 on: September 05, 2011, 04:33:12 PM »
Red is the starter solioid
Blue is the fuse box get one from HondaMan comes with the connectors
pink looks like the flasher relay
yellow comes with HondaMans fuse panel plug & play

bollingball

  • Guest
Re: 1975 CB550 help!
« Reply #2 on: September 05, 2011, 04:35:59 PM »

Offline Scott S

  • Global Moderator
  • Really Old Timer ...
  • *****
  • Posts: 8,252
Re: 1975 CB550 help!
« Reply #3 on: September 05, 2011, 04:38:18 PM »
4.4: If you're pumping the master cylinder and getting fluid down at the "little circle metal piece that the screw goes through about halfway down the front of the forks", then the m/c itself is probably good.

 There is a banjo bolt at that junction. The banjo bolt uses copper crush washers. Try replacing the crush washers (or just tightening what you have) and see what happens. If you break the system, you'll have to re-bleed the brakes.
'71 CB500 K0
'17 Triumph Street Scrambler
'81 Yamaha XS650

bollingball

  • Guest
Re: 1975 CB550 help!
« Reply #4 on: September 05, 2011, 04:51:45 PM »
Looks like it was rode hard and put up wet. So are you have you looked at the storm heading your way? It just passed over me here in NC Big storm

Offline thehammer

  • Enthusiast
  • **
  • Posts: 109
Re: 1975 CB550 help!
« Reply #5 on: September 05, 2011, 06:10:02 PM »
I replace the fuse boxes with micro blade type fuseholders from radio shack. It's getting hard to find the glass buss fuses in the right size and amperage. you've got to get 3 separate holders but you can use zip ties to fasten them to the electrical panel and they look sharp! just solder them into the harness, eliminate that old connector.

Offline speedy_the_drummer

  • Enthusiast
  • **
  • Posts: 139
Re: 1975 CB550 help!
« Reply #6 on: September 05, 2011, 07:13:15 PM »
4.4: If you're pumping the master cylinder and getting fluid down at the "little circle metal piece that the screw goes through about halfway down the front of the forks", then the m/c itself is probably good.

 There is a banjo bolt at that junction. The banjo bolt uses copper crush washers. Try replacing the crush washers (or just tightening what you have) and see what happens. If you break the system, you'll have to re-bleed the brakes.

Where might I get crush washers? Are they just lock washers?

I'm going to have to bleed the brakes. The whole brake system came to me in pieces.

Offline speedy_the_drummer

  • Enthusiast
  • **
  • Posts: 139
Re: 1975 CB550 help!
« Reply #7 on: September 05, 2011, 07:16:05 PM »
I replace the fuse boxes with micro blade type fuseholders from radio shack. It's getting hard to find the glass buss fuses in the right size and amperage. you've got to get 3 separate holders but you can use zip ties to fasten them to the electrical panel and they look sharp! just solder them into the harness, eliminate that old connector.


So should I do this or use the hondaman kit the guy above posted? Why do the two connectors look like they would not go together (male to male)? So I would eliminate the whole blue thing and make my own little fuse box, or would the hondaman thing take care of that?

Offline xsmooth69x

  • Master
  • *****
  • Posts: 1,621
Re: 1975 CB550 help!
« Reply #8 on: September 05, 2011, 11:05:57 PM »
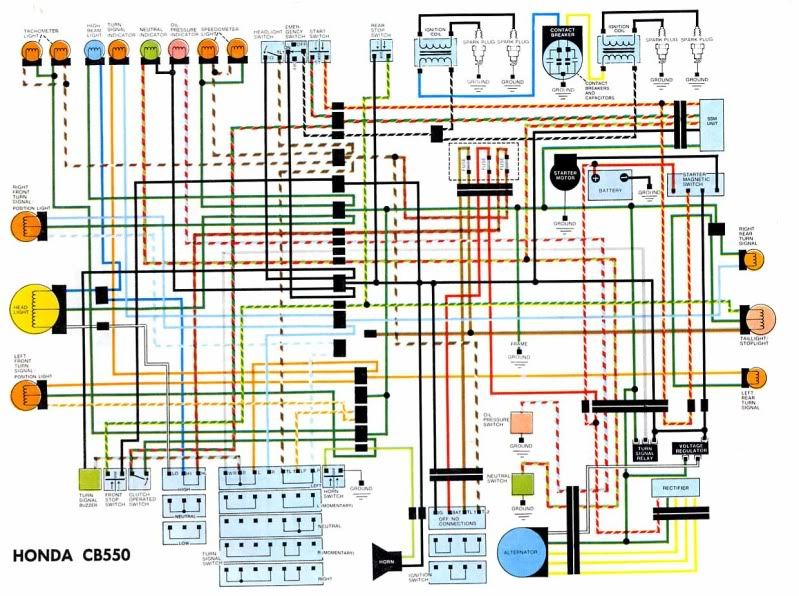
1.1 red- starter solenoid
      pink- blinker flasher
      blue- fuse box

1.2 fuse connectors

1.3 you can just replace the connector http://vintageconnections.com/
there are other websites too

1.4 my 1975 cb550 only needs 3 fuses. do you have a K or F. i think the F model had 4 fuses (i think)

------------------------------------------------

2.1 its actually not that complicated once you know what is going on.


2.2 the stock coils on these bikes are beasts. they dont go out. but on the rare occasion they do you just have to buy another used one or go down the full out electrical overhaul.

i would test it out first and see if work. (have all the electrical hooked up and take off a plug put an extra spark plug on it and hold it up to the engine and hit the starter and see if it sparks.)

the way i went was kept the coils cut the cables replaced it with a dyna solid copper core used the splicers to attach and replaced the spark plug caps


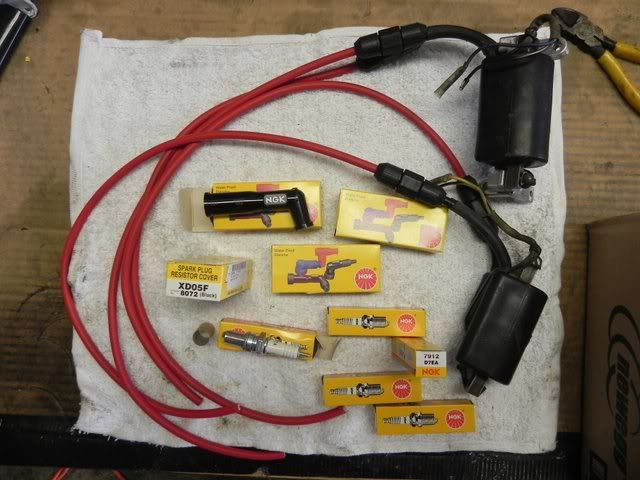
you can see the model # for the spark plug caps and spark plugs

replacing the whole points plate coils wires plugs. you a lot of people can chime in on this and head you down the dyna coil path. get ready to drop $300+

-----------------------------------------

3.1 answered

3.2 replacing the headlight is easy. just make sure u use a bulb that has a high and low beam.

personally keep the headlight bucket and get a 7" H4 conversion headlight. this eliminates the whole buying a new headlight thing and not you can just replace the bulb.

understand the bikes dont have the best charging system so make sure you use the motorcycle H4 bulbs and not the car H4 bulb like the 100/90 watt

people will probably chime in but i would thrown in a 35w HID H4 kit in the conversion. its more light and its only 35w so its super easy on the electrical system. stock bulbs are 50watt (i think)

---------------------------------

4.1 this all depends on how tall you are. im 5'9 175lb i like the clip on handle bars but you are a little hunched over. you would probably like clubmans and if you taller or lankier i heard the euro clubmans are good.

4.2 switching speedos and tachs are easy. just make sure the speedo  2240:60  tach 20:3 ratio

literally its just switching out the big metal cables and probably a red and black wire for the led on you new speedo and tach.

4.3 i dont really understand..... where are the wires cut? close to the exit by the connectors or close to the actual controls? you can just use any wire and if you can wield a soldering iron its pretty easy.

i took apart all my hand controls and re solders all the points.

used controls you can probably get them for 20-60 a piece

4.4 i dont know what your asking please elaborate more.

the master cylinder is up by the right hand control. a MC rebuild kit is just for the brake handle with the circle reservoir. you will need a long nose c clip pliers for the clip that holds everything in the MC (i hated doing mine)

honestly the best route to go and what i did was run a SS line from the MC all the way down to the metal pipe on the caliper and getting a brake switch banjo combo and placing that up into the MC and eliminating the tri splitter thing connected to your lower triple tree. the only thing that splitter is for is the brake switch to activate the brake light but with technology you can just completely ditch that.


« Last Edit: September 05, 2011, 11:14:01 PM by xsmooth69x »
1975 CB550 (FINISHED?!?!?)
first motorcycle ever!!! ow and i dont know how to ride it either :D

raw rust rice venti quad shot cafe racing latte project aka my build..... http://forums.sohc4.net/index.php?topic=88853.0

black and white equation godzilla chalkboard 
1972 cb750 - next in line for some <3

Offline RAWNOG

  • Full Member
  • *
  • Posts: 97
  • Pretty pretty pretty pretty... Pretty good.
Re: 1975 CB550 help!
« Reply #9 on: September 06, 2011, 12:27:46 AM »
 Ill be keeping track of this (I have a 75 cb550k), I recently fried my harness somehow... I think it was an old corroded fuse that did it in, but the red wire from the fuse box fried till it was all copper.... didnt even get a chance to start it after carb/top end rebuild. :-\ I replaced the harness and a new(old) stock electrical panel will be here tomorrow. Should I forget the old fuse box and go with the hondaman alternative?
BTW i cant figure out hot start a topic.... :-X
1975 CB550k 

Offline thehammer

  • Enthusiast
  • **
  • Posts: 109
Re: 1975 CB550 help!
« Reply #10 on: September 06, 2011, 07:47:21 AM »
I replace the fuse boxes with micro blade type fuseholders from radio shack. It's getting hard to find the glass buss fuses in the right size and amperage. you've got to get 3 separate holders but you can use zip ties to fasten them to the electrical panel and they look sharp! just solder them into the harness, eliminate that old connector.


So should I do this or use the hondaman kit the guy above posted? Why do the two connectors look like they would not go together (male to male)? So I would eliminate the whole blue thing and make my own little fuse box, or would the hondaman thing take care of that?

Either way will work. converting to microfuses will save you alot of hassle trying to find replacement fuses. if you take that fusebox off your electrical panel, you can see wich wires go to wich fuses. these wires will be the same colors on the other side of that (yellow) connector.

you'll have to unwrap the electrical tape on the harness side of the (yellow) connector, cut and strip the wires and solder 3 new fuseholders in relative to the wiring of the stock fusebox. use heat shrink tubing to reinsulate the wires. Looks like your bike has 4 fusible links? is one of the fuses missing and you actually have 5? or is that a spare fuse holder?
« Last Edit: September 06, 2011, 07:50:05 AM by thehammer »

Offline johnrdupree

  • Enthusiast
  • **
  • Posts: 244
Re: 1975 CB550 help!
« Reply #11 on: September 06, 2011, 08:42:17 AM »
I think it's important to point out that you've got an F model.  It differs from the K in some respects so advice from K model owners (like me) may or may not be useful.  That being said, here's my 2¢:

Section 1 seems to be covered pretty well already.

2.1 - Print out the color chart xsmooth69x posted (or find a bigger version online) and just go through one piece at a time.  Once all the connectors are in the headlight bucket, pick one part of the harness, like the left handle bar switch, and plug it all up.  Then move on to the right switch, then the idiot lights, etc., until you're done.  If you don't have all the electrical parts installed (you seem to be missing front turn signals) then you will have stuff left over.  If you go through it methodically it won't be that bad.

2.2 - Odds are your coils are fine.  If the spark plug wires are intact, not brittle or splitting, then don't worry about them right now.  Most people clip off about 1/4" of the spark plug wires and reinstall the plug caps.  This helps ensure a good electrical connection between the wire and the cap.  A word about the caps: they are resistor types, 10K ohms.  If you have a multi-meter you can unscrew them from the wires and check their resistance.  They should be within a couple hundred ohms of 10K.  If they are not you can replace them with the 5K versions since the 10K ones seem to be unavailable.

3.2 - Before replacing the headlight, get all the stock stuff working first.  Then when you replace the headlight and something goes wrong, you know it must be something you just did since it was right before you mucked with it.  The stock headlight is 7" (I think).  The next common size down is 5-1/4".  You could look at a side mount 5-1/4" Bates style:


Remember that the stock headlight ears are meant for a 7" bucket and a 5-1/4" may make them look funny.  Also, all those electrical connectors in the stock bucket will have to find someplace else to live since the bates style buckets don't have a hole in the back.  Of course, you could put a hole in the back.  Another option is a smaller OEM headlight.  I have a 4-1/2" Yamaha enduro headlight on my 550K1:


Since it is an OEM unit it is made well and has a hole for the wiring.  This one is thirty-something years old and all I did was derust it and paint it.  It uses a 25w/25w bulb so riding at night is best avoided.  This option requires a lot of research and/or wandering your local salvage yard.

4.2 - A lot of folks use smaller gauges from the chopper/bobber shops, like these at Dime City:

http://www.dimecitycycles.com/vintage-cafe-racer-caferacer-bobber-brat-chopper-custom-motorcycle-electronic-parts-mini-chrome-black-face-led-speedo-speedometer-15-0032b.html

http://www.dimecitycycles.com/vintage-cafe-racer-caferacer-bobber-brat-chopper-custom-motorcycle-electronic-parts-mini-chrome-tachometer-15-0031b.html

The speedo can be had with or without idiot lights, but since you want to eliminate that housing I linked to the one with the lights.  They are pretty handy to have, especially the oil and neutral.  You'll have to fab your own mount and wire them in.  Make sure you get the correct ratios.  Whoever you buy them from should be able to handle that.  If they can't tell you the correct ratios, don't buy from them (speedo=2240:60,  tach=20:3).

4.4 - It would be worth replacing the caliper seal at the same time you rebuild the master cylinder.  It will give you a chance to examine the caliper piston and replace it if needed, they have a tendency to corrode.  You'll also be able to clean the groove the seal sits in so that the piston will retract correctly.  The leak at the junction block (that's what your description sounds like) could just be a loose banjo bolt.  Tighten it down and try again.  If it still leaks take the banjo bolt and washers to a good auto parts store, they'll have the washers you need.

~john
« Last Edit: September 06, 2011, 08:44:50 AM by johnrdupree »
1975 Honda CB550K1
1991 Honda ST1100
1989 Suzuki GS500E
1954 NSU Lambretta 125 (long term project)

Offline RAWNOG

  • Full Member
  • *
  • Posts: 97
  • Pretty pretty pretty pretty... Pretty good.
Re: 1975 CB550 help!
« Reply #12 on: September 06, 2011, 09:43:08 AM »
nice info John, Ill be riding from stone mountain to augusta for my new job pretty soon. its about 2.5 hours... but i stay for two weeks at a time. Ill be riding the same bike, 1975 cb550k with a green stock tank.
1975 CB550k 

Offline xsmooth69x

  • Master
  • *****
  • Posts: 1,621
Re: 1975 CB550 help!
« Reply #13 on: September 06, 2011, 09:54:50 AM »
an awsome tip on taking out the  brake caliper piston is

when you take off the 2 bolts that hold the caliper together (front and back of the caliper with the pads) there should be 2. hold on to one of those bolts.

take off the hard line off the caliper and then take that bolt and it threads perfectly into the hole that the hard line comes off of. this seals off the big whole. thennnnnnn unscrew the brake bleeder nipple a little like you about to bleed the brakes.

1) attache an air compressor to the bleeder nipple. make sure to to place the caliper piston face down on a towel because it will shoot out

2) if you dont have shop air take a grease gun and attach it to the bleeder nipple and pump greese into it and it will push the piston out.

after that clean out all the grease and shoot brake cleaner through all the holes to get the remaining grease out

-----------

i had a seized brake piston and i used the grease gun method since i didnt have shop air and it pushed (with a little force) out.  ;)
1975 CB550 (FINISHED?!?!?)
first motorcycle ever!!! ow and i dont know how to ride it either :D

raw rust rice venti quad shot cafe racing latte project aka my build..... http://forums.sohc4.net/index.php?topic=88853.0

black and white equation godzilla chalkboard 
1972 cb750 - next in line for some <3

Offline xsmooth69x

  • Master
  • *****
  • Posts: 1,621
Re: 1975 CB550 help!
« Reply #14 on: September 06, 2011, 09:56:59 AM »
I think it's important to point out that you've got an F model.  It differs from the K in some respects so advice from K model owners (like me) may or may not be useful.  That being said, here's my 2¢:

Section 1 seems to be covered pretty well already.

2.1 - Print out the color chart xsmooth69x posted (or find a bigger version online) and just go through one piece at a time.  Once all the connectors are in the headlight bucket, pick one part of the harness, like the left handle bar switch, and plug it all up.  Then move on to the right switch, then the idiot lights, etc., until you're done.  If you don't have all the electrical parts installed (you seem to be missing front turn signals) then you will have stuff left over.  If you go through it methodically it won't be that bad.

2.2 - Odds are your coils are fine.  If the spark plug wires are intact, not brittle or splitting, then don't worry about them right now.  Most people clip off about 1/4" of the spark plug wires and reinstall the plug caps.  This helps ensure a good electrical connection between the wire and the cap.  A word about the caps: they are resistor types, 10K ohms.  If you have a multi-meter you can unscrew them from the wires and check their resistance.  They should be within a couple hundred ohms of 10K.  If they are not you can replace them with the 5K versions since the 10K ones seem to be unavailable.

3.2 - Before replacing the headlight, get all the stock stuff working first.  Then when you replace the headlight and something goes wrong, you know it must be something you just did since it was right before you mucked with it.  The stock headlight is 7" (I think).  The next common size down is 5-1/4".  You could look at a side mount 5-1/4" Bates style:


Remember that the stock headlight ears are meant for a 7" bucket and a 5-1/4" may make them look funny.  Also, all those electrical connectors in the stock bucket will have to find someplace else to live since the bates style buckets don't have a hole in the back.  Of course, you could put a hole in the back.  Another option is a smaller OEM headlight.  I have a 4-1/2" Yamaha enduro headlight on my 550K1:


Since it is an OEM unit it is made well and has a hole for the wiring.  This one is thirty-something years old and all I did was derust it and paint it.  It uses a 25w/25w bulb so riding at night is best avoided.  This option requires a lot of research and/or wandering your local salvage yard.

4.2 - A lot of folks use smaller gauges from the chopper/bobber shops, like these at Dime City:

http://www.dimecitycycles.com/vintage-cafe-racer-caferacer-bobber-brat-chopper-custom-motorcycle-electronic-parts-mini-chrome-black-face-led-speedo-speedometer-15-0032b.html

http://www.dimecitycycles.com/vintage-cafe-racer-caferacer-bobber-brat-chopper-custom-motorcycle-electronic-parts-mini-chrome-tachometer-15-0031b.html

The speedo can be had with or without idiot lights, but since you want to eliminate that housing I linked to the one with the lights.  They are pretty handy to have, especially the oil and neutral.  You'll have to fab your own mount and wire them in.  Make sure you get the correct ratios.  Whoever you buy them from should be able to handle that.  If they can't tell you the correct ratios, don't buy from them (speedo=2240:60,  tach=20:3).

4.4 - It would be worth replacing the caliper seal at the same time you rebuild the master cylinder.  It will give you a chance to examine the caliper piston and replace it if needed, they have a tendency to corrode.  You'll also be able to clean the groove the seal sits in so that the piston will retract correctly.  The leak at the junction block (that's what your description sounds like) could just be a loose banjo bolt.  Tighten it down and try again.  If it still leaks take the banjo bolt and washers to a good auto parts store, they'll have the washers you need.

~john

the headlight is 7"

you can convert the micro fuse to a regular fuse size like the ones you buy from auto stores but i just placed the long fuses in the micro fuse box. they are a little long but still make contact so it works  :P
1975 CB550 (FINISHED?!?!?)
first motorcycle ever!!! ow and i dont know how to ride it either :D

raw rust rice venti quad shot cafe racing latte project aka my build..... http://forums.sohc4.net/index.php?topic=88853.0

black and white equation godzilla chalkboard 
1972 cb750 - next in line for some <3

Offline Gordon

  • Global Moderator
  • Really Old Timer ...
  • *****
  • Posts: 12,114
  • 750K1, 550K2
Re: 1975 CB550 help!
« Reply #15 on: September 06, 2011, 10:35:18 AM »
an awsome tip on taking out the  brake caliper piston is

when you take off the 2 bolts that hold the caliper together (front and back of the caliper with the pads) there should be 2. hold on to one of those bolts.

take off the hard line off the caliper and then take that bolt and it threads perfectly into the hole that the hard line comes off of. this seals off the big whole. thennnnnnn unscrew the brake bleeder nipple a little like you about to bleed the brakes.

1) attache an air compressor to the bleeder nipple. make sure to to place the caliper piston face down on a towel because it will shoot out

2) if you dont have shop air take a grease gun and attach it to the bleeder nipple and pump greese into it and it will push the piston out.

after that clean out all the grease and shoot brake cleaner through all the holes to get the remaining grease out

-----------

i had a seized brake piston and i used the grease gun method since i didnt have shop air and it pushed (with a little force) out.  ;)

Or, before you disconnect any of the lines, just pump the piston out with the brake lever.  No need for an air compressor or cleaning a bunch of grease out of the caliper.

Offline xsmooth69x

  • Master
  • *****
  • Posts: 1,621
Re: 1975 CB550 help!
« Reply #16 on: September 06, 2011, 01:36:16 PM »
an awsome tip on taking out the  brake caliper piston is

when you take off the 2 bolts that hold the caliper together (front and back of the caliper with the pads) there should be 2. hold on to one of those bolts.

take off the hard line off the caliper and then take that bolt and it threads perfectly into the hole that the hard line comes off of. this seals off the big whole. thennnnnnn unscrew the brake bleeder nipple a little like you about to bleed the brakes.

1) attache an air compressor to the bleeder nipple. make sure to to place the caliper piston face down on a towel because it will shoot out

2) if you dont have shop air take a grease gun and attach it to the bleeder nipple and pump greese into it and it will push the piston out.

after that clean out all the grease and shoot brake cleaner through all the holes to get the remaining grease out

-----------

i had a seized brake piston and i used the grease gun method since i didnt have shop air and it pushed (with a little force) out.  ;)

Or, before you disconnect any of the lines, just pump the piston out with the brake lever.  No need for an air compressor or cleaning a bunch of grease out of the caliper.

^ well that first lol but he says the brakes are leaking so i hope he has enough preasure
1975 CB550 (FINISHED?!?!?)
first motorcycle ever!!! ow and i dont know how to ride it either :D

raw rust rice venti quad shot cafe racing latte project aka my build..... http://forums.sohc4.net/index.php?topic=88853.0

black and white equation godzilla chalkboard 
1972 cb750 - next in line for some <3

Offline johnrdupree

  • Enthusiast
  • **
  • Posts: 244
Re: 1975 CB550 help!
« Reply #17 on: September 06, 2011, 03:06:02 PM »
nice info John, Ill be riding from stone mountain to augusta for my new job pretty soon. its about 2.5 hours... but i stay for two weeks at a time. Ill be riding the same bike, 1975 cb550k with a green stock tank.

I moved here from Atlanta a few years ago and have driven & ridden back and forth about a million times.  I can tell you with certainty that I-20 is a mind numbing ride.  US278 isn't much better.

What will you be doing here?

~john
1975 Honda CB550K1
1991 Honda ST1100
1989 Suzuki GS500E
1954 NSU Lambretta 125 (long term project)

Offline TwoTired

  • Really Old Timer ...
  • *******
  • Posts: 21,802
Re: 1975 CB550 help!
« Reply #18 on: September 06, 2011, 03:13:11 PM »
you can convert the micro fuse to a regular fuse size like the ones you buy from auto stores but i just placed the long fuses in the micro fuse box. they are a little long but still make contact so it works  :P
There's contact, and there's full contact.  Fuses too long don't make good contact and a far more prone to generate heat at the fuse clips.  The generated heat effectively lowers here current rating, and they melt at a lower load factor.

Sometimes you can hang on by your fingertips  ...for a while.

As to the fuse box, if the base plastic has melted, a replacement is required.  The melting/distortion usually prevents the clips from floating so they can self align with the fuse barrel.  Again, reducing contact area.

Cheers,
Lloyd... (SOHC4 #11 Original Mail List)
72 500, 74 550, 75 550K, 75 550F, 76 550F, 77 550F X2, 78 550K, 77 750F X2, 78 750F, 79CX500, 85 700SC, GL1100

Those that learn from history are doomed to repeat it by those that don't learn from history.

Offline RAWNOG

  • Full Member
  • *
  • Posts: 97
  • Pretty pretty pretty pretty... Pretty good.
Re: 1975 CB550 help!
« Reply #19 on: September 07, 2011, 10:54:23 AM »
Quote
What will you be doing here?

~john

 Some friends of mine started working for a contractor who does work for GA power, cutting branches, measuring powerlines, etc. They said they have an opening in Augusta, and Im pretty sure Im the first one in line for the position. Ill be there 2 weeks at a time IF I get the gig, so got my fangers crossed!
1975 CB550k 

Offline speedy_the_drummer

  • Enthusiast
  • **
  • Posts: 139
Re: 1975 CB550 help!
« Reply #20 on: September 10, 2011, 11:15:00 AM »
Thanks for all the help. I've got a handful of this stuff done and A LOT of parts on order thanks to you all.

Here's a couple more things.

My back break doesn't seem to work right, or at all. I took it off well over a year and a half ago and I don't remember how it is supposed to go back. Here's a picture that hopefully shows how I have it right now.


I also am confused on this. It seems like I won't be able to kit start the bike because the break pedal is in the way. Does this look right?

Offline Tews19

  • I am no
  • Really Old Timer ...
  • *******
  • Posts: 6,433
Re: 1975 CB550 help!
« Reply #21 on: September 10, 2011, 12:48:28 PM »
You are missing your foot peg
1969 Honda CB750... Basket case
1970 Honda CB750 survivor.

Offline speedy_the_drummer

  • Enthusiast
  • **
  • Posts: 139
Re: 1975 CB550 help!
« Reply #22 on: September 11, 2011, 09:11:50 AM »
Where is the best place to get a new brake line?


Offline speedy_the_drummer

  • Enthusiast
  • **
  • Posts: 139
Re: 1975 CB550 help! (new questions in first post)
« Reply #24 on: September 11, 2011, 04:49:34 PM »
NEW questions in the original post.