Author Topic: 1975 CB750 K5 cafe build - first bike, first build - almost there!  (Read 106075 times)

0 Members and 1 Guest are viewing this topic.

Offline the architect

  • Hot Shot
  • ***
  • Posts: 424
I finally decided to do a build thread write-up for my project. I fell in love with café bikes and wanted to do my own brand.  And I have to add that none of this would have been possible if not for the wealth of information on this forum and its kind, helpful and brilliant members.  I welcome any and all feedback, comments, critiques or well-deserved reprimands!  This is my first bike.  Ever.  This makes it my first bike project.  Ever.  It’s been a rewarding and enjoyable (for the most part) experience.  And, just like so many before me, I’m already looking forward to my next one.  And the next, and the next . . .

Enjoy.

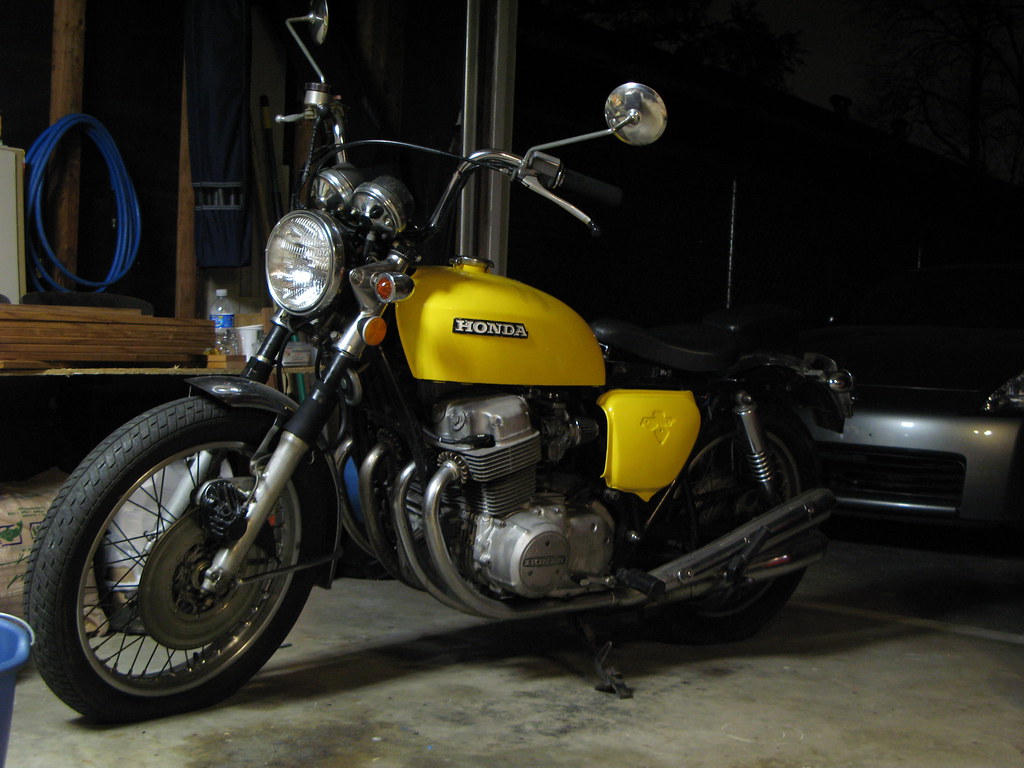
The victim . . . I mean bike:  1975 Honda CB750 K5.  A craigslist find that ran me $650 and some title headaches – long story, I’ll spare you.  It ran (barely) when I went to check it out – didn’t get to ride it, just listened to the engine rev and kicked the tires.  The seller was nice enough to deliver it to my house with his pickup the next day for free.  The '75 really caught my fancy since it's the same year as me.

-  20,000 miles
- I’m the fourth owner, from what I’ve been able to ascertain – so plenty of P.O. “discoveries”.

This was my starting place.  Day one.  Looking back, I can’t get over how tall she was!
You can see the solo seat + pillion pad the P.O. installed.  I missed out on the nice OEM seat  :(  
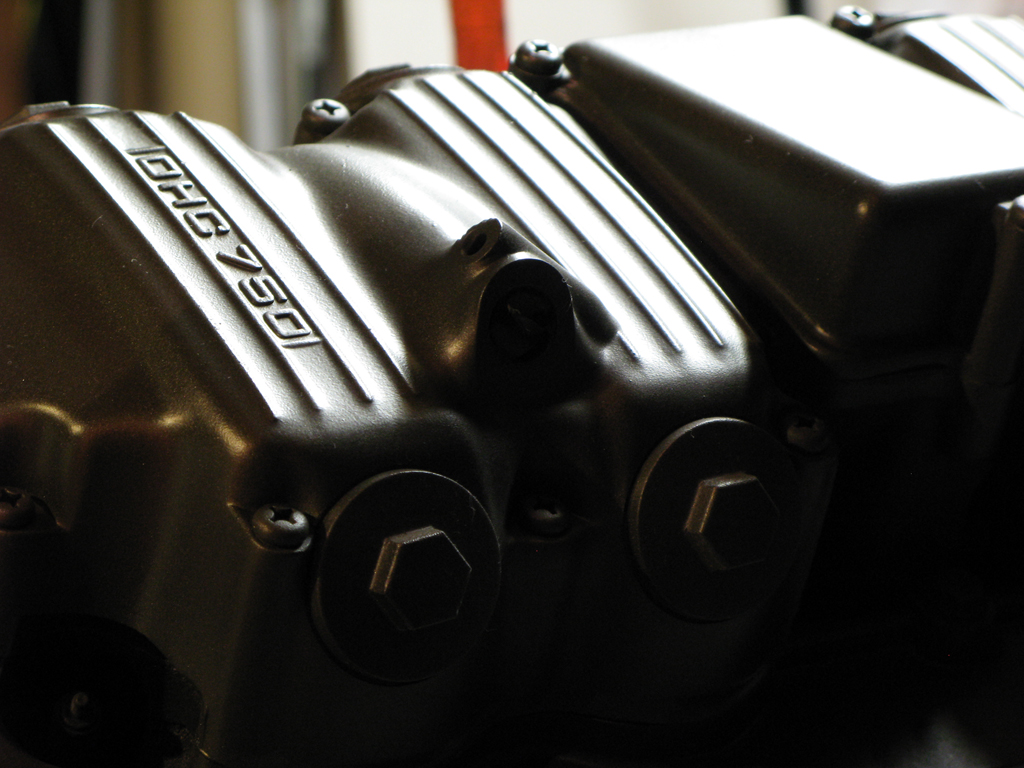
I later realized the rear frame was chopped and modified to allow for this seat combo.  Other P.O. “blessings”: the yellow paint job, the missing emblems on the side covers, some aftermarket cone filters (I did get the OEM airbox, though!), and the list goes on.


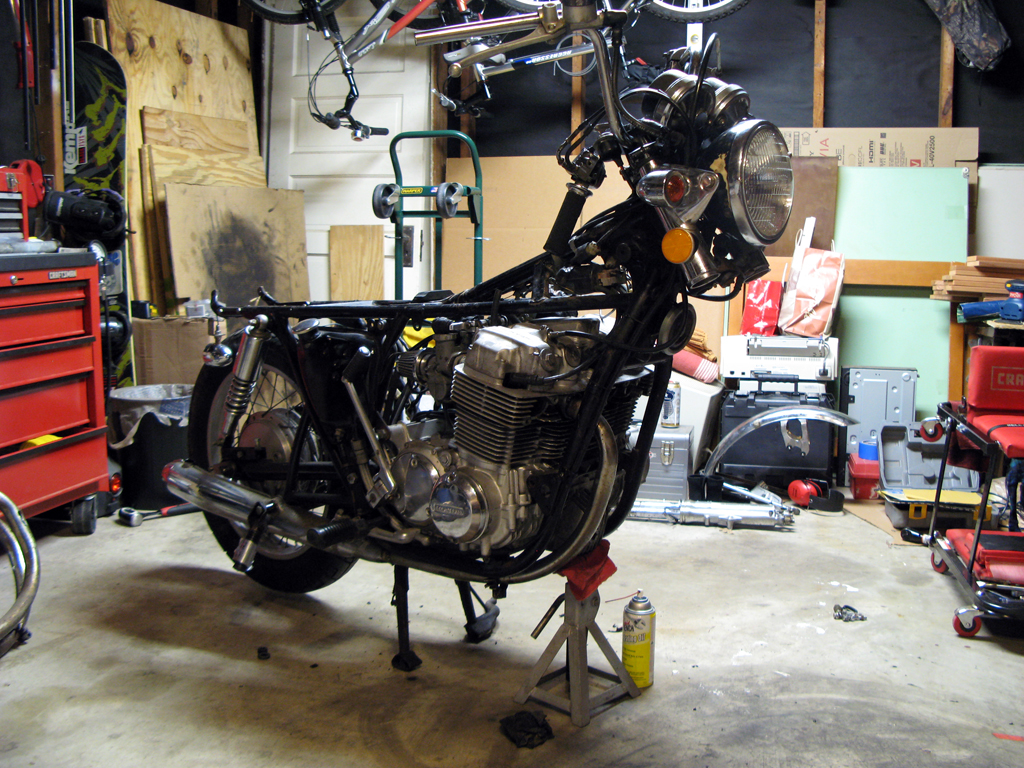
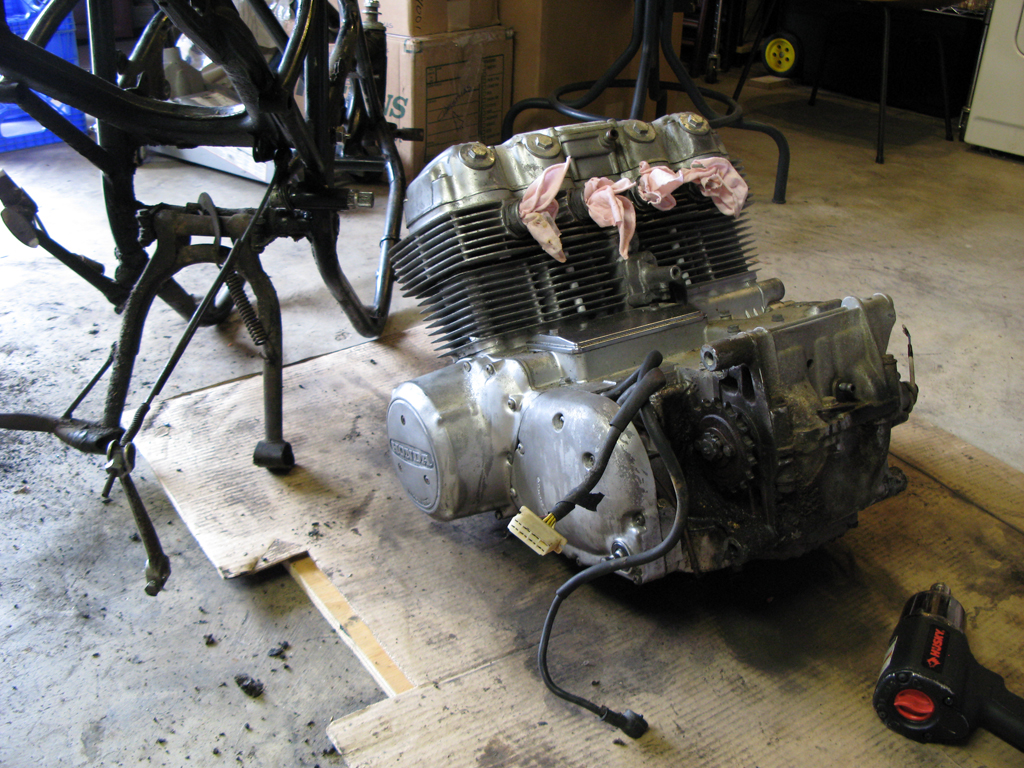
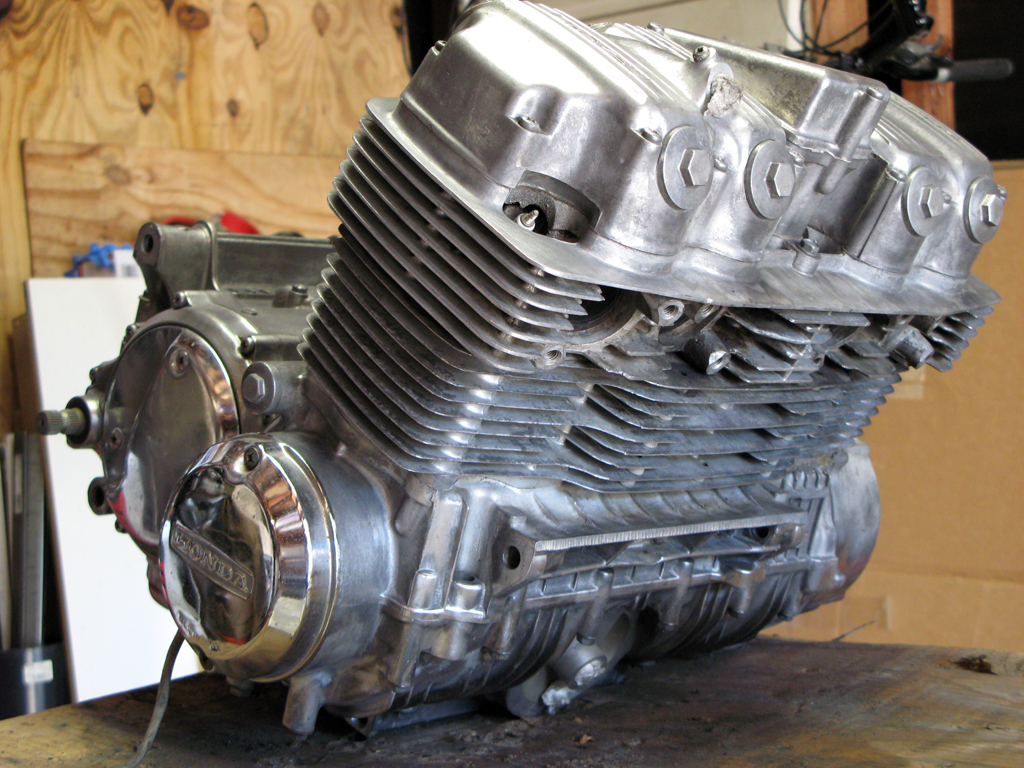
And it didn’t take long for it to start looking like this.  That one lone exhaust pipe almost killed me!  It took me days to remove the stuck screws at the engine, soaking it periodically with penetrating oil and wailing on it with an impact driver.  I finally got it.  I still need to think of a proper revenge for that screw.


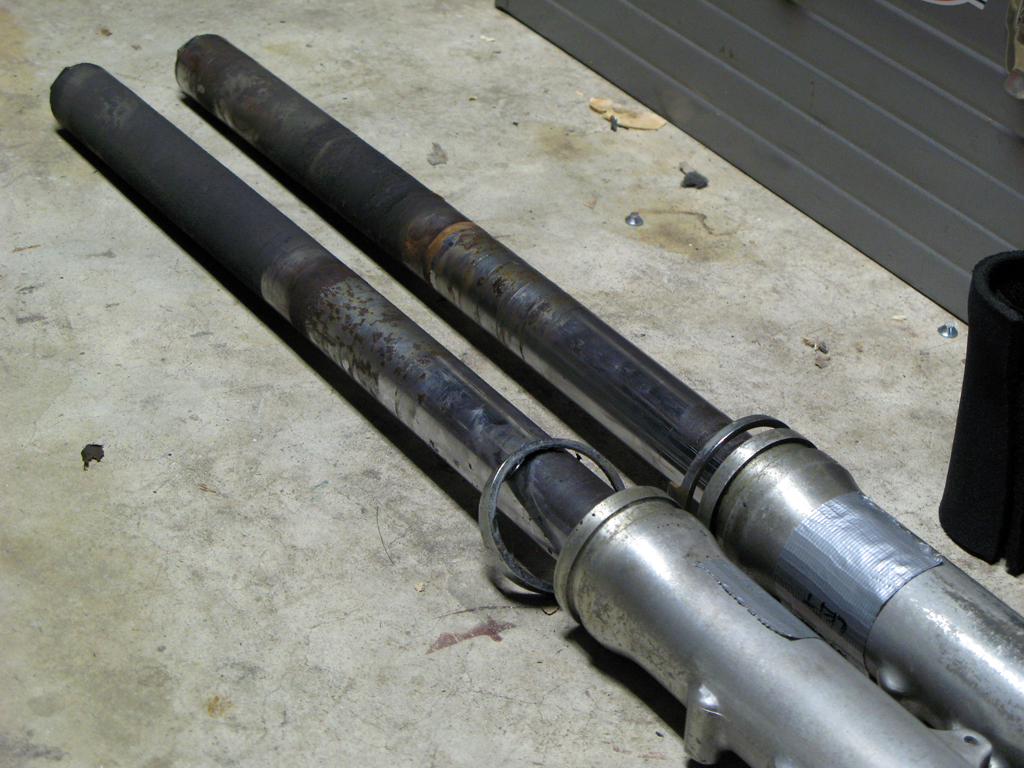
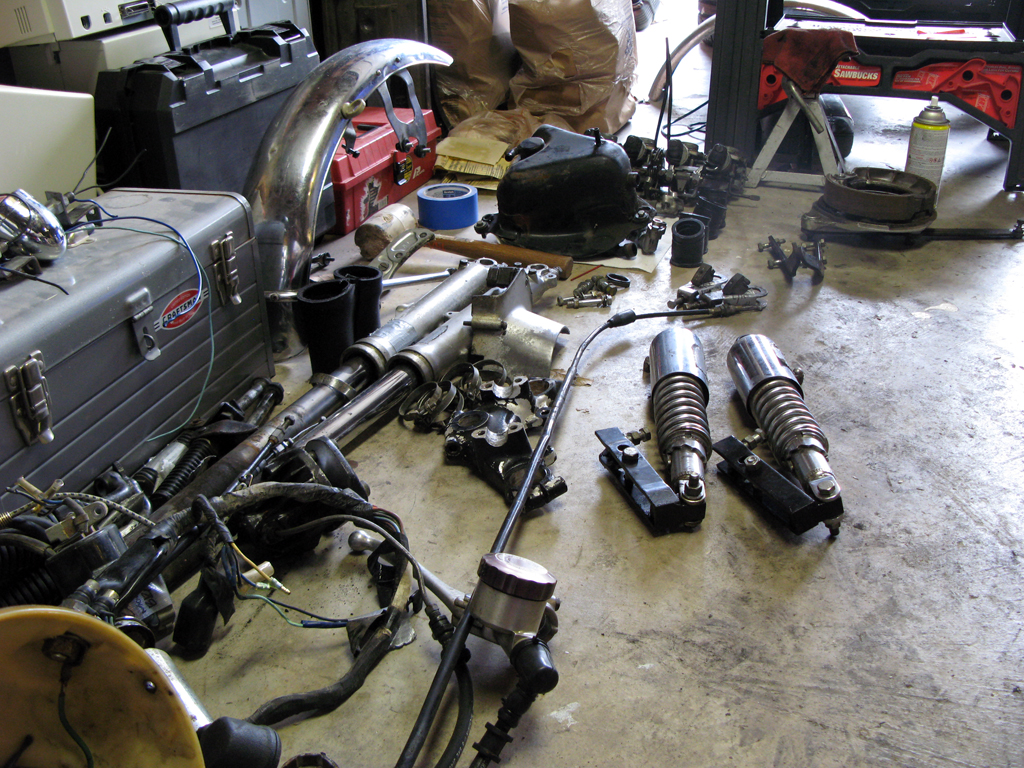
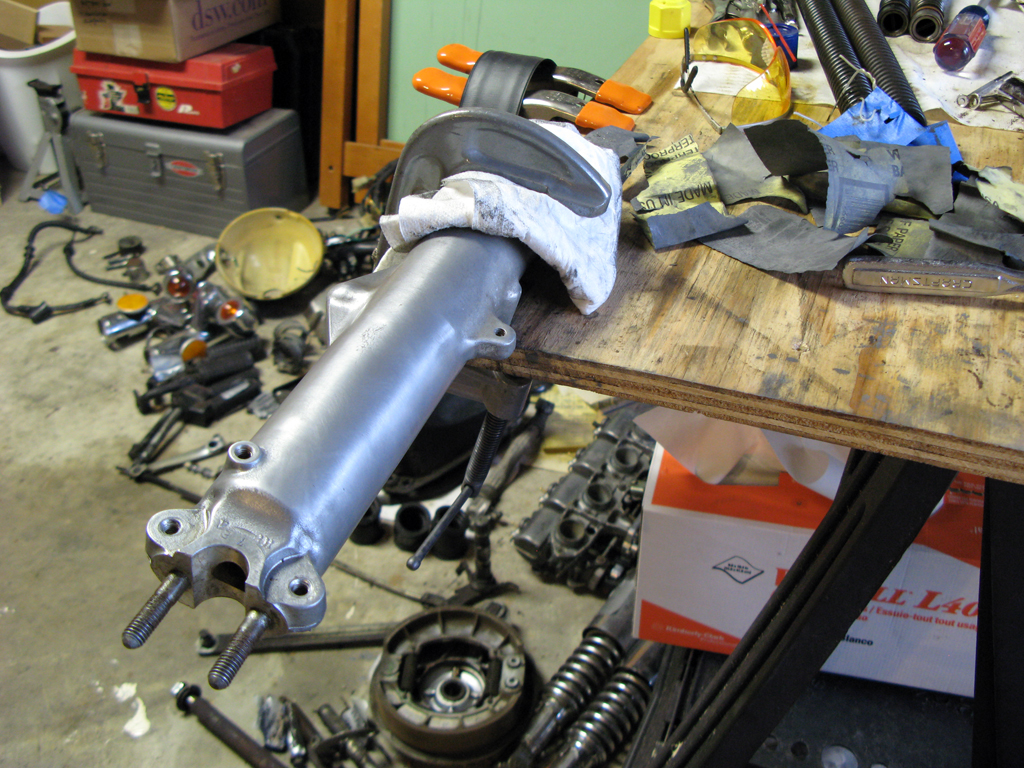
The forks were nasty.  They’d both been covered with some neoprene like material to soak up all the fork oil they’d been leaking.  Upon disassembly, one was completely dry.  As you can see, both were quite corroded.  More on the ensuing fiasco dealing with this later.


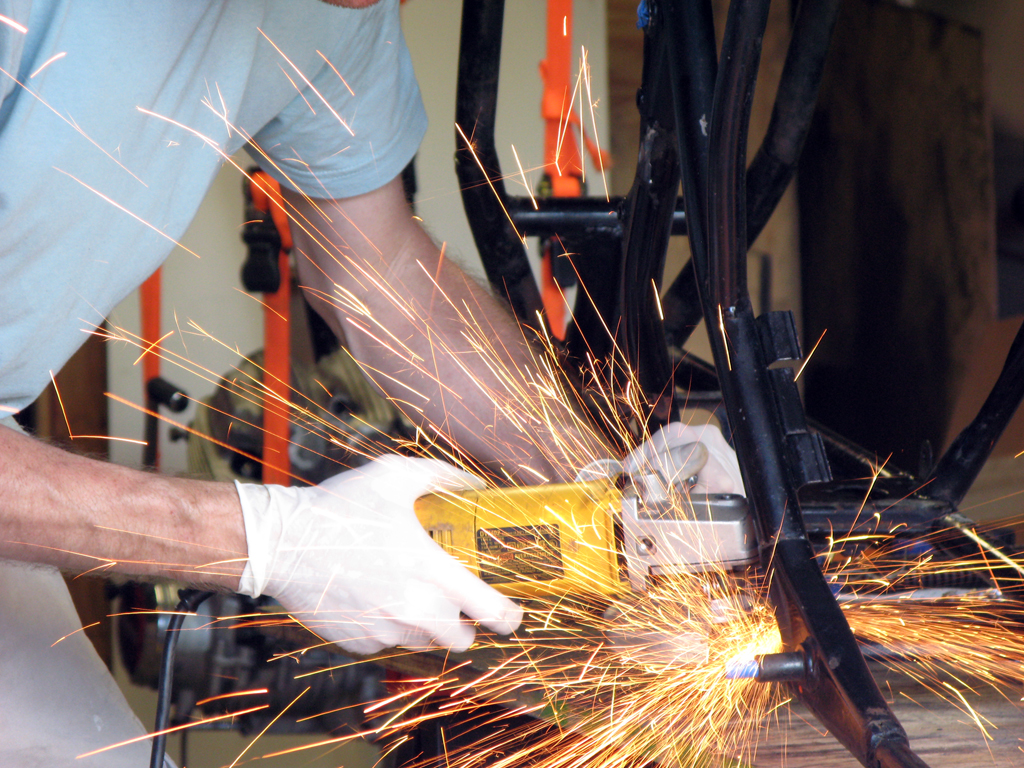
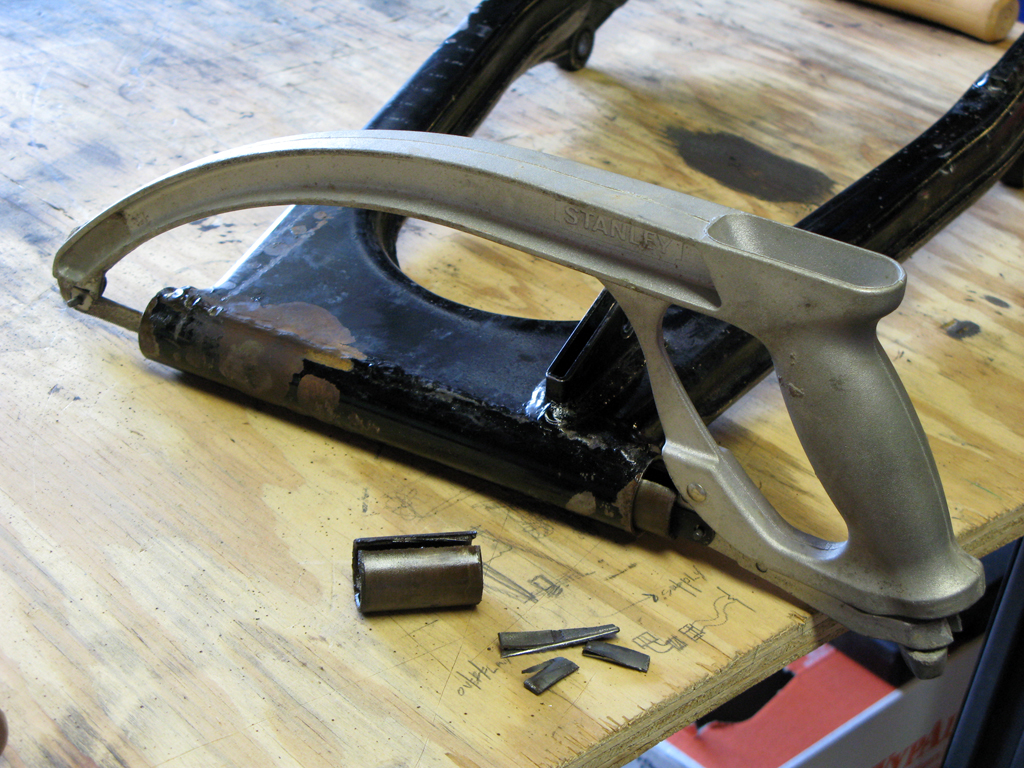
Getting this lug out was a beast of a job!  When I do it again (on a subsequent build), I’ll lay the frame on its side, unbolt the mounts and lift the frame off the engine.  230 lbs and one strained back later, I had this.


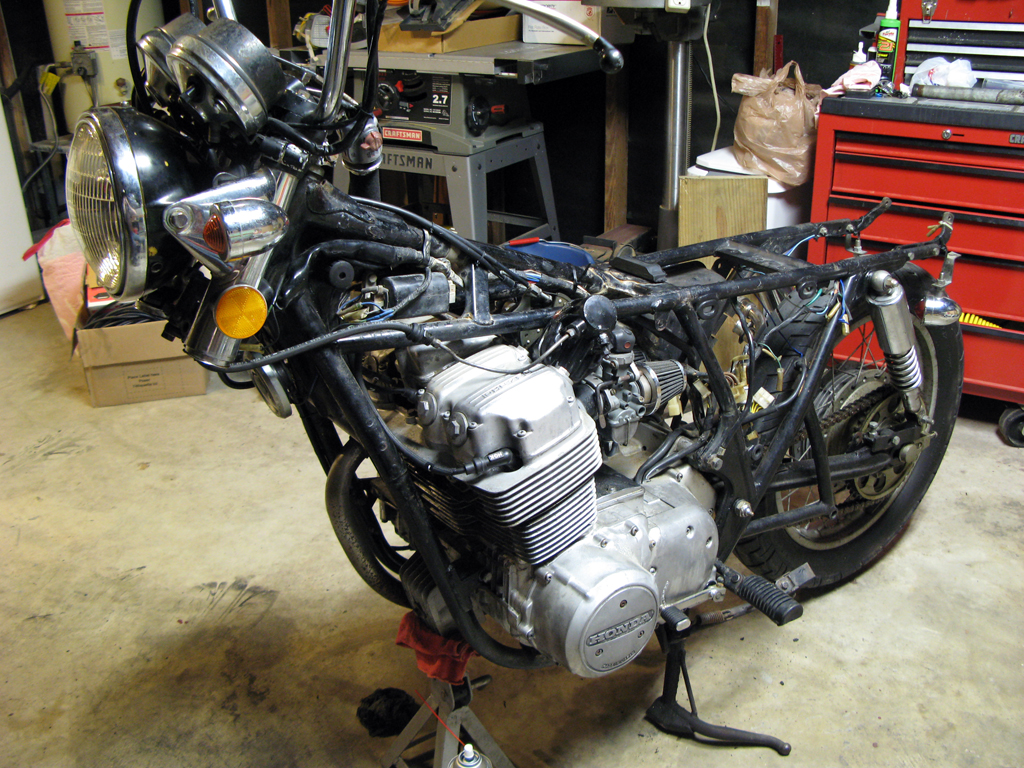
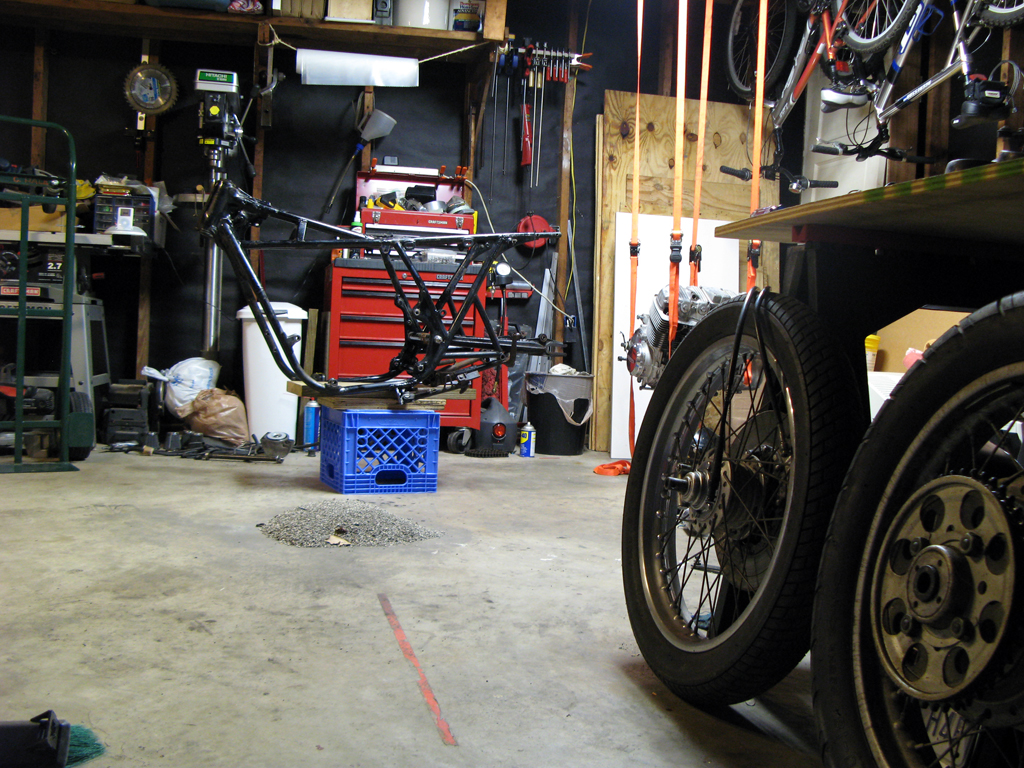
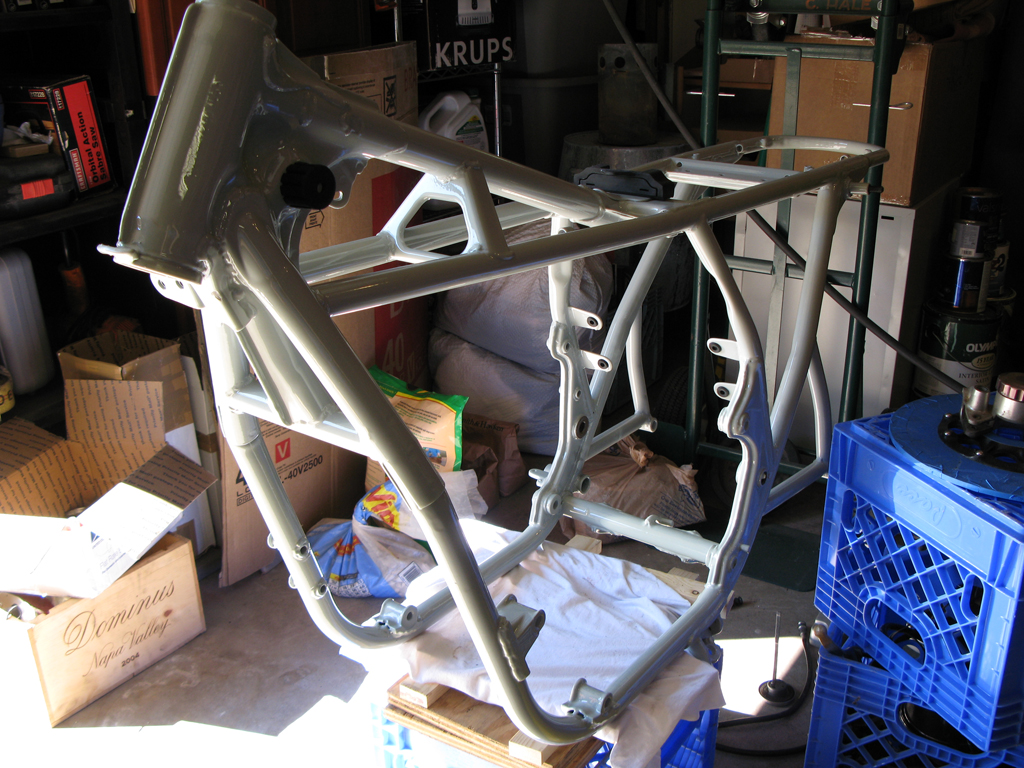
Just about there with the stripping down of the frame.


I tagged and photographed as I went, and I wish that I'd have been even more thorough.  I constantly go back to photos to see how things were assembled or looked.


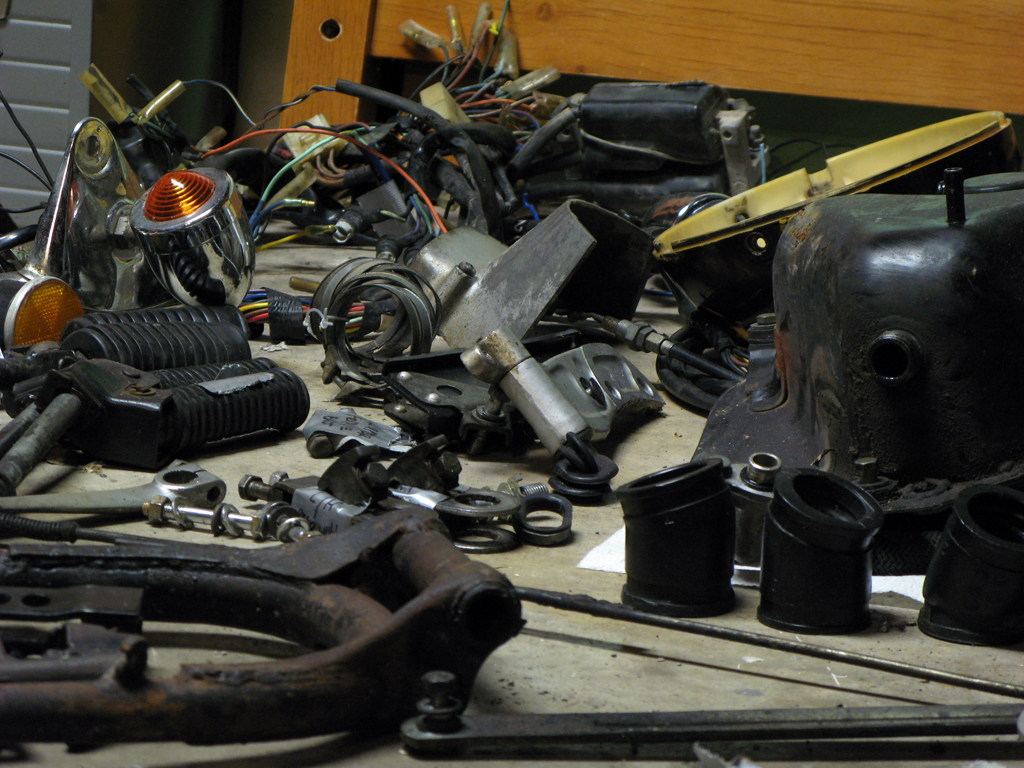
Where does all of this go?!?  I’m sure I’ll remember.  Famous last words?


It’s funny how one project has a tendency to spawn other projects.  I borrowed a portable sand blaster.  So, I needed to build a blasting cabinet.  Done.  Wow.  It makes parts look great!  I wanted to just clear coat these parts and put them back on!  Maybe next time.  At this point, I media blasted everything I could get my hands on.  Operation of my borrowed blaster was sporadic, at best, coupled with my modestly sized compressor, so this also taught me much patience.


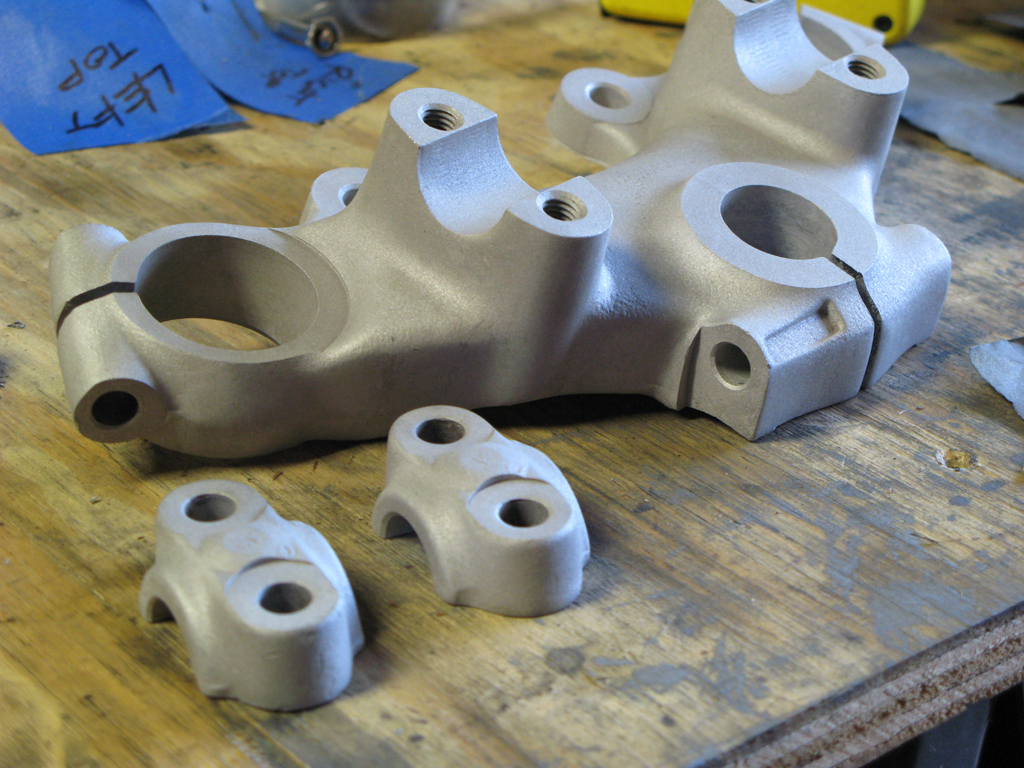
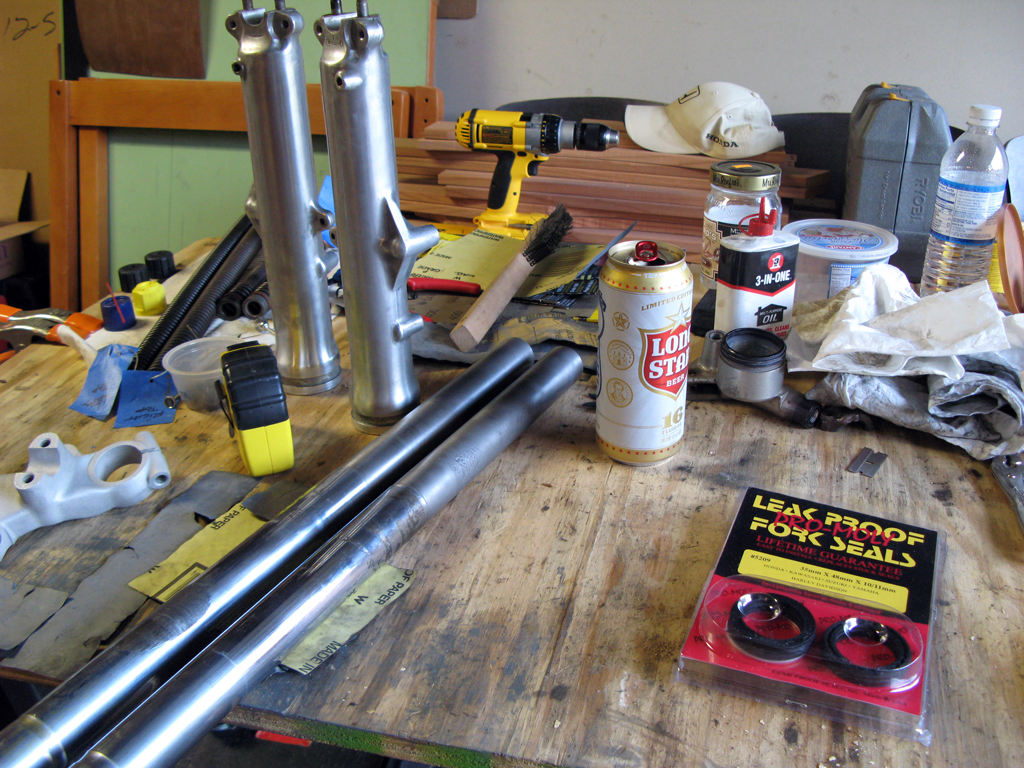
Next, I set my sights on polishing my fork lowers.  This took time.  I started with 400 grit and, step-by-step, worked my way to 2000 grit.  Then polish.  They turned out decent.  I also had the “brilliant” idea of trying to clean up my fork tubes by having a machine shop “clean cut” them back to clean metal, similar to having a brake rotor machined.  This was a bad idea.  Too much material came off.  I would have to use shims in the triple clamps to run these fork tubes – doesn’t seem that safe.  And they only came out about 80% clean – still showed some significant pitting.  I ended up replacing them.  More on this later.


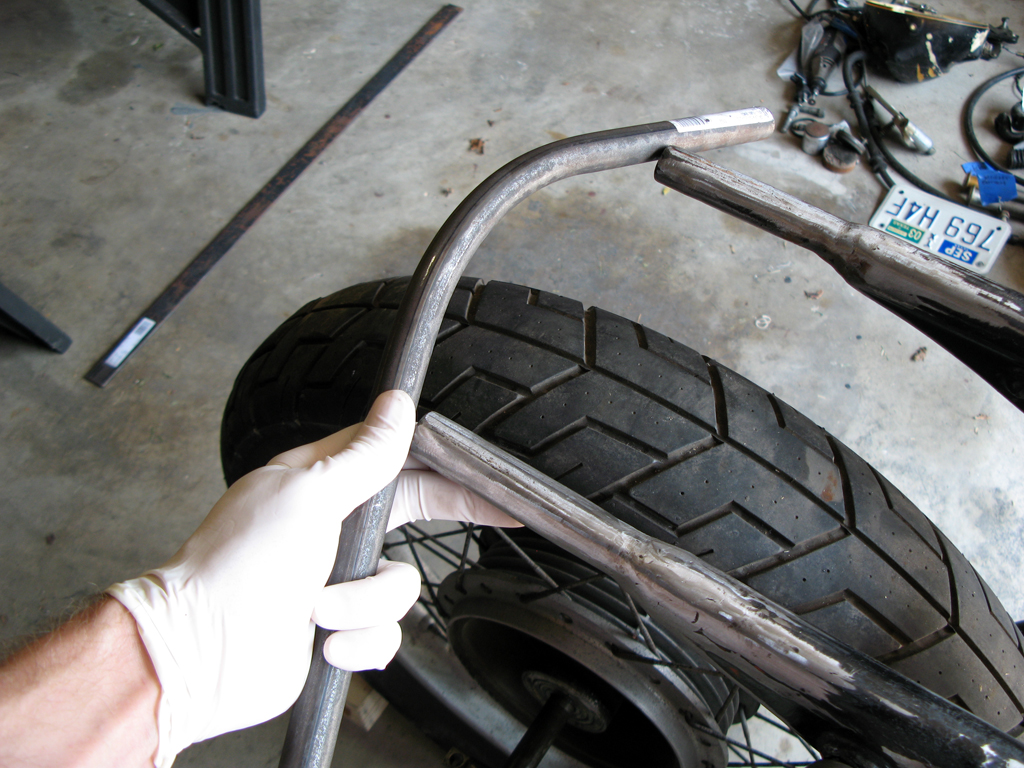
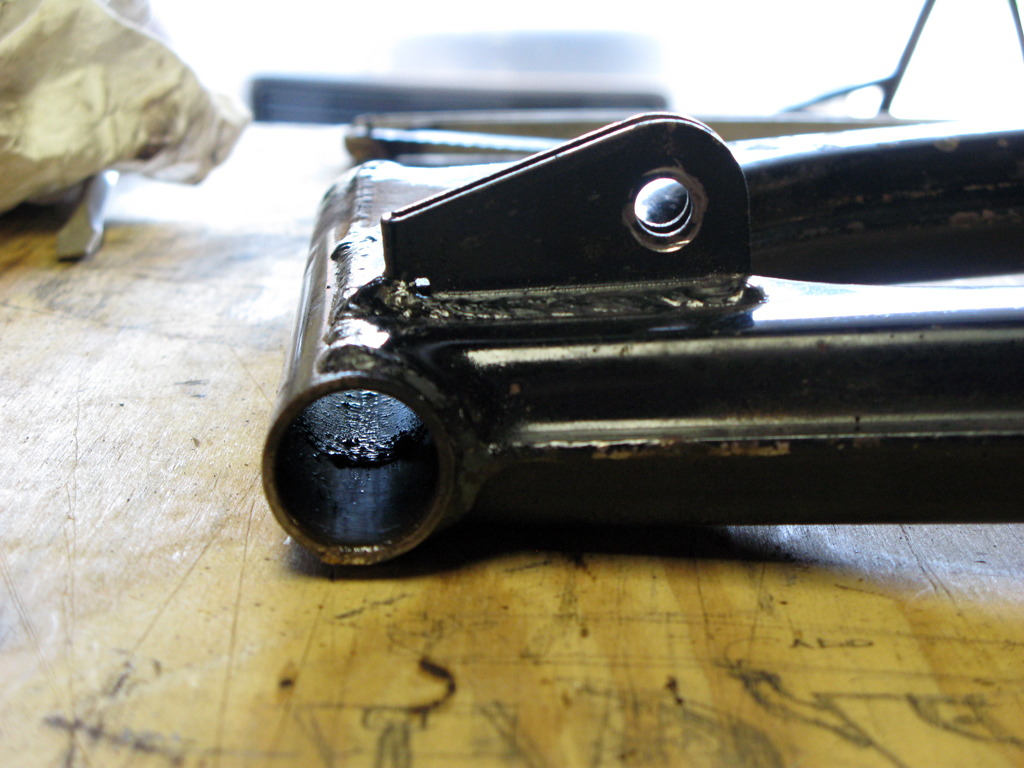
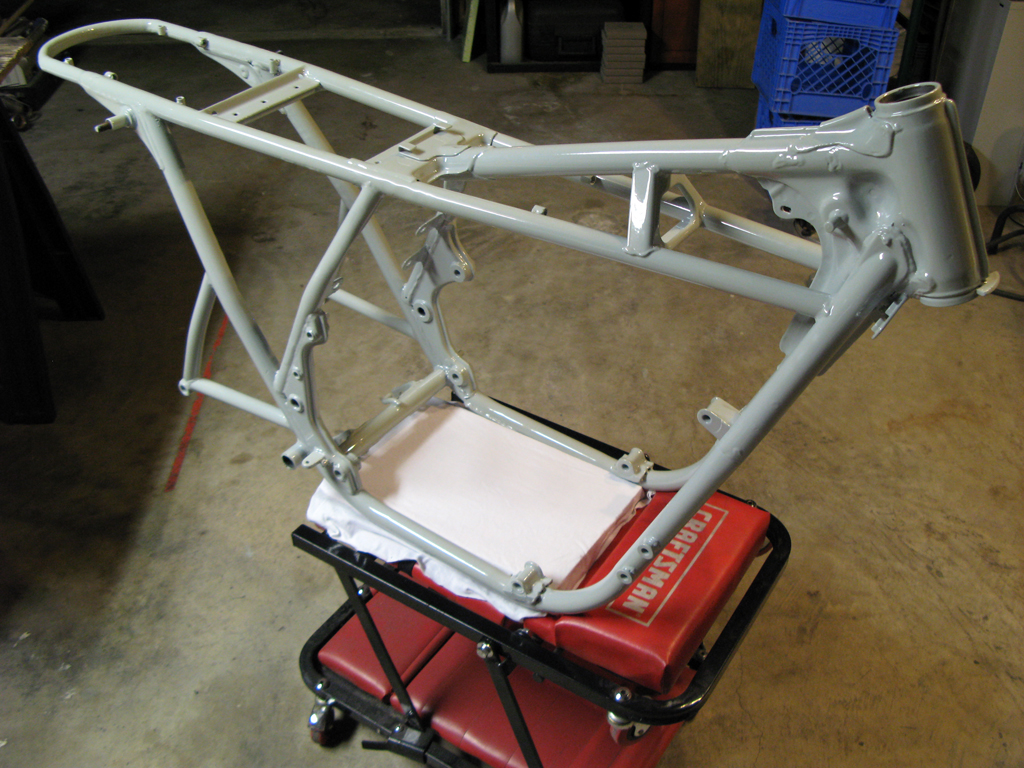
Next up:  frame mods.  I removed all brackets I wouldn't be using.  I fabricated and welded on some brackets I designed to mount my custom oil tank (also my design and fabrication).  A previous owner did some minor frame mods to accommodate a solo seat, so I cut those back and welded a "hoop" to finish off the back of the frame.  Eventually, my tail light will mount here.  I made a couple of other minor frame tweaks, maily to help me run hidden wiring, later on.  


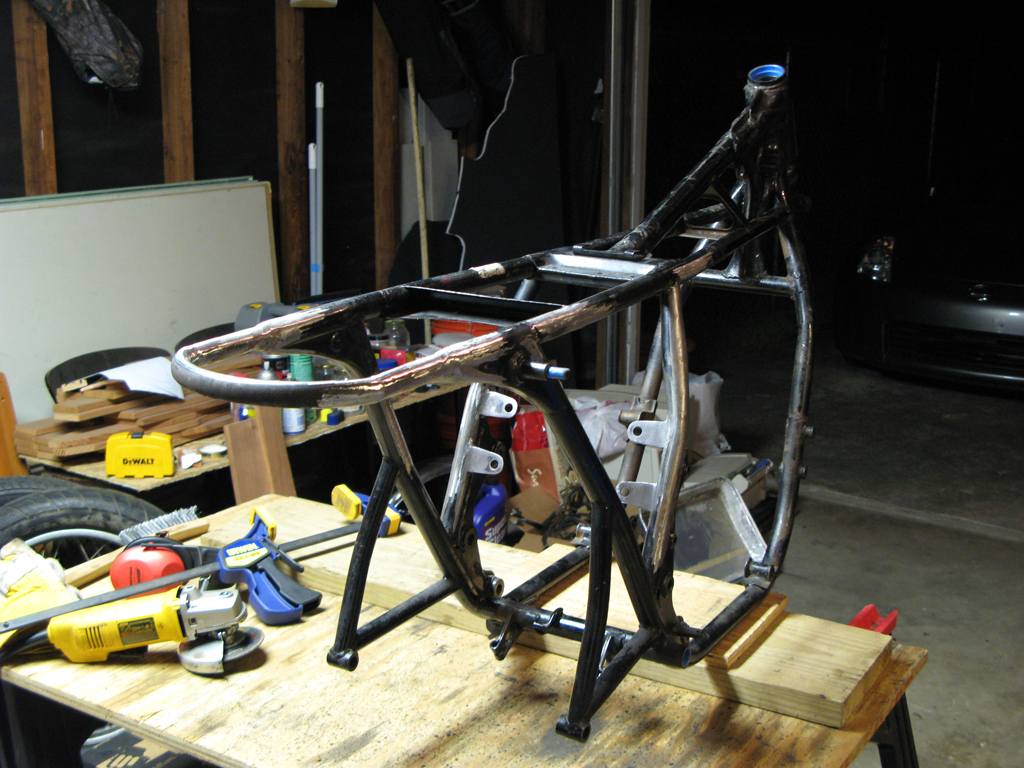
Mocking up the frame with my anticipated new battery / electronics location.


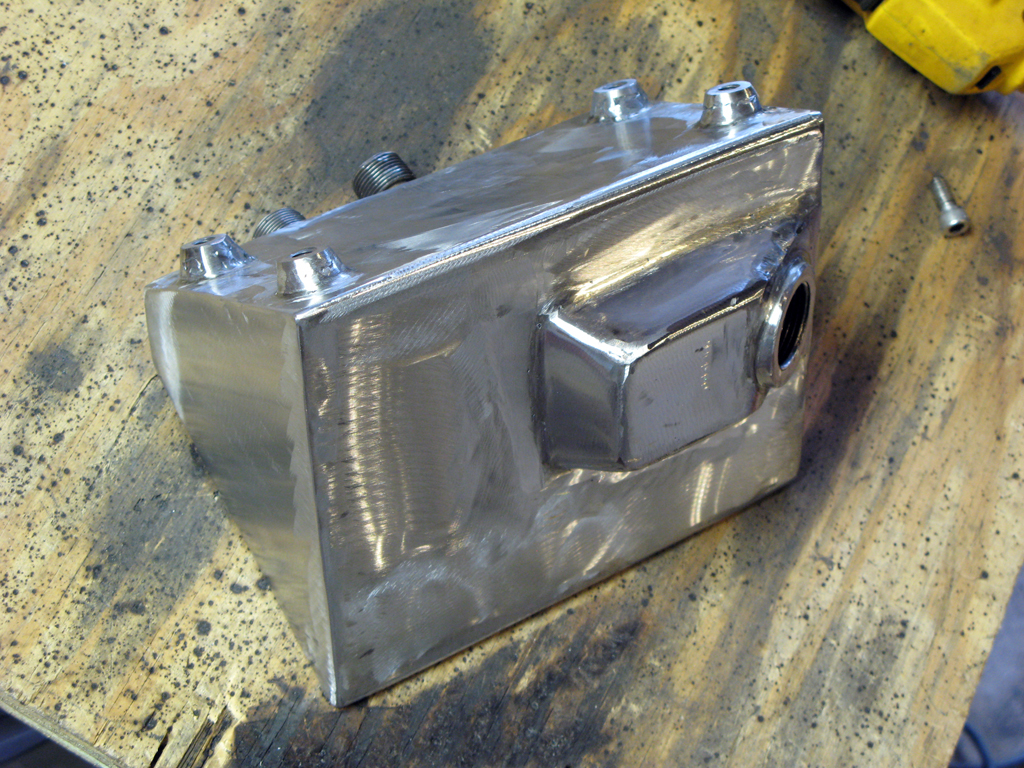
I designed a custom oil tank to help the bike achieve its new look.  Then I redesigned it.  Then I designed it again.  And one more time.  I did it so many times, I finally just need to decide on something and get moving.  I began by harvesting the OEM fittings from the original tank and oil lines.  I had the epiphany that I could carefully remove the clamping bands from the OEM oil line fittings, install new oil line tubing with new clamps, and I’d have custom lines, good as new, using all the original hardware.  And cheaply, too, I might add.


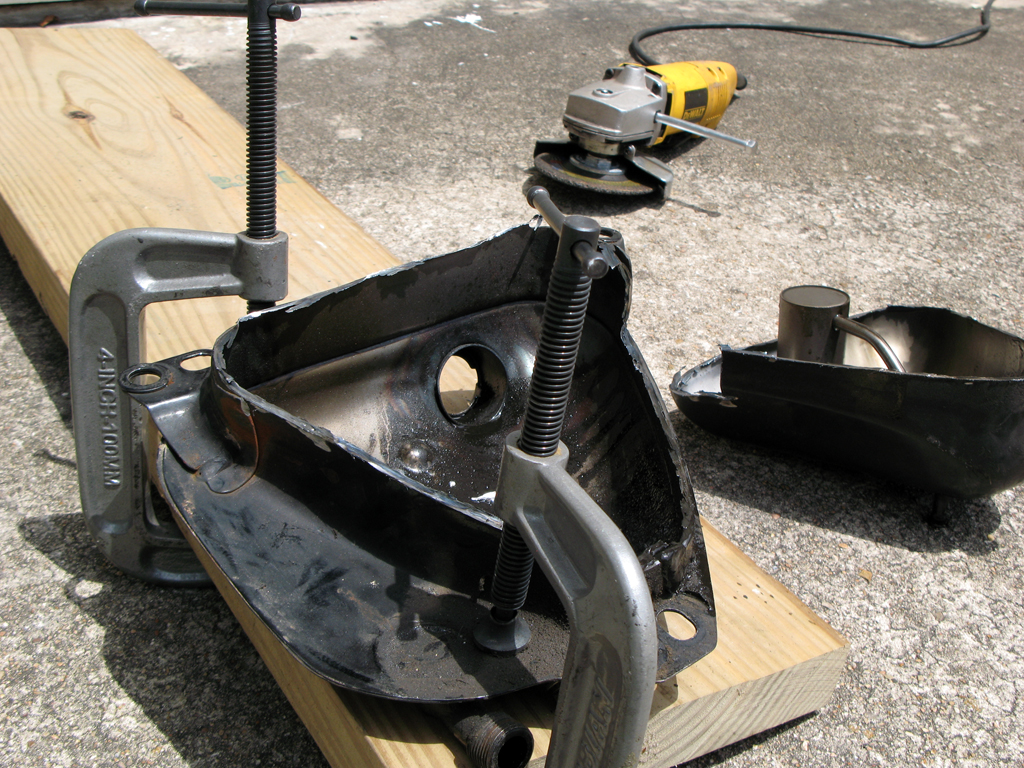
I made my own rudimentary sheet metal brake with some 2x12’s and hinges.  With this, I bent the sheet metal into the right shape, meaning I only needed one weld to close the “loop” of my tank.  I cut the side shapes and welded them on, along with the re-used fittings, cap bung, mounting bungs, etc.  Weld, grind, repeat.


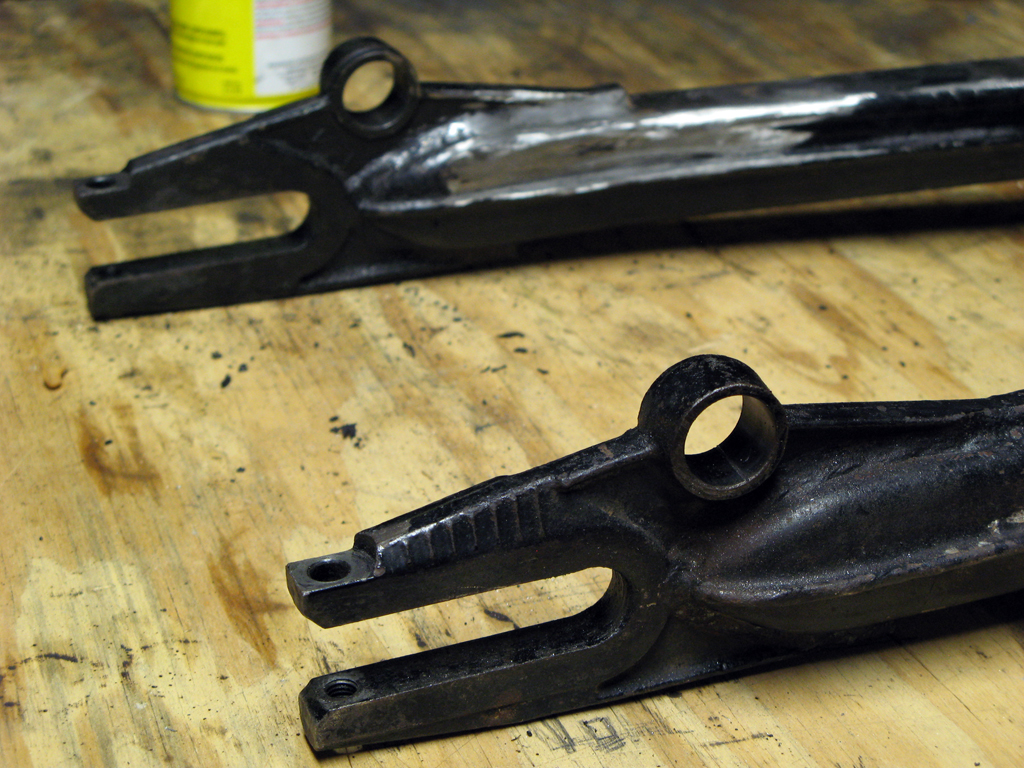
A well-known factory weak point, the swingarm bushings, were next up.  As usual, I had to cut the original ones out.  After much deliberation, research and input from Hondaman, I decided on his swingarm rebuild.  Unfortunately, funds ran low and time kept ticking, so I ended up trying the needle bearing kit.  The instructions are all in German.  I think I put it all in right.


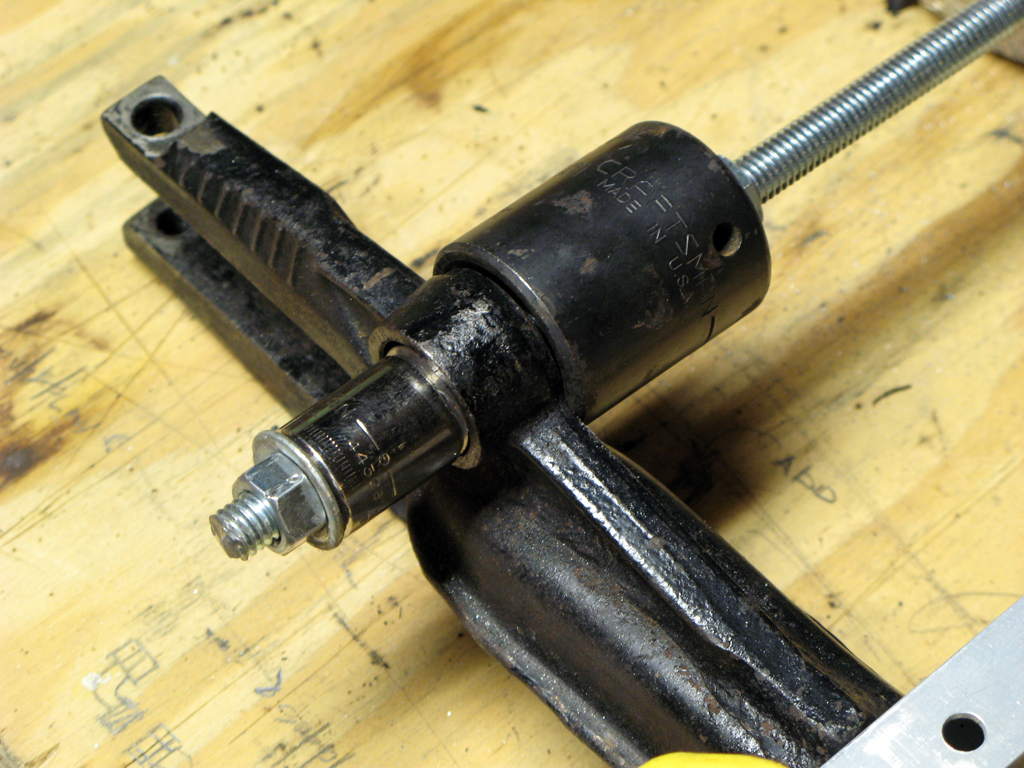
I removed the lower rubber shock mounting bushings from the swingarm next.  It was tough.  I used an arrangement of washers, threaded rod, nuts and sockets to enable me to use my impact gun to extract the stuck bushings.


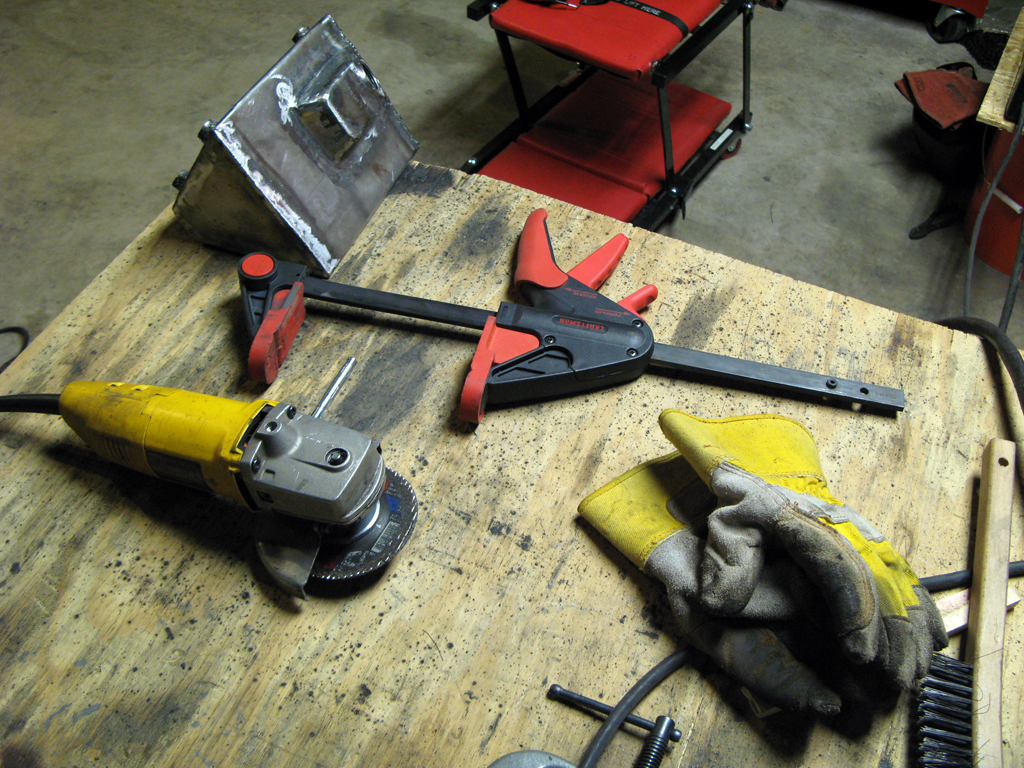
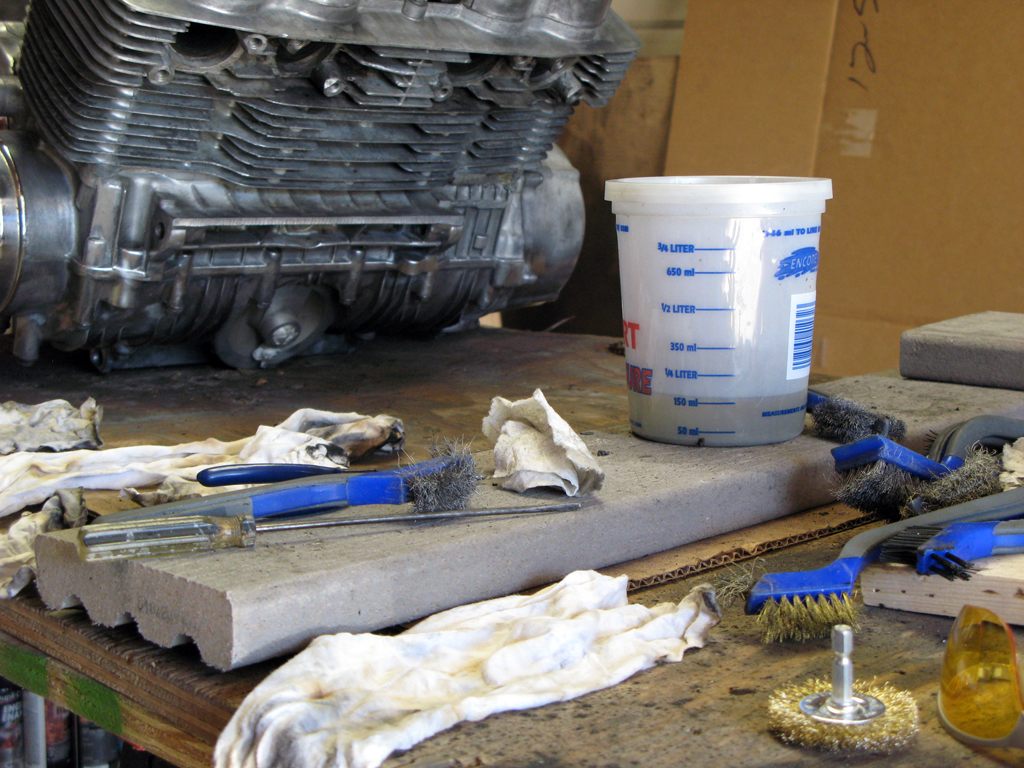
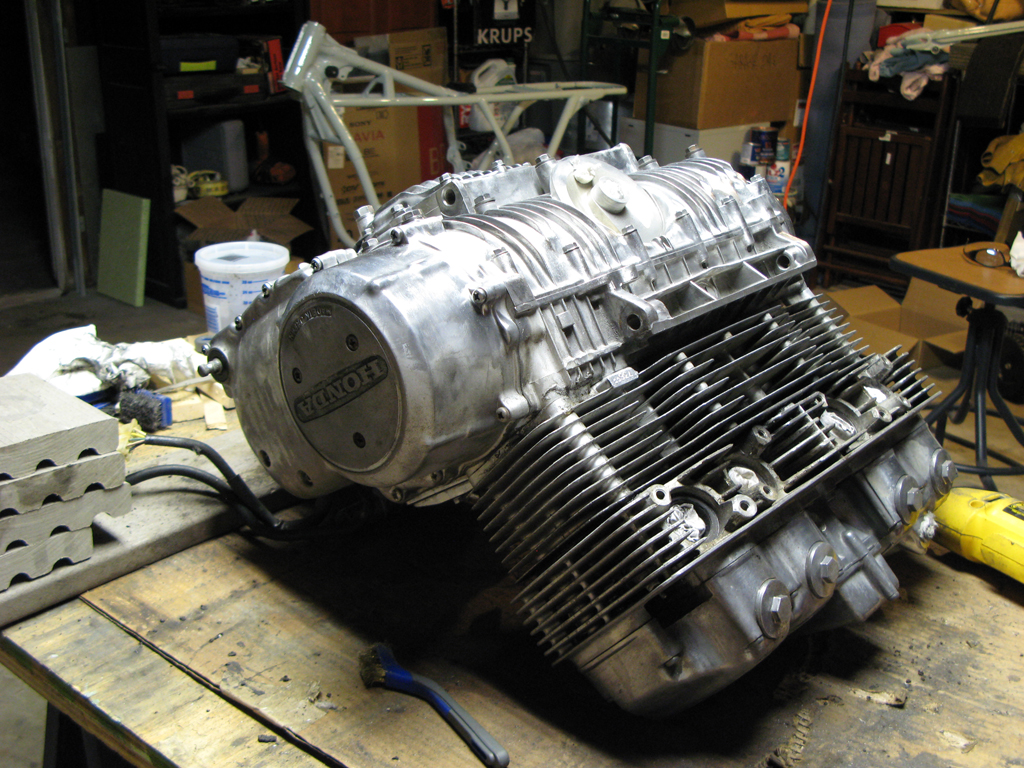
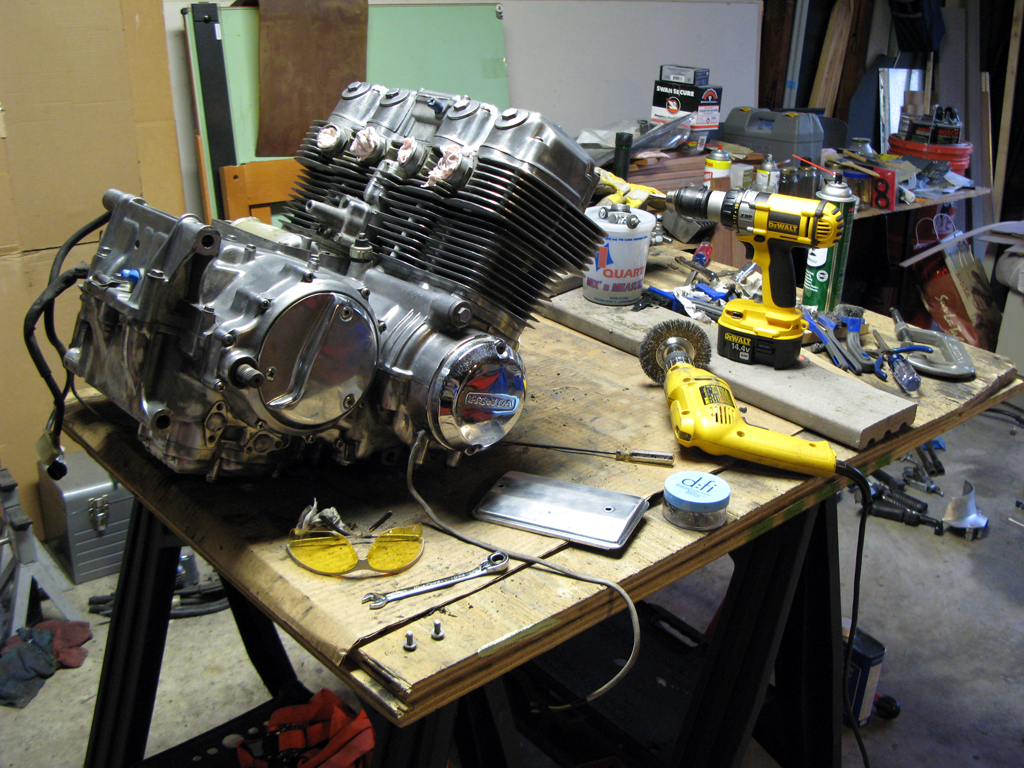
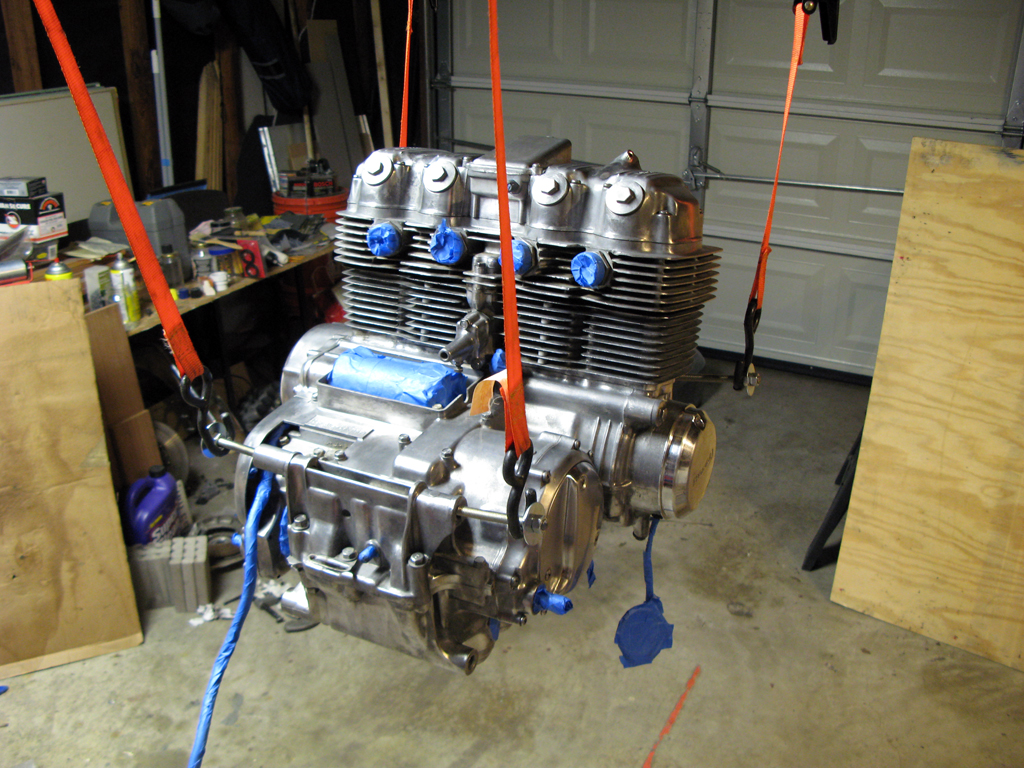
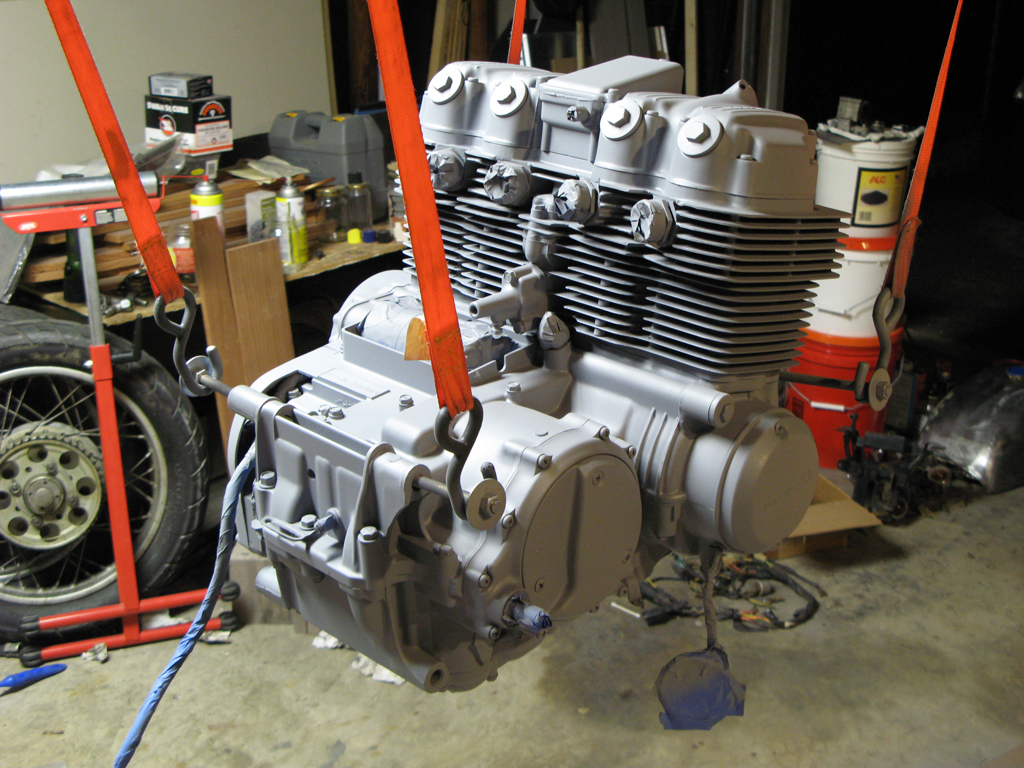
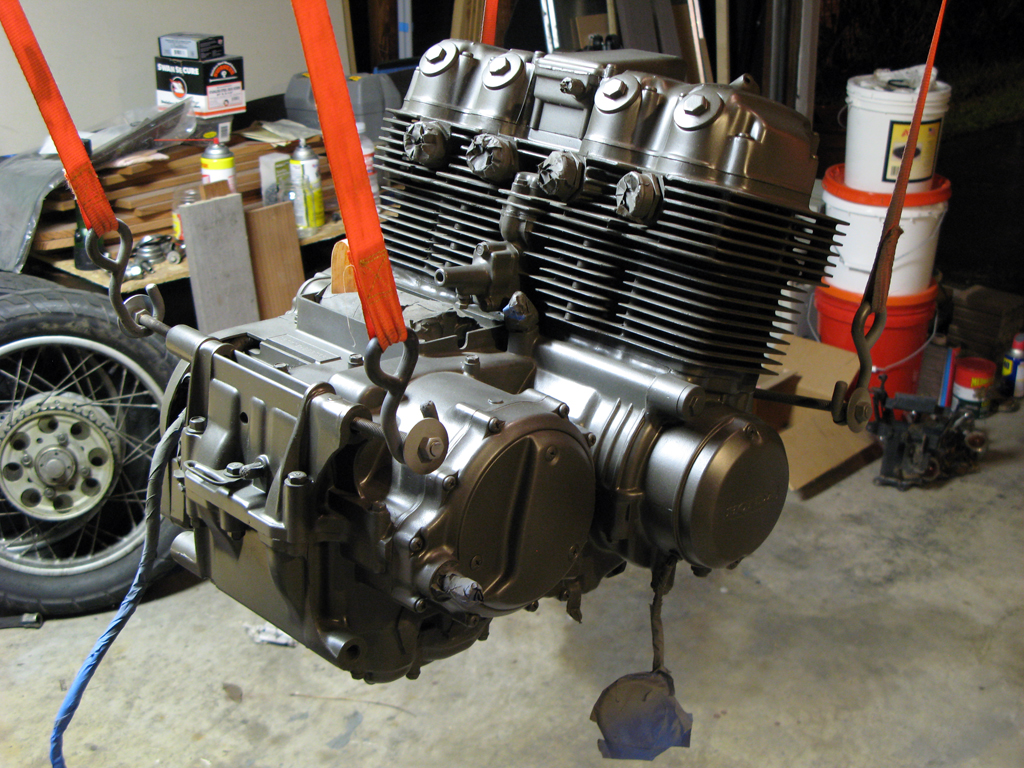
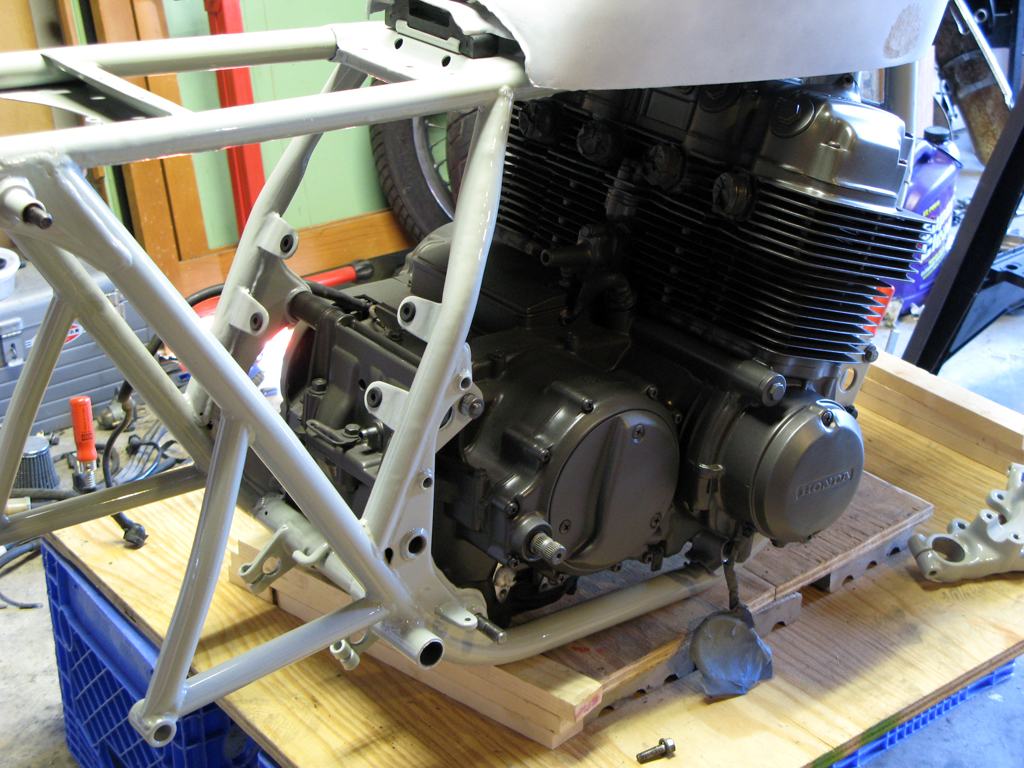
So, while the frame + parts were off getting powdercoated, I turned my attention to cleaning, priming and painting the engine.  On my worktop, I cleaned and cleaned and cleaned my engine.  For two weeks I cleaned it.  I used a combination of brake cleaner, lacquer thinner, wire wheels, and brushes (stainless steel, brass and nylon bristled).  It took forever, but I didn't want the paint to start flaking off because of a bad bond.  From there, I hung the engine in my garage and prepped, primed and painted it.  I used Duplicolor's high-temp engine paint (color: cast coat iron).  This paint wants a week of cure time following application but doesn’t call for and heat-curing.  I'm really pleased with the look of it.  I painted a few matching bits at the same time (brake caliper, rear shock covers, front fork lowers, etc).


Engine clean, degreased + masked for paint.


Engine in Duplicolor high-temp engine primer.


Engine in Duplicolor high-temp engine paint (color: cast coat iron).  Finally!


Brake caliper, also in the engine enamel.  We’ll see if it can hold up.


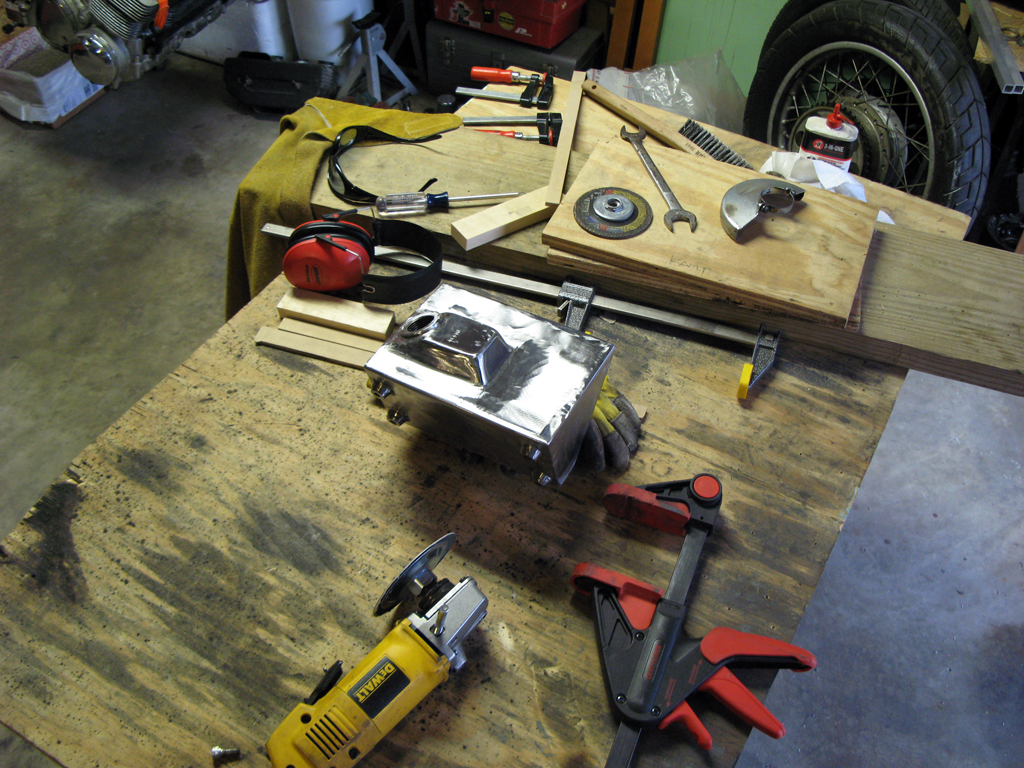
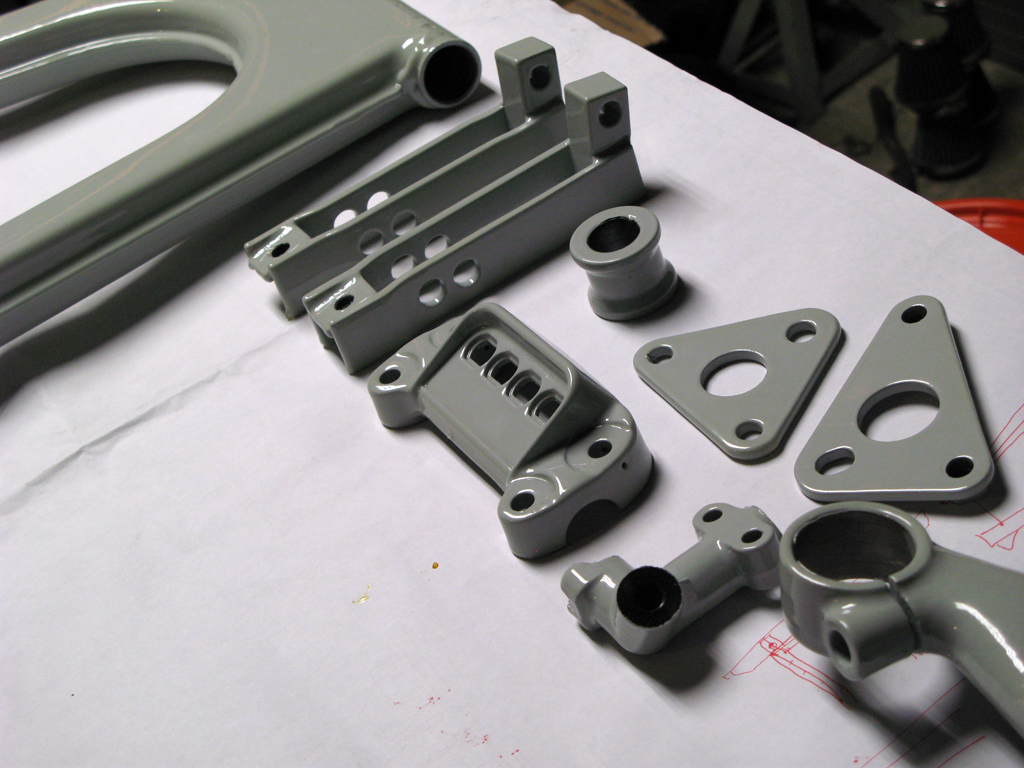
Yay!  Frame and parts back from powder coat.  It came out about 2 shades lighter than it was supposed to.  Live and learn, I guess.  I had a few other parts coated at the same time, to match (triple clamps, etc).  And wow -- powdercoat is so thick!  Preparation and post-coating cleaning of critical clearance areas is necessary.  Thanks to Hondaman for his tips on critical and problem areas!


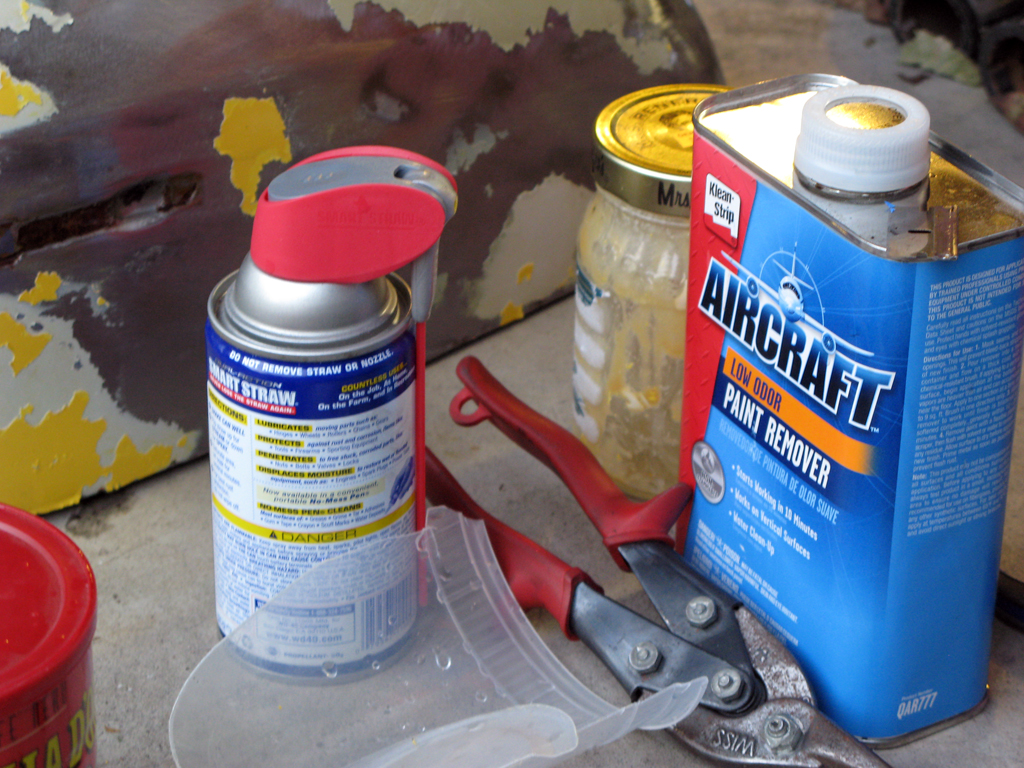
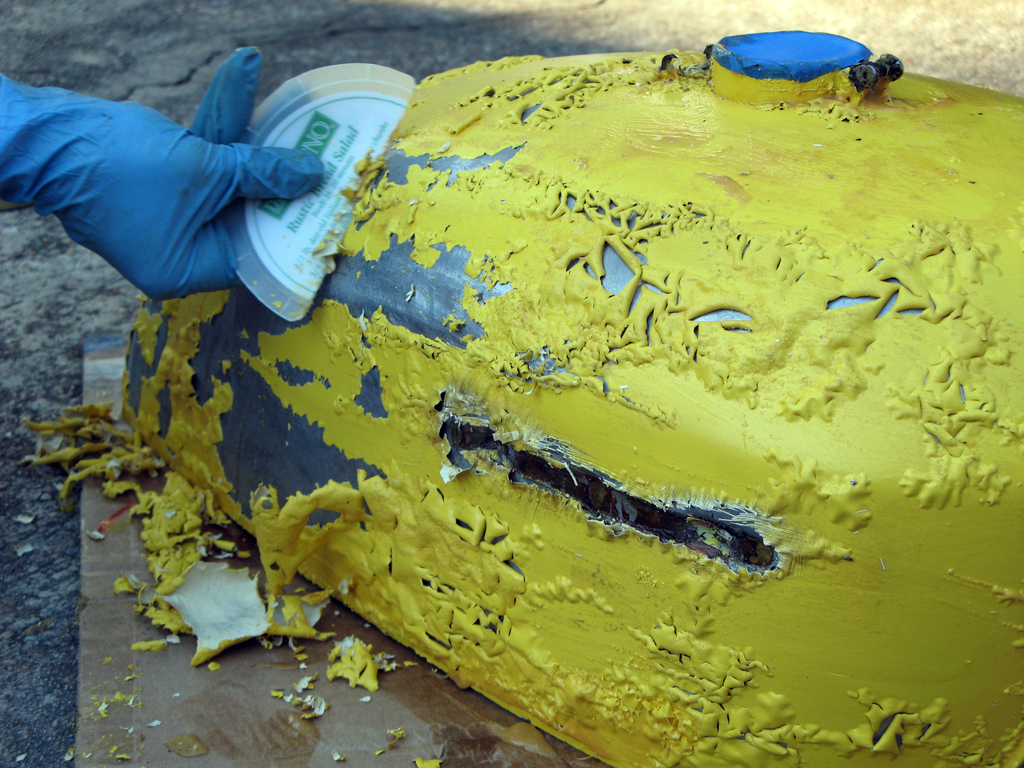
While the engine primer + paint was curing, I tackled my fuel tank.  It had some rust in it, but not as bad as some I’ve seen – middle of the road, probably.  The Works toilet bowl cleaner worked like a charm!  I threw in some nuts and bolts for extra scouring action, swished, repeated, rinsed.  It looks great.  After using this stuff, I’ve read on this board that the trick is to neutralize the acid in the cleaner, to avoid flash rust.  So, I’m planning one more round of cleaner, neutralizing if afterward this time.  Since it’s been so long since I first cleaned it (couple of months), I see some signs of surface rust reappearing.  Even though I coated it with some oil (WD-40, actually) to stave off the rust, this is a hot, humid climate (Houston, TX).

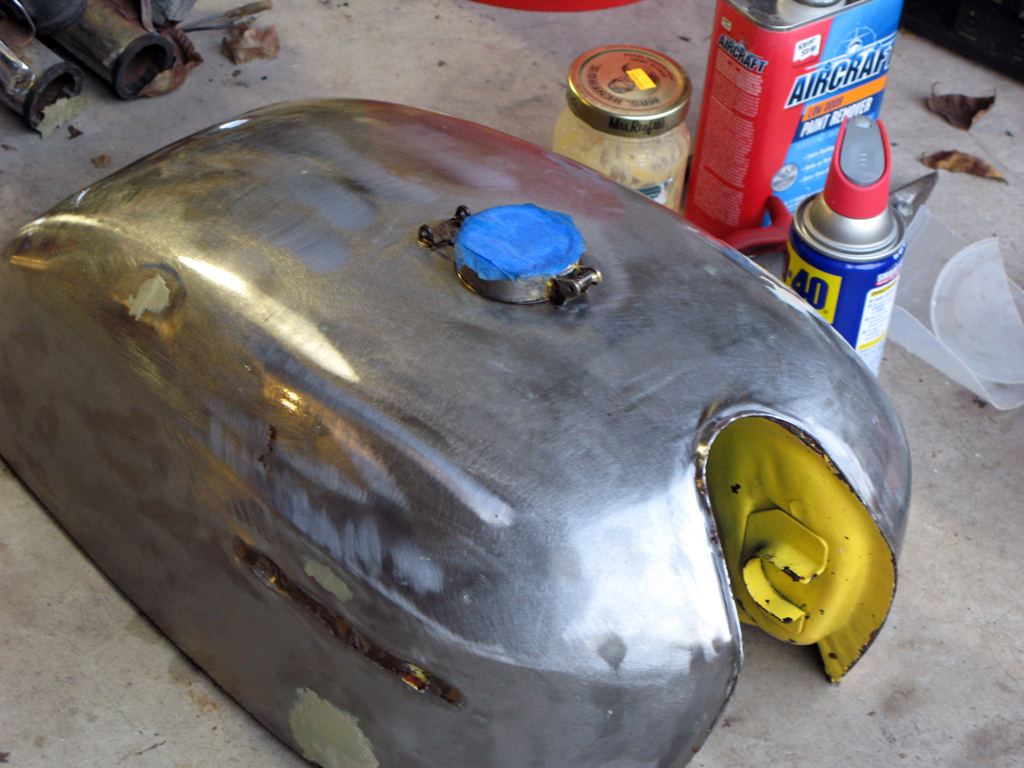
I also used aircraft remover to strip that yellow paint off.  Beauty is in the eye of the beholder, and I didn’t care for it.  This stuff worked great and burns like the devil when it gets on your skin.  I discovered what I believe to be the original bike color, too.  It was kind of a metallic dark eggplant purple.


Bare metal: good.  Finding somebody else’s body filler: bad.  I was planning to fill the badge indents with metal epoxy, anyway, so I’ll be teaching myself body work, too, it appears!  I'll be painting it a warm, metallic medium silver-gray.  The color should bridge the gap between the engine color and the frame color.  I have a brand new petcock waiting to go on.

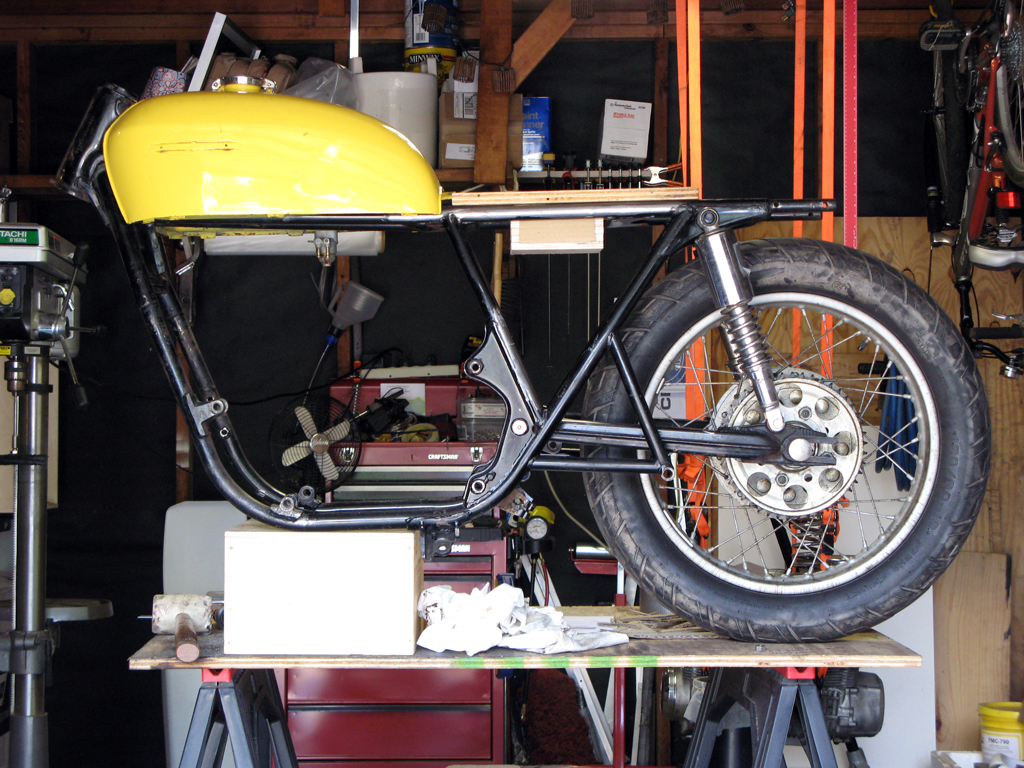
Where soul meets body.  Or, more particularly, where engine meets frame.  I laid the engine on its side and a friend and I lowered the frame over it.  Once it was lined up on all the motor mounts, we hand-tightened the mounts and uprighted the bike.  This is when it started looking more like a bike again.  The tank is test-fitted to help visualize -- it's just in primer still, and you can see the body filler I discovered after stripping the paint.


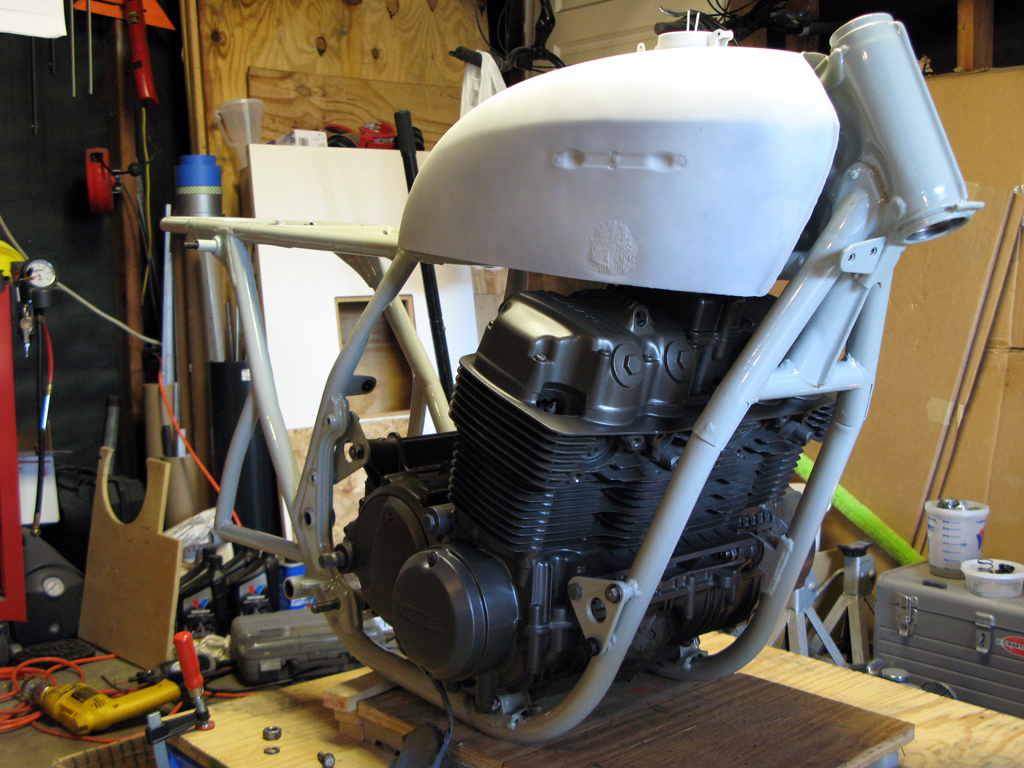
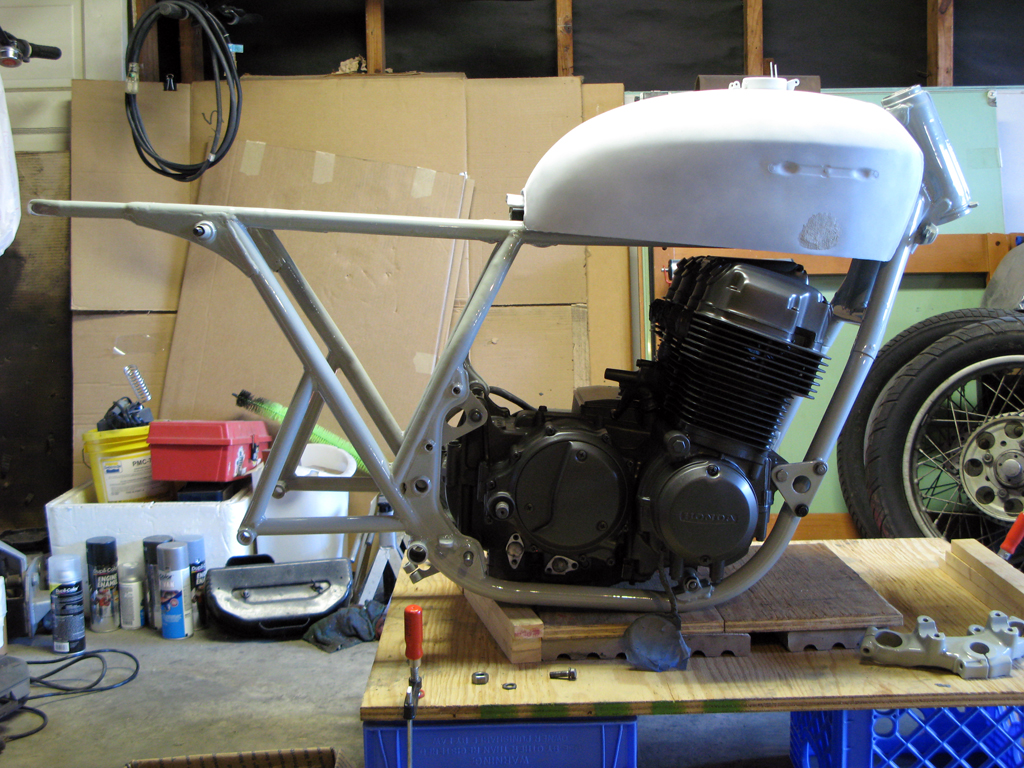
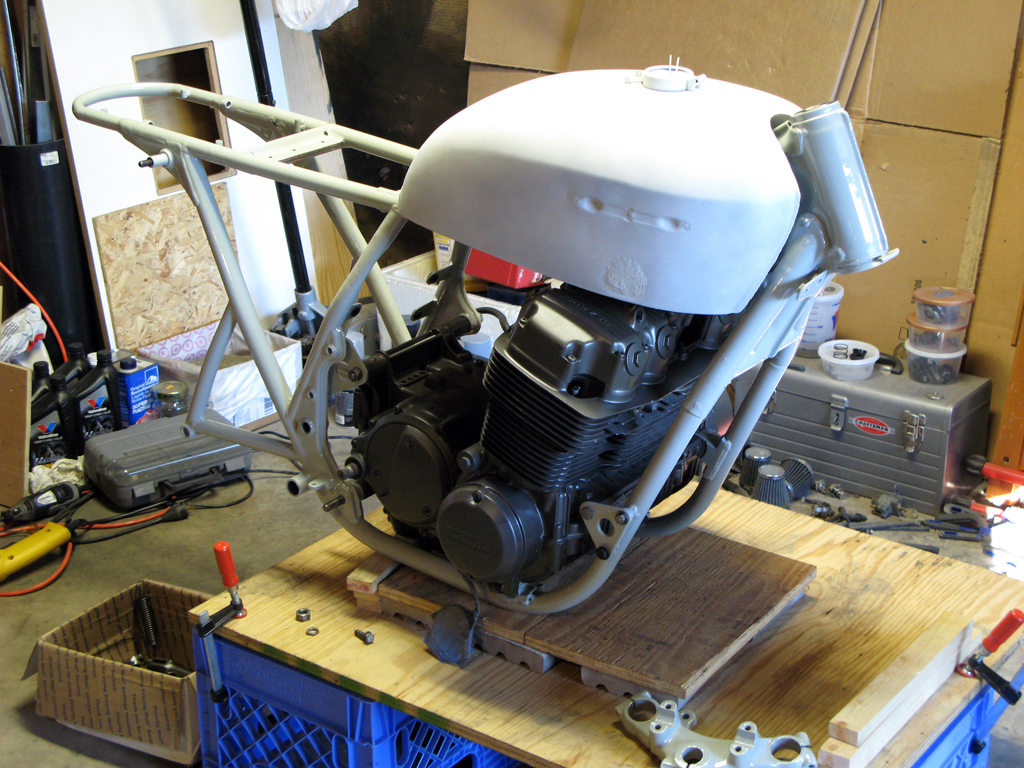
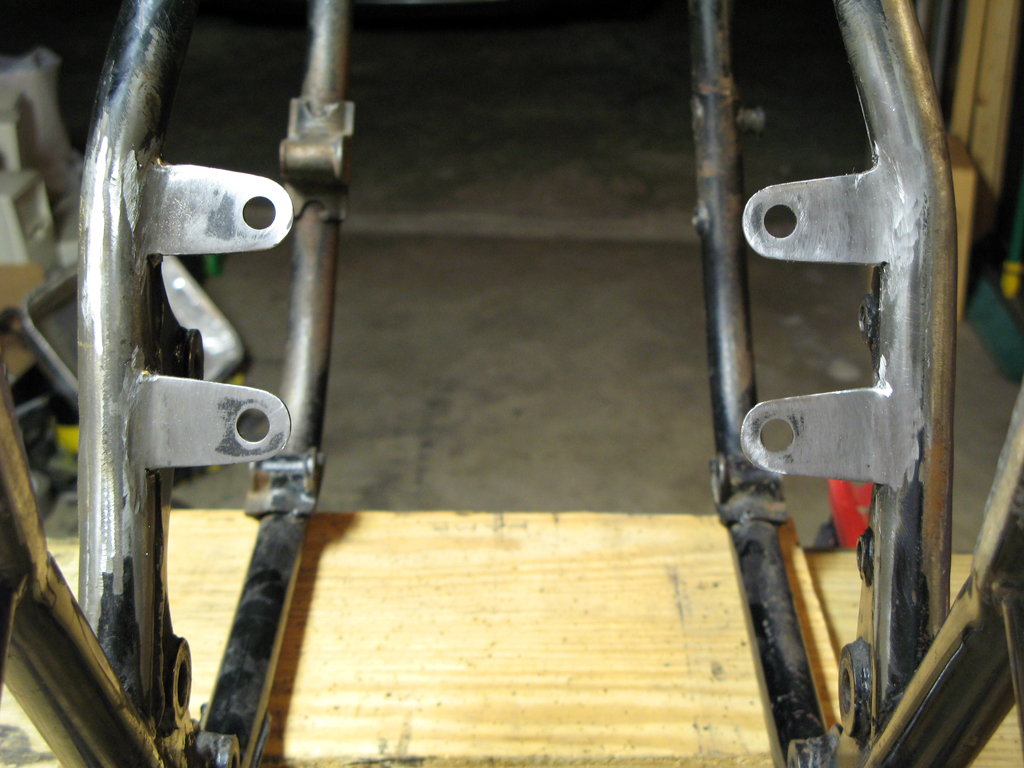
In this one, you can really see the mounts, already fitted with their rubber isolation grommets, I made for my oil tank.


New tapered steering stem bearings will make it handle better.  These were a piece of cake, using all the information I’d gathered from the forum!


More updates to come.  I’m a little past this point, right now, but I don’t have my photos edited and posted, yet.  So, I hate to say it, but stay tuned.  I’ve been working on this since April, and I’m hoping to be closing in on the finale, soon!
« Last Edit: December 23, 2009, 02:18:19 pm by the architect »
Rider no. 83 on the 2013 SOHC/4 Honda World Tour
Rider no. 228 on the 2012 SOHC/4 Honda World Tour
Rider no. 70 on the 2011 SOHC/4 Honda World Tour

my '75 CB750 cafe build photo documentary:  looking for the Lone Stars is like playing Where's Waldo -- enjoy.
http://www.flickr.com/photos/34828040@N05/sets/72157615892537535/

CB350 twin, rigid meat grinder:
http://www.flickr.com/photos/34828040@N05/sets/72157627005176764/

Blip Workshop
http://www.blipworkshop.com
http://www.facebook.com/blipworkshop

Offline jreich

  • Enthusiast
  • **
  • Posts: 196
Re: 1975 CB750 K5 cafe build - first bike, first build - almost there!
« Reply #1 on: December 23, 2009, 01:34:53 pm »
Great build/pictures so far!

I really like the color of that powder on the frame...can't wait to see how it comes together

cheers

Offline 750goes

  • Master
  • *****
  • Posts: 2,128
  • it will live
Re: 1975 CB750 K5 cafe build - first bike, first build - almost there!
« Reply #2 on: December 23, 2009, 02:24:13 pm »
Very nice...... :)


Offline sangyo soichiro

  • Tuck
  • Master
  • *****
  • Posts: 2,167
  • ☢ the atomic playboy ☠
Re: 1975 CB750 K5 cafe build - first bike, first build - almost there!
« Reply #3 on: December 23, 2009, 02:47:03 pm »
This is my first bike.  Ever.  This makes it my first bike project.  Ever.  It’s been a rewarding and enjoyable (for the most part) experience.  

While I've had motorcycles before, I never had a motorcycle endorsement on my driver's license.  However, I finally did get the endorsement.  The bike in my avatar is the bike I used for the driving test.  And let me tell you... it was a very rewarding experience.

If you're lucky enough to not have a motorcycle endorsement on your driver's license, you'll get to have that same experience I had.


I can't wait for your next set of pictures, by the way.  Looking forward to seeing what's next.   8)
1974 CB 750
1972 CB 750 http://forums.sohc4.net/index.php/topic,57974.0.html
1971 CL 350 Scrambler
1966 Black Bomber
Too many others to name…
My cross country trip: http://forums.sohc4.net/index.php/topic,138625.0.html

traveler

  • Guest
Re: 1975 CB750 K5 cafe build - first bike, first build - almost there!
« Reply #4 on: December 23, 2009, 03:40:47 pm »
Nice work!

I really like what you're doing with it.

Thanks for sharing!

~Joe

byfbo

  • Guest
Re: 1975 CB750 K5 cafe build - first bike, first build - almost there!
« Reply #5 on: December 24, 2009, 09:32:52 am »
Very nice.  I do like the cast iron color, Im using a combo of that same color and semi gloss black on my motor.  I also like your oil tank, its lookin good.

oldman

  • Guest
Re: 1975 CB750 K5 cafe build - first bike, first build - almost there!
« Reply #6 on: December 24, 2009, 02:48:44 pm »
Sir you are going to have a nice bike , love your welding ,engineering , hope you guys can don't mine me asking questions. Who's Hondaman

Offline Toxic

  • Expert
  • ****
  • Posts: 1,200
Re: 1975 CB750 K5 cafe build - first bike, first build - almost there!
« Reply #7 on: December 25, 2009, 05:38:15 am »
Very nice.  I do like the cast iron color, Im using a combo of that same color and semi gloss black on my motor.  I also like your oil tank, its lookin good.

Oh man I thought I was being original.  My Alt . cover, Tran cover, Point cover and clutch cover will be CastIron. The rest will be Satin black.  Hard to do something original on a 40 year old bike.  I't all been done before.

Awesome build up, thanks for posting

joec3613

  • Guest
Re: 1975 CB750 K5 cafe build - first bike, first build - almost there!
« Reply #8 on: December 25, 2009, 05:59:04 am »
Sweet. Did you pull the heads or anything? How many miles on the engine? Looks sweet. How did you remove the brackets from the tank? Nice work! Can't wait to see more.

Offline grandelatte

  • CB750K1-ish Frankenstein
  • Full Member
  • *
  • Posts: 65
    • Life is Xampericious!
Re: 1975 CB750 K5 cafe build - first bike, first build - almost there!
« Reply #9 on: December 25, 2009, 07:42:53 am »
Howdy, fellow Houstonian!  I found your project a while back on flickr and left a comment there.  You do a great job!!

Offline Holdingfast

  • Full Member
  • *
  • Posts: 36
  • It's all up in the air.
Re: 1975 CB750 K5 cafe build - first bike, first build - almost there!
« Reply #10 on: December 25, 2009, 03:37:19 pm »
wow! I LOVE the color scheme you got going on! Cant wait to see this finished! Keep em coming!

traveler

  • Guest
Re: 1975 CB750 K5 cafe build - first bike, first build - almost there!
« Reply #11 on: December 25, 2009, 07:18:55 pm »
I'll chime in quickly...

"Hondaman" is a member here who seems to know everything about these old girls.
 :D
~Joe

Offline the architect

  • Hot Shot
  • ***
  • Posts: 424
Re: 1975 CB750 K5 cafe build - first bike, first build - almost there!
« Reply #12 on: December 28, 2009, 09:15:31 am »
Thanks for all the compliments!  I'll be updating my photos shortly, with my new progress.

Let's see if I can address some of the questions and comments, so far . . .


This is my first bike.  Ever.  This makes it my first bike project.  Ever.  It’s been a rewarding and enjoyable (for the most part) experience.  

While I've had motorcycles before, I never had a motorcycle endorsement on my driver's license.  However, I finally did get the endorsement.  The bike in my avatar is the bike I used for the driving test.  And let me tell you... it was a very rewarding experience.

If you're lucky enough to not have a motorcycle endorsement on your driver's license, you'll get to have that same experience I had.


I can't wait for your next set of pictures, by the way.  Looking forward to sieing what's next.   8)

soichiro, I couldn't agree more.  I took the Rider Safety Course and got my lecense already, though.  I'd love to show up for the rider's test on my own, hand-built cafe bike.  What a feeling that must have been for you!


Sir you are going to have a nice bike , love your welding ,engineering , hope you guys can don't mine me asking questions. Who's Hondaman

oldman, Hondaman quite literally "wrote the book" on these CB750's.  Or, I should say, is writing the book.  He knows more things Honda in his index finger than I could ever hope to know in my entire life.  He's a superb resource, a real asset to our community and an all-around nice guy.


Very nice.  I do like the cast iron color, Im using a combo of that same color and semi gloss black on my motor.  I also like your oil tank, its lookin good.

Oh man I thought I was being original.  My Alt . cover, Tran cover, Point cover and clutch cover will be CastIron. The rest will be Satin black.  Hard to do something original on a 40 year old bike.  I't all been done before.

Awesome build up, thanks for posting

It's undeniable.  The cast iron color is a keeper.  The choices of engine paint are fairly limited, so it's refreshing, to me, anyway, to see something other than black, "aluminum" or polished.


Sweet. Did you pull the heads or anything? How many miles on the engine? Looks sweet. How did you remove the brackets from the tank? Nice work! Can't wait to see more.

joe, after much contemplation, I decided not to pull the heads or get into the engine.  If anything comes back to haunt me, it will be this decision.  The bike has right at 20k miles on it.  The build was just taking too long and costing way more than I'd planned, so this was the right decision for me, at the time.  I'm sure I'll wish I'd at leas done the easy gaskets.  But, being my first build, I was grappling with so many things already, I just needed some simplificaiton.  Fingers crossed!


Howdy, fellow Houstonian!  I found your project a while back on flickr and left a comment there.  You do a great job!!

grandelatte, howdy!  I'm always looking our for fellow H-towners!  Glad to hear you found me over on flickr, too.  What part of Houston are you in?  Maybe we could get together for a beer sometime and talk bikes..  Do you have some photos up on flickr, too?  I'd love to check them out.
Rider no. 83 on the 2013 SOHC/4 Honda World Tour
Rider no. 228 on the 2012 SOHC/4 Honda World Tour
Rider no. 70 on the 2011 SOHC/4 Honda World Tour

my '75 CB750 cafe build photo documentary:  looking for the Lone Stars is like playing Where's Waldo -- enjoy.
http://www.flickr.com/photos/34828040@N05/sets/72157615892537535/

CB350 twin, rigid meat grinder:
http://www.flickr.com/photos/34828040@N05/sets/72157627005176764/

Blip Workshop
http://www.blipworkshop.com
http://www.facebook.com/blipworkshop

Offline knowsnothing

  • Hot Shot
  • ***
  • Posts: 643
Re: 1975 CB750 K5 cafe build - first bike, first build - almost there!
« Reply #13 on: December 28, 2009, 12:29:21 pm »
Great work keep it up!!!  ;D
1978 CB750k Green - 811 engine
1978 CB750k Blue - for sale
1974 CB375F Faded Black - had to have that 6th gear
1976 CB400F Red - in many pieces
1973 CB350F TBD - in many pieces

Offline the architect

  • Hot Shot
  • ***
  • Posts: 424
Re: 1975 CB750 K5 cafe build - first bike, first build - almost there!
« Reply #14 on: December 30, 2009, 01:54:09 pm »
Great work keep it up!!!  ;D

Thanks, buddy!  Great to see you on the forum.  Get some progress photos of your bike up here.  I'd love to see them.
Rider no. 83 on the 2013 SOHC/4 Honda World Tour
Rider no. 228 on the 2012 SOHC/4 Honda World Tour
Rider no. 70 on the 2011 SOHC/4 Honda World Tour

my '75 CB750 cafe build photo documentary:  looking for the Lone Stars is like playing Where's Waldo -- enjoy.
http://www.flickr.com/photos/34828040@N05/sets/72157615892537535/

CB350 twin, rigid meat grinder:
http://www.flickr.com/photos/34828040@N05/sets/72157627005176764/

Blip Workshop
http://www.blipworkshop.com
http://www.facebook.com/blipworkshop

Offline the architect

  • Hot Shot
  • ***
  • Posts: 424
Re: 1975 CB750 K5 cafe build - first bike, first build - almost there!
« Reply #15 on: December 30, 2009, 03:15:12 pm »
More progress.  My momentum ebbs and flows.  In trying to shorten my already looooonnnnngggg timeframe, I have made a conscious decision to keep the work on parts that are easily removable to a minimum, for the time being.  This will let me focus on getting the bike working, while letting me take my time in getting these "easy" parts detailed out, later on.  So, with that . . . .


Rear brake drum cover, all cleaned up and ready for new shoes.  I'm installing new EBC pads and shoes, F+R.  I wish I had before and after pics of this.  I didn't think it would ever get this clean.  For now, not polishing wheel pieces.  I'll do hubs and the drums if/when I do wheels.  I want to get the bike running!


Swingarm is installed.  Needle bearing kit is in.  I'd decided to do Hondaman's awesome swingarm service but am running short on funds and long on time.  Rear suspension is mocked up, to get an idea of the overall look.


New engine hardware installed!  I'm replacing most all fasteners with new, mostly stainless hardware.  In many instances, I'm switching to cap head allen bolts.  This should make routine maintenacne, like accessing the sidecovers, so much easier.


Fork seals are up next.  Even though I spent tons of time and effort sanding and polishing the original fork lowers, I ended up replacing them with new(er) units.  My original fork tubes, like many, were badly pitted and corroded.  I had a machine shop turn them on a lathe, going for a "clean cut" - think turning brake rotors.  Well, it didn't exactly work as planned.  Too much material was removed for the triple clamps to be able to clamp onto them, and they were still fairly pitted.  So, I found some forks from a '77/'78 model on eBay for $40.  Instead of polishing, I decided to paint them to match my engine.  I liked the idea already, but since I'd already polished my originals, I wasn't about to paint over them!  This gave me a good chance to try out this look.  The newer fork tubes are hard-chromed and not as succeptible to corrosion.  These were beauts!  As it turns out, the '77/'78 fork lowers are slightly longer than my '75's, meaning more support for the fork tubes inside the lowers (I guess).  

So, here is my fork seal replacememnt process.  Here, the old seal is removed.  In the background, you can see the old seal, along with the new seal waiting to go in.


Old seal on the right (OEM Honda) with the new seal on the left (Leakproof brand -- we'll see how it holds up!).


And, two new fork seals, done!


And, progress . . . . .


So, to fit the look of the bike, I wanted to lower the and "tuck in" the gauges a bit -- for this build, the original location just stood too proud.  I set to desiging, test-fitting and tweaking a new bracket.  This is the bulk of the fiished product.


Instead of mounting above the triple clamp, it will mount below it.  It also moves the gauges closer together and pulls them in toward the bike.  I finished my new bracket in the same low-gloss black as my headlight bucket and oil tank.
  If anyone else might be intersted in these, I'd be glad to do a limited run of them, precision cut on a water jet.  I'd need to get a hanful of people to take part, though.  It should translate to any CB750 looking to mitigate the . . . . ummmm . . . . ample-ness of their stock gauges.


And a little side-by-side comparision . . . . .


Nothing much going on here, just a different angle of the progress.


Getting the rear brakes together here.  Front suspension is coming together, too.


I'm still needing to do some tweaking to my oil tank, but it seems at home in its place, inside the frame.


Did some filling and smoothing on the gas tank.  It's in primer, here, to evaluate the trouble spots.  I'm not happy with it, so it'll undergo another round of filling and sanding.  The rear brakes are done.  The front suspension is on -- just need to remember to add oil still.  The front brake rotor has been painted the low-gloss black, to match the other items that color.  My new gauge bracket is flying low, as it should.


Another angle.  The masonite is just my seat template.  I've been using it to refine the size and shape for the seat pan I'll build later.


The helm.


A good close-up of the gauges in their new position.  I'll be refinishing the gauges themselves at a later time, too.


This is pretty much how she sits right now.  The kickstand is on, but it's easier working with it on the center stand.  I do put it down on the kickstand sometimes, though, for a change of scenery.  I need to roll it outside to get a look at her in the sunlight.


Still plenty to do.  I should be finishing up the gas tank smoothing this evening.  I'm somewhat concerned about doing the wiring.  I've done a good bit of research, but I'm still in the hunt for the right battery.  I need something that will fit between the upper frame rails, under the seat  - that gives the correct footprint.  From there, it just needs to be as thin as possible and still get 10 or 12 aH.  I've been looking at some Odyssey batteries, but they are pricey!
« Last Edit: December 30, 2009, 03:37:19 pm by the architect »
Rider no. 83 on the 2013 SOHC/4 Honda World Tour
Rider no. 228 on the 2012 SOHC/4 Honda World Tour
Rider no. 70 on the 2011 SOHC/4 Honda World Tour

my '75 CB750 cafe build photo documentary:  looking for the Lone Stars is like playing Where's Waldo -- enjoy.
http://www.flickr.com/photos/34828040@N05/sets/72157615892537535/

CB350 twin, rigid meat grinder:
http://www.flickr.com/photos/34828040@N05/sets/72157627005176764/

Blip Workshop
http://www.blipworkshop.com
http://www.facebook.com/blipworkshop

byfbo

  • Guest
Re: 1975 CB750 K5 cafe build - first bike, first build - almost there!
« Reply #16 on: December 31, 2009, 07:23:45 am »
Nice work!

Offline ev0lve

  • Master
  • *****
  • Posts: 1,930
Re: 1975 CB750 K5 cafe build - first bike, first build - almost there!
« Reply #17 on: December 31, 2009, 08:00:50 am »
That is really sweet. I love what you did with the gauges as well! If I was keeping my K frontend I'd so sign-up for one of those brackets!


Love the updates and keep em coming!

traveler

  • Guest
Re: 1975 CB750 K5 cafe build - first bike, first build - almost there!
« Reply #18 on: December 31, 2009, 09:16:09 am »
The only part that looks bad is that darn tank! :(

Maybe you could find a smoother one to replace it with?

The rest of the bike really looks nice!

Gonna have to do the engine bolt kit, it looks like! ;D

~Joe
« Last Edit: December 31, 2009, 09:13:23 pm by traveler »

Offline Holdingfast

  • Full Member
  • *
  • Posts: 36
  • It's all up in the air.
Re: 1975 CB750 K5 cafe build - first bike, first build - almost there!
« Reply #19 on: December 31, 2009, 11:13:35 am »
Gonna have to do the engine bolt kit, it looks like! ;D

~Joe


did you just get some stainless steel allen bolts or is there a kit as joe here suggests that you can buy?

Offline the architect

  • Hot Shot
  • ***
  • Posts: 424
Re: 1975 CB750 K5 cafe build - first bike, first build - almost there!
« Reply #20 on: December 31, 2009, 11:51:10 am »
Thanks, guys, for the compliments and encouragement!

I think I've got the tank in a happy place now. I'll be shooting primer and, hopefully, paint soon.

For the bolts, I documented all the bolts that were candidates for replacement (pretty much everything I could put my hands on). I confirmed sizes and thread pitches using both the parts fische and first-hand test-fitting with my bike. I sourced all the fasteners from a local fastener supply house.

I'd be glad to help anyone interested in putting together some turn-key "kits".  These would likely be less costly than the few commercially available kits that are out there.  They would be customizable to the individual, too. So, if you want certain bots to be Allen head and others hex, that's cool. I can do that.

Cheers!   Looking forward to some New Years holiday progress.   
Rider no. 83 on the 2013 SOHC/4 Honda World Tour
Rider no. 228 on the 2012 SOHC/4 Honda World Tour
Rider no. 70 on the 2011 SOHC/4 Honda World Tour

my '75 CB750 cafe build photo documentary:  looking for the Lone Stars is like playing Where's Waldo -- enjoy.
http://www.flickr.com/photos/34828040@N05/sets/72157615892537535/

CB350 twin, rigid meat grinder:
http://www.flickr.com/photos/34828040@N05/sets/72157627005176764/

Blip Workshop
http://www.blipworkshop.com
http://www.facebook.com/blipworkshop

Offline Mayor08

  • Enthusiast
  • **
  • Posts: 240
Re: 1975 CB750 K5 cafe build - first bike, first build - almost there!
« Reply #21 on: December 31, 2009, 09:01:29 pm »
Great job documenting the fantastic work you're doing on your project!  I would be interested in one of those brackets if you do make up a few and I'll be copying your engine paint color!
Scottish ex-wife Brit Mistress

traveler

  • Guest
Re: 1975 CB750 K5 cafe build - first bike, first build - almost there!
« Reply #22 on: December 31, 2009, 09:12:04 pm »
Gonna have to do the engine bolt kit, it looks like! ;D

~Joe


did you just get some stainless steel allen bolts or is there a kit as joe here suggests that you can buy?

There are kits on eBay for $10 US Dollars.  60 piece set.  They say they are for CB550/750.  Stainless Allen head bolts.

~Joe


Offline Ben Woodward

  • Full Member
  • *
  • Posts: 10
Re: 1975 CB750 K5 cafe build - first bike, first build - almost there!
« Reply #23 on: January 03, 2010, 12:04:29 pm »
architect- Are you interested in making anymore of those awesome gauge mounts? I really like the look, a lot more streamlined than the stock mount. If so, I am interested.

Offline the architect

  • Hot Shot
  • ***
  • Posts: 424
Re: 1975 CB750 K5 cafe build - first bike, first build - almost there!
« Reply #24 on: January 03, 2010, 12:09:28 pm »
architect- Are you interested in making anymore of those awesome gauge mounts? I really like the look, a lot more streamlined than the stock mount. If so, I am interested.


Ben --

I am!  I think I'll make a run of these units, since a few folks have said they'd be interested.  I can't give an exact timeframe, though. 

Do you have a timeframe you're specifically working toward?
Rider no. 83 on the 2013 SOHC/4 Honda World Tour
Rider no. 228 on the 2012 SOHC/4 Honda World Tour
Rider no. 70 on the 2011 SOHC/4 Honda World Tour

my '75 CB750 cafe build photo documentary:  looking for the Lone Stars is like playing Where's Waldo -- enjoy.
http://www.flickr.com/photos/34828040@N05/sets/72157615892537535/

CB350 twin, rigid meat grinder:
http://www.flickr.com/photos/34828040@N05/sets/72157627005176764/

Blip Workshop
http://www.blipworkshop.com
http://www.facebook.com/blipworkshop