Author Topic: CB550K0 Build - 450T Tank mods  (Read 55325 times)

0 Members and 2 Guests are viewing this topic.

Offline streak09

  • Enthusiast
  • **
  • Posts: 203
  • I don't know what im doing, but I'll do it anyway
Re: CB550K0 Build - Fresh Engine Paint!
« Reply #75 on: June 20, 2013, 07:53:07 PM »
Well I took the BEAUTIFUL evening to paint the motor. I'm really excited at how it came out. I love the flat black (has a little sheen to it). I waited for the paint to dry for about half an hour or so and then I replaced some of the stock screws with some from Stainless Cycle. Highly recommend them. Got the whole st from them for about 35 bucks. I love the contrast between the stainless and flat black. The plan is to rig up a baking system when I get back from my business trip. The flat colors always lay so smooth.


Offline RAFster122s

  • I feel like a really really
  • Really Old Timer ...
  • *******
  • Posts: 12,430
  • SOHC4 member # 2605
Re: CB550K0 Build
« Reply #76 on: June 20, 2013, 08:49:14 PM »
Be sure to use the silver antisieze paste on the SS screws as the dissimilar metal corrosiin would with time eat the aluminum.
David- back in the desert SW!

Offline DustyRags

  • I'm not skilled, I'm just a
  • Hot Shot
  • ***
  • Posts: 720
  • Just try it and see what happens
Re: CB550K0 Build
« Reply #77 on: June 21, 2013, 09:58:44 AM »
Wow, that is a gorgeous engine!
1976 CB550K- sold
2005 Kawasaki Vulcan 500- sold
2000 CB750 Nighthawk - sold
1975 XL350 - crashed
2004 Suzuki Vstrom 650 - sold

Offline streak09

  • Enthusiast
  • **
  • Posts: 203
  • I don't know what im doing, but I'll do it anyway
Re: CB550K0 Build
« Reply #78 on: June 21, 2013, 12:56:42 PM »
Be sure to use the silver antisieze paste on the SS screws as the dissimilar metal corrosiin would with time eat the aluminum.


Thanks for the heads up!


Wow, that is a gorgeous engine!


Thanks! The 550 engine is a good lookin engine to begin with, but I think it looks pretty mean in black.


Offline DustyRags

  • I'm not skilled, I'm just a
  • Hot Shot
  • ***
  • Posts: 720
  • Just try it and see what happens
Re: CB550K0 Build
« Reply #79 on: June 21, 2013, 01:48:10 PM »
Agreed. I once heard Honda motorcycle engines described as "the engineers decided what they wanted in there, figured out how to make it all fit, and then just shrink-wrapped it." You can practically see the parts, and everything is there for a purpose. Form follows function in the best way, all you need is some paint. And that right there's some sharp paint.
1976 CB550K- sold
2005 Kawasaki Vulcan 500- sold
2000 CB750 Nighthawk - sold
1975 XL350 - crashed
2004 Suzuki Vstrom 650 - sold

Offline streak09

  • Enthusiast
  • **
  • Posts: 203
  • I don't know what im doing, but I'll do it anyway
Re: CB550K0 Build
« Reply #80 on: September 21, 2013, 12:10:58 PM »
Well, its been a loooooong time since Ive updated. Ive been traveling a lot for work and just haven't had the time to spend much time on the bike. But, Ill hopefully be in town for the next two weeks and can make some good headway! My goal is to at least have the motor installed in the frame and start to rebuild the forks.

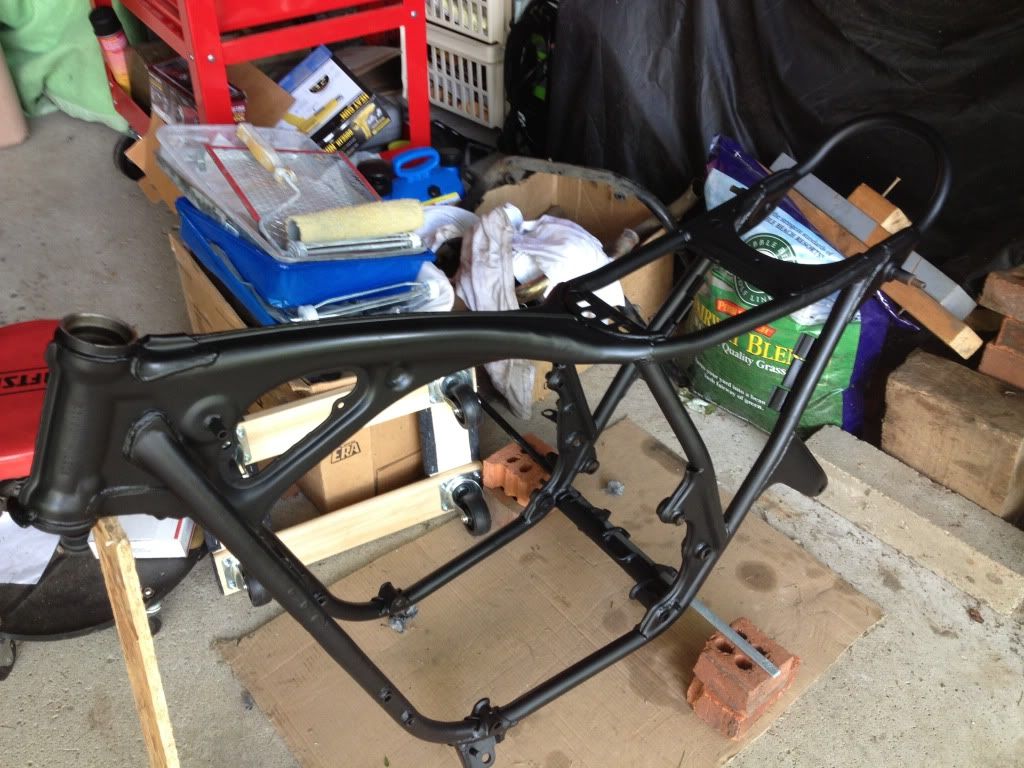
I painted the frame with POR-15 Chassis Black, I didn't feel like going all out with POR-15. I think it turned out quite good!


Last night I set the valve clearances and checked the timing. I think the timing is good but Im putting a picture here for you guys to check.
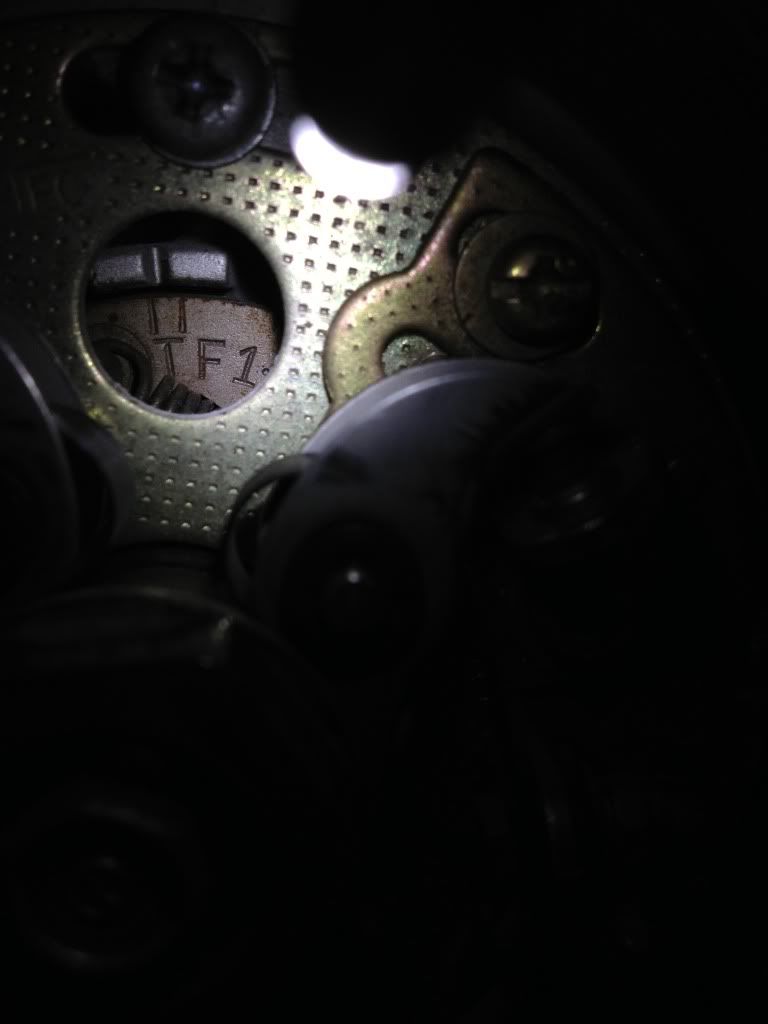


The tick mark should line up with the line on the right when the 1/4 points just begin to open right? (I know the mark in the picture isn't lined up, but the picture is just for reference to the marks). Also, there are another set of marks just after these but before the 2/3 marks. What are these for?

I also took some compression readings. I got 100-110 on all cylinders. I think this will be okay. It hasnt had much oil in it, hasn't been run in a while, and i didnt screw the tester in all that tight. I was mainly looking to make sure all 4 were pretty close to the same.

Next up is to get all the engine mounting pieces painted up so I can get the engine in the frame.

Ill try to update more regularly!


Offline Ewan 500K1

  • Hot Shot
  • ***
  • Posts: 311
    • Adams Bros Probe 2001
Re: CB550K0 Build
« Reply #81 on: September 21, 2013, 02:34:19 PM »
did you ever get a page 8 of the shop manual . I've attached a scan for you if not. ... In the printed version I have, the pages are out of synch , either page 6 or page 7 is  missing out the sequence but it doesnt appear that there is actually any text missing because of that . The page I've sanned follows directly on from para 6 in the single page on tappet adjustment and is immediately followed by para 5 (page 9) on carb adjustment
« Last Edit: September 21, 2013, 03:00:23 PM by Ewan »
jings, crivens, help ma boab

500 four K1 cafe racer build thread at :
http://forums.sohc4.net/index.php?topic=100883.0

Offline streak09

  • Enthusiast
  • **
  • Posts: 203
  • I don't know what im doing, but I'll do it anyway
Re: CB550K0 Build
« Reply #82 on: September 21, 2013, 02:44:57 PM »
NICE!  8) I never did find one! Thanks! Yea, so either page 6 or 7 is missing, but like you said it doesnt seem like anything is left out because of that.

Thanks for the scan Ewan!

Offline streak09

  • Enthusiast
  • **
  • Posts: 203
  • I don't know what im doing, but I'll do it anyway
Re: CB550K0 Build
« Reply #83 on: September 23, 2013, 07:44:51 PM »
Got the last if the bolts and hangers painted so I can get the engine in the frame tomorrow!

I also bashed the bushings out of the swingarm. I was very hesitant, but everyone else is doing it so why not!? Ill be replacing with the bronze bushings. Wasn't bad, a few wacks of the hammer and they came out, no heat or nothin.

Hopefully this thing goes in the frame fairly easy tomorrow!

Offline streak09

  • Enthusiast
  • **
  • Posts: 203
  • I don't know what im doing, but I'll do it anyway
Re: CB550K0 Build
« Reply #84 on: September 25, 2013, 04:34:07 PM »
Well I was able to get the motor in the frame without too much trouble. I wrapped a lot of the frame in towels to try to prevent scratching and chipping, but the oil pan got chipped some. Not real noticeable, and should easily touch up. Ill be lucky if that's all I have to touch up. Im a little worried about how easily it chipped, but Im hoping it was just an error on my part by not cleaning all the oil off in that spot  :-\ . Cant be too upset though, im stoked about how it looks!


I guess ill start work on cleaning up and painting foot pegs, swingarm, and tripple trees??? Haven't really thought about what I was gonna do after getting it in the frame.

I need a little bit of help on colors though. I really like the satin/flat black but I dont want it to be overwhelming and monotonous. I was thinking forks, triple tree, rear shocks, spokes, and maybe some other small pieces I would paint gloss black instead of satin/flat. I think it it would break up the flat nicely. What do you guys think? The plan right now is to go with a gloss graphite tank with matching rims, and I have some ideas to pull some flat and gloss black into some of the tank graphics  8)

Also got a bunch of nuts and washers from Bolt Depot and a 550F kickstarter off of ebay. A XS650 brake pedal is also on the way. Member sixthwisconsin used one on his K model with F pipes and looked like it worked well, so Im giving it a shot!


Offline DustyRags

  • I'm not skilled, I'm just a
  • Hot Shot
  • ***
  • Posts: 720
  • Just try it and see what happens
Re: CB550K0 Build
« Reply #85 on: September 25, 2013, 09:27:52 PM »
Agreed, some gloss black would break it up nicely. You can also polish the fins- that's always a good look, and classic too. Maybe add some pinstriping to the frame- breaks it up, emphasizes the shape of the bike but isn't overdone.
1976 CB550K- sold
2005 Kawasaki Vulcan 500- sold
2000 CB750 Nighthawk - sold
1975 XL350 - crashed
2004 Suzuki Vstrom 650 - sold

Offline jdtim

  • Full Member
  • *
  • Posts: 22
Re: CB550K0 Build
« Reply #86 on: September 25, 2013, 10:33:37 PM »
First and foremost, nice project! I absolutely love the satin black theme! And the stainless steel screws compliment it very well! Which leads me to my question(s)...

I waited for the paint to dry for about half an hour or so and then I replaced some of the stock screws with some from Stainless Cycle. Highly recommend them. Got the whole st from them for about 35 bucks.

Did Stainless Cycle sell a set made specifically for our CB550's?

Also got a bunch of nuts and washers from Bolt Depot and a 550F kickstarter off of ebay.

How do you like Bolt Depot?

Subscribed =)
-tim

Offline streak09

  • Enthusiast
  • **
  • Posts: 203
  • I don't know what im doing, but I'll do it anyway
Re: CB550K0 Build
« Reply #87 on: September 26, 2013, 06:46:31 AM »
You can also polish the fins- that's always a good look, and classic too. Maybe add some pinstriping to the frame

The pinstripe on the frame is a great idea. Im still trying to decide on the fins. I figued i would wait to see how the bike looks with all the other colors before i try to do that. I dont want to have to add paint after I decide I dont like it.

Thanks jdtim! I like the way it looks so far. Its got a long way to go, but I am finaly making progress again!

Stainless cycle has kits for a lot of bikes, I ended up getting the unpolished to keep it looking kinda raw.

http://www.stainlesscycle.com/catalog/product_info.php?cPath=46_55_57&products_id=488

All the bolts come in seperate labeled baggies for each part or section of the engine. They dont have bolt by bolt location instructions, so you need to know the lengths of each (i just replaced each bolt 1 by 1 so I didnt have to write down what length went into each hole) but they have them sorted by location (i.e. clutch cover, points cover, head...).

Bolt Depot is pretty good. I bought 100 of each: 6, 8, 10, 12mm nuts, washers, and lock washers so I wont have to run to the hardware store everytime I need a washer or nut. Shipping was quick and their website is pretty easy to navigate and order through. I also thought the prices were pretty fair.

I will probably be spending time cleaning up a lot of parts that I need to paint before it gets too cold!


Offline DustyRags

  • I'm not skilled, I'm just a
  • Hot Shot
  • ***
  • Posts: 720
  • Just try it and see what happens
Re: CB550K0 Build
« Reply #88 on: September 26, 2013, 09:51:01 AM »

The pinstripe on the frame is a great idea. Im still trying to decide on the fins. I figued i would wait to see how the bike looks with all the other colors before i try to do that. I dont want to have to add paint after I decide I dont like it.

To be perfectly fair- not my idea. SOHC Digger did it first. Here's his finished frame: http://forums.sohc4.net/index.php?topic=69745.msg1425821#msg1425821

If you REALLY wanna get ambitious, paint the ends of the fins the same color as the pinstripe!  ;D
1976 CB550K- sold
2005 Kawasaki Vulcan 500- sold
2000 CB750 Nighthawk - sold
1975 XL350 - crashed
2004 Suzuki Vstrom 650 - sold

Offline RAFster122s

  • I feel like a really really
  • Really Old Timer ...
  • *******
  • Posts: 12,430
  • SOHC4 member # 2605
Re: CB550K0 Build
« Reply #89 on: September 26, 2013, 10:09:52 AM »
With relief printing the paint or ink only transfers from the high points. A roller with no nap would transfer the paint to the surface of the fins. So, trying to paint the edges of the fins would be difficult to control using a brush.

Removing the paint with fine sand paper and working slowly would allow you to remove the paint from the fins without it chipping out.

If you did not like it, it would be hard to go back without disassembly, paint, reassembly.
David- back in the desert SW!

Offline streak09

  • Enthusiast
  • **
  • Posts: 203
  • I don't know what im doing, but I'll do it anyway
Re: CB550K0 Build
« Reply #90 on: September 26, 2013, 11:03:32 AM »
If you did not like it, it would be hard to go back without disassembly, paint, reassembly.

That was my thoughts also... but I like the idea of painting the fin edges a different color. A lot of good ideas floating around here.  8)


Offline streak09

  • Enthusiast
  • **
  • Posts: 203
  • I don't know what im doing, but I'll do it anyway
Re: CB550K0 Build
« Reply #91 on: September 26, 2013, 06:37:45 PM »
Starting to sound gay. Why not paint the letters on your tyres as well?
I thought that would be over kill, I was going to go with pink streamers...

Anyways.  ???


Picked up some cheapo (hopefully not too cheap!) bins at Harbor Freight on my way and got my mini market set up. It will be nice having a nut or washer right there handy when one rolls off to who knows where.


Got my XS650 brake pedal in today, looks like it will work well.


Offline streak09

  • Enthusiast
  • **
  • Posts: 203
  • I don't know what im doing, but I'll do it anyway
Re: CB550K0 Build
« Reply #92 on: September 26, 2013, 07:21:29 PM »
Anyone in the Dayton Ohio area with a sandblasting cabinet? It would be awesome if I could get access to one to help clean these parts!

Offline jdtim

  • Full Member
  • *
  • Posts: 22
Re: CB550K0 Build
« Reply #93 on: September 26, 2013, 10:44:04 PM »
Sweet, thanks so much for the info! Looking forward to how this progresses =)

-tim

Offline streak09

  • Enthusiast
  • **
  • Posts: 203
  • I don't know what im doing, but I'll do it anyway
Re: CB550K0 Build
« Reply #94 on: September 29, 2013, 01:38:06 PM »
Ive got everything together that I want to sand blast. I found out a friends dad has a sandblasting cabinet so I'm going to try to use that early this week so I can get stuff painted before I leave on business again. I disassembled the front forks today and found what seems to be chocolate syrup... :o


I will be cleaning all the internals well and putting new seals in. I am strongly considering putting Race Tech emulators in as well, and maybe new springs (thats getting pricey though  :-\). I have heard good things about the emulators.

The forks after dis-assembly, they came apart fairly easily.


Took some prying on the seals but wasn't too bad.

Offline streak09

  • Enthusiast
  • **
  • Posts: 203
  • I don't know what im doing, but I'll do it anyway
Re: CB550K0 Build - Front suspension help!
« Reply #95 on: October 03, 2013, 11:58:41 AM »
So I borrowed a friends sandblaster and I have started to clean things up. I have also been getting a parts list together so I know where to buy each of the parts I need. While doing so, I realized I need some help and input in regards to my front suspension. The plan is to put Race Tech emulators in for improved front suspension. BUT, it looks like someone has put progressive springs in this thing at one time (check the picture above). Am I correct in thinking this? From what I have heard, its kind of counter productive to run emulators and progressive springs.

Heres my question: Can someone verify that the springs above are progressive springs?

If they are progressive springs, do I have other options other than spilling out $125 for new sing spring rate springs from Race Tech?

Another thought, will progressive springs give me a good enough ride to just stick with what I have (assuming they are progressive) and just forget about the emulators and save some cash?

Let me know what you guys think!

Offline RAFster122s

  • I feel like a really really
  • Really Old Timer ...
  • *******
  • Posts: 12,430
  • SOHC4 member # 2605
Re: CB550K0 Build
« Reply #96 on: October 04, 2013, 03:50:56 AM »
What is the coil wire diameter of your springs? They look like stock springs to me. They could be aftermarket but the wire diameter of the wire gauge will be greater. How strong are the springs? The stock springs had bad metalurgy and were fatigued loosing a lot of their spring strength pretty quick. So, it was not uncommon to sometimes find a rare owner replacing them, too many just chalk it up to how the bikes are suppose handle (ignorant of what a proper set of springs would do for the handling). 
The RaceTech emulators are the way to go for better performance in the stock forks. Kind of like the difference between KYab (Keep Your Bilsteins) and Bilsteins, Bilsteins HD version have firm dampening of suspension travel in both compression and rebound, KYB in my experience  (and others) only have it in compression leading to inferior performance and handling that feels harsh instead of just firm.
David- back in the desert SW!

Offline streak09

  • Enthusiast
  • **
  • Posts: 203
  • I don't know what im doing, but I'll do it anyway
Re: CB550K0 Build
« Reply #97 on: October 04, 2013, 06:16:44 AM »
Thanks David, good info. I will check my coil diameter when I get home this afternoon.

So will I see much improvement with just emulators and stock springs (assuming I have stock now)? or would it be much more beneficial to "spring"  :P for new ones. The only place I can find single rate springs is Race Teck, and they aint cheap. I wanna do this right, but I dont want to be completely broke, so If I can see good improvement with just emulators and keep my springs that would be ideal.

Thanks again for the info! Great to have such knowledgable people around for those of us who dont know what they are doing!  ;D

Offline RAFster122s

  • I feel like a really really
  • Really Old Timer ...
  • *******
  • Posts: 12,430
  • SOHC4 member # 2605
Re: CB550K0 Build
« Reply #98 on: October 04, 2013, 06:42:38 AM »
Sonic springs also make std rate springs and are inexpensive.  Stay with stock now if they aren't rusty and later add the straight rate springs. Ask Race Tech what their spring rate is, if they don't publish it on the website. Match that at Sonic...yeah I know, dirty pool. When you switch you will know what the race tech solution feels like, presuming you are close in rates with Sonic and Sonic has similar metallurgy ( if metallurgy has an impact on spring performance I don't know.) Then you will know how bad your your springs were. Not knowing what condition your springs are in and not measuring their compression, not easy, then Since you are doing emulators I think you need to do the springs.  BUT, springs can be done without disassembly of the forks, just pull the caps, compress the fork so you can grab the spring, replace, check fluid level (measure level from the top of tubes before you pull the springs) and add as necessary. So, personally I would hold off on springs to see their improvement and make the budget more tolerable over time.
David- back in the desert SW!

Offline streak09

  • Enthusiast
  • **
  • Posts: 203
  • I don't know what im doing, but I'll do it anyway
Re: CB550K0 Build
« Reply #99 on: October 05, 2013, 06:55:23 PM »
That sounds like some very good advice, thanks RAFster122S!

Ive been looking into maybe using some cheaper emulators from Mike XS650 site. Seems like people have had some luck with those, and being less than half the price, I think they are worth a look.

I was able to sand blast all the parts that I wanted to paint, but didnt get a chance to paint.

I also got these swingarm bushings in from ebay.


I wont have much to update this week, ill be gone