Author Topic: 1975 CB400F  (Read 16671 times)

0 Members and 1 Guest are viewing this topic.

Offline NobleHops

  • Don ya be callin' me no
  • Expert
  • ****
  • Posts: 1,345
  • Misfit - Tucson, Arizona
Re: 1975 CB400F
« Reply #25 on: February 02, 2015, 05:16:37 PM »
Congrats on your "roller" I agree, that's a great milestone and a great platform to continue working on.

Must disagree with you about your spacer advice and the AllBalls kit. I did not install it and destroyed my set when I learned it was needed. 3 or 4 other guys then piped up saying they went through the same thing. There seems to be some variance in the parts on the 400F determining whether or not it's needed, not sure what it is, but it's not useful to say, "don't use the spacer" without folks verifying fit first, because that stem bearing takes a one-way trip onto the stem as you know, and if you get it wrong, you get to buy another set.

My $.02

« Last Edit: February 02, 2015, 06:03:51 PM by NobleHops »
Nils Menten * Tucson, Arizona, USA

I have a motorcycle problem.

My build thread: NobleHops makes a 400F pretty for his wife: http://forums.sohc4.net/index.php?topic=131210.0

Offline Kevin

  • Hot Shot
  • ***
  • Posts: 514
Re: 1975 CB400F
« Reply #26 on: February 02, 2015, 05:32:55 PM »
I while back when I was still in business and selling the AllBalls kits TTR400 and I put together a white paper on how to properly install the bearings.

Here it is:
A couple of 400F's and a
'98 Suzuki Intruder VS1400 ~ for long rides

Offline NobleHops

  • Don ya be callin' me no
  • Expert
  • ****
  • Posts: 1,345
  • Misfit - Tucson, Arizona
Re: 1975 CB400F
« Reply #27 on: February 02, 2015, 06:05:16 PM »
I while back when I was still in business and selling the AllBalls kits TTR400 and I put together a white paper on how to properly install the bearings.

Here it is:

Super cool man, thanks for posting that.
Nils Menten * Tucson, Arizona, USA

I have a motorcycle problem.

My build thread: NobleHops makes a 400F pretty for his wife: http://forums.sohc4.net/index.php?topic=131210.0

Offline przjohn

  • Expert
  • ****
  • Posts: 948
Re: 1975 CB400F
« Reply #28 on: February 03, 2015, 05:31:33 AM »
Congrats on your "roller" I agree, that's a great milestone and a great platform to continue working on.

Must disagree with you about your spacer advice and the AllBalls kit. I did not install it and destroyed my set when I learned it was needed. 3 or 4 other guys then piped up saying they went through the same thing. There seems to be some variance in the parts on the 400F determining whether or not it's needed, not sure what it is, but it's not useful to say, "don't use the spacer" without folks verifying fit first, because that stem bearing takes a one-way trip onto the stem as you know, and if you get it wrong, you get to buy another set.

My $.02

Yes you are correct, you should check the dimension first, and not just slap it together. I guess at the heat of the moment, and having to disassemble that bearing without ruining the bearing and the seal I felt like throwing it out the window.  >:( I measured the dimension the way the instructions state and did install the thick spacer but the top threads of the tree were just at the top of the upper bearing, they would not connect with the retainer threads. Both races were completely set with the lower about 10mm up into the frame and the upper sticking slightly up out of the frame. They were firmly seated and could not go further. I don't know if the upper bearing was different with my kit but with no spacer the kit fits fine. I would suggest that a better measurement would be to install the races and bearings in the frame and measure the TOTAL dimension against the tree length to see where the threads end up to decide what spacer to use. Anyway, it's together and on to the next round.
I like poetry, long walks on the beach, and poking at dead things with a stick.

Offline przjohn

  • Expert
  • ****
  • Posts: 948
Re: 1975 CB400F
« Reply #29 on: February 04, 2015, 06:27:32 AM »
Got out a little early today and did some engine work while plating other stuff. Got the head disassembled and cylinders off while the plating tank did it's magic. For this resto I am plating by bagged group of parts, rear brake, center stand, air filter, etc. instead of a whole batch and figuring it out. There are a lot of parts to be plated on this bike though stuff will probably still get mixed up. ALso put some eye candy on the rolling chassis, a front reproduction fender, which I like to do during this part of a resto. It keeps the looks of the bike moving while all the prep work is going on. Some pics of today,

Rear Brake Parts Plated'


Air Filter parts plated. And yes, the Anal Douche in me  did Yellow Chromate parts no one will see unless they replace the air filter. Make a bike as good on the inside as it is on the outside and the detail will come through.


Top end is off,


Front fender is now on, ooooh  ;D


I like poetry, long walks on the beach, and poking at dead things with a stick.

Offline NobleHops

  • Don ya be callin' me no
  • Expert
  • ****
  • Posts: 1,345
  • Misfit - Tucson, Arizona
Re: 1975 CB400F
« Reply #30 on: February 04, 2015, 06:44:48 AM »

Front fender is now on, ooooh  ;D


A man after my own heart. I like it! Well done!

I also popped for the repro fender, was really surprised how hard I had to reef on it to get the stays onto the fork leg bosses. Like, almost a two-person job. Same with you?
Nils Menten * Tucson, Arizona, USA

I have a motorcycle problem.

My build thread: NobleHops makes a 400F pretty for his wife: http://forums.sohc4.net/index.php?topic=131210.0

Offline NobleHops

  • Don ya be callin' me no
  • Expert
  • ****
  • Posts: 1,345
  • Misfit - Tucson, Arizona
Re: 1975 CB400F
« Reply #31 on: February 04, 2015, 06:52:28 AM »
P.S. Here's what my rotor looked like after a trip to TrueDisk (http://www.truedisk.net) Drilling is optional of course.


« Last Edit: February 04, 2015, 07:44:08 AM by NobleHops »
Nils Menten * Tucson, Arizona, USA

I have a motorcycle problem.

My build thread: NobleHops makes a 400F pretty for his wife: http://forums.sohc4.net/index.php?topic=131210.0

Offline Kevin

  • Hot Shot
  • ***
  • Posts: 514
Re: 1975 CB400F
« Reply #32 on: February 04, 2015, 07:02:52 AM »
NH, Your link takes me to a travel website .......
A couple of 400F's and a
'98 Suzuki Intruder VS1400 ~ for long rides

Offline NobleHops

  • Don ya be callin' me no
  • Expert
  • ****
  • Posts: 1,345
  • Misfit - Tucson, Arizona
Re: 1975 CB400F
« Reply #33 on: February 04, 2015, 07:44:28 AM »
NH, Your link takes me to a travel website .......

D'OH!

Fixed, thanks for the heads-up.
Nils Menten * Tucson, Arizona, USA

I have a motorcycle problem.

My build thread: NobleHops makes a 400F pretty for his wife: http://forums.sohc4.net/index.php?topic=131210.0

Offline thirsty 1

  • Hot Shot
  • ***
  • Posts: 512
Re: 1975 CB400F
« Reply #34 on: February 04, 2015, 07:33:16 PM »
If you have any questions on the internals of your 400 send me off a pm. I'm more then happy to give a heads up with some advise.
73' CL125, 75' CB400F, 16' KTM 1190R, 05' KTM 525EXC

75' CB400F  -  http://forums.sohc4.net/index.php?topic=127295.0

My 79 CB750F for fun   ----   http://www.dotheton.com/forum/index.php?topic=19923.0

Offline przjohn

  • Expert
  • ****
  • Posts: 948
Re: 1975 CB400F
« Reply #35 on: February 05, 2015, 07:26:04 AM »
P.S. Here's what my rotor looked like after a trip to TrueDisk (http://www.truedisk.net) Drilling is optional of course.


Wow, I like the look of that disk. Did that on a Norton resto and was worried it wouldn't look "Period Correct" but it came out great with the drilling and was glad I did it. I am going to check it out as now would be a good time to do it and the front tire can still stay in the clamp for a secure working base while I wait for the disk to come back.

The front fender was a PITA to get all lined up, somebody in China needs to check their measurements. Was surprised though after all the pulling and prodding how well it lined up on the tire.

I like poetry, long walks on the beach, and poking at dead things with a stick.

Offline przjohn

  • Expert
  • ****
  • Posts: 948
Re: 1975 CB400F
« Reply #36 on: February 05, 2015, 07:35:02 AM »
Got the cases split today but didn't have any time to inspect anything. Had one small incident where a clutch side cover screw broke and one heart stopping moment when, for some reason one of the lower case bolts that holds the crank mains would not budge. I worked it and worked it back and forth and finally got it to go. Took the bolt out of the line up and it will be replaced because I feel it is stressed and not worth keeping. The new bolt underneath the motor will probably not match the others, oh well there goes the concourse  . The clutch side case will most likely end up being drilled out and Helicoiled. Just 2 pics today cause I had to do some real work too today.

Cases split but no time to check stuff out. If you do this job with a Haynes manual and have my sort of IQ the paragraphs have to be read several times to get to this point. It is very easy with that manual to be reading about a 550 and then skip over a paragraph of the 400. Good thing I wait till the end of a work day to crack a cold one.

Thirsty 1, thank you very much for the offer. I am sure I will be in touch with you now that I've torn into the motor. This will be my first Honda 4 motor. Most all of my other builds had no valves at all.


The clutch cable access cover screw that snapped. You would think these screws would have been accessed at some time and be an easy task, nope, not this one, maybe a PO thought Red Locktite was "Kick Azz". A good wack on the impact snapped it off. I will try heat and an easy out but forsee a helicoil in this screw's future. Have also heard of the left hand drill bit trick for broken bolts and thinking about getting a small set for the tool chest.


I like poetry, long walks on the beach, and poking at dead things with a stick.

Offline NobleHops

  • Don ya be callin' me no
  • Expert
  • ****
  • Posts: 1,345
  • Misfit - Tucson, Arizona
Re: 1975 CB400F
« Reply #37 on: February 05, 2015, 07:41:55 AM »
P.S. Here's what my rotor looked like after a trip to TrueDisk (http://www.truedisk.net) Drilling is optional of course.


Wow, I like the look of that disk. Did that on a Norton resto and was worried it wouldn't look "Period Correct" but it came out great with the drilling and was glad I did it. I am going to check it out as now would be a good time to do it and the front tire can still stay in the clamp for a secure working base while I wait for the disk to come back.

The front fender was a PITA to get all lined up, somebody in China needs to check their measurements. Was surprised though after all the pulling and prodding how well it lined up on the tire.

Whether or not you elect to have Tom drill it, the grinding will make it flat and true and that will enhance the braking performance. I like the freshened look of it too.

Re the fender I was certain that it had been made wrong till I compared it to the stocker and found it identical. Not sure why it was designed to be under so much tension, possibly to ensure that it never contacts the tire? It was a PITA to install for sure.

When you reinstall that transmission, take care to ensure that the dowel pins are into the locating holes on the bearings. I'm dealing with the consequences of the APO not doing that on my engine now.
Nils Menten * Tucson, Arizona, USA

I have a motorcycle problem.

My build thread: NobleHops makes a 400F pretty for his wife: http://forums.sohc4.net/index.php?topic=131210.0

Offline przjohn

  • Expert
  • ****
  • Posts: 948
Re: 1975 CB400F
« Reply #38 on: February 05, 2015, 07:51:56 AM »
P.S. Here's what my rotor looked like after a trip to TrueDisk (http://www.truedisk.net) Drilling is optional of course.


Wow, I like the look of that disk. Did that on a Norton resto and was worried it wouldn't look "Period Correct" but it came out great with the drilling and was glad I did it. I am going to check it out as now would be a good time to do it and the front tire can still stay in the clamp for a secure working base while I wait for the disk to come back.

The front fender was a PITA to get all lined up, somebody in China needs to check their measurements. Was surprised though after all the pulling and prodding how well it lined up on the tire.

Whether or not you elect to have Tom drill it, the grinding will make it flat and true and that will enhance the braking performance. I like the freshened look of it too.

Re the fender I was certain that it had been made wrong till I compared it to the stocker and found it identical. Not sure why it was designed to be under so much tension, possibly to ensure that it never contacts the tire? It was a PITA to install for sure.

When you reinstall that transmission, take care to ensure that the dowel pins are into the locating holes on the bearings. I'm dealing with the consequences of the APO not doing that on my engine now.

Yea, I read that in your thread, that sux. Happened to me on a 1972 Kawasaki H2 that a PO "rebuilt" the motor. Ended up loosing the tranny and had to buy used cases on Ebay. Good luck with that pin.
I like poetry, long walks on the beach, and poking at dead things with a stick.

Offline Trad

  • Expert
  • ****
  • Posts: 964
Re: 1975 CB400F
« Reply #39 on: February 05, 2015, 09:13:23 AM »
Rotor looks great. I had Tom do mine with the same pattern last year. Great guy, great service.
74 CB550 Build: NOS-GUTTED-OEMplus-HOLDTRUE
http://forums.sohc4.net/index.php/topic,130575.0.html

Offline przjohn

  • Expert
  • ****
  • Posts: 948
Re: 1975 CB400F
« Reply #40 on: February 06, 2015, 04:49:29 PM »
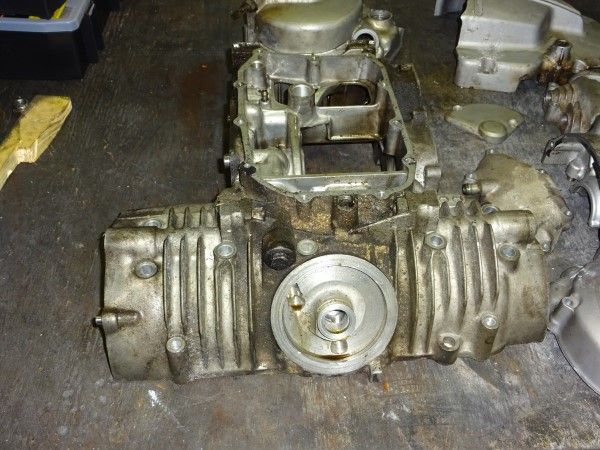
Half a day today spent on just the lower case half, well, that's not completely true. I had to change out the solvent in the parts washer too, that job is a Peach too. I go through a whole meticulous procedure for cleaning and bead blasting these cases. I know there are folks out there who think bead blasting ANYTHING on a motor is a no no. If you prep right and meticulously clean the cases there should be no problem. This case has absolutely no residue anywhere on, or in it. Most of my work is prepping and making sure there is no bead in there. That includes, blocking all bolt holes and passageways, multiple washings, both solvent and soap and water, along with air blasting. My hope is to have all the engine cases painted by the end of the weekend. A lower case before,


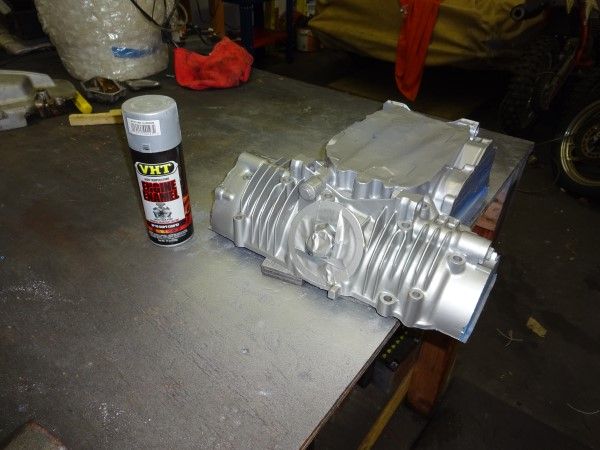
And, after, waiting to dry. I use the VHT Universal Aluminum paint for many things. I used it on the Honda 90 and think it came out perfect. The great thing about this paint is if you get some on a place you don't want paint just wait till it dries and wipe it right off with Acetone or even gasoline. But, cure it in the oven and it becomes very resistant to solvents and stains.


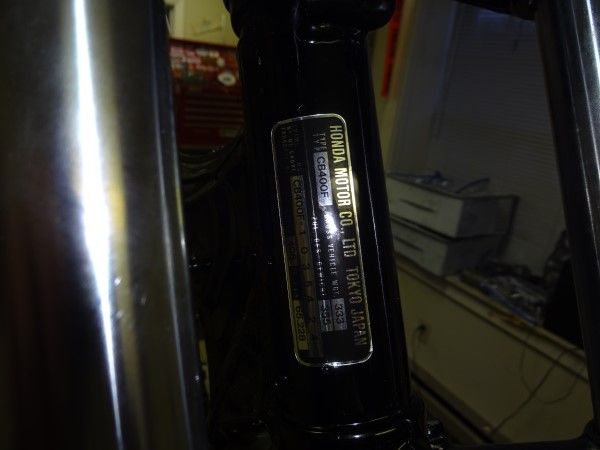
I am a big Decal Guy. So, while waiting in between coats on the lower case I put some eye candy on the chassis. Here is a pic of a decal I got on Ebay and had the VIN put on it. Most restos I do loose the paper tag from powder coat and go thru DMV with the stamp in the frame only. Even though the Honda had a riveted tag this tag looked better to me than riveting back on the old tag.


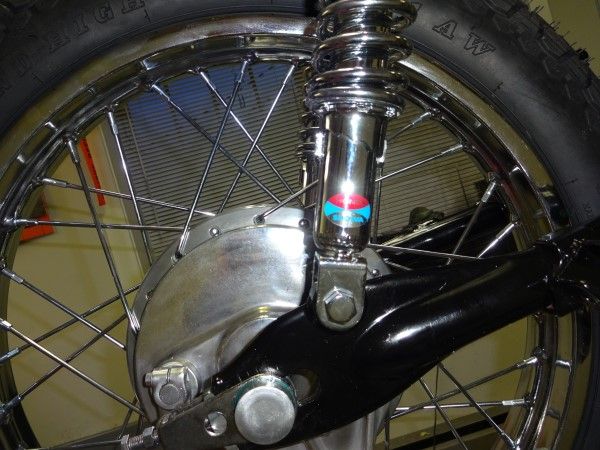
Speaking of decals, check out these bad boys. I know they are not correct but this is America. Before we believed everything we read on the internet we believed everything we saw in writing. 


I like poetry, long walks on the beach, and poking at dead things with a stick.

Offline NobleHops

  • Don ya be callin' me no
  • Expert
  • ****
  • Posts: 1,345
  • Misfit - Tucson, Arizona
Re: 1975 CB400F
« Reply #41 on: February 06, 2015, 07:58:58 PM »
Awesome!
Nils Menten * Tucson, Arizona, USA

I have a motorcycle problem.

My build thread: NobleHops makes a 400F pretty for his wife: http://forums.sohc4.net/index.php?topic=131210.0

Offline przjohn

  • Expert
  • ****
  • Posts: 948
Re: 1975 CB400F
« Reply #42 on: February 07, 2015, 05:02:31 PM »
Well, today was more plating , prepping, taping, and painting. The case halves are finally done and I am looking forward to painting the side cases. Usually I am polishing side cases and come home looking like an indigent soul, let's just say polishing is a dirty job. Here is a pic of today's effort, oh, I also got all the case bolts and valve cover bolts plated too!


The only side case that is going to be a PITA is the Clutch Cover. This is the cover with the frozen screw. I have since Heli coiled that but the Cable Adjustment fitting is rusted out to lunch, I hacksawed it off square to the base of the cover and was going to Heli Coil when I checked the new cable and found it is a separate part. Hopefully it is still available and I can just Heli Coil that part and move on with painting the cover, no biggie.


So, the head and cylinders are at Eastwood Machine, Motor wise this bike looks like it may come together in time for Deals Gap. But, the big news is paint is starting to come around courtesy of the year's Snow Run Trail Boss, Larry Kilgore. Couple of pics from Larry, it is ready for decals and clear coat, yes Mike it is Red. :D


I like poetry, long walks on the beach, and poking at dead things with a stick.

Offline Restoration Fan

  • My wife will never call me
  • Master
  • *****
  • Posts: 1,966
Re: 1975 CB400F
« Reply #43 on: February 07, 2015, 06:13:51 PM »
Man, I dig that red color! 
Ron

Stella - Logan's Senior Project    78 750K http://forums.sohc4.net/index.php?topic=141761.0

Logan's Reward - CB500 and CB550 Cafes    http://forums.sohc4.net/index.php/topic,147787.0.html

Offline SOHC4 Cafe Racer Fan

  • Speak up, Whipper-Snapper! I'm a
  • Really Old Timer ...
  • *******
  • Posts: 15,733
  • SOHC/4 Member #1235
Re: 1975 CB400F
« Reply #44 on: February 07, 2015, 07:11:17 PM »
That's rich, warm red. Very nice.
1975 CB550K1 "Blue" Stockish Restomod (http://forums.sohc4.net/index.php?topic=135005.0)
1975 CB550F1 frame/CB650 engine hybrid "The Hot Mess" (http://forums.sohc4.net/index.php/topic,150220.0.html)
2008 Triumph Thruxton (http://forums.sohc4.net/index.php/topic,190956.0.html)
2014 MV Agusta Brutale Dragster 800
2015 Yamaha FZ-09 (http://forums.sohc4.net/index.php/topic,186861.0.html)

"There are some things nobody needs in this world, and a bright-red, hunch-back, warp-speed 900cc cafe racer is one of them — but I want one anyway, and on some days I actually believe I need one.... Being shot out of a cannon will always be better than being squeezed out of a tube. That is why God made fast motorcycles, Bubba." Hunter S. Thompson, Song of the Sausage Creature, Cycle World, March 1995.  (http://www.latexnet.org/~csmith/sausage.html and https://magazine.cycleworld.com/article/1995/3/1/song-of-the-sausage-creature)

Sold/Emeritus
1973 CB750K2 "Bionic Mongrel" (http://forums.sohc4.net/index.php?topic=132734.0) - Sold
1977 CB750K7 "Nine Lives" Restomod (http://forums.sohc4.net/index.php?topic=50490.0) - Sold
2005 RVT1000RR RC51-SP2 "El Diablo" - Sold
2016+ Triumph Thruxton 1200 R (http://forums.sohc4.net/index.php/topic,170198.0.html) - Sold

Offline NobleHops

  • Don ya be callin' me no
  • Expert
  • ****
  • Posts: 1,345
  • Misfit - Tucson, Arizona
Re: 1975 CB400F
« Reply #45 on: February 08, 2015, 06:49:59 AM »
I have good news, that 2-piece threaded adjuster comes with the clutch cable, or at least it did when I bought it from 4:1.

Nils Menten * Tucson, Arizona, USA

I have a motorcycle problem.

My build thread: NobleHops makes a 400F pretty for his wife: http://forums.sohc4.net/index.php?topic=131210.0

Offline nvr2old

  • Hot Shot
  • ***
  • Posts: 484
Re: 1975 CB400F
« Reply #46 on: February 08, 2015, 11:21:36 AM »
I have good news, that 2-piece threaded adjuster comes with the clutch cable, or at least it did when I bought it from 4:1.


Sorry to hijack, but could you give me a link to where you bought that clutch adjuster bolt at?  That's the only part I still need for my 400F.  It's frozen in place and I can't remove it w/o ruining it so I want to make sure I have a replacement before doing so.  Thanks in advance.
'76 CB550F-'72 XL250-'82 MB5-'82 CX500 Turbo-'77 naked Goldwing-'75 CB400F cafe'-'79 Suzuki GS1000S..hey, it's a Wes Cooley..

Offline NobleHops

  • Don ya be callin' me no
  • Expert
  • ****
  • Posts: 1,345
  • Misfit - Tucson, Arizona
Re: 1975 CB400F
« Reply #47 on: February 08, 2015, 01:57:51 PM »
I have good news, that 2-piece threaded adjuster comes with the clutch cable, or at least it did when I bought it from 4:1.


Sorry to hijack, but could you give me a link to where you bought that clutch adjuster bolt at?  That's the only part I still need for my 400F.  It's frozen in place and I can't remove it w/o ruining it so I want to make sure I have a replacement before doing so.  Thanks in advance.


BOOSH

http://4into1.com/honda-cb400f-clutch-cable-1975-1976/

Nice part, I have one on my bike. Looks OEM.
Nils Menten * Tucson, Arizona, USA

I have a motorcycle problem.

My build thread: NobleHops makes a 400F pretty for his wife: http://forums.sohc4.net/index.php?topic=131210.0

Offline przjohn

  • Expert
  • ****
  • Posts: 948
Re: 1975 CB400F
« Reply #48 on: February 08, 2015, 03:48:36 PM »
WTF, clicking away with the camera today and the memory card was still in the computer, so no pics. Got all the other motor parts painted except the clutch cover, and most all the plating is done though that is never true till start up day. The clutch cable adjuster is NLA and I ended up making one from a M10 1.25 X 50 bolt and a bushing. Drilled out the bolt on the drill press and brazed it to a bushing. Will post a pic sometime later.  I am going to check out the 4 into site and get that cable though, thanks for the info.  I have to say I was pretty proud of myself boring through a 50MM bolt on a drill press  :) Waiting on a 10M 1.25 Helicoil as I tried the left hand drill method but still no go, it needs a Heliicoil. Hoping to keep moving along this week as next weekend it is back to the garage project.
I like poetry, long walks on the beach, and poking at dead things with a stick.

Offline przjohn

  • Expert
  • ****
  • Posts: 948
Re: 1975 CB400F
« Reply #49 on: February 08, 2015, 03:59:18 PM »
Just ordered the cable from 4 into 1. $16.00 + S & H, a no brainer. I checked Ebay, David Silver, and CMSNL with no luck. I have bought a few things from 4 into 1 but never though of them, good to know. If anybody needs the Motion Pro Cable without the adjuster let me know.
I like poetry, long walks on the beach, and poking at dead things with a stick.