Author Topic: 1976 CB750F Restoration  (Read 19181 times)

0 Members and 1 Guest are viewing this topic.

Offline RodSOHC750

  • Full Member
  • *
  • Posts: 94
  • Restoring Vintage Honda Motorcycles
Re: 1976 CB750F Restoration
« Reply #75 on: January 23, 2016, 06:01:44 PM »
I started a restoration on my 1975 Super Sport.  I'm planning to open the engine case because there are signs of oil leaks possibly from the case split joints or seals and I want to check the shift forks and bearings.   
1979 Honda CB750L Limited Edition
1975 Honda CB750F Super Sport
1972 Honda CL450
1970 Honda CT70

Offline przjohn

  • Expert
  • ****
  • Posts: 948
Re: 1976 CB750F Restoration
« Reply #76 on: January 24, 2016, 04:09:31 PM »
Got up this morning and figured, what a great Winter day to assemble the motor. Got to this point and went to put the rings on the pistons.


Everything was measuring out great, until the ring to side clearance. I could tell just handling them that something was wrong. The clearance is beyond spec limit and the rings are useless. A pic of the measurement of an old ring,


And a new ring,


Long story short;

From what I can figure Honda had a change in design after S# 2551567, this bike is before that, The piston appears to be from before that number, and the ring set, after. Got the whole set off Ebay, go figure, right? We'll see how this works out as the seller is across the pond. And I don't mean the UK Pond, The Big Pond. Don't know what my next move will be, that's what work is for, looking like I am busy as hell and checking on my bike parts.
I like poetry, long walks on the beach, and poking at dead things with a stick.

Offline przjohn

  • Expert
  • ****
  • Posts: 948
Re: 1976 CB750F Restoration
« Reply #77 on: January 24, 2016, 04:12:13 PM »
So it was back to the chassis. I hate jumping around but got a few things mounted and tried to concentrate on rough in of the wiring. The harness is new reproduction and so are many of the small jumper connections. The signal light kit from 4 into one worked very well. The reproduction tail light, as they all seem to need, required some mods.


It took a few KTM parts to get this reproduction tail light assembly to mount. I have never, any bike, God don't even get me started on the Norton, had a reproduction tail light that didn't need some time, thought, and a trip to the Hardware Store to mount properly. The Chinese are great believers in, "Close Enough, Good to Go" when it comes to reproduction tail lights.


I like poetry, long walks on the beach, and poking at dead things with a stick.

Offline Jerry Rxman Griffin aka MuthaF'er

  • This MuthaF'er is getting to be a
  • Really Old Timer ...
  • *******
  • Posts: 14,912
  • Bought her new 4/75
Re: 1976 CB750F Restoration
« Reply #78 on: January 24, 2016, 05:18:22 PM »
-392 rings?! 1.2mm vs 1.5mm? Need -300 on all but the last thousand or so of the 76 and down F's. If those are -392 rings you shouldn't have any trouble selling them on here.

I have to sort out my wiring too next couple days but I'm using my old harness and it may not be promising. Turned on the key and wasn't impressed LOL. Where did you get your harness?
As of today 3/13/2012 my original owner 75 CB750F has made it through 3 wives, er EX-wives. Free at last.  ;-)

Offline przjohn

  • Expert
  • ****
  • Posts: 948
Re: 1976 CB750F Restoration
« Reply #79 on: January 25, 2016, 02:21:51 PM »
-392 rings?! 1.2mm vs 1.5mm? Need -300 on all but the last thousand or so of the 76 and down F's. If those are -392 rings you shouldn't have any trouble selling them on here.

I have to sort out my wiring too next couple days but I'm using my old harness and it may not be promising. Turned on the key and wasn't impressed LOL. Where did you get your harness?

I got the harness from Vintage CB750.COM. for this restoration. I have to say, they are very quick on turn around for an order. At the end of this project the plan is to report on what my experience with the various vendors has been, so far Vintage has been very good.
I like poetry, long walks on the beach, and poking at dead things with a stick.

Offline przjohn

  • Expert
  • ****
  • Posts: 948
Re: 1976 CB750F Restoration
« Reply #80 on: January 31, 2016, 03:45:34 PM »
Well the motor is back together. I sure hope I got it right as it is a PITA to take in and out. Everything looks good, it turns over easily, all gears shift though easily. Even tested the new Neutral switch and that is working properly too. Hondamans book helped immensely through the rebuild. It is the little tips he has that make a difference. For instance, I didn't have Permatex #2 for the head discs, I went out and got it. Some pics of the motor done.


Got the carbs backs from Nils and am very happy with the results. The carbs came back super clean and I like the finish. I like the Vapor Blasting look and could see how it could work very well especially for cases that don't get painted like Kawasaki Triples. Restocycle is another great resource for those of us who restore old stuff and I would highly recommend their services.


Got the new face plates in from Marcel, thank you Marcel, and installed them on the meters, and this time I took it easy on the screw torque.


I like poetry, long walks on the beach, and poking at dead things with a stick.

Offline Stev-o

  • Ain't no
  • Really Old Timer ...
  • *******
  • Posts: 34,309
  • Central Texas
Re: 1976 CB750F Restoration
« Reply #81 on: January 31, 2016, 04:17:10 PM »
Motor & carbs look great, I'm sending my H2 carbs to him next week for vapor. [He's already done my H2 cases, cylinders and heads]
'74 "Big Bang" Honda 750K [836].....'76 Honda 550F.....K3 Park Racer!......and a Bomber!............plus plus plus.........

Offline Jerry Rxman Griffin aka MuthaF'er

  • This MuthaF'er is getting to be a
  • Really Old Timer ...
  • *******
  • Posts: 14,912
  • Bought her new 4/75
Re: 1976 CB750F Restoration
« Reply #82 on: January 31, 2016, 04:20:08 PM »
If it runs as good as it looks it's gonna be killer!  ;)

I have my VintageCB750 order in for the new harness and a few other goodies. We may be wiring about the same time. I ordered a new right control from Honda. Vintage said their 73 - 75 K would work on the F but.... in the end they said the harness was only 24". I was hoping to use it and wire in the headlight shutoff switch for those times when the battery is taxed.
As of today 3/13/2012 my original owner 75 CB750F has made it through 3 wives, er EX-wives. Free at last.  ;-)

Offline przjohn

  • Expert
  • ****
  • Posts: 948
Re: 1976 CB750F Restoration
« Reply #83 on: January 31, 2016, 05:19:08 PM »
Yeah, I gotta say Steve, this process looks like just the ticket for Triple Cases and Carbs. If you are going to paint, that is another thing, but, for the natural Aluminum look this works very well IMO.
I like poetry, long walks on the beach, and poking at dead things with a stick.

Offline Stev-o

  • Ain't no
  • Really Old Timer ...
  • *******
  • Posts: 34,309
  • Central Texas
Re: 1976 CB750F Restoration
« Reply #84 on: January 31, 2016, 05:52:25 PM »
I left my H1 motor naked when rebuilding, it looks "grungy", especially the cases.

I was planning on powdercoating the H2 motor and Nils basically talked me out of it. And glad he did...


'74 "Big Bang" Honda 750K [836].....'76 Honda 550F.....K3 Park Racer!......and a Bomber!............plus plus plus.........

Offline calj737

  • Really Old Timer ...
  • *******
  • Posts: 21,033
  • I refuse...
Re: 1976 CB750F Restoration
« Reply #85 on: January 31, 2016, 06:39:38 PM »
Its bikes like this one that make me appreciate restored bikes. Love the clean, super tidy motor and carbs. Really beautiful guts on this bike-
'74 550 Build http://forums.sohc4.net/index.php?topic=126401.0
'73 500 Build http://forums.sohc4.net/index.php?topic=132935.0

"Of all tyrannies, a tyranny sincerely exercised for the good of it's victim may be the most oppressive. It may be better to live under robber barons than under omnipotent moral busybodies. The robber baron's cruelty may sometimes sleep, his cupidity may at some point be satiated, but those who torment us for our own good will torment us without end for they do so with the approval of their own conscience." - C.S. Lewis

Offline NobleHops

  • Don ya be callin' me no
  • Expert
  • ****
  • Posts: 1,345
  • Misfit - Tucson, Arizona
Re: 1976 CB750F Restoration
« Reply #86 on: January 31, 2016, 10:00:19 PM »
It was totally my pleasure to have a small part in this excellent build. Thanks for the project John.
Nils Menten * Tucson, Arizona, USA

I have a motorcycle problem.

My build thread: NobleHops makes a 400F pretty for his wife: http://forums.sohc4.net/index.php?topic=131210.0

Offline przjohn

  • Expert
  • ****
  • Posts: 948
Re: 1976 CB750F Restoration
« Reply #87 on: February 07, 2016, 06:33:28 AM »
Yesterday was Wedding Day, the motor got married to the chassis. If you've never done a motor change out on one of these bikes, you haven't experienced what a "Tight Fit" is. I had some good, no, great material to go with that last sentence but, after all, this is a family friendly site.

The idea was to get a couple of guys who will do just about anything for beer to do the monkey work.

I used  Forum Member Dino, (Hack a Week) method of installing the motor. My configuration is slightly different from his but it is basically the same means to an end. An "H" Frame is constructed of 2X4s and strapped to the motor in both planes.


I also took Hondaman's advice from his book and ground off the few MM off the top of the lower right mount, yes, that's how tight this fit is. The grind got painted for corrosion only, you can't even tell it was ground off with the motor in the frame.


One thing I do is to sand off the PC on engine mounting surfaces on the frame that have to mount an engine between them. First, it gets rid of the thick powder coat, and second, there is a good ground now.


My crew at work.


The motor in the frame,


Oh, and these Stainless braided lines are real Peaches to get on too. I thought the ones on The Norton resto were tricky, 2 strokes only have a 1/4" plastic tube with a couple of crappy clamps. Ahhhh, simplicity.


Goal today is to check out the oil system and see if it is working properly, I don't want to hook up carbs and exhaust until I know the oil system is solid.


I like poetry, long walks on the beach, and poking at dead things with a stick.

Offline Stev-o

  • Ain't no
  • Really Old Timer ...
  • *******
  • Posts: 34,309
  • Central Texas
Re: 1976 CB750F Restoration
« Reply #88 on: February 07, 2016, 06:46:10 AM »
Will work for beer!   Good pics. 
'74 "Big Bang" Honda 750K [836].....'76 Honda 550F.....K3 Park Racer!......and a Bomber!............plus plus plus.........

Offline przjohn

  • Expert
  • ****
  • Posts: 948
Re: 1976 CB750F Restoration
« Reply #89 on: February 09, 2016, 07:06:37 AM »
Glad that I took the time to test the oil system. I could not get any oil pressure using the starter motor with the plugs removed. The scavenge pump was moving oil back to the tank but there was no oil making it's way the main galley behind the cylinders where the pressure switch and a gauge I installed reside. The oil pan got dropped and the pump pulled. I put it back into a tank of oil and realized my mistake. I was watching the scavenge section while priming the pump and not the pressure side. I still had a hard time priming the pressure side until I held back the check valve and a big "Blurp" came out. The pump started moving oil and was now primed. Maybe it would have self primed but I wasn't taking any chances.

Scavenge from the pan back to the tank. This is where I thought I was priming the pump when I saw the oil moving through the first time.


If I could read properly and understand simple pictures from a book, I would have realized this is where I wanted to see oil coming from when priming. Holding open the check valve with my finger helped get the air bubble out.


And this was the result after about a minute of cranking. I observed oil moving around on both sides of the top end so that was good news too.


The exhaust got put on too. This is part of the restoration that will not be stock. For one thing NOS Exhausts are made of Unobtainium. The  Kerker Exhaust, along with the low bars were common mods to bikes back in the late 70's and early 80's. Just about all the guys I hung out with back then had those mods on their bikes so I figure the look will be close to period correct. It is starting to look more and more like a motorcycle now. My hope is to have it running with all lights working off a bottle by March. This weekend is The Snow Run Enduro, our Dirt Bike Club's Annual Event, so that will take a little of my weekend time. The wives are very happy it is on Valentine's Day this year. A couple of pics of the exhaust installed,


I like poetry, long walks on the beach, and poking at dead things with a stick.

Offline Jerry Rxman Griffin aka MuthaF'er

  • This MuthaF'er is getting to be a
  • Really Old Timer ...
  • *******
  • Posts: 14,912
  • Bought her new 4/75
Re: 1976 CB750F Restoration
« Reply #90 on: February 09, 2016, 08:35:11 AM »
Moving right along  :)

Suggestion: Hoping you're going to change that rear brace on the Kerker. I cut, bent and fitted my brace to the back side of the rear peg mount. Plenty strong.
As of today 3/13/2012 my original owner 75 CB750F has made it through 3 wives, er EX-wives. Free at last.  ;-)

Offline SOHC4 Cafe Racer Fan

  • Speak up, Whipper-Snapper! I'm a
  • Really Old Timer ...
  • *******
  • Posts: 15,731
  • SOHC/4 Member #1235
Re: 1976 CB750F Restoration
« Reply #91 on: February 09, 2016, 09:13:13 AM »
That Kerker looks great, but I agree that you ought to think about a new strap.  That long reach from the shock is a little bit awkward.
1975 CB550K1 "Blue" Stockish Restomod (http://forums.sohc4.net/index.php?topic=135005.0)
1975 CB550F1 frame/CB650 engine hybrid "The Hot Mess" (http://forums.sohc4.net/index.php/topic,150220.0.html)
2008 Triumph Thruxton (http://forums.sohc4.net/index.php/topic,190956.0.html)
2014 MV Agusta Brutale Dragster 800
2015 Yamaha FZ-09 (http://forums.sohc4.net/index.php/topic,186861.0.html)

"There are some things nobody needs in this world, and a bright-red, hunch-back, warp-speed 900cc cafe racer is one of them — but I want one anyway, and on some days I actually believe I need one.... Being shot out of a cannon will always be better than being squeezed out of a tube. That is why God made fast motorcycles, Bubba." Hunter S. Thompson, Song of the Sausage Creature, Cycle World, March 1995.  (http://www.latexnet.org/~csmith/sausage.html and https://magazine.cycleworld.com/article/1995/3/1/song-of-the-sausage-creature)

Sold/Emeritus
1973 CB750K2 "Bionic Mongrel" (http://forums.sohc4.net/index.php?topic=132734.0) - Sold
1977 CB750K7 "Nine Lives" Restomod (http://forums.sohc4.net/index.php?topic=50490.0) - Sold
2005 RVT1000RR RC51-SP2 "El Diablo" - Sold
2016+ Triumph Thruxton 1200 R (http://forums.sohc4.net/index.php/topic,170198.0.html) - Sold

Offline przjohn

  • Expert
  • ****
  • Posts: 948
Re: 1976 CB750F Restoration
« Reply #92 on: February 09, 2016, 09:43:18 AM »
That's what I'm thinking too. Once I put the passenger pegs on I'm going to look at fabricating a better bracket for it. It kind of reminds of an early '70's motocross bike bracket for the stinger on an expansion chamber.
I like poetry, long walks on the beach, and poking at dead things with a stick.

Offline Stev-o

  • Ain't no
  • Really Old Timer ...
  • *******
  • Posts: 34,309
  • Central Texas
Re: 1976 CB750F Restoration
« Reply #93 on: February 09, 2016, 02:18:31 PM »


Suggestion: Hoping you're going to change that rear brace on the Kerker. I cut, bent and fitted my brace to the back side of the rear peg mount. Plenty strong.

I did the same thing on my K5.   Love Kerkers...but not their stock mount.
'74 "Big Bang" Honda 750K [836].....'76 Honda 550F.....K3 Park Racer!......and a Bomber!............plus plus plus.........

Offline przjohn

  • Expert
  • ****
  • Posts: 948
Re: 1976 CB750F Restoration
« Reply #94 on: February 10, 2016, 04:22:15 PM »
Got the wiring straightened out tonight. All lights, blinkers, horn, and starter circuits are working. The only thing not working, and not hooked up is the signal buzzer, too annoying IMO. Pretty much just about every electrical connection is new as is the harness. There are always a few bugs to be worked out and this bike was no different. Much of the wiring connections are held in this box located on the forward frame,


Most all the wiring changes on this bike revolve around the Left Bar Control Cluster. For some reason new European Model switches are readily available, and not so the US, I guess we just crashed more on the Left side than our friends over the pond and the NOS stock got used up? The difference is the Horn/Passing switch on the Euro model. Easy enough to work around on the new harness and just required snaking a ground to the frame box and a couple of extra connections in the headlight shell, and now I also have a passing light.


I thought I could get the headlight assembled and mounted for a pic of the lights running and that's where fate stepped in, not tonight. I got the new headlight assembled with the new trim ring and new adjuster components, and proceeded to drop it on the floor. When shiny delicate stuff falls on the floor it doesn't just hit and stay, no, it goes for a bouncing ride around the room and then tries to hide under the bench. I should have just been happy enough for a weeknight to have all the bugs worked out of the wiring, but now I am ordering a new ring.

I like poetry, long walks on the beach, and poking at dead things with a stick.

Offline Jerry Rxman Griffin aka MuthaF'er

  • This MuthaF'er is getting to be a
  • Really Old Timer ...
  • *******
  • Posts: 14,912
  • Bought her new 4/75
Re: 1976 CB750F Restoration
« Reply #95 on: February 10, 2016, 04:45:21 PM »
That's what I'm thinking too. Once I put the passenger pegs on I'm going to look at fabricating a better bracket for it. It kind of reminds of an early '70's motocross bike bracket for the stinger on an expansion chamber.

Let me know and I can shoot you a pic of my solution.

The VintageCB750 wire harness works like a champ but those damn connectors are SOOOO tight  ;)  ;D

I like the idea of your passing flasher too! I had hoped to adapt their 73-75K right control and use the headlight on/off by tapping power from the headlight harness' extra brown power female. Apparently the harness is shorter than ours. My next thought was to splice on the ending of one of our broken existing harnesses but I bit the bullet and got a new Honda control. They have made a upgrade/modification to their starter button housing so hopefully that will add some longevity.   
As of today 3/13/2012 my original owner 75 CB750F has made it through 3 wives, er EX-wives. Free at last.  ;-)

Offline przjohn

  • Expert
  • ****
  • Posts: 948
Re: 1976 CB750F Restoration
« Reply #96 on: February 15, 2016, 08:25:27 AM »
Well a big WTF? The new faces have cracked just like the last ones. The only thing I can figure is it is the Loctitie, the screws have very little pressure on them. I have used Loctite before on decal plates and never had this problem. The holes on the plates seem to have closed up around the screws, meaning the screws went right through the holes when they went on but had to screwed out of the holes when taking the plates back off? What else could it be? I am just going to send the whole shebang off to CB750faces and have them do them, and move on to other stuff.


Plan "B" was put into effect and these reproduction units I had will do until I can get the OEM meters straightened out.


Speaking of plan "B" I ended up finding a tank on Ebay and scraping the idea of painting the leaker I soldered after talking it over with The Painter. He got the tank fairly well prepped and I installed the Caswell Liner. It will go back to him Monday for paint.


The Electronic Ignition and new Coils went in too. The coils come with wires and the cylinder numbers already on them.


Clutch cable got shortened and installed for the low bars. I use the Motion Pro Kit for this and have had good luck. It has just about every cable end you could need and will most likely get used again for the throttle cables.


Also got started on the carbs and did some plating and Yellow Chromate on the linkage assembly parts. Of course after all the plating stuff was shut down I realized I forgot the Choke Levers, so they will need to get plated before the carbs can be assembled and mounted. Hopefully, that will be next weekend.


I like poetry, long walks on the beach, and poking at dead things with a stick.

Offline Jerry Rxman Griffin aka MuthaF'er

  • This MuthaF'er is getting to be a
  • Really Old Timer ...
  • *******
  • Posts: 14,912
  • Bought her new 4/75
Re: 1976 CB750F Restoration
« Reply #97 on: February 15, 2016, 08:50:33 AM »
Sooooo close it hurts huh?  ;) Sucks about the face plates!

John, here is the pics of the Kerker mount I rigged up. I don't remember the details about what, why but it will give you an idea of what I was attempting. Pieces from the Kerker kit rigged together or another spare source?? 2 pieces due to the 2 planes and the required bends. Works great.

Speaking of coils if anyone looking in has a pair of the color coded leads that attach to the coils and the main harness and you don't need them I found I only have 1 set for 2 bikes.


« Last Edit: February 15, 2016, 08:54:06 AM by Jerry Rxman Griffin aka MuthaF'er »
As of today 3/13/2012 my original owner 75 CB750F has made it through 3 wives, er EX-wives. Free at last.  ;-)

Offline przjohn

  • Expert
  • ****
  • Posts: 948
Re: 1976 CB750F Restoration
« Reply #98 on: February 15, 2016, 09:35:02 AM »
Thanks Jerry, that gives me just the info I need to make up a bracket. That one looks much less conspicuous than the shock mount one. When you say you need the coil wires, do you mean the primary side wires that are color coded on the coils to the wiring harness? If that is them PM me and you can have the ones I took off as the new coils came with them.
I like poetry, long walks on the beach, and poking at dead things with a stick.

Offline przjohn

  • Expert
  • ****
  • Posts: 948
Re: 1976 CB750F Restoration
« Reply #99 on: February 21, 2016, 01:06:52 PM »
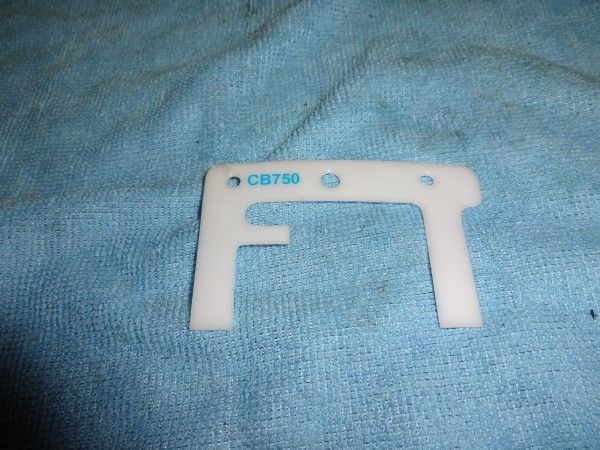
Carburetor Weekend. It don't look like much in the end but it takes time to rebuild, assemble, bench synch, and then mount them up. It would have helped immensely if my float gauge didn't decide to fall between the drawers of the tool chest and hide in the back between the drawers. I walked around for a good half an hour yelling at any drill press, parts washer, buffing machine, or anyone else that would listen, "I know I put that farking thing right in there in the tool box, where is it?  You guys better stop screwing around with me".

A must have,


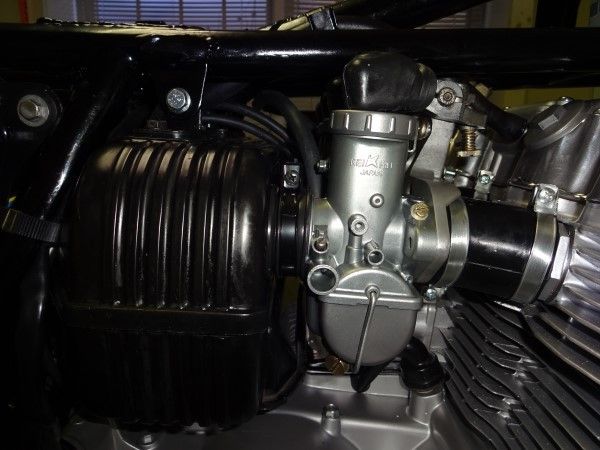
Carbs mounted,
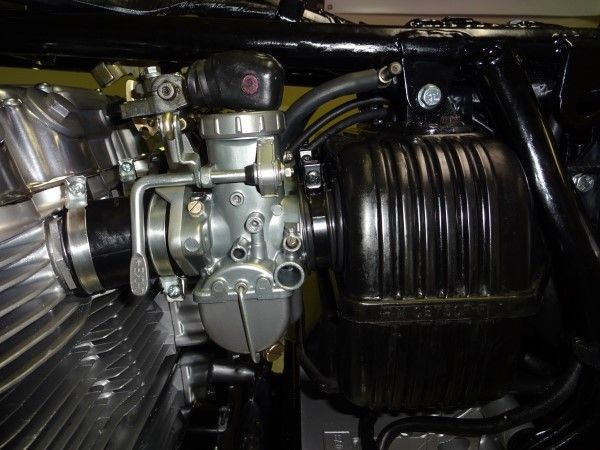


The air box came back remarkably well. It took awhile but it got cleaned really good with the parts washer, soap and water, and then a final Acetone cleaning. After that it was 3 coats of Mothers Black Magic and I have to say it restored quite well for plastic. The Vapor Blasted Carb Look is pretty good, I'm a fan.


The carb cables were next. Once again the Motion Pro Cable End Kit got put to good use. I lay out the cables and then mark where they need to be cut. After that I measure the cable exit length fully extended and cut the cable. The cover is then cut back and the cable to the same fully extended measurement. The cable is then reinserted into the cover and an end slid onto the cable. The end of the cable is then frayed.
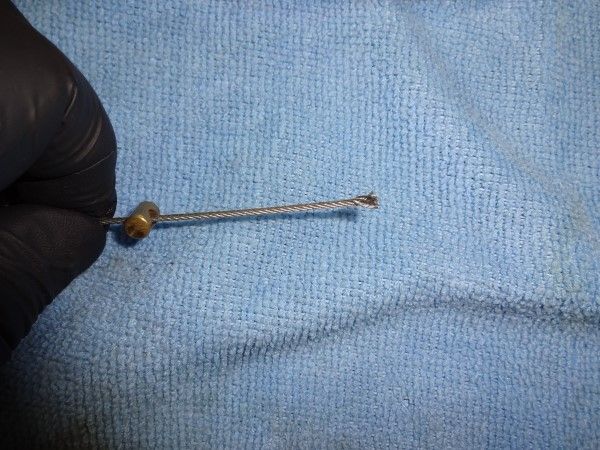


The cable end then gets slid up the cable. The frayed end gets just enough friction in the space at the end of the cable end to hold it in place.
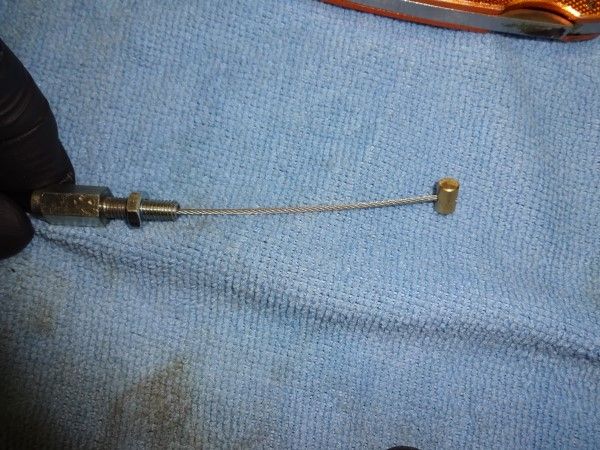


It then goes into the cable pot. Mine is nothing more than a 1-1/4" copper end cap with a small roll of 50/50 solder. Enough solder to do as many cable ends as I will probably do in my lifetime. A simple torch heats it to melting in about 1 minute and the end is dunked after first being fluxed.
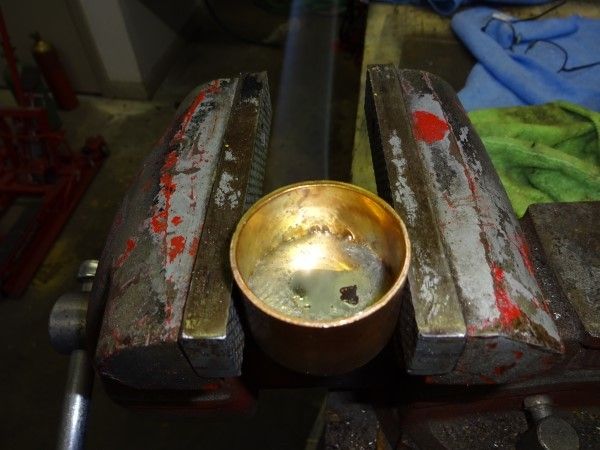


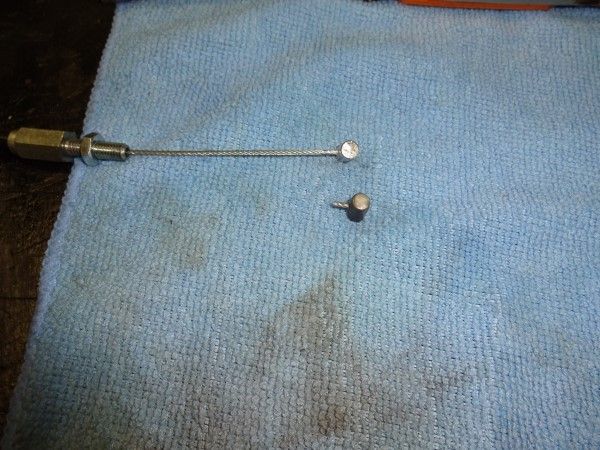
And you end up with this, the cut off end is next to the newly shortened cable for comparison.


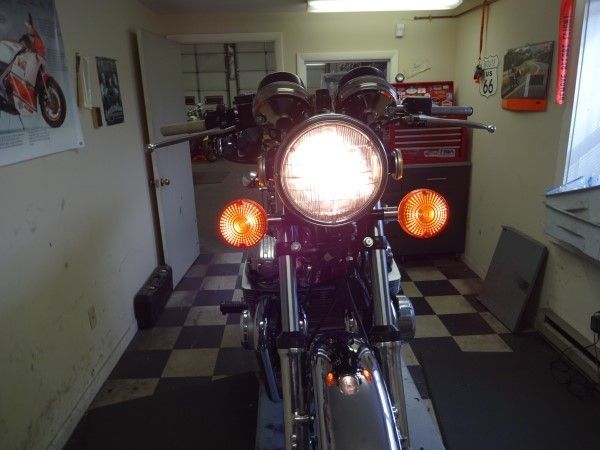
This time the headlight didn't get dropped on the floor and made it's way to the bucket. I always check the operation of everything after the headlight is installed as I have had them pull connectors apart because of the normally tight space. Everything is working as far as lights, horn, signals, ignition, etc.


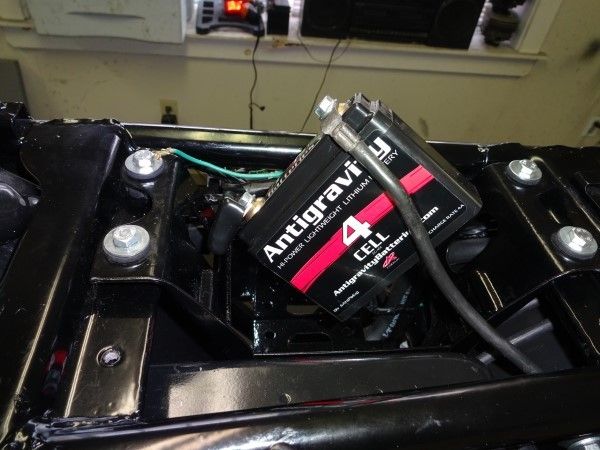
This bike is just about ready to test fire. I am waiting on the new Antigravity battery to get here, and that should be any day now. I have been doing my testing off this dirt bike battery which works OK for lights and stuff but it needs a properly sized battery to start, and I am hoping that will happen this week.


I like poetry, long walks on the beach, and poking at dead things with a stick.