Author Topic: Sandcast #97 restoration  (Read 197255 times)

0 Members and 2 Guests are viewing this topic.

Offline lucky

  • Really Old Timer ...
  • *******
  • Posts: 6,717
Re: Sandcast #97 restoration
« Reply #275 on: October 03, 2011, 12:54:20 pm »
Here are some pics of the oil filter housing.  I’ve never actually seen one in person but I’m pretty sure it’s the real deal.  There are no reinforcing ribs on the inside and the surface definitely appears to have a cast finish.


The outside has imperfections but I don’t think it’s road blast because it’s uniform all around the outside.


The front face definitely has road blast but I think it should clean up.


Is this the real deal?  If it is my list of needed correct parts is getting shorter.  Am I correct that the smooth housings were polished like the engine covers and not painted?  Any tips for restoring?
Thanks for any input.

I would get it micropolished.
It is a process that uses vibration and pins and needles of stainless to clean the oxides from the surface and all the nooks and crannys.

i will post a link.
http://www.paltech1.com/
Scroll down the page and check out the results.
Many cities have this vibratory polishing service available at some machine shops.
« Last Edit: October 03, 2011, 12:57:28 pm by lucky »

Offline markb

  • When I finish my current project I might be a
  • Master
  • *****
  • Posts: 1,615
Re: Sandcast #97 restoration
« Reply #276 on: October 03, 2011, 04:00:23 pm »
How about an update Mark?

Summer progress is measured in miles on the road......not hours in the shop! 


Things are starting to settle down.  My boat's going into storage this week and the riding season in Minnesota is getting close to an end.  I hope to have the two runners (the K0 and the later sandcast) in storage by the end of the week.  Soon I'll be getting back into my "winter" sport.  Of course I picked up another distraction, an H-D Triglide Ultra Classic (sorry guys).  It was ridden by a little old lady on Sundays to church (well kind of).  She bought it in 2009 and put 1400 miles on it and the price was right so I couldn't pass it up.  The best part is my wife likes it (she won't ride on the old Hondas) and this will be my daily rider.  So it looks like we're going to have some nice weather for the next week so I better take advantage of it.  Then I will get organized again and get to it.  I promise.

lucky:
From previous posts, the engine has long been disassembled and cases cleaned.  The broken stud was EDM'ed out.  The crank has been checked out and repaired and I won't be afraid to ride it.  And I will ride it but realistically it won't be ridden much at all.  Too much work will have gone into it.  I will check into the micro polishing.  Thanks for the tip.

 
1969 CB750 sandcast #97 restored - Sold Restoration thread link
1969 CB750 sandcaxt #576 - Sold
1969 CB750 sandcast #1553 - Sold
1969 CB750 sandcast #1990 - Sold
1969 CB750 sandcast #5383 restored - Sold Restoration thread link
1970 CB750 K0 restored - Sold
2010 H-D Tri Glide Ultra Classic (Huh?)

Offline lucky

  • Really Old Timer ...
  • *******
  • Posts: 6,717
Re: Sandcast #97 restoration
« Reply #277 on: October 03, 2011, 04:21:09 pm »
How about an update Mark?

Summer progress is measured in miles on the road......not hours in the shop! 


Things are starting to settle down.  My boat's going into storage this week and the riding season in Minnesota is getting close to an end.  I hope to have the two runners (the K0 and the later sandcast) in storage by the end of the week.  Soon I'll be getting back into my "winter" sport.  Of course I picked up another distraction, an H-D Triglide Ultra Classic (sorry guys).  It was ridden by a little old lady on Sundays to church (well kind of).  She bought it in 2009 and put 1400 miles on it and the price was right so I couldn't pass it up.  The best part is my wife likes it (she won't ride on the old Hondas) and this will be my daily rider.  So it looks like we're going to have some nice weather for the next week so I better take advantage of it.  Then I will get organized again and get to it.  I promise.

lucky:
From previous posts, the engine has long been disassembled and cases cleaned.  The broken stud was EDM'ed out.  The crank has been checked out and repaired and I won't be afraid to ride it.  And I will ride it but realistically it won't be ridden much at all.  Too much work will have gone into it.  I will check into the micro polishing.  Thanks for the tip.


EDM'd (electrical discharge machining), out! wow never thought of that. Very cool.

Offline Damfino

  • Sneaky, Evil, Magnificent Bastard of a
  • Really Old Timer ...
  • *******
  • Posts: 5,216
  • Look at the grouse! NYUK,NYUK,NYUK!
Re: Sandcast #97 restoration
« Reply #278 on: October 03, 2011, 05:25:32 pm »
Of course I picked up another distraction, an H-D Triglide Ultra Classic (sorry guys).  It was ridden by a little old lady on Sundays to church (well kind of).  She bought it in 2009 and put 1400 miles on it and the price was right so I couldn't pass it up.

No need for apologies here Mark, I like the Harley TriGlides. How about a couple of pictures?  ;D
« Last Edit: October 06, 2011, 04:05:17 pm by FranknSpanknBakn »
Your Message Here!
You can still call me 'Schmitty'

1976 CB 750
2014 CB 1100DLX
2015 Harley Davidson Freewheeler


You know, a long time ago being crazy meant something. Nowadays everybody's crazy.
Charles Manson

You've got to watch your back in the SSDB, this is where the clever guys get bored with bike talk and make poo jokes.
I like my women a little big. Natural. Now, they shave this and wax that. It's not right. I love natural women. Big women. This trend in women has to go. Bulomia, anorexia. That's just wrong. You know what will cure that? My special sticky buns. One lick of my sticky buns and your appetite will come right back. ~ RIP Mr. Borgnine  01/24/1917 - 07/08/2012  :'(

Offline markb

  • When I finish my current project I might be a
  • Master
  • *****
  • Posts: 1,615
Re: Sandcast #97 restoration
« Reply #279 on: October 05, 2011, 03:39:26 pm »
OK, here's a pic.  About as far from a sandcast as you can get.  You can see by the leaves on the ground that there isn't many days left.  I'm going to enjoy it while I can.  :)
1969 CB750 sandcast #97 restored - Sold Restoration thread link
1969 CB750 sandcaxt #576 - Sold
1969 CB750 sandcast #1553 - Sold
1969 CB750 sandcast #1990 - Sold
1969 CB750 sandcast #5383 restored - Sold Restoration thread link
1970 CB750 K0 restored - Sold
2010 H-D Tri Glide Ultra Classic (Huh?)

Offline Magpie

  • Old Timer
  • ******
  • Posts: 3,286
Re: Sandcast #97 restoration
« Reply #280 on: October 05, 2011, 05:35:43 pm »
You could tow a sandcast on a trailer to shows with that! nice bike, I like those. Cliff.

Offline markb

  • When I finish my current project I might be a
  • Master
  • *****
  • Posts: 1,615
Re: Sandcast #97 restoration
« Reply #281 on: October 24, 2011, 01:37:24 pm »
OK, so after my summer hiatus, I’m officially back to it.

I’ve spent the last week or more getting things organized and trying to figure out what to do for the alternator cover.  As earlier posts show, it has a crack and some gouges in it.  One way or the other, it has to have some welding done to it.  I decided to experiment with an old valve cover that came off an 11/69 build engine (probably about as close to being the same material as could be).  I had a welder make some welding rods out of the cover and use it to patch a hole that he had drilled into the cover.  It actually turned out pretty good as far as blending in but even with the small diameter rods (1/16” or 1.5 mm) I’m still concerned about getting weld into the lettered area on the cover plus I would have to do a test area on the alternator cover to be sure it would color match.

After a dozen or so phone calls and visiting several shops I came up with some other options.  Two places suggested I just weld the whole lower half over and redo the lettering.  After taking a picture and digitizing it, one guy would make an electrode with the lettering on it and EDM it and the other guy would engrave it.  Both said it would be identical.  OK, so in case I really botch it up I have a backup plan to fix it.

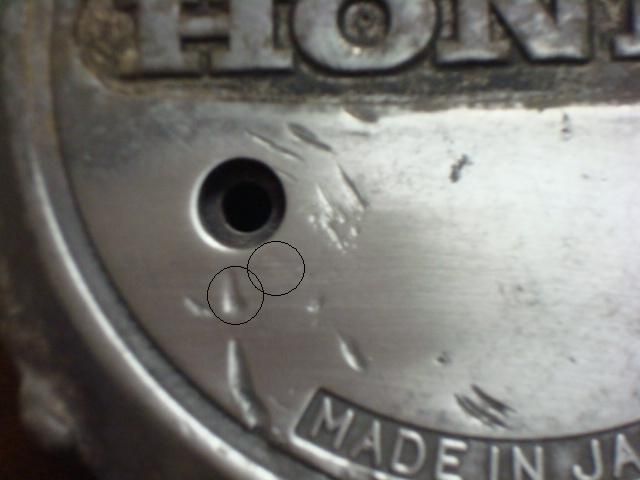
So I also found a guy that does micro welding and mold repair.  For those not familiar with it, you actually look at the work through a microscope and a laser does the welding with a very small diameter wire.  The welder didn’t think the color would match but he did a small test weld and I think it’s pretty close.  I tried taking a pic that shows it but this crappy one is the best I could get.  The left black circle shows a typical gouge and the right circle shows the area where there was a gouge a little smaller than the one that’s circled.  If I hold it just right I can see it from about 6” (15 cm) away but on the bike from a foot (30 cm) away I don’t think you’re going to see it.  You can kind of make it out.  I go for the original brushed look instead of polished and I think that will make it harder to see too.


I think this is the method I’m going to use.  A real plus is there is virtually no heat.  I touched it immediately after he was done welding and it was cold.  I would have left it with him but I’ve got some screws that I want to remove first in case he has to do more repair.  I don’t think I mentioned this in the spring but I had to drill screw heads off to remove the coil.  I didn’t want to, but believe me, I tried everything.  I tried tapping it and using a left-handed screw (better than an Ezy Out I thought, I don't like them) to get them out but they still wouldn't budge


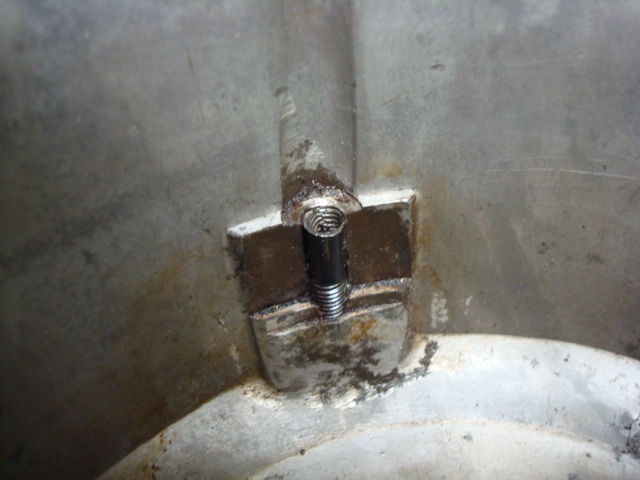
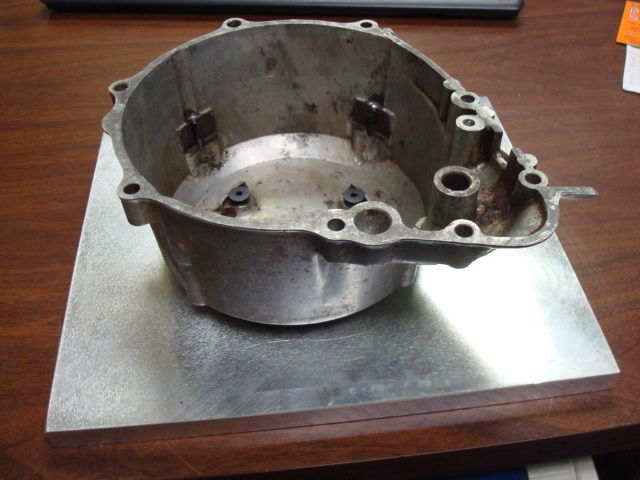
So I mounted the cover on a plate to make it easier to remove the screws.  I’m dropping it off today.  The guy is going to first trying putting a hex hole in the end of the screw with EDM and removing them with an allen wrench.  If that doesn’t work he’ll EDM the screws out.  I should get it back by the end of the week.


After that I’m going to clean it up and try to sand out some of the gouges that aren’t too deep and then drop it off for micro welding.
1969 CB750 sandcast #97 restored - Sold Restoration thread link
1969 CB750 sandcaxt #576 - Sold
1969 CB750 sandcast #1553 - Sold
1969 CB750 sandcast #1990 - Sold
1969 CB750 sandcast #5383 restored - Sold Restoration thread link
1970 CB750 K0 restored - Sold
2010 H-D Tri Glide Ultra Classic (Huh?)

Offline Greggo

  • Somebody's
  • Old Timer
  • ******
  • Posts: 4,164
  • Helmets Save Lives. Period.
Re: Sandcast #97 restoration
« Reply #282 on: October 24, 2011, 04:20:39 pm »
Details Details Details.  I have to believe Soichiro would be proud.

Offline MoMo

  • Really Old Timer ...
  • *******
  • Posts: 8,275
  • Ride like you're invisible
Re: Sandcast #97 restoration
« Reply #283 on: October 24, 2011, 06:31:01 pm »
Good to see you back at it Mark...Larry

Offline markb

  • When I finish my current project I might be a
  • Master
  • *****
  • Posts: 1,615
Re: Sandcast #97 restoration
« Reply #284 on: October 28, 2011, 12:15:46 pm »
I picked up the alternator cover, minus the screws.  It wasn’t as bad as I thought.  They ended up burning a hex hole in the end of the screw and turning them out with an allen wrench.  They still had to use heat but much less invasive than burning the screw out.  I guess I had the right idea with the LH screw but I had torqued it to the point where I though the screw was about to break.  This was better.


1969 CB750 sandcast #97 restored - Sold Restoration thread link
1969 CB750 sandcaxt #576 - Sold
1969 CB750 sandcast #1553 - Sold
1969 CB750 sandcast #1990 - Sold
1969 CB750 sandcast #5383 restored - Sold Restoration thread link
1970 CB750 K0 restored - Sold
2010 H-D Tri Glide Ultra Classic (Huh?)

Offline markb

  • When I finish my current project I might be a
  • Master
  • *****
  • Posts: 1,615
Re: Sandcast #97 restoration
« Reply #285 on: October 30, 2011, 03:12:13 pm »
I should be working on my alternator cover but I decided to plastigage my mains instead.  After remeasuring the crank journals I decided to go with yellow-green-yellow-green-yellow for the bearings.  They ended up all being very close to same.  As you can see in the pic, the one that appeared to have the largest clearance was somewhere between .0015 and .002”, maybe .0017 to .0018”.  Since the standard clearance is supposed to be between .0008-.0018”, I’m on the high side but well within the factory maximum of .0032”.  All the others were maybe .0001-.0002” less.  I suppose I could go green-brown-green-brown-green and tighten them up a little but I think I’m OK with it.  This engine probably won’t get more than a few hundred more miles on it so maybe looser is better.  Although I thought I read somewhere that plastigaging indicates a bit tighter than it really is.  I think I’m still OK with it unless someone has a strong opinion otherwise.


1969 CB750 sandcast #97 restored - Sold Restoration thread link
1969 CB750 sandcaxt #576 - Sold
1969 CB750 sandcast #1553 - Sold
1969 CB750 sandcast #1990 - Sold
1969 CB750 sandcast #5383 restored - Sold Restoration thread link
1970 CB750 K0 restored - Sold
2010 H-D Tri Glide Ultra Classic (Huh?)

Offline bjatwood

  • I never claimed to be an
  • Expert
  • ****
  • Posts: 976
  • 1973 CB750-K3
    • Minbikers Proboards
Re: Sandcast #97 restoration
« Reply #286 on: October 30, 2011, 06:26:09 pm »
Good Read and very informative, subscribed.... ;)
Brian
#24193

I believe that the Finest things are the most thoughtfully made, not the most expensive!
http://minibikers.proboards.com/

Offline CycleRanger

  • No comment about being an
  • Really Old Timer ...
  • *******
  • Posts: 5,366
  • Central Texas Shop Manual Advocate
Re: Sandcast #97 restoration
« Reply #287 on: October 31, 2011, 06:49:44 am »
They ended up burning a hex hole in the end of the screw and turning them out with an allen wrench.

I would love to see that process in action.
Do you have a copy of the Honda Shop Manual or Parts List for your bike? Get one here:
https://www.honda4fun.com/materiale/documentazione-tecnica
CB750K5        '79 XL250s     CL350K3
CB750K3        '76 XS650      '76 CJ360T

Offline lucky

  • Really Old Timer ...
  • *******
  • Posts: 6,717
Re: Sandcast #97 restoration
« Reply #288 on: October 31, 2011, 11:06:51 am »
They ended up burning a hex hole in the end of the screw and turning them out with an allen wrench.

I would love to see that process in action.
You would not be able to see much, as it is done underwater.

Offline kenhan

  • Full Member
  • *
  • Posts: 9
Re: Sandcast #97 restoration
« Reply #289 on: October 31, 2011, 03:10:41 pm »
Hi markb,

Following your amazing restoring project closely!

I´m soon going to check my bearings with plastigage as you did. Is it necessary to also tighten all 6 mm bolts in the block or only the bigger ones for the crank? Any suggestions?

/Ken
1969 CB750 sandcast #5084 Running
1969 CB750 #5128 Running with diecast engine
1970 CB750 next project
1975 K2 (K3-5 don´t exist in Sweden) Runner

Offline markb

  • When I finish my current project I might be a
  • Master
  • *****
  • Posts: 1,615
Re: Sandcast #97 restoration
« Reply #290 on: October 31, 2011, 03:58:20 pm »
You only have to do the ten 8mm ones for the mains.  Just follow the manual for the correct tighteting order and torque.  Good luck!
1969 CB750 sandcast #97 restored - Sold Restoration thread link
1969 CB750 sandcaxt #576 - Sold
1969 CB750 sandcast #1553 - Sold
1969 CB750 sandcast #1990 - Sold
1969 CB750 sandcast #5383 restored - Sold Restoration thread link
1970 CB750 K0 restored - Sold
2010 H-D Tri Glide Ultra Classic (Huh?)

Offline markb

  • When I finish my current project I might be a
  • Master
  • *****
  • Posts: 1,615
Re: Sandcast #97 restoration
« Reply #291 on: November 15, 2011, 08:35:27 am »
I see no comments about my bearing clearance so I guess that’s a good thing.  :)

So I thought I’d made up my mind about doing the micro welding but in second guessing myself I decided to do a little more research.  There are two choices for rods, 4043 and 5356.  I had my welder use those materials on my test cover so I could compare.  Here’s after welding.


Here’s after sanding and polishing.  Not a great job but enough to see results.  It took about 20 shots to get one that showed a difference and you still have to hold it just right to see it but there is a difference.  The 4043 and 5356 look very similar in the picture but the 5356 is definitely shinier.  Between those two the 4043 would be the best choice.  That’s what the micro welder used to test on the alternator cover.  But the area that was welded with rods made from the cover (somewhere in the circle) is barely detectable.  I’m not even sure that I can see it with the naked eye. 


So I am going to have my welder do it with the similar material home-made rods.  He said he would see how it goes and could do most of it but he may want to stay away from the lettering.  I figure at most there are two spots in the narrow band just below the “MADE IN JAPAN” that I could finish with the micro welding where it won’t show.  Here are the rods I made up.  It was hard to make them much smaller than 1mm square because they are very brittle.


I realize I’ve been pretty anal about this cover.  I’ve even been annoying myself but this smooth logo, thin-lipped cover was only used on the first 342 engines.  So I want to get it as good as I can.  The bad part is my welder just took on a big job and won’t be able to get to it for a couple of weeks.  I’ll have to find something else to work on.  Only about a million things to pick from.
1969 CB750 sandcast #97 restored - Sold Restoration thread link
1969 CB750 sandcaxt #576 - Sold
1969 CB750 sandcast #1553 - Sold
1969 CB750 sandcast #1990 - Sold
1969 CB750 sandcast #5383 restored - Sold Restoration thread link
1970 CB750 K0 restored - Sold
2010 H-D Tri Glide Ultra Classic (Huh?)

Offline markb

  • When I finish my current project I might be a
  • Master
  • *****
  • Posts: 1,615
Re: Sandcast #97 restoration
« Reply #292 on: December 12, 2011, 11:14:53 am »
It’s been a while since I posted again but I having been working on it.  I’m still waiting for my welder to do the alternator cover.  In the meantime I have been busy trying to gather and sort all of my parts into their finish category: paint, zinc, chrome, anodize, etc., so I can send them out.  Some of the smaller chrome parts I may try to buy if available because it’s cheaper than trying to rechrome them.  What’s slowing things up is I’m trying to get everything together for #97 and well as most of the parts for #1553 plus a spare engine so basically parts for 2 ½ bikes.  That and I want to drop off the head for some valve guide work and cylinders for honing.
So that brings me up to my current problem.  The cylinder separated cleanly from the case, In other words virtually no gasket stuck to the case, but the gasket on the bottom of the cylinders is kicking my a$$.  It is hard as rock and stuck to the cylinder like it was super glued.  This picture shows my progress after three hours of work, maybe 10% removed.  I’ve tried various solvents, Permatex gasket remover, razor blades and gasket scrapers.  Nothing seems to soften it or get it loose.  I talked to the guy whose going to hone the cylinders and he said he would just sandblast it off.  I’m concerned that may damage the surface.  This is the worst I have ever seen.  Any suggestions?  At the rate I am going it will only be another 27 hours.  ::)

1969 CB750 sandcast #97 restored - Sold Restoration thread link
1969 CB750 sandcaxt #576 - Sold
1969 CB750 sandcast #1553 - Sold
1969 CB750 sandcast #1990 - Sold
1969 CB750 sandcast #5383 restored - Sold Restoration thread link
1970 CB750 K0 restored - Sold
2010 H-D Tri Glide Ultra Classic (Huh?)

Offline Greggo

  • Somebody's
  • Old Timer
  • ******
  • Posts: 4,164
  • Helmets Save Lives. Period.
Re: Sandcast #97 restoration
« Reply #293 on: December 12, 2011, 12:00:45 pm »
Try heatin' it up!

Offline MoMo

  • Really Old Timer ...
  • *******
  • Posts: 8,275
  • Ride like you're invisible
Re: Sandcast #97 restoration
« Reply #294 on: December 12, 2011, 02:41:12 pm »
Mark

One of those plastic wheels that goes on a grinder can do wonders, helped me clear an old, stubborn 500 of gasket material...Larry

Offline Prospect

  • Expert
  • ****
  • Posts: 1,169
Re: Sandcast #97 restoration
« Reply #295 on: December 12, 2011, 05:13:24 pm »
My machine shop boils the hell out of the cases and heads first to remove all the old oil and crud.  I bet that would greatly help to remove that gasket.  Or you could heat it up a bit with a heat gun or ???
« Last Edit: December 12, 2011, 06:10:31 pm by Prospect »
Current Bikes

1969 CB750  Sandcast #256
1971 CB750K1
1972 CB750K1
1975 CB400F
1975 GL1000 Goldwing
1954 Harley Davidson Panhead
1957 Harley Davidson Panhead

Toronto Canada

Offline fastbroshi

  • Puppet
  • Old Timer
  • ******
  • Posts: 2,645
Re: Sandcast #97 restoration
« Reply #296 on: December 12, 2011, 05:25:23 pm »
You could try and stick it in the oven and drop the liners out, giving you the benefit of not having to work around them and all that heat should soften up that gasket. 
Just call me Timmaaaaay!!!

Offline supersports400

  • Hot Shot
  • ***
  • Posts: 270
Re: Sandcast #97 restoration
« Reply #297 on: December 12, 2011, 11:02:51 pm »
Hi,

I know the drill. Don't know why these old bikes have these stubborn gaskets, but i run in them more often on the pre 70 bikes. I use fluids like penetrating oil trying to dissolve the layer between the gasket and cylinder. Sometimes it works, but sometimes it just hard labor to remove them.

Jensen

Offline MasterChief750

  • Detonation
  • Expert
  • ****
  • Posts: 805
Re: Sandcast #97 restoration
« Reply #298 on: December 13, 2011, 12:28:18 pm »
i had great success with my head gasket using chem dip carb cleaner. submerse the gasket in it overnight, scrape off what you can and resoak. the solvent in the chem will evap off. i used kerosene to dilute it. worked eventually
1978 CB750 K - Project Red Headed Step Child
1976 CB750 K - Drag Bike
Some things i know, others i dont.
I AM THE STIG
Sam is THE STIG
he said i can be STIG3 tho

Offline Old Scrambler

  • My CB750K3 has been in 39 States & 5 Provinces
  • Old Timer
  • ******
  • Posts: 3,803
Re: Sandcast #97 restoration
« Reply #299 on: December 13, 2011, 06:04:24 pm »
Mark, good to see your back at it. Sorry about all of the fuss over my suggestion of making welding rods from scrap HONDA materials. It looks to be working just fine.  +1 with the others on heat, boiling, carb-dip and one more............brake cleaner. No No No to grinding, sanding, or blasting on surfaces that require a gasket................although I have used a brass-brush on my Dremil to clean any remaining small specks.
Dennis in Wisconsin
'64 Triumph Cub & '74 Honda CB750 Bonneville Salt Flats AMA Record Holder (6)
CB750 Classic Bonneville Racer thread - http://forums.sohc4.net/index.php/topic,135473.0.html
'63 CL72 Project(s)
'66 CL77 Red
'67 Triumph T100C
'73 750K3 Owned since New
'77 750F2 Cafe Project
2020 ROYAL ENFIELD Himalayan