Author Topic: 1972 CB450 "Supersport" NOW SHE REALLY LIVES!!!!!  (Read 102343 times)

0 Members and 3 Guests are viewing this topic.

Offline hoodellyhoo

  • CB350F
  • Master
  • *****
  • Posts: 1,726
Re: 1972 CB450 "Supersport" Finally, onto Assembly!!!!!
« Reply #100 on: February 10, 2010, 12:17:27 PM »
Looking good! Good louck with the rest of the reassembly
1972 CB350F (Back from the Dead!)- http://forums.sohc4.net/index.php?topic=20822.0
1965? S65 - Coming Eventually!
1972 CB750K2 (father-son project)
1976 CB750K6- (sold) http://forums.sohc4.net/index.php?topic=96859.0
1976 CB750K6 (sold)- http://forums.sohc4.net/index.php?topic=62569.0

Offline dagersh

  • "A country attempting to tax itself into prosperity is akin to a man standing in a bucket attempting to lift that bucket by its handle. - Winston Churchill"
  • Expert
  • ****
  • Posts: 1,010
    • Photos
Re: 1972 CB450 "Supersport" Finally, onto Assembly!!!!!
« Reply #101 on: February 10, 2010, 12:51:26 PM »
Thanks Man!  I have not forgotton about your request regarding the Vibratory Tumblers.  I needed one with a larger mouth opening, so I bought a Heavy Duty model from Eastwood, along with their dry-shine media.  The results amazing, their Dry-Shine media does really well.  I took apart all the footpegs and left the metal pieces in for about 48 hours, and even the springs look brand new.  This is great stuff!
1962 CA95
1966 Black Bomber
1966 CA77 Dream
1967 Superhawk
1970 CB750K0
1972 CL350
1972 CB450/500 Custom
1972 CB500K1
1975 CB550F
1976 CB400F
1975 CB750 Future Restoration
1976 CB750K6
1976 CB750F
1976 GL1000


1968 Suzuki T500 Cobra
1990 BMW K1
2001 'Busa
2003 RC 51
Bunch of Guzzi's

http://www.sohc4.us/gallery/v/members/personal/dagersh/

Offline dagersh

  • "A country attempting to tax itself into prosperity is akin to a man standing in a bucket attempting to lift that bucket by its handle. - Winston Churchill"
  • Expert
  • ****
  • Posts: 1,010
    • Photos
Re: 1972 CB450 "Supersport" Finally, onto Assembly!!!!!
« Reply #102 on: February 17, 2010, 11:49:01 AM »
Wow, I got a lot done over the holiday weekend.  However, for the 15 steps I took forward, I dropped back 10 when the Cam Chain fell back into the crankcase.

To say I am frustrated is a major understatement…

Anyways, looks like I will have to tear everything back down again.    Unless, someone can give me another option (hopefully, please, pretty please?)

I did document everything I did up to that point though, so here goes.

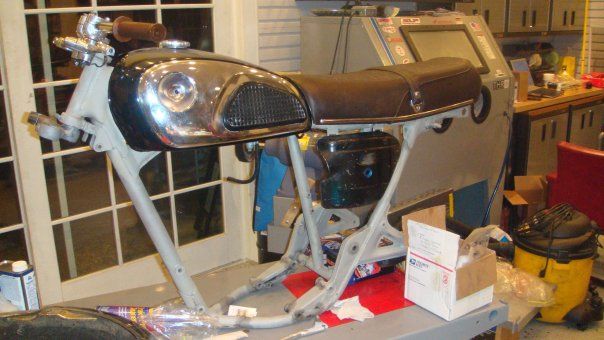
I did get my frame back from the blaster, and at some point I am going to have to weld up new attachment points for the 550F seat .  Uh, I should mention that I have to learn how to weld first!!! 

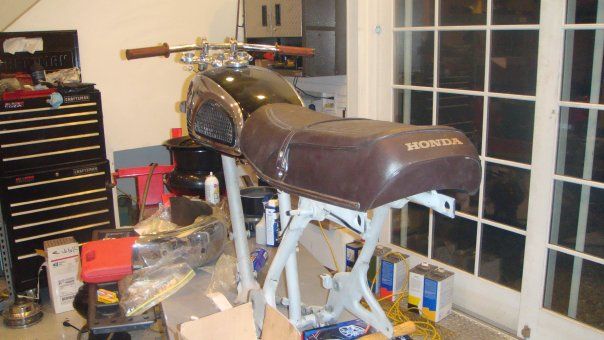
I did want to see a little concept of where I was heading, so here is a little tease
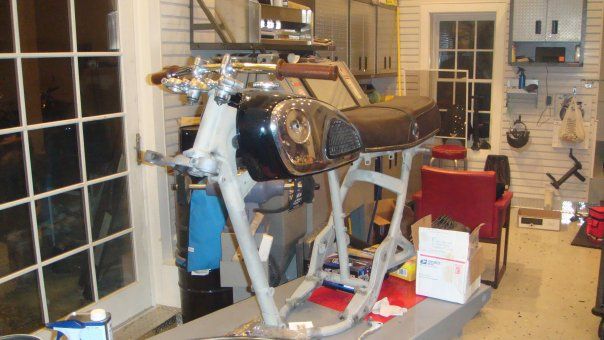


Last update, I had installed the pistons on the cranks.  I had a 1-piece ring compressor, but that clearly would not do the job.  I completely forgot about the Hose Clamp option, and when I did remember, I did not have one that would work.  So my first step was to take the stock piston down to the auto parts store and find a hose clamp that would comfortably fit round it.  I say comfortably because the new pistons are oversized, and I wanted to make sure I had enough room to account for the difference in size.

I was then able to use the hose clamp (HC) to compress the rings, one at a time and methodically insert the pistons into the cylinders.  This is a task I have been sweating over in my mind for a long time, and I was very pleased to see how easy it actually is to do.  I did have a second pair of hands to assist me, so that also made it easier as well.  Due to the hands on nature of this process, I really could not document it very well with the camera, so I apologize for the following rambling explanation!

Make sure that you have generously lubed the inside of the cylinders as well as the pistons themselves.  The HC needs to slide down the piston so that the rings can expand and make good contact with the cylinder walls.  You cannot use too much lube!

I fed the Cam Chain through the Cylinder Block and secured it with wire ties to wherever I could on the crankcase – this is very, very important!!!!!!!

The key to this process is to use the hose clamp to compress the rings.  You start by focusing on the top ring.  Once the ring is inside the cylinder skirt, you loosen the HC enough so that you can slide it down the piston.  If you did it right, the top ring will be seated inside the cylinder wall.  I then inserted the piston until the 2nd ring was just below the cylinder skirt.  Again, I used the HC to compress that ring and get it seated in the cylinder, loosened the HC and slid it down to make sure the 2nd ring was inside the cylinder.  And of course then on to the last set rings, the same process again. 

I then moved to the other piston, and got that in the cylinder using the same steps.  Soon enough, the pistons were seated in the cylinders, and all was good in my world…  for the time being.

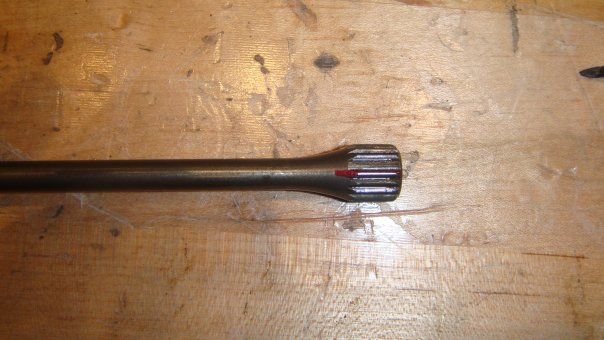
As this is an educational project for me, I wanted to use a piece of Hondaman’s advice on hopping up the engine.  The CB450, does not use valve springs.  Instead the valve train is driven by a torsion bar assembly.  Hondaman recommends increasing the closing pressure on the valves by setting the torsion bars one spline tighter than stock.  Everything is keyed for proper alignment, so I would have to grind off one spline to get to the tighter setting.

As always, pics speak much louder than my words…

Here is the torsion bar
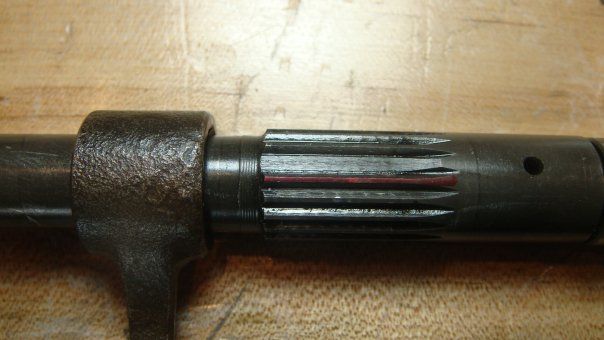


The spline marked in red is the one that will be ground off.  You can see that there is a space “above” that spline – that is the key, which corresponds to splines on the outer sleeve.  Honda’s parts fiche only refers to the entire assembly, so I am not sure what to call the individual parts.  The “Spring Assembly Torsion Bars” are #10 and #11 on the following diagram.


I used a small grinding attachment on my Dremel and had at it
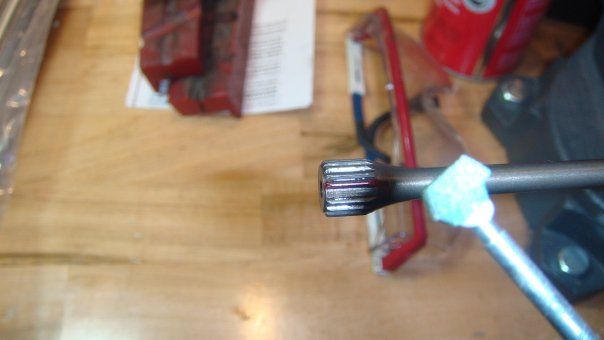


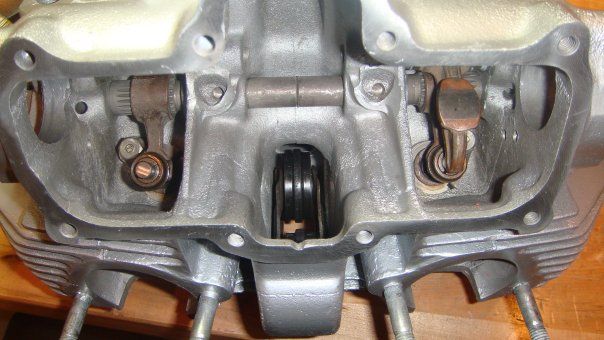
Here is a comparison of the difference between the positions.  Notice the Oil Galleys line up on the stock setting and are slightly offset on the new tighter setting.
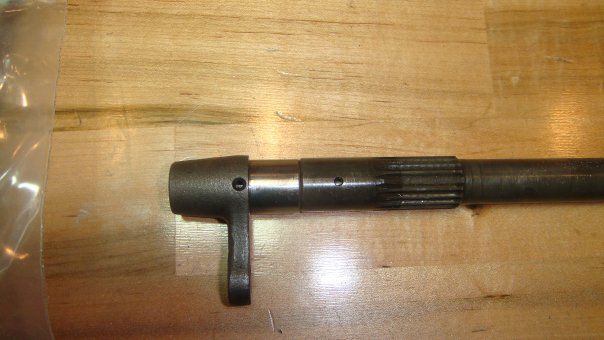


Stock
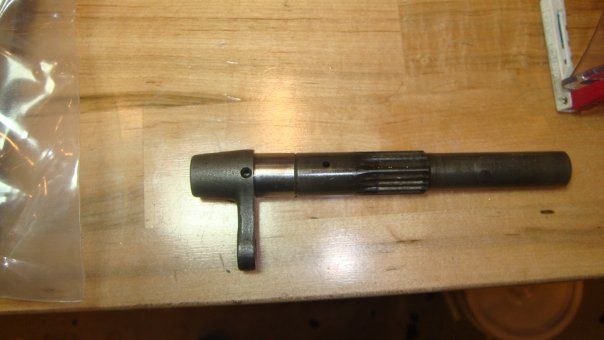


1 Spline tighter


The Torsion Bar Assemblies installed in the head, with the Cam Followers installed.
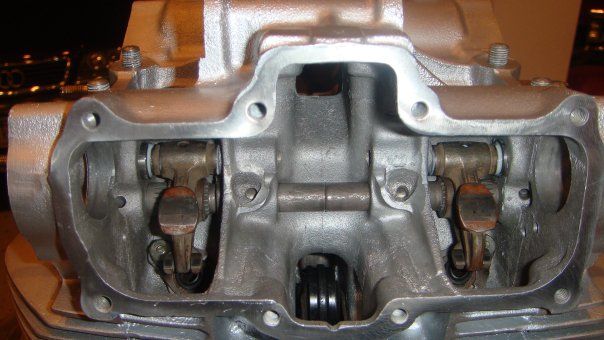


Exhaust
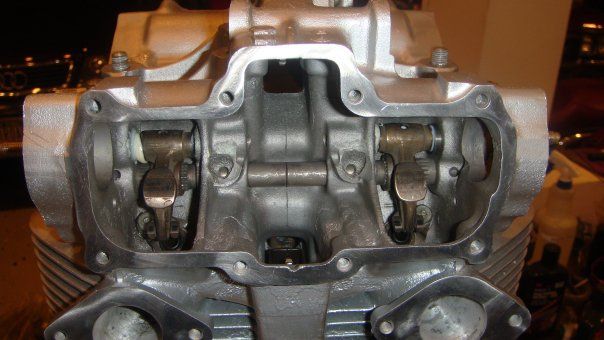


Intake:


Alright, making serious progress, it’s now time for the valves to be installed.  Getting my fingers into the head in order to install the valve keepers was an exercise in futility.  I tried to use a straight pick with grease to install the keepers, but the grease would keep pulling them back out again.  My buddy suggested the following set-up
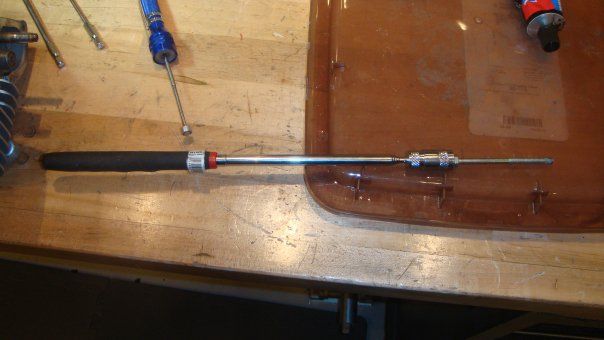


All it is, is a retractable magnet with a long bolt on the end of it.  The bolt is magnetized, and will hold the keeper very well.  I would then put the keeper in place, and then remove the magnet from the bolt and, voila, the keeper stayed put.  Lickety-split, I had the valves installed!  Now I am cooking!!!!
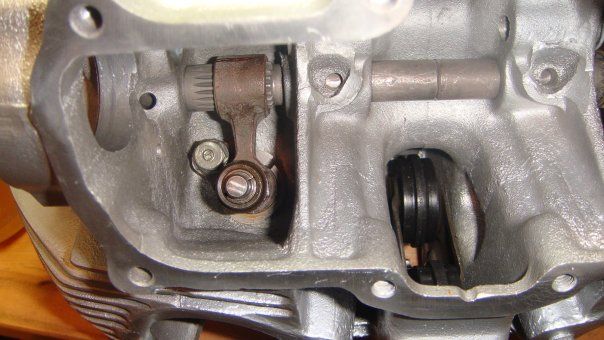


Wow, I am ready to install the head!  But, I decided to tackle some little odds and ends first…

I polished up the starter with a fine Scotchbrite Rock-lok on my air rotary tool.  Cam out nice, and I installed it and the starter chain and sprocket.
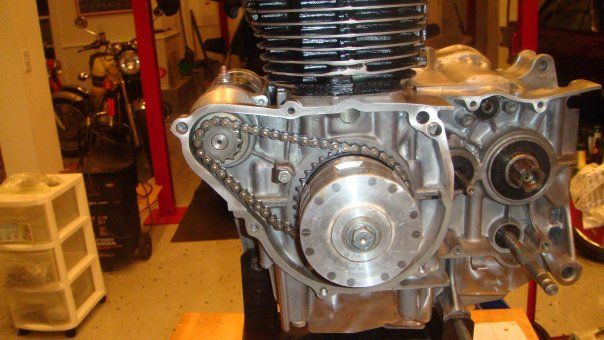


That done, I installed some seals around the various points of potential oil leaks – i.e the sprocket carrier and kick starter shaft.  For some reason, I was hesitant to install the head…

So onto the fork seals!


I cleaned up the seal surface with some Scotchbrite (this is the before picture)
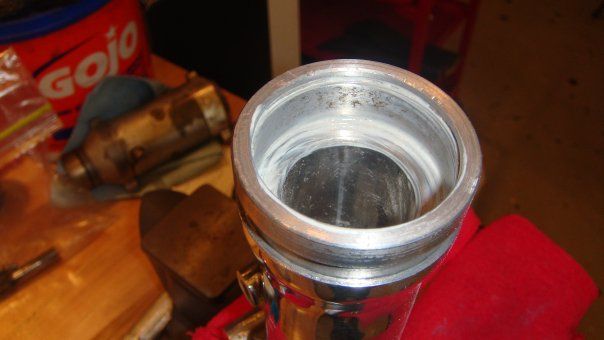


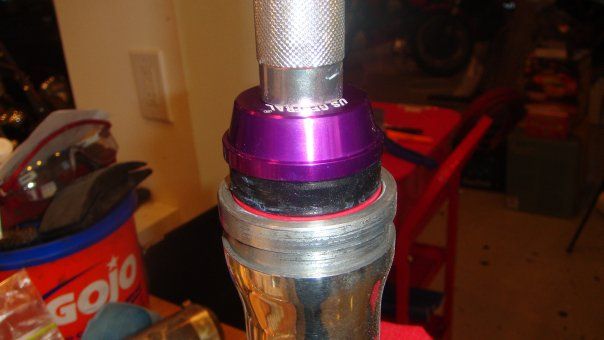
Here is the All Balls fork seal.  Looking at the cross section on the box, I determined that this is the air side (Oil Side is down)  ****Important – this is incorrect!!!!  It is upside down!!!!!****
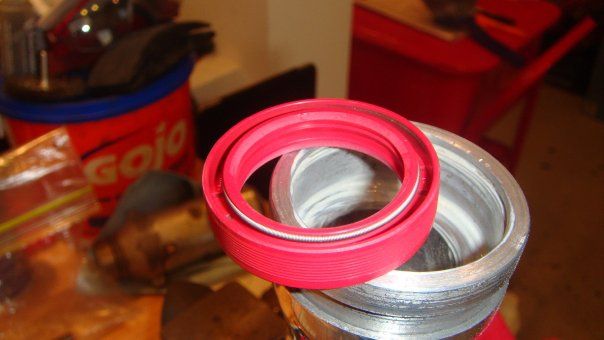


I lightly pressed in the seal with my fingers, making sure to keep everything level so as not to deform the seal at all
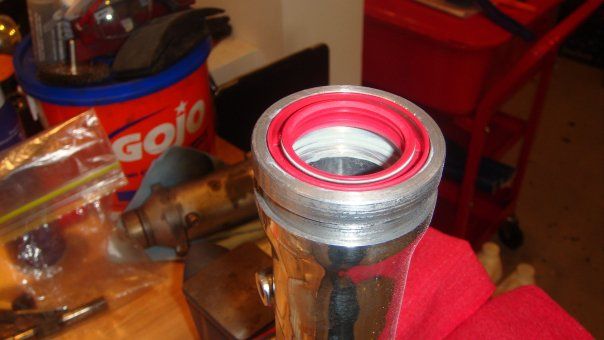


I used the oil seal as a countersink for the new seal
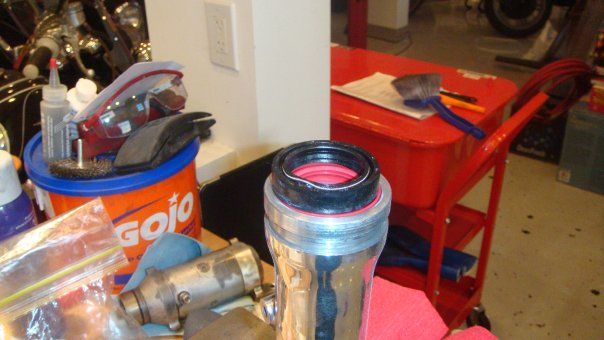


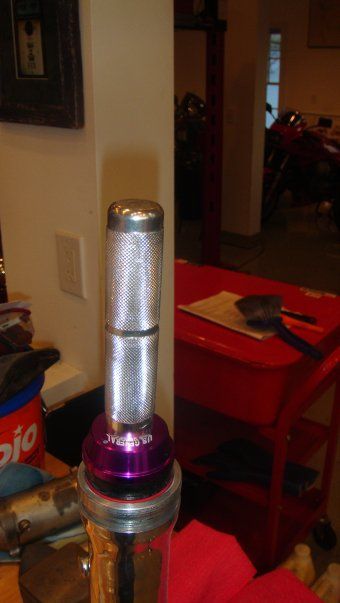
And used my seal driver to seat the new seal in the fork leg


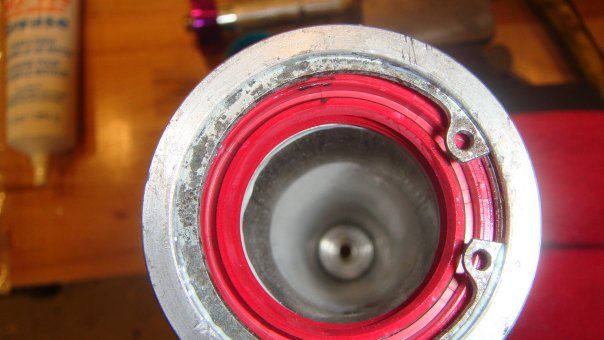
And here she is with the circlip installed.


No ATF, so I stopped there….  I guess on to the head again…


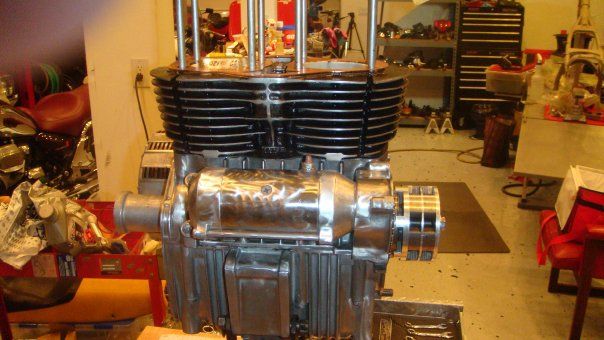
The head, on the engine!!!!
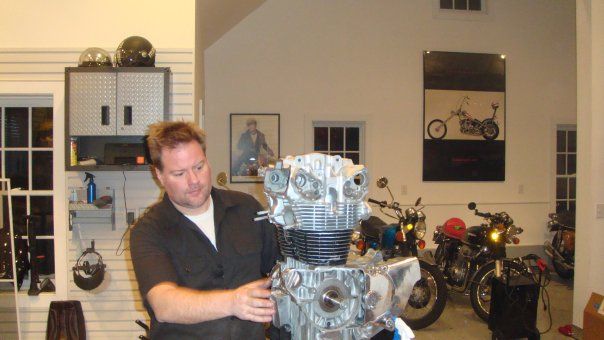


F({K!!!!!!!!!!!!!!!  The A$$ Rape Fairy then decided to come screaming through my own little version of paradise….

I dropped the Cam Chain into the crankcase!!!!!!!!!!!!!!

Here is how the engine sits now.
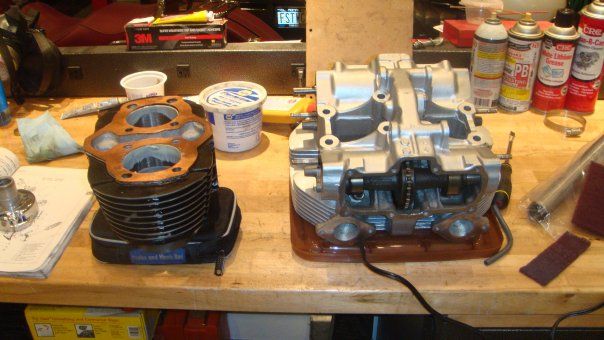


Any thoughts on how not to tear the cases apart are most welcome…..
« Last Edit: December 18, 2013, 02:38:40 PM by dagersh »
1962 CA95
1966 Black Bomber
1966 CA77 Dream
1967 Superhawk
1970 CB750K0
1972 CL350
1972 CB450/500 Custom
1972 CB500K1
1975 CB550F
1976 CB400F
1975 CB750 Future Restoration
1976 CB750K6
1976 CB750F
1976 GL1000


1968 Suzuki T500 Cobra
1990 BMW K1
2001 'Busa
2003 RC 51
Bunch of Guzzi's

http://www.sohc4.us/gallery/v/members/personal/dagersh/

Offline haill

  • Hot Shot
  • ***
  • Posts: 319
Re: 1972 CB450 "Supersport" Who ordered the AR Fairy to my garage?????
« Reply #103 on: February 17, 2010, 05:47:55 PM »
can't you just tip the motor upside down and let gravity do the work.
that or your magnet tool which you used early for the valves?

Offline fastbroshi

  • Puppet
  • Old Timer
  • ******
  • Posts: 2,645
Re: 1972 CB450 "Supersport" Who ordered the AR Fairy to my garage?????
« Reply #104 on: February 17, 2010, 06:24:32 PM »
+1
Just call me Timmaaaaay!!!

Offline dagersh

  • "A country attempting to tax itself into prosperity is akin to a man standing in a bucket attempting to lift that bucket by its handle. - Winston Churchill"
  • Expert
  • ****
  • Posts: 1,010
    • Photos
Re: 1972 CB450 "Supersport" Who ordered the AR Fairy to my garage?????
« Reply #105 on: February 18, 2010, 09:21:57 AM »
I got the chain out, but how do I get it back in w/o splitting the cases?
1962 CA95
1966 Black Bomber
1966 CA77 Dream
1967 Superhawk
1970 CB750K0
1972 CL350
1972 CB450/500 Custom
1972 CB500K1
1975 CB550F
1976 CB400F
1975 CB750 Future Restoration
1976 CB750K6
1976 CB750F
1976 GL1000


1968 Suzuki T500 Cobra
1990 BMW K1
2001 'Busa
2003 RC 51
Bunch of Guzzi's

http://www.sohc4.us/gallery/v/members/personal/dagersh/

Offline Slams77

  • Enthusiast
  • **
  • Posts: 162
  • Naturally Aspirated
Re: 1972 CB450 "Supersport" Who ordered the AR Fairy to my garage?????
« Reply #106 on: February 18, 2010, 11:40:07 AM »
I got the chain out, but how do I get it back in w/o splitting the cases?
I was going to suggest the above, turning the engine upside down or the telescoping magnet to get it out.  Maybe use some fish tape/wire to get it back in?  looking good by the way.

Offline dagersh

  • "A country attempting to tax itself into prosperity is akin to a man standing in a bucket attempting to lift that bucket by its handle. - Winston Churchill"
  • Expert
  • ****
  • Posts: 1,010
    • Photos
Re: 1972 CB450 "Supersport" Who ordered the AR Fairy to my garage?????
« Reply #107 on: February 18, 2010, 11:55:15 AM »
Thanks Slams.  I was thinking the same thing.  It is pretty tight in there.  But maybe if I can get up through the oil drain I can work it out.
1962 CA95
1966 Black Bomber
1966 CA77 Dream
1967 Superhawk
1970 CB750K0
1972 CL350
1972 CB450/500 Custom
1972 CB500K1
1975 CB550F
1976 CB400F
1975 CB750 Future Restoration
1976 CB750K6
1976 CB750F
1976 GL1000


1968 Suzuki T500 Cobra
1990 BMW K1
2001 'Busa
2003 RC 51
Bunch of Guzzi's

http://www.sohc4.us/gallery/v/members/personal/dagersh/

Offline dagersh

  • "A country attempting to tax itself into prosperity is akin to a man standing in a bucket attempting to lift that bucket by its handle. - Winston Churchill"
  • Expert
  • ****
  • Posts: 1,010
    • Photos
Re: 1972 CB450 "Supersport" Who ordered the AR Fairy to my garage?????
« Reply #108 on: February 24, 2010, 08:12:18 PM »
My progress is becoming a bit ADD in nature, as I have been bouncing around a bit.

I was able to reroute the Cam Chain without taking the crankcase apart.  My buddy Tony and I fashioned hooks from wire, and after putting the crankcase on its side, we were able to fish the chain back into position.  So we then again installed the cylinder and then the head, making very sure to keep good control of the Cam Chain.

Once the head was on, it was time to install the Cam Shafts.  This turned out to be a major problem.  No matter how I articulated the shafts, I could not line them up in what I thought was the right position.  After an email to Hondaman, I learned that what I thought was the timing mark on the Cam Shaft, is actually nothing.  I now have to go back and study the camshafts closely to see where the actual timing marks are, and separate them from the various casting marks on the shafts. If anyone has any ideas for me here, I am all ears.  I will post close-up of the marks on the Cam Shafts this weekend….

Anyways, because we all like pictures:


After giving up on doing the timing, and losing an O-ring, I decided to move on to lacing up my new rims and spokes to the original, now polished, wheel hubs.

Again, this is something I have never done, and I was game to try it.  So, I searched out Jonsey’s awesome Ho-to Write-up in the FAQ’s ( http://forums.sohc4.net/index.php?topic=368.0 ) and went to town.  If you want to do learn to lace your wheels, start with his tutorial.  I am going to make some suggestions to add to the write-up, only because some things were a little unclear to me.  Otherwise, his write-up is a must have for this task.

In the following pictures, you will see me switching between the front and rear wheels.  I did not build them this way, I just kind of took pictures as I learned where potentially confusing points and concepts were ran into.

With our stock SOHC wheels (and fortunately, the Cb450 wheels, as they are identical), both the front and rear are laced with 40 spokes.  So in a correct kit, you will have 20 “overs” and 20 “unders”.  Over and under refers to how the shaft of the spoke lies over the wheel hub as you are looking down onto it. The “over” spokes will have almost a 90 degree bend, whereas the “under” spokes don’t quite bend over that far.  It is really easy to spot when they are side by side.

Like Jonsey, I started with my “unders”.  Because my spokes are little thicker than stock, I found it easier to install 10 on the first side I was dealing with.  Since there are 10 “unders”, and 20 holes in the wheel hub (on the side we are working on), I put 1 “under” in every other hole.

 You will see blue tape marking the “keyhole”, which is the valve hole in the rim.  This is very important, as it give you a firm starting place.  It is important to remember, whenever counting your holes/spokes, the keyhole is never counted!!!!


Now, as I said before, since there are 40 holes/spokes per wheel, we are going to count every 4 holes, and at every 4th hole, the type of spoke we are working with in that step will be installed (laced).  From our keyhole, I am going to count 4 holes in a counterclockwise direction to install my 1st spoke.  I also lined up the Wheel Hub so that one of the spokes is directly above the keyhole.  This will be important, as it will help determine where we start on the other side.


Here is the first spoke laced in.


Now the second spoke…

Notice, that a spoke goes in every 4th hole all the way around.  I only tightened the nipples onto the spokes 4 turns to keep everything aligned.  Tighten up the hub so that all the spoke nipples are flush with outside of the rim.  If they will not all get flush, you have mis-laced a spoke, and your pattern of every 4th hole is off.

Once that is done, flip the wheel over, and repeat the steps above, working counterclockwise.  And when you are done, make sure the hub will tighten, and the spoke nipples all can be made flush with the rim.


Onto the “overs”.  The next spokes in are run “up” through the wheel hub and laced so that the spoke shafts run on top of the hub’s edge.  The holes that are left on the rim should all run in one direction.  To see this, check by inserting a nipple into the hole.  I am using Sun rims, which do not have a protruding “dimple” like the stock rims.  Either way, the direction of the hole will tell you how the spokes will run.  The most important thing to remember, is that you should never have to force a spoke into a hole.  In most cases, you will have to insert the nipple to meet the spoke.  The position of the hub should be flexible enough, that you can move it in to a position where the   spokeee meets the hole.  If not, there is something that needs to be checked.  At this point refer back to Jonesey’s article…..

The finished product – sans truing….


The front wheel

And now for something completely different…


Bella!!!!!  Did you drink all my Beer?


Where is my TV show??????

I would say more next week, but I am going SKIING!!!!!  3 – 5’ in VT!!!!!!!

SEEEEEE YAAAA!
1962 CA95
1966 Black Bomber
1966 CA77 Dream
1967 Superhawk
1970 CB750K0
1972 CL350
1972 CB450/500 Custom
1972 CB500K1
1975 CB550F
1976 CB400F
1975 CB750 Future Restoration
1976 CB750K6
1976 CB750F
1976 GL1000


1968 Suzuki T500 Cobra
1990 BMW K1
2001 'Busa
2003 RC 51
Bunch of Guzzi's

http://www.sohc4.us/gallery/v/members/personal/dagersh/

Offline Slams77

  • Enthusiast
  • **
  • Posts: 162
  • Naturally Aspirated
Re: 1972 CB450 "Supersport" Who ordered the AR Fairy to my garage?????
« Reply #109 on: February 24, 2010, 08:41:46 PM »
Great stuff as always dagersh.  Glad you were able to get the cam chain w/o splitting the cases.

Offline dagersh

  • "A country attempting to tax itself into prosperity is akin to a man standing in a bucket attempting to lift that bucket by its handle. - Winston Churchill"
  • Expert
  • ****
  • Posts: 1,010
    • Photos
Re: 1972 CB450 "Supersport" Who ordered the AR Fairy to my garage?????
« Reply #110 on: February 24, 2010, 08:47:17 PM »
Thanks Slams! I will hopefully be able to document an answer regarding the timing marks.  But first, I need some face shots of POW!

How goes your build?


1962 CA95
1966 Black Bomber
1966 CA77 Dream
1967 Superhawk
1970 CB750K0
1972 CL350
1972 CB450/500 Custom
1972 CB500K1
1975 CB550F
1976 CB400F
1975 CB750 Future Restoration
1976 CB750K6
1976 CB750F
1976 GL1000


1968 Suzuki T500 Cobra
1990 BMW K1
2001 'Busa
2003 RC 51
Bunch of Guzzi's

http://www.sohc4.us/gallery/v/members/personal/dagersh/

Offline Slams77

  • Enthusiast
  • **
  • Posts: 162
  • Naturally Aspirated
Re: 1972 CB450 "Supersport" Who ordered the AR Fairy to my garage?????
« Reply #111 on: February 24, 2010, 09:04:53 PM »
Thanks Slams! I will hopefully be able to document an answer regarding the timing marks.  But first, I need some face shots of POW!

How goes your build?


I'm juggling between my CB450 and my CB400.  The 400 is complete and I would pretty much just be removing/replacing parts for weight reduction and performance, while the 450 isn't running and would require more involved work.  I'm kinda leaning towards the 400 since I would be able to have it ready to ride hopefully by this summer. 

Offline dagersh

  • "A country attempting to tax itself into prosperity is akin to a man standing in a bucket attempting to lift that bucket by its handle. - Winston Churchill"
  • Expert
  • ****
  • Posts: 1,010
    • Photos
Re: 1972 CB450 "Supersport" Who ordered the AR Fairy to my garage?????
« Reply #112 on: February 24, 2010, 09:16:37 PM »
Git 'er Done!
1962 CA95
1966 Black Bomber
1966 CA77 Dream
1967 Superhawk
1970 CB750K0
1972 CL350
1972 CB450/500 Custom
1972 CB500K1
1975 CB550F
1976 CB400F
1975 CB750 Future Restoration
1976 CB750K6
1976 CB750F
1976 GL1000


1968 Suzuki T500 Cobra
1990 BMW K1
2001 'Busa
2003 RC 51
Bunch of Guzzi's

http://www.sohc4.us/gallery/v/members/personal/dagersh/

Offline greasy j

  • lanesplitting
  • Expert
  • ****
  • Posts: 853
  • non serviam
    • Dimale Painting & Restoration
Re: 1972 CB450 "Supersport" A bit more frustration and how to lace spokes...
« Reply #113 on: February 26, 2010, 09:29:44 AM »
great job! love having lots of pics. I have a 450 also, but the engine is unsalvageable. I have a bunch of random parts if you need anything. just pay shipping and you can have whatev you need. I dig that these bikes have metal sidecovers. I ended up painting the tank and covers to match with exposed bare metal, and sold them to someone else.

I wish people would send me pics back of the tanks and whatnot on their bike. I saw one tank I painted at a bike show! surprised me.

check em out: (I've posted this pic before in other threads, but I just love the way these came out!)

Offline Magpie

  • Old Timer
  • ******
  • Posts: 3,317
Re: 1972 CB450 "Supersport" A bit more frustration and how to lace spokes...
« Reply #114 on: February 26, 2010, 11:51:11 AM »
Nice job! Are those Honda spokes or after market ones? They look good!
Cliff.

Offline dagersh

  • "A country attempting to tax itself into prosperity is akin to a man standing in a bucket attempting to lift that bucket by its handle. - Winston Churchill"
  • Expert
  • ****
  • Posts: 1,010
    • Photos
Re: 1972 CB450 "Supersport" A bit more frustration and how to lace spokes...
« Reply #115 on: February 27, 2010, 09:33:32 AM »
Greasy,

Gorgeous work!  Those look great with the exposed metal. 

Cliff,

The wheels and spokes are all from Buchannan's.  The Spokes are the heavier guage.  If I were to do it again, I would get the regular guage, as manhandling the thicker ones through the hub openings led to some scratches.  Although, I guess you could widen the openings a bit too....  just thought of that one.

Gersh
1962 CA95
1966 Black Bomber
1966 CA77 Dream
1967 Superhawk
1970 CB750K0
1972 CL350
1972 CB450/500 Custom
1972 CB500K1
1975 CB550F
1976 CB400F
1975 CB750 Future Restoration
1976 CB750K6
1976 CB750F
1976 GL1000


1968 Suzuki T500 Cobra
1990 BMW K1
2001 'Busa
2003 RC 51
Bunch of Guzzi's

http://www.sohc4.us/gallery/v/members/personal/dagersh/

Offline HondaMan

  • Someone took this pic of me before I became a
  • Really Old Timer ...
  • *******
  • Posts: 13,957
  • ...not my choice, I was nicknamed...
    • Getting 'em Back on the Road
Re: 1972 CB450 "Supersport" Finally, onto Assembly!!!!!
« Reply #116 on: February 27, 2010, 11:08:14 AM »

Here is the All Balls fork seal.  Looking at the cross section on the box, I determined that this is the air side (Oil Side is down)


I lightly pressed in the seal with my fingers, making sure to keep everything level so as not to deform the seal at all


Uh, oh...  :-\
See SOHC4shop@gmail.com for info about the gadgets I make for these bikes.

The demons are repulsed when a man does good. Use that.
Blood is thicker than water, but motor oil is thicker yet...so, don't mess with my SOHC4, or I might have to hurt you.
Hondaman's creed: "Bikers are family. Treat them accordingly."

Link to Hondaman Ignition: http://forums.sohc4.net/index.php?topic=67543.0

Link to My CB750 Book: https://www.lulu.com/search?adult_audience_rating=00&page=1&pageSize=10&q=my+cb750+book

Link to website: www.SOHC4shop.com

Offline greasy j

  • lanesplitting
  • Expert
  • ****
  • Posts: 853
  • non serviam
    • Dimale Painting & Restoration
Re: 1972 CB450 "Supersport" A bit more frustration and how to lace spokes...
« Reply #117 on: February 27, 2010, 01:43:39 PM »
why'd you say uh oh? is that wrong?

Offline fastbroshi

  • Puppet
  • Old Timer
  • ******
  • Posts: 2,645
Re: 1972 CB450 "Supersport" A bit more frustration and how to lace spokes...
« Reply #118 on: February 27, 2010, 09:03:25 PM »
Are they upside down?
Just call me Timmaaaaay!!!

Offline dagersh

  • "A country attempting to tax itself into prosperity is akin to a man standing in a bucket attempting to lift that bucket by its handle. - Winston Churchill"
  • Expert
  • ****
  • Posts: 1,010
    • Photos
Re: 1972 CB450 "Supersport" A bit more frustration and how to lace spokes...
« Reply #119 on: February 27, 2010, 10:16:28 PM »
Wow,

Just saw this, are they upside down????????  Not that I would be shocked!  And, its easily fixed, with some hot water and careful prying.....  I hope....

Hondaman, I am all ears!

Gersh
1962 CA95
1966 Black Bomber
1966 CA77 Dream
1967 Superhawk
1970 CB750K0
1972 CL350
1972 CB450/500 Custom
1972 CB500K1
1975 CB550F
1976 CB400F
1975 CB750 Future Restoration
1976 CB750K6
1976 CB750F
1976 GL1000


1968 Suzuki T500 Cobra
1990 BMW K1
2001 'Busa
2003 RC 51
Bunch of Guzzi's

http://www.sohc4.us/gallery/v/members/personal/dagersh/

Offline dagersh

  • "A country attempting to tax itself into prosperity is akin to a man standing in a bucket attempting to lift that bucket by its handle. - Winston Churchill"
  • Expert
  • ****
  • Posts: 1,010
    • Photos
Re: 1972 CB450 "Supersport" A bit more frustration and how to lace spokes...
« Reply #120 on: February 27, 2010, 10:19:51 PM »
Nevermind,

HM, just got your PM.  THE SEALS ARE UPSIDE DOWN!!!!!  I will switch them out ASAP.  I have not filled the forks with oil yet.

Gotta love the Allballs directions...

Gersh
1962 CA95
1966 Black Bomber
1966 CA77 Dream
1967 Superhawk
1970 CB750K0
1972 CL350
1972 CB450/500 Custom
1972 CB500K1
1975 CB550F
1976 CB400F
1975 CB750 Future Restoration
1976 CB750K6
1976 CB750F
1976 GL1000


1968 Suzuki T500 Cobra
1990 BMW K1
2001 'Busa
2003 RC 51
Bunch of Guzzi's

http://www.sohc4.us/gallery/v/members/personal/dagersh/

Offline HondaMan

  • Someone took this pic of me before I became a
  • Really Old Timer ...
  • *******
  • Posts: 13,957
  • ...not my choice, I was nicknamed...
    • Getting 'em Back on the Road
Re: 1972 CB450 "Supersport" A bit more frustration and how to lace spokes...
« Reply #121 on: February 27, 2010, 10:22:56 PM »
Wow,

Just saw this, are they upside down????????  Not that I would be shocked!  And, its easily fixed, with some hot water and careful prying.....  I hope....

Hondaman, I am all ears!

Gersh

Yep, they're upside-down.
Sorry to be the bearer of the news.  :-\

The "spring side" is also the "skirt side". You can think of it like this: when the forks compress, they pressurize a bit. The open side of the skirt them inflates slightly, pressing outward more as the fork compresses more. This helps compensate for wear, over time. If the seal is upside-down, the pressure pushes in and OPENS the skirt, letting the pressure (and oil) out. So, the spring side must go toward the pressure side.  ;)
See SOHC4shop@gmail.com for info about the gadgets I make for these bikes.

The demons are repulsed when a man does good. Use that.
Blood is thicker than water, but motor oil is thicker yet...so, don't mess with my SOHC4, or I might have to hurt you.
Hondaman's creed: "Bikers are family. Treat them accordingly."

Link to Hondaman Ignition: http://forums.sohc4.net/index.php?topic=67543.0

Link to My CB750 Book: https://www.lulu.com/search?adult_audience_rating=00&page=1&pageSize=10&q=my+cb750+book

Link to website: www.SOHC4shop.com

Offline fastbroshi

  • Puppet
  • Old Timer
  • ******
  • Posts: 2,645
Re: 1972 CB450 "Supersport" A bit more frustration and how to lace spokes...
« Reply #122 on: February 28, 2010, 07:37:40 AM »
  Something told me those might be upside down when I first saw the pic, but I haven't rebuilt my forks yet so didn't want to say anything.  Good to know our superhero was watching.
Just call me Timmaaaaay!!!

Offline dagersh

  • "A country attempting to tax itself into prosperity is akin to a man standing in a bucket attempting to lift that bucket by its handle. - Winston Churchill"
  • Expert
  • ****
  • Posts: 1,010
    • Photos
Re: 1972 CB450 "Supersport" A bit more frustration and how to lace spokes...
« Reply #123 on: February 28, 2010, 08:05:45 AM »
The good people of Gotham/Metropolis should always rest easy knowing the forces of good are vigilantly watching over us! ;D ;D ;D
1962 CA95
1966 Black Bomber
1966 CA77 Dream
1967 Superhawk
1970 CB750K0
1972 CL350
1972 CB450/500 Custom
1972 CB500K1
1975 CB550F
1976 CB400F
1975 CB750 Future Restoration
1976 CB750K6
1976 CB750F
1976 GL1000


1968 Suzuki T500 Cobra
1990 BMW K1
2001 'Busa
2003 RC 51
Bunch of Guzzi's

http://www.sohc4.us/gallery/v/members/personal/dagersh/

traveler

  • Guest
Re: 1972 CB450 "Supersport" A bit more frustration and how to lace spokes...
« Reply #124 on: February 28, 2010, 09:11:17 AM »
Nice work!

Did you port the head or change the cams at all?

Sure is a clean build....love it!

~Joe