Author Topic: Cafe 836 - first build... first bike...  (Read 27562 times)

0 Members and 1 Guest are viewing this topic.

Offline MRieck

  • Really Old Timer ...
  • *******
  • Posts: 10,593
  • Big ideas....
Re: Cafe 836 - first build... first bike...
« Reply #100 on: August 05, 2009, 05:33:45 AM »
How are you making out?
Owner of the "Million Dollar CB"

Offline mrosso

  • Enthusiast
  • **
  • Posts: 189
  • The before picture.
Re: Cafe 836 - first build... first bike...
« Reply #101 on: August 05, 2009, 12:45:39 PM »
How are you making out?

Pretty well, I believe. Here's where I'm at:

1.) Bought a K7 countersprocket shaft assembly, rear sprocket/carrier assembly, and a new output? gear on the countershaft (the gear closest to the bearing that's pressed into the case). Also got correct oil seal from Honda.
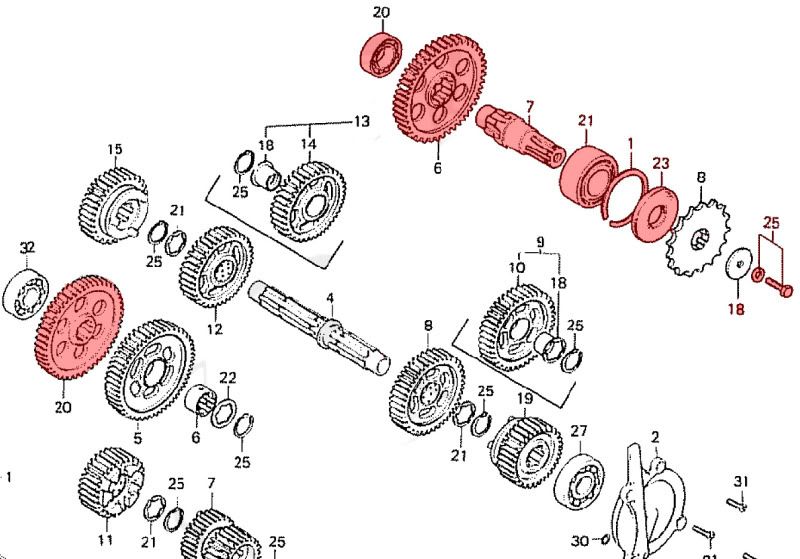


2.) Split crankcases.... again.

3.) Replaced all parts in red above in the picture.

Next planned steps:

1.) Remove threebond from the crankcase halves (although, I can hardly see any on there. It looks like it's been squeezed out or absorbed by the case halves - the layer seems transparent.) Anyone have any good tips for doing this?

2.) torque down case halves and continue on with valve train.

Thoughts?


Offline mystic_1

  • Really Old Timer ...
  • *******
  • Posts: 6,071
  • 1970 CB750K
Re: Cafe 836 - first build... first bike...
« Reply #102 on: August 05, 2009, 01:27:34 PM »
1.) Bought a K7 countersprocket shaft assembly, rear sprocket/carrier assembly, and a new output? gear on the countershaft (the gear closest to the bearing that's pressed into the case). Also got correct oil seal from Honda.

Not to nitpick but the highlighted shaft is called the "Final shaft" or sometimes the "Output Shaft".  The countershaft is the second transmission shaft, so called because it rotates counter to the direction of rotation of the mainshaft.


1.) Remove threebond from the crankcase halves (although, I can hardly see any on there. It looks like it's been squeezed out or absorbed by the case halves - the layer seems transparent.) Anyone have any good tips for doing this?

A solvent such as acetone may be helpful on a terrycloth rag or a nylon brush, but really in the end when it comes to cleaning gasket surfaces nothing replaces good old fashioned elbow grease, i.e. mechanical removal.  Make sure to eliminate any clingons from the previous squeeze-out, they tend to lurk in corners and such.

mystic_1
"A ship in harbor is safe, but that is not what ships are built for."
- John Augustus Shedd

My build thread:  http://forums.sohc4.net/index.php?topic=68952.0

Offline MCRider

  • Such is the life of a
  • Really Old Timer ...
  • *******
  • Posts: 14,376
  • Today's Lesson: One good turn deserves another.
Re: Cafe 836 - first build... first bike...
« Reply #103 on: August 05, 2009, 01:33:56 PM »
1.) Bought a K7 countersprocket shaft assembly, rear sprocket/carrier assembly, and a new output? gear on the countershaft (the gear closest to the bearing that's pressed into the case). Also got correct oil seal from Honda.

Not to nitpick but the highlighted shaft is called the "Final shaft" or sometimes the "Output Shaft".  The countershaft is the second transmission shaft, so called because it rotates counter to the direction of rotation of the mainshaft.


1.) Remove threebond from the crankcase halves (although, I can hardly see any on there. It looks like it's been squeezed out or absorbed by the case halves - the layer seems transparent.) Anyone have any good tips for doing this?

A solvent such as acetone may be helpful on a terrycloth rag or a nylon brush, but really in the end when it comes to cleaning gasket surfaces nothing replaces good old fashioned elbow grease, i.e. mechanical removal.  Make sure to eliminate any clingons from the previous squeeze-out, they tend to lurk in corners and such.

mystic_1
Very good point on the CS. To add a little, prior to the CB750, most motorcycles carried the drive sprocket on the coountershaft, hence countershaft sprocket. The CB750 added the final drive/output shaft. I haven't looked at the fiche, but the sprocket would be called a drive sprocket I guess.

i can nitpick too.   :D
Ride Safe:
Ron
1988 NT650 HawkGT;  1978 CB400 Hawk;  1975 CB750F -Free Bird; 1968 CB77 Super Hawk -Ticker;  Phaedrus 1972 CB750K2- Build Thread
"Sometimes the light's all shining on me, other times I can barely see, lately it appears to me, what a long, strange trip its been."

Offline mrosso

  • Enthusiast
  • **
  • Posts: 189
  • The before picture.
Re: Cafe 836 - first build... first bike...
« Reply #104 on: August 08, 2009, 07:49:21 PM »
Update - good news, bad news...


All went great reassembling the bottom-end (again). New shaft, seal, etc. I was putting in the final bottom case bolts when one of the f***ing front 6mm flange bolts snapped right off in while I was torquing it down (to the specs in the shop manual)! Half the bolt is stuck in the case.


Question: considering I have HD case bolts (top and bottom) and all the other bolts are good, can I live without this one 6mm bolt?

Offline KB02

  • Take it easy there, Sonny, I'm an
  • Old Timer
  • ******
  • Posts: 3,760
Re: Cafe 836 - first build... first bike...
« Reply #105 on: August 09, 2009, 05:34:33 AM »
Judging from that ding in the lower section of that bolt area, I would say it took a hit of some kind there and probably messed up your threads on the inside, hence your bolt seizing and snapping.

As for doing without it, I would suggest trying to replace it, but that's me. You might be able to get away without it, but you've got to figure that Honda placed a bolt there for a reason.
1978 CB750K Project
2000 Ducati ST2
...and a pedal bike

Join the AMA today!!

My project thread Part I: K8 Project "Parts Bike"
My project thread Part II: Finishing (yeah, right) touches on Project "Parts Bike"

Offline mystic_1

  • Really Old Timer ...
  • *******
  • Posts: 6,071
  • 1970 CB750K
Re: Cafe 836 - first build... first bike...
« Reply #106 on: August 09, 2009, 06:00:54 AM »
I hate to say it but that bolt will likely come out fairly easily of you re-split the cases.  Again.  :(

mystic_1
"A ship in harbor is safe, but that is not what ships are built for."
- John Augustus Shedd

My build thread:  http://forums.sohc4.net/index.php?topic=68952.0

Offline MRieck

  • Really Old Timer ...
  • *******
  • Posts: 10,593
  • Big ideas....
Re: Cafe 836 - first build... first bike...
« Reply #107 on: August 09, 2009, 07:16:52 PM »
There's no head on the bolt so there really isn't tension on it. I'd try to grab it with some pliers and spin it towards the lower case. You'll run out of room but just cut the bolt with a Dremel tool or hacksaw blade and continue to turn out. Like I said....there is no tension....maybe just a little 3 Bond sealer on it.
Owner of the "Million Dollar CB"

Offline mrosso

  • Enthusiast
  • **
  • Posts: 189
  • The before picture.
Re: Cafe 836 - first build... first bike...
« Reply #108 on: August 10, 2009, 01:47:33 PM »
Update on the snapped bolt:

I tried to drill-out and Eazy-out the bolt. Butterfingers that I am, I drilled a nice little hole right through the aluminum. You can see it here.


After splitting the cases (3rd. time) and working the bolt out of the case, I tried to TimeSert it. Made more of a mess of the hole, but got the TimeSert in. I used JB Weld to fill in the missing aluminum around the TimeSert and outside of the bolt hole. I'm hoping this will hold all in place when I go in for the final torque down this time.


Offline mrosso

  • Enthusiast
  • **
  • Posts: 189
  • The before picture.
Re: Cafe 836 - first build... first bike...
« Reply #109 on: August 12, 2009, 02:31:38 PM »
Any comments on the reliability of repairing the front case bolt threads with a timesert and jb weld?

Offline mystic_1

  • Really Old Timer ...
  • *******
  • Posts: 6,071
  • 1970 CB750K
Re: Cafe 836 - first build... first bike...
« Reply #110 on: August 12, 2009, 04:56:13 PM »
Sounds like a good fix to me, so long as the new hole is straight and flush.  Not a lot of stress on those case bolts after assembly.  I'd feel comfortable doing it myself it it became necessary.  Note however that JB weld does best when it's applied as thinly as possible, how much of a gap did you have to make up?  If it's a larger gap I'd use Fas-weld or a similar epoxy putty product rather than liquid JB Weld.

Got pics of the repair?

mystic_1
"A ship in harbor is safe, but that is not what ships are built for."
- John Augustus Shedd

My build thread:  http://forums.sohc4.net/index.php?topic=68952.0

Offline mrosso

  • Enthusiast
  • **
  • Posts: 189
  • The before picture.
Re: Cafe 836 - first build... first bike...
« Reply #111 on: August 13, 2009, 07:25:40 AM »
Here are some pix of the jb weld fix. Still not pretty, have some filing/shaping to do, but hopefully a strong bond. Comments?


Offline mystic_1

  • Really Old Timer ...
  • *******
  • Posts: 6,071
  • 1970 CB750K
Re: Cafe 836 - first build... first bike...
« Reply #112 on: August 13, 2009, 08:06:01 AM »
Doesn't look bad, hard to be 100% sure looking at through the internet like this though :)  Put a straight edge across the case mating surface to make sure your repair is at or below the level of the flange.  The liquid sealant will make up small gaps if necessary.  What is the widest gap bridged by the JB Weld?  I mean, filling spots in a bad hole is one thing but putting a 1/4" bolt into a 1" hole with the stuff just isn't going to work well, ya know?

Oh, and when you reassemble, put that bolt in last ;D

mystic_1
"A ship in harbor is safe, but that is not what ships are built for."
- John Augustus Shedd

My build thread:  http://forums.sohc4.net/index.php?topic=68952.0

Offline mrosso

  • Enthusiast
  • **
  • Posts: 189
  • The before picture.
Re: Cafe 836 - first build... first bike...
« Reply #113 on: August 16, 2009, 09:32:32 PM »
Haaaaa.... sigh... I got the #$%* torqued down for the third time! Hopefully all will stay together. Now on to the cam and rocker assembly. I've been dreading this part...

Offline Celco

  • Enthusiast
  • **
  • Posts: 100
Re: Cafe 836 - first build... first bike...
« Reply #114 on: August 16, 2009, 09:52:24 PM »
Keep up the good work.  I am excited to see how this all turns out.  That machine looking good.

Offline mrosso

  • Enthusiast
  • **
  • Posts: 189
  • The before picture.
Re: Cafe 836 - first build... first bike...
« Reply #115 on: August 17, 2009, 03:46:05 PM »
This is a timewarp post - I did some top-end work on the build before MREICK pointed out that I had the wrong output shaft/seal (thanks, by the way. It would have sucked so bad to drop the motor into frame with that problem).

So here are some pics from a few weeks ago, before the case-splitting crises took place.


M3 Racing cam chain tensioner and TSUBAKI Heavy Duty Cam Chain.


Offline mystic_1

  • Really Old Timer ...
  • *******
  • Posts: 6,071
  • 1970 CB750K
Re: Cafe 836 - first build... first bike...
« Reply #116 on: August 17, 2009, 04:31:28 PM »
Yeah, the moderators really need to add a "drooling" smiley to the "Post Reply" page.

mystic_1
"A ship in harbor is safe, but that is not what ships are built for."
- John Augustus Shedd

My build thread:  http://forums.sohc4.net/index.php?topic=68952.0

Offline MCRider

  • Such is the life of a
  • Really Old Timer ...
  • *******
  • Posts: 14,376
  • Today's Lesson: One good turn deserves another.
Re: Cafe 836 - first build... first bike...
« Reply #117 on: August 17, 2009, 08:01:51 PM »
Yeah, these shots of his engine going togeher are making me jealous. Real nice job, overcoming adversity. It'll be a nice result no doubt.
Ride Safe:
Ron
1988 NT650 HawkGT;  1978 CB400 Hawk;  1975 CB750F -Free Bird; 1968 CB77 Super Hawk -Ticker;  Phaedrus 1972 CB750K2- Build Thread
"Sometimes the light's all shining on me, other times I can barely see, lately it appears to me, what a long, strange trip its been."

Offline MRieck

  • Really Old Timer ...
  • *******
  • Posts: 10,593
  • Big ideas....
Re: Cafe 836 - first build... first bike...
« Reply #118 on: August 18, 2009, 10:34:26 AM »
In some of the pics the cam tensioner blade is upside down. The removable metal pin end sits in the upper case. It appears you have it correct in the last pic but it is kinda hard to be sure.
Owner of the "Million Dollar CB"

Offline mrosso

  • Enthusiast
  • **
  • Posts: 189
  • The before picture.
Re: Cafe 836 - first build... first bike...
« Reply #119 on: August 18, 2009, 10:55:42 AM »
In some of the pics the cam tensioner blade is upside down. The removable metal pin end sits in the upper case. It appears you have it correct in the last pic but it is kinda hard to be sure.

Yes, thanks. I flipped it around the right way before dropping the cylinders on. Thank God for pdf shop manuals and parts lists.

Offline MRieck

  • Really Old Timer ...
  • *******
  • Posts: 10,593
  • Big ideas....
Re: Cafe 836 - first build... first bike...
« Reply #120 on: August 18, 2009, 08:27:25 PM »
In some of the pics the cam tensioner blade is upside down. The removable metal pin end sits in the upper case. It appears you have it correct in the last pic but it is kinda hard to be sure.

Yes, thanks. I flipped it around the right way before dropping the cylinders on. Thank God for pdf shop manuals and parts lists.
Excellent. I hate to be the constant bearer of bad news. ;)
Owner of the "Million Dollar CB"

Offline fastbroshi

  • Puppet
  • Old Timer
  • ******
  • Posts: 2,645
Re: Cafe 836 - first build... first bike...
« Reply #121 on: August 23, 2009, 06:07:55 PM »
   Cool, despite all the setbacks, your motor is looking really nice.  You DO realize any 750 you ride after this just won't do, right?  Here's Mike after you torque down the head and get it in the frame:  "I hate to be the bearer of bad news, but you didn't send your head to me to get it ported/polished.  This will have to be rectified.  Better now than 100 miles down the road."   :D
Just call me Timmaaaaay!!!

Offline mrosso

  • Enthusiast
  • **
  • Posts: 189
  • The before picture.
Re: Cafe 836 - first build... first bike...
« Reply #122 on: August 24, 2009, 08:07:22 AM »
Here are some more pics of the top-end build.


I went ahead and put a couple light coats of Gaskacinch on a new Cometic copper base gasket.

Here's a pic of "new" oil pan with a magnetic drain plug. I stripped the plug on the old pan (yes, I used a torque wrench and manual). I didn't worry about painting this one. I'm getting lazy.


Getting the pistons and rings to slide into the jugs was a royal #$%*! I didn't hear any snaps or pings, so I'm hoping all is good.


Stoopid, stoopid, stupid! While dropping the cylinder block on the pistons and studs, I used a plastic hammer to "tap" down the block. Crap! Nice crack in the top fin. Stupid!


Offline blake255

  • Full Member
  • *
  • Posts: 68
  • Look Out! I'm about to crank this thing!
Re: Cafe 836 - first build... first bike...
« Reply #123 on: August 24, 2009, 09:18:16 AM »
mrosso,

I see the Honda piston ring clamps and blocks in your latest photos.  Mind sharing where you got them and how much they cost?
1970 CB750 K0 Project 1
1969 CB750 Sandcast Project 2
1969 CB750 Sandcast Project 3
2009 Yamaha YZF R6

Offline HedNut

  • Underwater Basket Weaving
  • Expert
  • ****
  • Posts: 844
  • CB750...A Two-wheeled hellcat from Planet Kickass
Re: Cafe 836 - first build... first bike...
« Reply #124 on: August 24, 2009, 09:22:05 AM »
Quite an inspirational build!... I'm loving all the details, tips and lessons learnt from your experience.  It's looking great! And fueling the fire of excitement to get down to getting dirty with my bike!  Good work so far!! Can't wait to see the bike up and running! Cheers!