Author Topic: 72 CB350 Build For The Wife  (Read 68541 times)

0 Members and 4 Guests are viewing this topic.

Offline Harsh

  • Expert
  • ****
  • Posts: 1,103
  • 74 CB750 and two 72 CB350's
Re: 72 CB350 Build For The Wife
« Reply #125 on: August 18, 2014, 04:13:02 PM »
Yah she is pretty awesome.  Especially for putting up with my antics for the past 24 years.  WOOT WOOT


And the polishing continues.  Moving to the front hub and wheels.

Before


After.  Now that I have seen the pic it looks like I still have a little bit of work to do.  It doesn't look nearly as bad when looking at it though, but I guess the camera pics up on things.


Wheels.  They were spotted with rust and the insides had a fair amount of it.  I used a brush dipped in Prep-N-Etch and coated them.  I let it sit for a little bit then hit them with some 0000 steel wool which polished them up nicely.


I had to give the frame a good coating of Prep-N-Etch today as well.  When I went in the garage this morning there was some flash rust on it.  I guess the extra moisture in the air last night took its toll.  The frame is no longer nice and shiny, but it is now sealed from the elements enough until I can get it powder coated.

Offline Harsh

  • Expert
  • ****
  • Posts: 1,103
  • 74 CB750 and two 72 CB350's
Re: 72 CB350 Build For The Wife
« Reply #126 on: August 19, 2014, 03:09:53 PM »
Here is the daily update.

Sanded and polished the brake side of the front hub.  What a pain this was.  All of the nooks and crannies wore my fingers out.


Took the forks apart.  The insides were nasty nasty nasty.  Getting the locknut at the top loose proved to be a bear because the rod kept spinning.  I wound up having to slide in a pair of needle nose vice grips to hold the rods while I unscrewed the nut.  The nut only has two flat side to it and is fairly thin.  I didn't have anything to slide in so I had to go to the store and buy a cheap 19mm wrench and grind it down to the point where it would slip in between the spring and the top nut.


In order to get the snap ring out I had to slide off the fork cover.  Great googly moogly that was tough.  I just kept working my screwdriver around and slowly worked it off.  Both the fork cover and the top nuts had a lot of rust.  A soaking in Prep-N-Etch and some lights scrubbing with some steel wool and they cleaned up nicely.  They are a bit pitted, but should work.


Tomorrow I will move onto getting the fork lowers polished up.

Offline Stev-o

  • Ain't no
  • Really Old Timer ...
  • *******
  • Posts: 34,413
  • Central Texas
Re: 72 CB350 Build For The Wife
« Reply #127 on: August 19, 2014, 08:58:15 PM »
Polishing looks fantastic.
'74 "Big Bang" Honda 750K [836].....'76 Honda 550F.....K3 Park Racer!......and a Bomber!............plus plus plus.........

Offline Harsh

  • Expert
  • ****
  • Posts: 1,103
  • 74 CB750 and two 72 CB350's
Re: 72 CB350 Build For The Wife
« Reply #128 on: August 20, 2014, 02:46:21 PM »
Thanks Stev-o.

I am almost done with polishing stuff.

Completed the lower fork tubes today.  Removing the casting marks around the screw bosses was a nightmare.


Also shined up the front fender.  It was in pretty good shape so just some light polishing was needed.  The inside however was nasty.  Filled with dirt, grease, and rust.  I forgot to take a picture of it before I started, but oh well.  After I scrubbed the dirt and grease off it it there was a lot of rust so I treated it with...you guessed it Prep-N-Etch.  All clean and ready to rock.


I met up with my buddy Cal and picked up all of the stuff he media blasted for me.  He also had my new (to me) head that his machinist did a proper job on clearing out the cam chain tunnel for the KA cam chain slipper.


Offline dusterdude

  • Really Old Timer ...
  • *******
  • Posts: 8,492
Re: 72 CB350 Build For The Wife
« Reply #129 on: August 20, 2014, 03:42:39 PM »
Cool stuff
mark
1972 k1 750
1949 fl panhead
1 1/2 gl1100 goldwings
1998 cbr600 f3

Offline MoMo

  • Really Old Timer ...
  • *******
  • Posts: 8,275
  • Ride like you're invisible
Re: 72 CB350 Build For The Wife
« Reply #130 on: August 20, 2014, 03:51:06 PM »
Head looks good!

The Mrs.  should be quite happy with your work ;)....Larry

Offline SOHC4 Cafe Racer Fan

  • Speak up, Whipper-Snapper! I'm a
  • Really Old Timer ...
  • *******
  • Posts: 15,733
  • SOHC/4 Member #1235
Re: 72 CB350 Build For The Wife
« Reply #131 on: August 20, 2014, 06:53:30 PM »
Calvary Cal comes through!!  That is some solid work!
1975 CB550K1 "Blue" Stockish Restomod (http://forums.sohc4.net/index.php?topic=135005.0)
1975 CB550F1 frame/CB650 engine hybrid "The Hot Mess" (http://forums.sohc4.net/index.php/topic,150220.0.html)
2008 Triumph Thruxton (http://forums.sohc4.net/index.php/topic,190956.0.html)
2014 MV Agusta Brutale Dragster 800
2015 Yamaha FZ-09 (http://forums.sohc4.net/index.php/topic,186861.0.html)

"There are some things nobody needs in this world, and a bright-red, hunch-back, warp-speed 900cc cafe racer is one of them — but I want one anyway, and on some days I actually believe I need one.... Being shot out of a cannon will always be better than being squeezed out of a tube. That is why God made fast motorcycles, Bubba." Hunter S. Thompson, Song of the Sausage Creature, Cycle World, March 1995.  (http://www.latexnet.org/~csmith/sausage.html and https://magazine.cycleworld.com/article/1995/3/1/song-of-the-sausage-creature)

Sold/Emeritus
1973 CB750K2 "Bionic Mongrel" (http://forums.sohc4.net/index.php?topic=132734.0) - Sold
1977 CB750K7 "Nine Lives" Restomod (http://forums.sohc4.net/index.php?topic=50490.0) - Sold
2005 RVT1000RR RC51-SP2 "El Diablo" - Sold
2016+ Triumph Thruxton 1200 R (http://forums.sohc4.net/index.php/topic,170198.0.html) - Sold

Offline Harsh

  • Expert
  • ****
  • Posts: 1,103
  • 74 CB750 and two 72 CB350's
Re: 72 CB350 Build For The Wife
« Reply #132 on: August 25, 2014, 03:14:36 PM »
Placed a number of orders for parts so I am mainly waiting on them to arrive to move forward.  I was going to replace all of the cables, but none of the aftermarket stuff matches up to the dimensions of my cables and the OEM stuff is stupid expensive.  The inners of the cables work just fine it is just the sheathing that is ugly and sun faded.  I lubed of and cleaned the cables then decided to hit them with a coat of PlastiDip.  That stuff worked like a charm.

Worked on the new head today.  Doing it once was a pain, but having to re-do all of the the fin sanding & polishing proved to be a frustrating all day endeavor.  Regardless I got it done.  I forgot to lap the valves to the new head before I cleaned up for the evening so I guess I will do that tomorrow before I do the final cleaning and paint.


Got the head cleaned and painted today.  I am glad that is done with cleaning the fins is a royal pain.


Also took apart the gauges to prep them for some overlays I purchased.  Just as I was about done cleaning them when the overlays arrived in the mail so on they went.

Before


After


I also cleaned and painted the needles.  They were very faded.


This is what I used on the tips.


Offline Stev-o

  • Ain't no
  • Really Old Timer ...
  • *******
  • Posts: 34,413
  • Central Texas
Re: 72 CB350 Build For The Wife
« Reply #133 on: August 25, 2014, 06:55:09 PM »
Nice work, Harsh. Work n the head but be a pain but sure looks great.  Do you just sand the edges?
Would like to do this on my RD.
'74 "Big Bang" Honda 750K [836].....'76 Honda 550F.....K3 Park Racer!......and a Bomber!............plus plus plus.........

Offline grcamna2

  • Not a
  • Really Old Timer ...
  • *******
  • Posts: 15,217
  • I love to restore & travel. Keep'em Going Strong !
Re: 72 CB350 Build For The Wife
« Reply #134 on: August 26, 2014, 10:40:54 AM »
Stev-o, you're RD came stock w/ that exact color scheme as Harsh made his into; how can you improve on that ?
75' CB400F/'bunch o' parts' & 81' CB125S modded to a 'CB200S'
  I love the small ones too !
Do your BEST...nobody can take that away from you.

Offline Harsh

  • Expert
  • ****
  • Posts: 1,103
  • 74 CB750 and two 72 CB350's
Re: 72 CB350 Build For The Wife
« Reply #135 on: August 26, 2014, 01:01:38 PM »
I start off by filing the edges to get the bulk of material removed and the edges flat.  I then move onto sanding using as small block of oak to keep everything flat.  I start out at 320 then 600 then 1200 then 2000.  Then I polish, black then rouge.


Well I tried to assemble the engine today, but failed.  Everything seemed to be going smoothly until I tried to get the rocker boxes on.  I could get one side on with some gentle caressing from the palm of my hand, but the other side absolutely would not go on.  I tried putting the opposite side that I was working on first to see if that did anything.  Nope.  I tried to get them both on at the same time.  Big helping of nope.  I tried to adjust the rockers to their loosest state.  Nope.  I noticed that there was no slack in the cam chain at all.  I pressed on the slipper as hard as I could and no matter what position I had the crank in the chain didn't move.  So I decided to take everything apart and see what the deal was.  I didn't see anything out of order. 

Unfortunately, when I took the head off the corner of the gasket tore off so now I need to source a new head gasket.  I looked on Bore-Tech's site, but they don't sell a stock head gasket and they are out of stock on the top end gasket kit.  Other than going to the dealership I really have no idea where to look for one and they probably want as much for the one gasket as a whole top end kit costs.


Offline grcamna2

  • Not a
  • Really Old Timer ...
  • *******
  • Posts: 15,217
  • I love to restore & travel. Keep'em Going Strong !
Re: 72 CB350 Build For The Wife
« Reply #136 on: August 26, 2014, 02:12:27 PM »
Harsh, I never installed a KA slipper cam chain tensioner but I imagine it'll be on the 'to do list' sometime in the future once I wear out my Polish made PA6 rollers.
I have a Vesrah(OEM quality) top end gasket set w/ all top end gaskets including the stock size head gasket made in Japan for my CB350K4 twin(my spare) that I'll sell to you for 25 shipped if interested. I can send it out 1st thing tomorrow morning USPS Priority Flat Rate envelope
                                                       Bill
« Last Edit: August 26, 2014, 02:21:15 PM by grcamna2 »
75' CB400F/'bunch o' parts' & 81' CB125S modded to a 'CB200S'
  I love the small ones too !
Do your BEST...nobody can take that away from you.

Offline Harsh

  • Expert
  • ****
  • Posts: 1,103
  • 74 CB750 and two 72 CB350's
Re: 72 CB350 Build For The Wife
« Reply #137 on: August 27, 2014, 06:41:49 AM »
Holy crap...the dealership wants $53 for the head gasket.  I didn't pay that much for the entire kit from Bore-Tech.

Bill you have a PM.

Offline grcamna2

  • Not a
  • Really Old Timer ...
  • *******
  • Posts: 15,217
  • I love to restore & travel. Keep'em Going Strong !
Re: 72 CB350 Build For The Wife
« Reply #138 on: August 27, 2014, 11:31:51 AM »
She's on the way to you Harsh,should be there this Fri. at the latest.
75' CB400F/'bunch o' parts' & 81' CB125S modded to a 'CB200S'
  I love the small ones too !
Do your BEST...nobody can take that away from you.

Offline Harsh

  • Expert
  • ****
  • Posts: 1,103
  • 74 CB750 and two 72 CB350's
Re: 72 CB350 Build For The Wife
« Reply #139 on: August 27, 2014, 02:19:03 PM »
Thanks Bill.

I sanded and painted the outer covers for the gauges and polished up the back covers a little bit.  Once done I assembled them.  This took a little bit of ingenuity.  In order to get the ring back on you have to have something solid to tap against.  So off to Lowes I went.  I finally found something that would work...a 4"atrium grate.  The inside ribs have to be ground down a little bit in order for the bottom of the case to rest on the lip of the atrium.  I wrap some painters tape around the case just to protect it a little bit.  Once that is complete is a simple task of tapping over the ring.  if you just start in one spot and start working around you will have very little ring available to tap down when you get about 2/3 of the way around.  To help combat this I tap over the ring at the 12 o'clock, 6 o'clock, 9 o'clock, then 3 o'clock.  After that I move around the ring sort of like you install a tire until everything is as flat as can be.  My wife has a little hammer that work great for the initial tapping, but once I get the four corners down I use a brass drift to aid in tapping down the ring.


Ribs ground down a little bit


Finished


Now the speedo side requires you to cut out a notch so that the trip reset can poke through.  A few seconds with my hand saw and it was done.  If you have removed the rubber gasket on the speedo make sure you orientate it correctly since it has a notch.  After that it is the same process.


My fork seals came in today so I put the forks together as well.  I may end up taking them apart again to swap out the springs, but I will see how they feel once everything is back together.


Offline MoMo

  • Really Old Timer ...
  • *******
  • Posts: 8,275
  • Ride like you're invisible
Re: 72 CB350 Build For The Wife
« Reply #140 on: August 27, 2014, 04:22:48 PM »
Did you have the cam chain tensioner in when you were trying to install the cam ends?...Larry

Offline Harsh

  • Expert
  • ****
  • Posts: 1,103
  • 74 CB750 and two 72 CB350's
Re: 72 CB350 Build For The Wife
« Reply #141 on: August 27, 2014, 04:28:42 PM »
Did you have the cam chain tensioner in when you were trying to install the cam ends?...Larry

Nope.   Looking back I didn't pay attention to the orientation of the eccentric adjusters.  I put then and set them to where they were the most loose.  Other than that I got nothing.

Offline Harsh

  • Expert
  • ****
  • Posts: 1,103
  • 74 CB750 and two 72 CB350's
Re: 72 CB350 Build For The Wife
« Reply #142 on: August 30, 2014, 07:09:47 AM »
Had to go back to work yesterday so I guess progress will slow down a little bit.

Since I am waiting on a replacement head gasket I decided to work on the wiring.  So that is what I did for the past couple of days.  Cleaning up a few old splices and getting rid of the old regulator and rectifier for a unit from Spark Moto.  I also scrubbed down each and every bullet connector so I should have nice clean connections.  Added in an electronic flasher because I am converting all bulbs to LED to reduce the electrical load.  I just got done taking apart the hand controls to clean the connections and so I can figure out what I want to do about making the housings all one color.  Not sure if I want to try and paint them or have the PC'd.  I am worried that the PC would be to thick which would cover the portions I am going to have to paint red later on.

Woot Woot.  The new gasket arrived yesterday so I guess today I will hopefully be able to get the engine completely assembled.


Offline Harsh

  • Expert
  • ****
  • Posts: 1,103
  • 74 CB750 and two 72 CB350's
Re: 72 CB350 Build For The Wife
« Reply #143 on: August 31, 2014, 06:13:20 AM »
Started the day sanding and painting the hand control covers.  I let them sit overnight and today I will throw them in my little oven to cure the paint.  I used the same paint I did on the engine.  Once the paint is cured and completely cool I will go back in and paint the red parts.

On to final assembly of the engine.  The gasket kit (Vesrah) I got from Bill fit so much better than the Athena stuff does.  I did a bunch of reading and decided to take a tip from someone that has assembled a number of these engines.  He likes to use a stack of washers to take up the space of the parts that go on top of the cam case so that he can torque down everything down.  Up until this point nothing is torqued down to the case.  I didn't really notice a whole lot of difference when I went to install the side covers though.
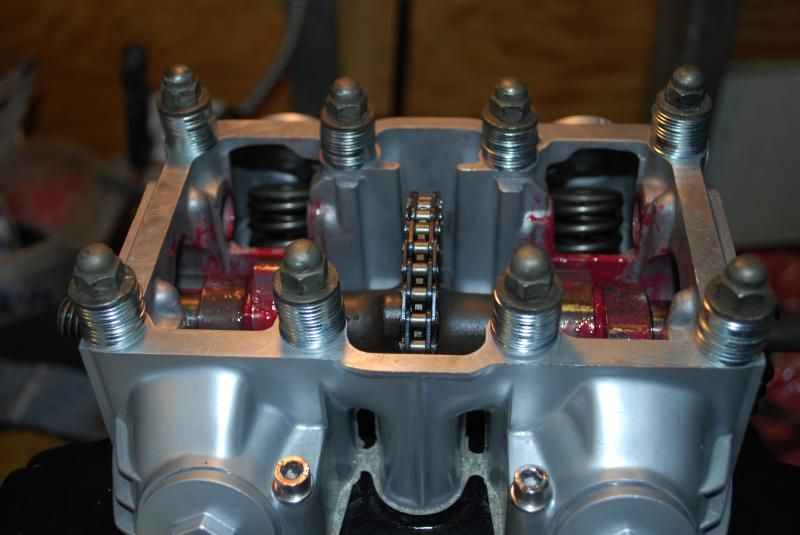


I struggled mightily to get the side covers on.  I think I tried about a dozen different ways to get them on.  One side would get close, but wouldn't go the last 1/2" or so at least not without a lot of persuasion and I didn't want to do that.  I finally tried to put them on at the same time so the cam shaft wouldn't get as cocked over to one side.  I got the covers started, but they would barely go on so I decided to rotate the crank a little bit as I pushed on the covers.  My thought process on that was rotating the crank would rotate the cam which would change when pressure was being applied to the rockers.  Then all of a sudden there was a POP from each cover as I pressed on them.  They slid right into position.

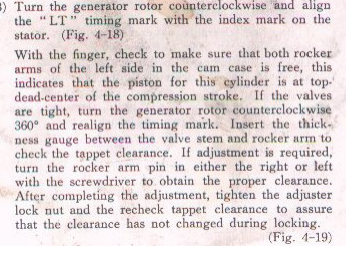
I started the process of setting the gaps on the valves, but I am not sure if I have the cam in correctly.  I fear that I may have it 180* out.  When I follow the instruction in the manual to align the marks for TDC and have slack on the rockers I no longer have the pin on the cam shaft pointing at 12 o'clock, it is at 6 o'clock.  If I rotate the crank 360* to get the pin at 12 o'clock there is a pressure on the rockers.  However, I am not 100% sure that it matters where the pin is at this point.  All I know is that from the reading I have done that is the predominant consensus.
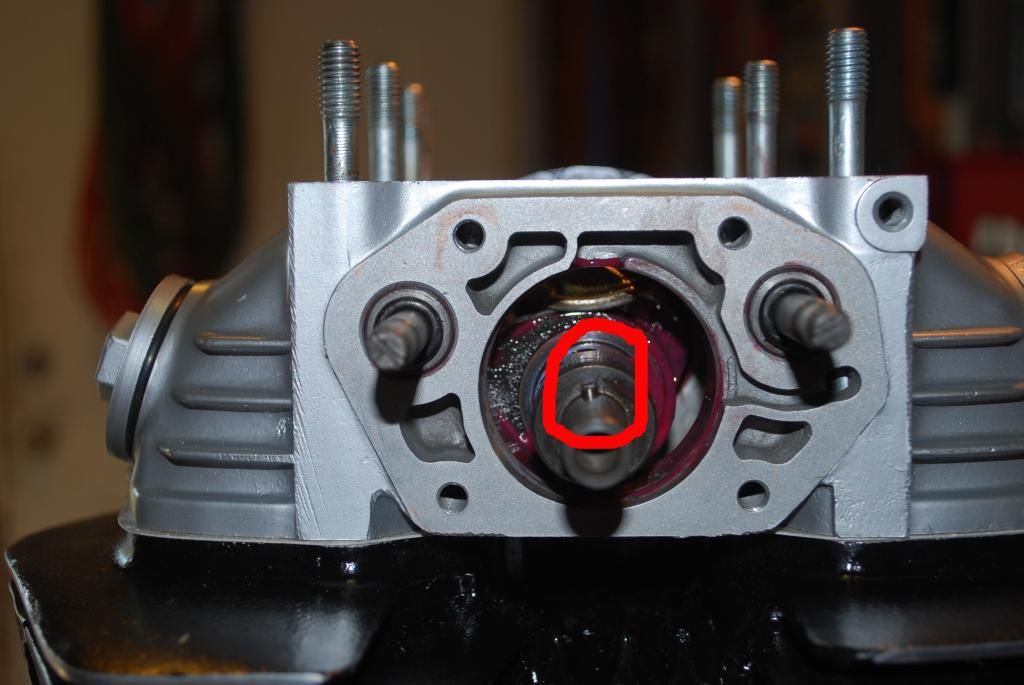


There is also some discussion that I need to trim some fo the rubber off of the cam shaft gear.  The new cam chain sits lower than the old one did and rubs against it.  Not really an issue since the new chain will wear into it, but the oil will need to be changed and monitored for a while.  The big issue is that removing the rubber will give provide a little bit of pressure relief on the cam.  I am going to try and see if I can trim it down with everything installed.
« Last Edit: August 31, 2014, 06:17:18 AM by Harsh »

Offline grcamna2

  • Not a
  • Really Old Timer ...
  • *******
  • Posts: 15,217
  • I love to restore & travel. Keep'em Going Strong !
Re: 72 CB350 Build For The Wife
« Reply #144 on: August 31, 2014, 07:26:10 AM »
That what the oem manual says about adjusting the valves also applies to this task you're doing when getting everything together " 90 deg. after TDC for the LT(left cylinder)while going counterclockwise"  my own rough translated quote from the oem Japanese shop manual  :)
75' CB400F/'bunch o' parts' & 81' CB125S modded to a 'CB200S'
  I love the small ones too !
Do your BEST...nobody can take that away from you.

Offline Harsh

  • Expert
  • ****
  • Posts: 1,103
  • 74 CB750 and two 72 CB350's
Re: 72 CB350 Build For The Wife
« Reply #145 on: August 31, 2014, 01:20:26 PM »
Well I took apart the cam and cam cover this morning to trim some of the rubber off of the cam gear so the chain will sit a little deeper on the gear.  I think that helped a lot.  I can visibly see that the chain sits deeper on the gear.  Put everything back together and was able to use the same technique I used yesterday to get the side covers on.  They are an interference fit part that the cam shaft rides in so there is very little wiggle room.  I just had to make sure there was no pressure on the cam shaft from the rockers.  She is all together minus some covers that I will put on once it is in the frame.


I also cured (baked in a toaster oven) the hand controls.  All that is left on them is to paint in the areas that are supposed to be red.


Offline calj737

  • Really Old Timer ...
  • *******
  • Posts: 21,076
  • I refuse...
Re: 72 CB350 Build For The Wife
« Reply #146 on: August 31, 2014, 01:23:29 PM »
Another top shelf build, Harsh.
'74 550 Build http://forums.sohc4.net/index.php?topic=126401.0
'73 500 Build http://forums.sohc4.net/index.php?topic=132935.0

"Of all tyrannies, a tyranny sincerely exercised for the good of it's victim may be the most oppressive. It may be better to live under robber barons than under omnipotent moral busybodies. The robber baron's cruelty may sometimes sleep, his cupidity may at some point be satiated, but those who torment us for our own good will torment us without end for they do so with the approval of their own conscience." - C.S. Lewis

Offline Harsh

  • Expert
  • ****
  • Posts: 1,103
  • 74 CB750 and two 72 CB350's
Re: 72 CB350 Build For The Wife
« Reply #147 on: September 01, 2014, 03:13:49 PM »
Thanks cal.

Alrighty...I painted the controls this morning.  What an absolute pain that was.  I knew it was going to be tough, but damn it was exhausting.  I ended up using a pin to apply the paint.  I didn't do nearly as good of a job as I had hoped, but I really don't know what else I could have done to make it look better.


Cleaned up the bars with some Prep-N-Etch and installed the controls.  Not too shabby.


I also took apart one of the air filters.  These things are stupid expensive.  I think the cheapest I have seen them is $120 for the pair.  instead of paying that I am going to get some Uni Foam and glue it in place.  You can see how nasty the original paper filter is.


I also started the process of stripping the paint off of the side covers.  I had to get another set since the ones that came with the bike were cracked.  The set I got had a lot of cracks in the paint that went all the way to the plastic.  They had been painted so many times some of the paint was flaking off and it was thick.  I tried a number of things to cut through the paint efficiently, but nothing really worked too well.  I counted 6 layers of paint in addition to primer between each color of paint.  They started off as gold, then maroon, green, red, brown, and finally a dark purple.  The best thing that cut through the paint was good old DOT 3/4 brake fluid.  It takes some time to start working and then a little attention with some steel wool, but it is working.  I don't figure the brake fluid will harm the plastic since most brake reservoirs are made of plastic and they seem to hold up just fine.  I will just make sure to clean them thoroughly after I get all of the paint off.

Offline grcamna2

  • Not a
  • Really Old Timer ...
  • *******
  • Posts: 15,217
  • I love to restore & travel. Keep'em Going Strong !
Re: 72 CB350 Build For The Wife
« Reply #148 on: September 01, 2014, 03:42:23 PM »
Harsh, I also have a pr. of plastic side covers that have many layers of paint on them,they're the ones that I eventually want to paint gold the same color as my bike;I cracked the little ribs/vents on my mint L. side original by pulling my car's bumper up too close w/ the bike covered... How did the brake fluid work on your plastic surfaces? was it fresh brake fluid? or a little older/weaker ?
75' CB400F/'bunch o' parts' & 81' CB125S modded to a 'CB200S'
  I love the small ones too !
Do your BEST...nobody can take that away from you.

Offline Harsh

  • Expert
  • ****
  • Posts: 1,103
  • 74 CB750 and two 72 CB350's
Re: 72 CB350 Build For The Wife
« Reply #149 on: September 01, 2014, 04:02:15 PM »
Harsh, I also have a pr. of plastic side covers that have many layers of paint on them,they're the ones that I eventually want to paint gold the same color as my bike;I cracked the little ribs/vents on my mint L. side original by pulling my car's bumper up too close w/ the bike covered... How did the brake fluid work on your plastic surfaces? was it fresh brake fluid? or a little older/weaker ?

It seems to be working fairly well.  I let some sit for a while so I could take a shower and eat dinner.  I just went and checked it and the paint is starting to peel off.  The fluid I am using is a bit old, but I don't know if that makes it any weaker.  I think I have a left side cover that isn't cracked and has its tabs.  I would have to check to verify that it is the left side.  It know it doesn't have the jewel or the rubber piece that the attachment bolt goes through.