Author Topic: C-Hook Engine Removal & Rotisserie Engine Stand  (Read 68072 times)

0 Members and 2 Guests are viewing this topic.

Offline blake255

  • Full Member
  • *
  • Posts: 68
  • Look Out! I'm about to crank this thing!
C-Hook Engine Removal & Rotisserie Engine Stand
« on: September 11, 2009, 01:41:49 PM »
UPDATE 5/9/12: After a long absence, I have finally gotten .dxf files posted for anyone who would like to make a c-hook.  You can find the link here.  There are three versions, modify them as you see fit.  Again, I am not an engineer and make no claims as to fitness for any purpose. All I ask is that you take pictures and post them so that others may benefit.  It’s great to be back.  Thank you to all who have posted.

Blake


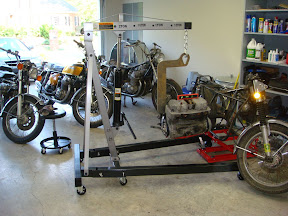
I’ve been lurking on this forum for about a year now, and after benefiting greatly from the wisdom so many of you have taken the time to share, I decided its time to pay it forward in what little way I could.  Unlike many of you, for me, motorcycling is a solitary pursuit. Whether it’s riding or wrenching, I pretty much have to go it alone.  So I needed a safe way to remove an engine, mount it on a stand, and replace the engine by myself.

So I began searching the forum for engine stands and saw several good examples, but having no welding skills I was very limited in what I could actually do.  I settled on the Bracket Method seeing it was the most simple and cost effective.  After buying a stand and making the brackets I realized that my setup would not allow me to split the cases (Chalk one up for “The Hard Way”).  So what to do?  I jumped back on the web and found the K&L bench top stand.  But it’s $172.00 and I didn’t want to give up my bench space.  Then I had the idea that I could make a K&L style rotisserie by modifying a second stand and mounting it to the first, with the added benefits of it being cheaper, self contained, and on casters.  The next challenge was to come up with a way to remove the engine.  I remembered seeing The Engine Extraction Helper thread, but again, no welding skills.  While I was mulling over a solution, I came a cross a two ton engine hoist at Tractor Supply Co. on close out for $100.00 (With engine leveler!), so I snapped it up.  A few days later I was out in the maintenance shop of the company that I work for and came across a huge C-clamp and thought, “man, if I could just modify this thing”, so to the web I went.  I came a cross several companies that make large C-hooks for heavy lifting and I knew I could design one for what I wanted.  So I drew one up in a vector graphics program to my specs then called every stinkin’ machine shop in town until I found one that had a water-jet and was willing to do a small job.  When I found one I sent the guy a file.  Two days and $25.00 later (That’s right, Twenty Five Bucks) I had a custom made ½” plate C-hook in hand.  Then I ordered some cam straps and I was in business.

Below are the details of what I’ve done.  Things that I had at my disposal were a drill press, metal band saw, center punches, free scrap angle iron, and a wall to bang my head against.  All in all, this project cost me about $220.00.  Feel free to ask questions or leave comments.  I hope someone finds this information useful.


The Victim
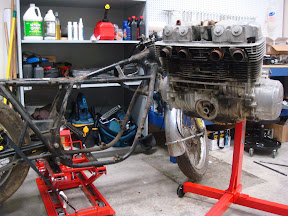
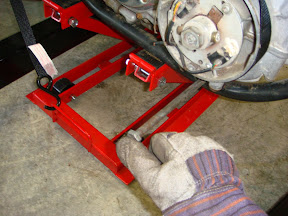
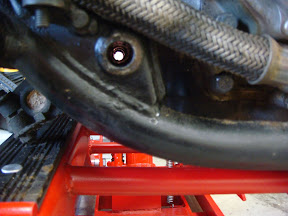
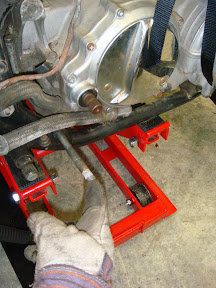
You’ll notice this is a roller.  One reason I worked to devise this system was that the “frame on engine” method is not always suitable, like if you have a rolling chassis or just need to replace a head gasket on an otherwise running bike.  Obviously the bike in the pictures had been prepped.  Consult your manual for proper engine removal instructions. For this lift you’ll need to secure the bike in an upright position.  A motorcycle jack was in order here, because this bike has no center stand.  Also, a motorcycle lift wouldn’t work because you can’t roll the engine hoist’s legs underneath.


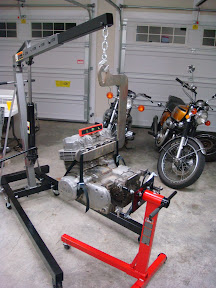
Engine Hoist, C-Hook, & Straps
Like I mentioned above, I picked this up from Tractor Supply Co. brand new on closeout for $100.00 with engine leveler.  You can get a good used on from Craig’s List (God bless you Craig) for about the same or less.

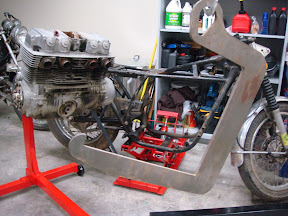
Again, I custom designed the C-hook using a vector graphics program and saved it as a cad file to send to the machine shop.  The machinist cut it out while he had another ½” plate job on the jet.  When he told me it would be $25.00, I figured he must have liked the idea of doing a favor for a guy who wrenches on vintage bikes.  Based on ratings of similar comercially available C-hooks, this hook should lift between 1/2 and 1 ton.  Note: I am not an engineer and am not qualified to make that kind of stament  ;D

There is a downloadable .pdf of the C-Hook at the bottom of this post.  If I were to make another one, I would shorten the Throat "C", and lengthen the Lifting Arm "A".  If you decide to alter the dimensions, make sure that the Neck "B" is 1/2 the length of the Lifting Arm "A".

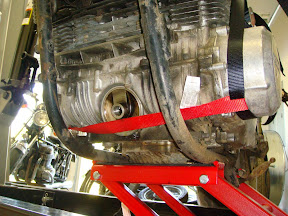
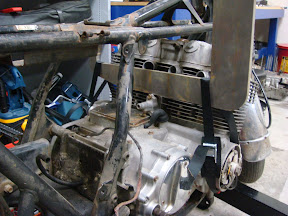
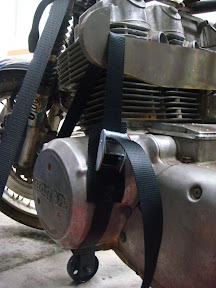
I ordered the straps from Strapworks.com.  They will custom make ANY type of strap you want.  I had them make me 36” Polyester Cam Straps.  They cost about $5.00 each.  Make sure you use Polyester webbing.  It is the only type that is heavy load rated (3500 lbs) AND is abrasion resistant.  The red one pictured is an 18” double ended loop strap.  It served to keep the two cam straps from slipping off the engine.


Hooking It Up
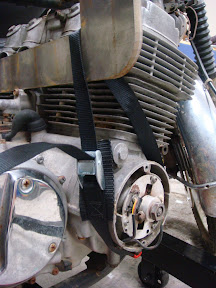
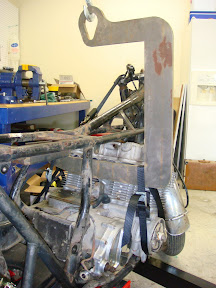
Just hang the C-hook from the hoist, and position it into the frame.  I like to line up the lower arm with the intake ports on the head.  Too low and the C-hook will be sitting on the cam chain tensioner.  Don’t want to scratch up that nice paint job!  The C-hook will hang tilted to the closed side until you get a strap hooked up.  So pre-thread the loop strap and one of the cam straps, then tread the cam strap on itself.  Holding the C-hook by hand position the cam strap over the lower arm and then loop it over the dyno cover.  Put a little tension on it then do the points side.  On the points’ side, make sure you don’t bind up the cam strap on the two case bolts.  I like to make sure the red loop strap runs between the bolts as well, just to make sure things don’t shift around when tension is applied.  Also, before commencing the final lift, make sure your hoist chain and hook are vertically centered over the backbone of the bike.  This isn’t usually a big issue, but if there is a side load going on, it could make it harder to adjust the straps level and walk the engine out.

Getting It Out
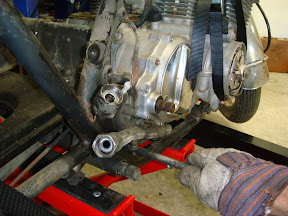
Once everything is hooked up to your satisfaction, apply tension with the hoist.  You’ll see the bike shift a little when the hoist is carrying the engine weight.  You should be able to adjust the hoist finely enough to pull the bolts out with a light pull (if the bolts aren’t rusted/frozen/bent/other).  Do the rear first, then, when the bolt is out, apply a little more tension and the front should come free.  Once the bolts are free and the engine is fully supported by the hoist, tilt the engine forward to clear the engine mounts and then walk the engine out of the frame.  It may take a little more tilting and maneuvering, but it’s relatively easy, especially considering your friend isn’t about to loose his grip and drop the whole thing on your toe/bike/side cover/dog.

One note: If you can take the breather cover off, then it would be wise to do so. This goes for any 750 engine removal method.  It will give you a few millimeters more room to maneuver.

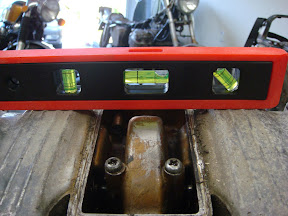
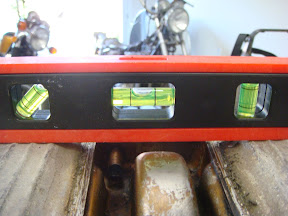
Once the engine is out, its time to get ready to mount it on the stand.  Using cam straps makes it very easy to adjust the rig.  I throw a level on top and even everything up once its free, just to give me the best chance of getting it mounted smoothly and evenly.  And it only takes two seconds.


The Engine Stand
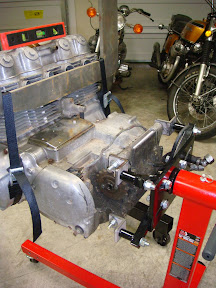
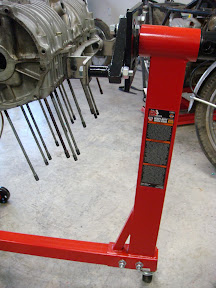
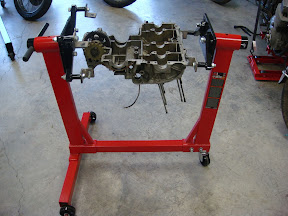
Like I stated earlier, I chose the “bracket” method of mounting the engine to a 750 lb engine stand.  Harbor Freight has their 750 lb engine stands on sale for $35.00 at the time of this post.  You will need two of them.  I bought mine at a local auto parts store thinking that it wasn’t worth the 45 mile drive to the nearest Harbor Freight.  Then I realized I needed two of them.  I overpaid.  (“The Hard Way”, remember?). 

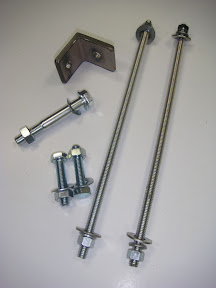
I made six brackets using some free scrap 2”x 2” angle iron.  Make sure you offset one of the holes.  You will cuss if you don’t.  Then you’ll get to make some new brackets (THW).  You will need appropriate hardware to mount your brackets to your engine stand.

To mount the engine to the brackets I chose two 12”x3/8” threaded rods and appropriate nuts & washers.  You will also need two 10mm x 60mm bolts, nuts, and washers that fit the front engine mounts.
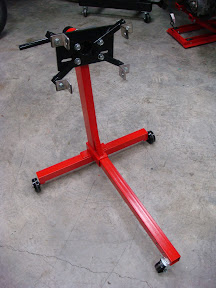


Mounting the Engine to the Stand
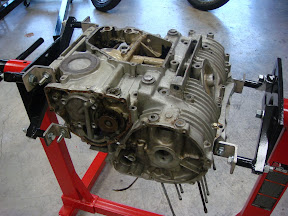
Adjust the engine stand arms and brackets to their approximate positions and hand tighten them.  Make sure you have the correct ratchets and wrenches close by for this one (preferably in the pockets of those snazzy wrangler work pants you got from Wal-Mart for fifteen bucks)  Pull the stand in position, swing the engine to meet the stand and mate the two by securing the rear engine mount holes.  Thread whichever holes line up first.  Top or bottom, it doesn’t matter.  Then you can raise or lower the hoist to pivot the other holes into alignment.  Once everything is tightened down, you can lower the hoist a little and release the cam straps.
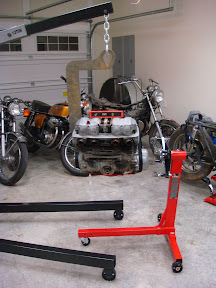


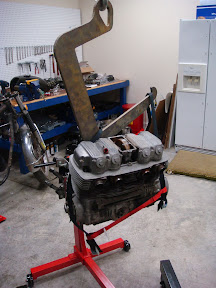
The Top End
At this point you’re ready to rip off that valve cover, send the head out for porting, and bore the cylinders for that Cycle-X 850 kit. Then get ready to take it all the way down town to the bottom end.
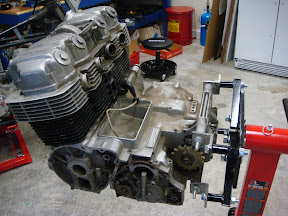
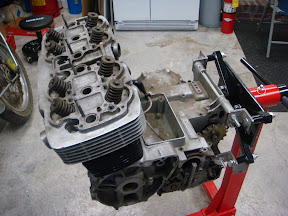
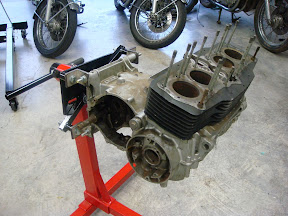
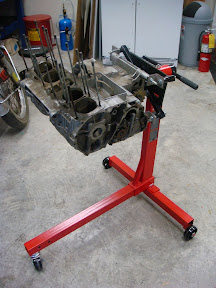
The Bottom End
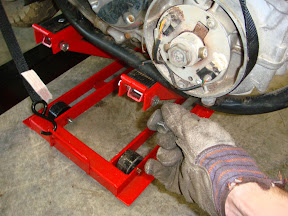
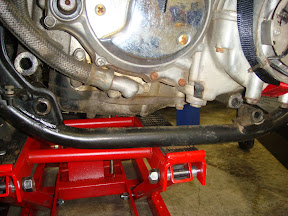
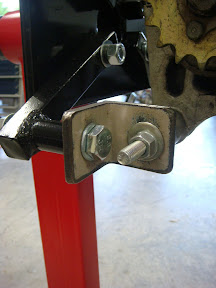
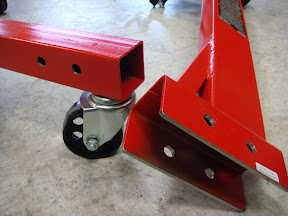
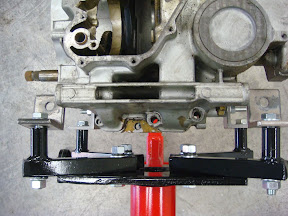
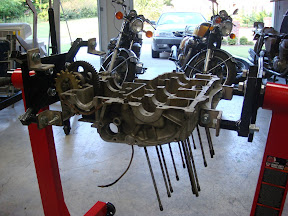
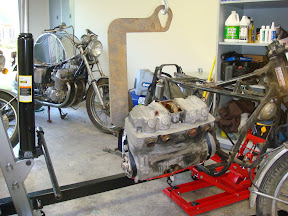
In case you don’t know, (and if you’re like me, you don’t know until after you needed to know) the cases split horizontally on a cb750 engine.  And if you’re going to get inside and do any work, you need to invert the top half of the case to get the job done.  So to do that, I bought a second engine stand and modified it. 

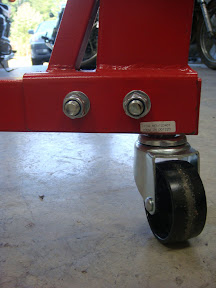
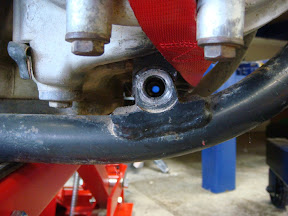
I took the vertical arm and mounting plate from the second stand and using a metal band saw, I cut the bottom wall off the square tubing.  I then drilled two holes.  Once that was complete, with the engine inverted on the first stand, I placed the second arm on the end of the first stand’s leg.  I bolted it up to the engine and center punched the lower leg of the first stand.  Then after disassembling everything, I drilled the two holes in the first stand’s leg.  It sounds worse than it is, just a little time consuming for this part.  But once it’s done, you’re good to go.  Just bolt it all up, remove the uppercase threaded rod, and you’re ready to split the cases.
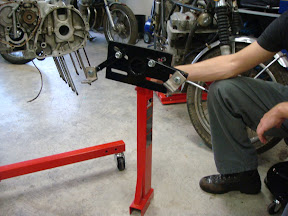


Reassembly
“Reassemble in order of disassembly” Don’t you just hate it when the manual says that?  Well, it really is that simple this time, but I’ll throw in a couple of pointers.  When you walk the engine back into the frame, lower the engine slowly until the front holes line up.  You can see when it’s right. You should be able to push the bolt in with one finger.  Then, lower again until you can do the same with the rear bolt.  Remove the straps, and you’re done!


Success!

« Last Edit: May 10, 2012, 08:44:49 AM by blake255 »
1970 CB750 K0 Project 1
1969 CB750 Sandcast Project 2
1969 CB750 Sandcast Project 3
2009 Yamaha YZF R6

Offline The_Crippler

  • In regards to doing it wrong, I'm an
  • Expert
  • ****
  • Posts: 1,262
  • Work in progress.
Re: C-Hook Engine Removal & Rotisserie Engine Stand (Unlocked Re-post)
« Reply #1 on: September 11, 2009, 01:45:52 PM »
It's a sign of how long my day has been that I first read that headline and thought some glorious bastard had designed a SOHC-powered chicken cooker.


But now that I'm on the right page, that's some strong DIY work there.  Two thumbs up.

Offline gonzobrian

  • Enthusiast
  • **
  • Posts: 110
Re: C-Hook Engine Removal & Rotisserie Engine Stand (Unlocked Re-post)
« Reply #2 on: September 11, 2009, 05:22:19 PM »
Great post.  Thanks!

Offline manjisann

  • Hazardous Chemical Inhalation
  • Master
  • *****
  • Posts: 1,828
Re: C-Hook Engine Removal & Rotisserie Engine Stand (Unlocked Re-post)
« Reply #3 on: September 11, 2009, 07:48:08 PM »
Quote
It's a sign of how long my day has been that I first read that headline and thought some glorious bastard had designed a SOHC-powered chicken cooker.

HAHAHA, that'd be awsome!

Very very nice writeup! Now I have something more to do to my engine stand, when I unpack it again. LOVE the c-hook!

Brandon
Sure it's for sale! How much you ask?? Well, how much are you willing to pay??? Now triple it, that's the price!

1973 CB500 K2 - Sold the bike and bought a Mig, Miss the bike, Love the Mig :D
1980 CB650 Custom
1971 CB500 Frame 650 engine: Project

Trip and General Ramblings blog: manjisann.blogspot.com

Offline The Gardener

  • It is what it is
  • Full Member
  • *
  • Posts: 72
    • WATTO
Re: C-Hook Engine Removal & Rotisserie Engine Stand (Unlocked Re-post)
« Reply #4 on: September 12, 2009, 08:10:17 PM »
Killer idea! Would you mind posting a drawing with the dimensions of the C hook?

Jon
'75 CB750K
'84 CB700SC

Offline blake255

  • Full Member
  • *
  • Posts: 68
  • Look Out! I'm about to crank this thing!
Re: C-Hook Engine Removal & Rotisserie Engine Stand (Unlocked Re-post)
« Reply #5 on: September 13, 2009, 07:01:35 AM »
I'm working on posting the files to an ftp site.  That way, all you have to do is e-mail it to your machinist, or customize it to suit your own needs.  If anyone knows a good free ftp hosting site, drop me a line.

Blake
1970 CB750 K0 Project 1
1969 CB750 Sandcast Project 2
1969 CB750 Sandcast Project 3
2009 Yamaha YZF R6

Offline markb

  • When I finish my current project I might be a
  • Master
  • *****
  • Posts: 1,615
Re: C-Hook Engine Removal & Rotisserie Engine Stand
« Reply #6 on: September 13, 2009, 02:04:57 PM »
Very nice work!  I would be interested in getting a copy of the file.
Mark
1969 CB750 sandcast #97 restored - Sold Restoration thread link
1969 CB750 sandcaxt #576 - Sold
1969 CB750 sandcast #1553 - Sold
1969 CB750 sandcast #1990 - Sold
1969 CB750 sandcast #5383 restored - Sold Restoration thread link
1970 CB750 K0 restored - Sold
2010 H-D Tri Glide Ultra Classic (Huh?)

Offline kerryb

  • Not a very
  • Expert
  • ****
  • Posts: 1,155
  • 78 750k 74 cb550k, '83GL1100 FXSTC, 1979 Wilmac
Re: C-Hook Engine Removal & Rotisserie Engine Stand
« Reply #7 on: September 13, 2009, 08:37:47 PM »
Wow!!!  Thankyou, I've already started modifying my HF engine stand.
intrigued by the wail...seduced by the scream.

Offline motocyconomad

  • Expert
  • ****
  • Posts: 1,401
Re: C-Hook Engine Removal & Rotisserie Engine Stand
« Reply #8 on: September 14, 2009, 02:35:34 AM »
love the sohC hook
I run a waterjet for a living ...I could cut that really easy and quick.

Offline manjisann

  • Hazardous Chemical Inhalation
  • Master
  • *****
  • Posts: 1,828
Re: C-Hook Engine Removal & Rotisserie Engine Stand
« Reply #9 on: September 14, 2009, 04:14:43 AM »
Quote
love the sohC hook
I run a waterjet for a living ...I could cut that really easy and quick.

How much would you charge for such a thing?

Brandon
Sure it's for sale! How much you ask?? Well, how much are you willing to pay??? Now triple it, that's the price!

1973 CB500 K2 - Sold the bike and bought a Mig, Miss the bike, Love the Mig :D
1980 CB650 Custom
1971 CB500 Frame 650 engine: Project

Trip and General Ramblings blog: manjisann.blogspot.com

Offline motocyconomad

  • Expert
  • ****
  • Posts: 1,401
Re: C-Hook Engine Removal & Rotisserie Engine Stand
« Reply #10 on: September 15, 2009, 04:21:23 AM »
Quote
love the sohC hook
I run a waterjet for a living ...I could cut that really easy and quick.

How much would you charge for such a thing?

Brandon

just materials enough for a couple of them 2 or 3 ...I would do it during a moment of the machine being "idle" i wouldn't mess with production time
I really just need the dimensions

that goes for any waterjetting

Offline scartail

  • Hot Shot
  • ***
  • Posts: 286
Re: C-Hook Engine Removal & Rotisserie Engine Stand
« Reply #11 on: September 15, 2009, 06:09:46 AM »
Holy Big Hook Batman!!
'89 Hawk GT, newly acquired, daily beater...
'76 CB550, was my daily beater... my cafe project...
'72 Yamaha R5, newly acquired project... donated to my buddy...
'67 Suzuki T20, still working on her too... Currently in pieces...

Offline blake255

  • Full Member
  • *
  • Posts: 68
  • Look Out! I'm about to crank this thing!
Re: C-Hook Engine Removal & Rotisserie Engine Stand
« Reply #12 on: September 15, 2009, 08:02:07 AM »
I have added a downloadable .pdf file of the C-Hook.  You can find it at the bottom of the orriginal post.  If I were to make another one, I would shorten the Throat "C", and lengthen the Lifting Arm "A".  If you decide to alter the dimensions, make sure that the Neck "B" is 1/2 the length of the Lifting Arm "A".

Blake
1970 CB750 K0 Project 1
1969 CB750 Sandcast Project 2
1969 CB750 Sandcast Project 3
2009 Yamaha YZF R6

Offline blake255

  • Full Member
  • *
  • Posts: 68
  • Look Out! I'm about to crank this thing!
Re: C-Hook Engine Removal & Rotisserie Engine Stand
« Reply #13 on: September 15, 2009, 08:33:10 AM »
By the way, I just wanted to say thanks for the posts and comments.  If any of you make your own c-hook or engine stand, then please post it here.  And make sure you include details of any improvements that you make.

Blake
1970 CB750 K0 Project 1
1969 CB750 Sandcast Project 2
1969 CB750 Sandcast Project 3
2009 Yamaha YZF R6

Offline 754

  • Really Old Timer ...
  • *******
  • Posts: 29,058
Re: C-Hook Engine Removal & Rotisserie Engine Stand
« Reply #14 on: September 15, 2009, 08:50:12 AM »
Looks really good, I bet the factory used something like that!

 I agree you can take up to a foot out of the upright, I am thinking though, that after the part starts rising on the side (about 3 inches above strap surface), could it not veer over at a 45 deg angle to the  hole for your hook?

 IMO it would look better and be cheaper to Make as it uses less material, & chances of the person cutting, being able to utilize more of the sheet should lower cost a bit.
Maker of the WELDLESS 750 Frame Kit
dodogas99@gmail.com
Kelowna B.C.       Canada

My next bike will be a ..ANFOB.....

It's All part of the ADVENTURE...

73 836cc.. Green, had it for 3 decades!!
Lost quite a few CB 750's along the way

Offline blake255

  • Full Member
  • *
  • Posts: 68
  • Look Out! I'm about to crank this thing!
Re: C-Hook Engine Removal & Rotisserie Engine Stand
« Reply #15 on: September 15, 2009, 10:58:15 AM »
Quote
I am thinking though, that after the part starts rising on the side (about 3 inches above strap surface), could it not veer over at a 45 deg angle to the  hole for your hook?

754,

If I read your post correctly, below is a drawing of what you described.  Yes, you could definately make a hook like that.  I actually thought about it in the begining, but there were a few reasons why I chose not to.  On a 750, unless you widen out the Load Arm, and really test the measurments, you run the chance of having clearance issues between the hook and the stabalizer tubes/backbone group during the up and down lift.  But I guess a guy who is tallented with sissors and cardboard could clear that all up.  I felt that I only had one shot at this, so I modeled mine after what I saw actually being used in the heavy lifiting industy.  That, and I'm an overkill type of guy :).  Also, from what I've learned, the cost is based on machine time which is measured in linial inches.  The material is only a small fraction of the cost so the savings would be minimal.  But that's what this is all about, finding better ways to do things.  Thanks for the post.

Blake

« Last Edit: September 15, 2009, 11:07:25 AM by blake255 »
1970 CB750 K0 Project 1
1969 CB750 Sandcast Project 2
1969 CB750 Sandcast Project 3
2009 Yamaha YZF R6

Offline 754

  • Really Old Timer ...
  • *******
  • Posts: 29,058
Re: C-Hook Engine Removal & Rotisserie Engine Stand
« Reply #16 on: September 15, 2009, 10:41:39 PM »
Usually in industry you will get charged by the square or rectangle area that will completely cover your piece..

 To cover their cost, and to make money.. that way you usually end up getting mor out of the sheet.

 The size of the part you made does not fall into the (we can squeeze that into the corner of an already cut sheet.

 Of course its at their discretion when to offer  a 'deal" or to give material away.. I think 25.00 will not cover true cost of the material in rectangle form.

 Just threw the other idea out there as they can be nested and cut cheaper.. like 2 pcs out of 1,3 times the material.

 Are you thinking/going to make them to sell? Or are they fair game?
 754
Maker of the WELDLESS 750 Frame Kit
dodogas99@gmail.com
Kelowna B.C.       Canada

My next bike will be a ..ANFOB.....

It's All part of the ADVENTURE...

73 836cc.. Green, had it for 3 decades!!
Lost quite a few CB 750's along the way

Offline blake255

  • Full Member
  • *
  • Posts: 68
  • Look Out! I'm about to crank this thing!
Re: C-Hook Engine Removal & Rotisserie Engine Stand
« Reply #17 on: September 16, 2009, 01:09:05 PM »
Quote
Are you thinking/going to make them to sell? Or are they fair game?
 754

By all means, have at it.  I posted the info so that everyone could benefit.  Let us know if you decide to make them, especially if you alter the design.  Don't forget to post pictures. ;)

Blake
1970 CB750 K0 Project 1
1969 CB750 Sandcast Project 2
1969 CB750 Sandcast Project 3
2009 Yamaha YZF R6

Offline tool14

  • Expert
  • ****
  • Posts: 794
Re: C-Hook Engine Removal & Rotisserie Engine Stand
« Reply #18 on: September 18, 2009, 11:32:29 AM »
great looking tool ,really like the engine stand idea makes it easy to split cases

cb550fan

  • Guest
Re: C-Hook Engine Removal & Rotisserie Engine Stand
« Reply #19 on: December 15, 2009, 05:55:18 PM »
hello Blake,

that is real clever on the c-hook ! and  the engine stand. I  am trying to figure out the way to put the 550 engine on it's original frame.I bought the bike project from a guy who gave up. all the parts were in cardboard boxes and the engine was on the sawhorses.
Thanks again for sharing .
cb550fan

Offline blake255

  • Full Member
  • *
  • Posts: 68
  • Look Out! I'm about to crank this thing!
Re: C-Hook Engine Removal & Rotisserie Engine Stand
« Reply #20 on: December 16, 2009, 10:27:59 AM »
Thanks for the post cb550fan,

If you make any modifications to suit the 550 engine, please post it here.  I'm sure a lot of the 550 guys would be interested.  Good luck with your build!

Blake
1970 CB750 K0 Project 1
1969 CB750 Sandcast Project 2
1969 CB750 Sandcast Project 3
2009 Yamaha YZF R6

Offline bill440cars

  • Feeling More & More,
  • Really Old Timer ...
  • *******
  • Posts: 12,358
  • Tryin' To Slow Down "Time"!
Re: C-Hook Engine Removal & Rotisserie Engine Stand
« Reply #21 on: December 17, 2009, 04:56:08 AM »


      Totally Awesome! 8) I had once wondered if something like the hook could be done, but that as far as it went. I just didn't have the brain power to think it out and don't know how I would have attached it either. Sometimes details allude me. Great deal though. Outstanding that you have come up with this and offered the info so others can do it as well. I saw where another had posted a similar version of the "double stand", to handle the engine disassembly and had looked at it first. Sure looks to be a few of those done up by the SOHC4 bunch, I betcha. :D Soon as I can, I hope to have one of those suckers, along with the "C" hook and straps. Thanks for posting! ;) 
Member # 1969
PRAYERS ALWAYS FOR: Bre, Jeff & Virginia, Bear, Trevor & Brianna ( Close Friend's Daughter)
"Because HE lives, I can Face Tomorrow"                  
 You CAN Teach An Old Dog New Tricks, Just Takes A Little Bit Longer & A Lot More Patience!! 
             
Main Rides: '02 Durango, '71 Swinger & Dad's '93
                  Dakota LE 4x4 '66 CB77 & '72 SL350K2
Watch What You Step Into, It Could  End Up A Mess!

Offline HedNut

  • Underwater Basket Weaving
  • Expert
  • ****
  • Posts: 844
  • CB750...A Two-wheeled hellcat from Planet Kickass
Re: C-Hook Engine Removal & Rotisserie Engine Stand
« Reply #22 on: December 17, 2009, 08:39:06 AM »
Great stuff! Thanks.... sure beats the crap outa the "wiggle-wiggle-beer-wiggle-curse-beer-tip'on'side-wiggle-curse-lift-ouch-wiggle-beer-beer-1 hr montage-SHE's on the BENCH!" method... I will try to use yours for putting the beast back in! Cheers!

Offline 70cbk0

  • Hot Shot
  • ***
  • Posts: 281
Re: C-Hook Engine Removal & Rotisserie Engine Stand
« Reply #23 on: January 11, 2010, 06:13:45 AM »
Wow, that thing looks slick! My brother manages a tool and die shop..I think I'll see if he can make it for me. I downloaded the pdf fie, Thanks. can a machine shop work from that> I think someone mentioned a CAD file, is that what they'd really need? Thanks, John.
1970 CB 750K0
1969 CB 750K0
1966 CB77 Superhawk
1982 Honda XR200R

Offline blake255

  • Full Member
  • *
  • Posts: 68
  • Look Out! I'm about to crank this thing!
Re: C-Hook Engine Removal & Rotisserie Engine Stand
« Reply #24 on: January 11, 2010, 06:29:49 AM »
Thanks for the posts, Headnut, John,

Wow, that thing looks slick! My brother manages a tool and die shop..I think I'll see if he can make it for me. I downloaded the pdf fie, Thanks. can a machine shop work from that> I think someone mentioned a CAD file, is that what they'd really need? Thanks, John.

A cad operator should be able to re-create the hook from the .pdf, but I sent my own .dxf file to the machine shop just because I wanted to make it easy for they guy to say yes to the job (or at least hard to say no).  I don't know if he actually used the file or not because I sent a .pdf as well.  .dxf is the only cad format that I can save, but if you would like a copy, PM me and we'll work out the details to transfer it to you.
« Last Edit: January 12, 2010, 12:34:30 PM by blake255 »
1970 CB750 K0 Project 1
1969 CB750 Sandcast Project 2
1969 CB750 Sandcast Project 3
2009 Yamaha YZF R6